2A8DGB-X123Collar
Shenzhen Saiku Electronic Co., Ltd.
Click to zoom
Application Details
- Equipment Class
- DSC - Part 15 Security/Remote Control Transmitter
- Date of Grant
- Aug 30, 2022
- Application Purpose
- Original Equipment
- Date of Application
- Aug 30, 2022
- Equipment Note
- Collar
- Frequency Range
- 433.05000000 - 434.79000000
- Country
- China
Documents & Files
Document Text
Text extracted from the exhibit documents filed with the FCC. Open a document above to read the original.
Users Manual
1、Power button().Long press the button for 2 secs to turn on/off. Short press to lock the button, and then short press to unlock. 2、Channel switch/pairing button( ), long press for 3 seconds to enter the pairing state, short press to select a different dog terminal. 3、Level setting button( ), short press to select (electric shock) (vibration) adjustment level, long press to enter the electronic fence (Model X3 Only) 4、Vibrate button( ), short press to vibrate once, long press the vibrate for 8 seconds to stop. 5、Static button( ), short press the electric shock for one second, long press the electric shock for 8 seconds to stop. Release the hand and then press the (Static button) to start the shock. 6、Flashlight button( ), cycle short press to switch between long on/flash. (standalone system, still available after shutdown) 7、Beep button, short press( )( ▲ )()()(),it will emit 5 different sounds. When the key is locked, press and hold the( )for 3 seconds to make a music sound. Quick User Manual 1.Charging 1.1 Use the included USB cable to fully charge the collar and remote control at 5V. 1.2 When the remote control is fully charged, the battery display is full. 1.3 When the collar is fully charged, the red light turns green. It fully charges in about two hours. 1.4 The battery level is shown on the remote control screen. 2.Collar On/Off 2.1 Short press the power button()for 1 second, the collar will beep and vibrate to turn on. 2.2 After it powers on, the green light flashes once for 2 secs, automatically enter the sleep state if it is not used for 6 minutes, and the green light flashes once for 6 secs. 2.3 Press and hold for 2 seconds to power off. 3.Remote control On/Off 3.1 Long press the button()for 2 seconds to turn on/off. There will be a beep and the screen will light up. 3.2 Long press the button( )for 2 seconds, a beep will be heared and the display will turn off. 4.Keyboard lock 4.1 Short press to lock the button(), and then short press to unlock. 4.2 Recommended to lock the buttons when not in use to prevent misuse. 5.Pairing(One‐to‐one has been paired in the factory, you can use it directly) 5.1 Make sure the collar is turned off. Press and hold the power button( )for 3 seconds, until 4 beeps are heared, the indicator light flashes alternately, then it is ready to pair. 5.2 Press and hold the remote control channel switch button ( )for 3 seconds within 30secs, then short the button() to select the collar that will be paired. 5.3 Short press the left arrow button( )on the remote control to confirm the pairing, and a beep means the pairing is successful. 5.4 The icon on the remote will stop flashing after pairing is complete.The battery level of the collar is displayed on the remote control screen. 6.Cancel pairing 6.1 Long press the remote control channel switch button() for 3 seconds, then the icon will flash, and Select the collar you want to cancel. 6.2 Short press the( )key, then press the (▲) button to cancel the pairing. 7.Pairing with multiple collars Repeat the above operations, you can continue to pair other collars. 7.1 One channel has one collar, and multiple collars cannot be connected to the same channel. 7.2 After all four channels are paired, you can press the channel switch button( )to select 1 to 4 channels to control a single collars, or control all collars at the same time. 7.3 Vibration and shock levels can be individually adjusted when controlling a single collar. 7.4 4. When controlling multiple collars at the same time, the vibration level is the same, and the electric shock function is turned off. 8.Beep tone command 8.1 Short press the remote control arrow and volume key and the collar will emit 5 different sounds. 8.2 Long press to make a continuous sound. 9.Vibration intensity adjustment 9.1 Short press the Level setting button()and the vibration icon will flash. 9.2 Press the up and down keys to adjust the level (0‐9). 9.3 Press( )to save. 0 is to stop the vibration, 9 is the strongest vibration. 10.Vibration command 10.1 Short press the vibration button()and the collar will vibrate once. 10.2 Long press the vibration button( ),the collar will vibrate continuously and will stop after 8 seconds. 10.3 When controlling multiple collars at the same time, the vibration level is the current set value. 11.Shock intensity adjustment 11.1 Short press the Level setting button(),theshockicon will flash. 11.2 Press the up and down button to adjust the value (0‐30). 11.3 Press( )to save. 0 is to stop, 30 is the strongest level. 11.4 Recommended to start training the dog from level 1, observe its response, and then slowly increase it. 12.Shock command 12.1 Short press the electric shock button()and there will be an electric shock for one second. 12.2 Long press the electric shock button( )and the electric shock will stop after 8 seconds. 12.3 Release the shock button and press the shock button again to activate the shock. 13.Electronic fence function (Model X3 Only) 13.1 Long press the function selection button()for 3 seconds and the electronic fence icon will pop up. 13.2 A double circle is displayed, indicating that the fence distance is 150 meters. 13.3 Short press the function selection button again and a single circle is displayed, indicating that the fence distance is 300 meters. 13.4 When the collar exceeds the specified distance and the remote control will emit a beep warning sound. 14.Turn on the flashlight 14.1 Regardless of power on/off, short press the flashlight button( )and the light will turn on. 14.2 Short press again and the flashlight will switch between 3 modes: long on/on/off. 15.Song playing After the collar and the remote control are paired normally, in the locked state, long press the beep button( )for 3 seconds and the collar will play music for 10 seconds. 16.Shock intensity test 16.1 Screw thecontact pointsonto the collar. 16.2 Tighten the contact pointswith neon bulb, and then put on the conductive cap. Also the contact point of neon bul…
Text truncated - open the document above for the full version.
Cover Letter(s)
Shenzhen Saiku Electronic Co.,Ltd. Date: Aug. 23, 2022 Federal Communications Commission Authorization and Evaluation Division Confidentiality Request regarding application for certification of FCC ID: 2A8DGB-X123 Pursuant to Sections 0.457 and 0.459 of the Commission’s Rules, we hereby request confidential treatment of information accompanying this application as outlined below: Exhibit Type File Name Schematics Block Diagram Operational Description BOM Schematics.pdf Block Diagram.pdf Operational Description.pdf BOM.pdf The above materials contain trade secrets and proprietary information not customarily released to the public. The public disclosure of these materials may be harmful to the applicant and provide unjustified benefits to its competitors. The applicant understands that pursuant to Section 0.457 of the Rules, disclosure of this application and all accompanying documentation will not be made before the date of the Grant for this application. Sincerely, Shenzhen Saiku Electronic Co.,Ltd. Signature Yan Wang / Company Directors Typed name and Title
Cover Letter(s)
Shenzhen Saiku Electronic Co.,Ltd. FCC ID: 2A8DGB-X123 POWER OF ATTORNEY Date: Aug. 23, 2022 Federal Communications Commission Authorization and Evaluation Division 7435 Oakland Mills Road Columbia, MD 21046 To Whom It May Concern: We, the undersigned, hereby authorize Waltek Testing Group Co., Ltd. (Philo Zhong) on our behalf, to apply to the Federal Communications Commission on our equipment. Any and all acts carried out by Waltek Testing Group Co., Ltd. (Philo Zhong) on our behalf shall have the same effect as acts of our own. This authorization expires on Aug. 22, 2023. This is to advise that we are in full compliance with the Anti-Drug Abuse Act. We, Shenzhen Saiku Electronic Co.,Ltd. are not subject to a denial of federal benefits pursuant to Section 5301 of the Anti-Drug Act of 1988, 21 USC853a, and no party to the application is subject to a denial of federal benefits pursuant to that section. Sincerely, Shenzhen Saiku Electronic Co.,Ltd. Signature Yan Wang / Company Directors Typed name and Title
Cover Letter(s)
Shenzhen Saiku Electronic Co.,Ltd. Date: 2022-08-23 Subject: authorization for adding family models To whom it May concern, Statement We would like to confirm the product Collar with models X1, X2 and X3 are all the same. Only the model names are different. Yours sincerely, Yan Wang / Company Directors ................................................ Typed name and Title
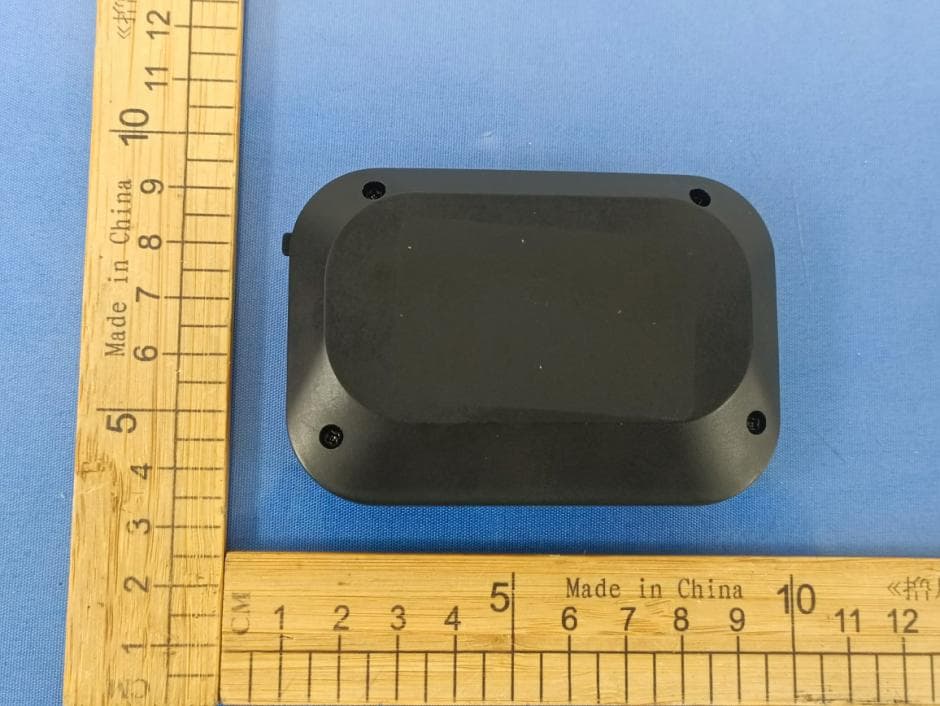
External Photos
Appendix-2A8DGB-X123-Photos Page 3 of 8 2. Photographs –Constructional Details 2.1. EUT – External View Model X1 FCC ID: 2A8DGB-X123 Appendix-2A8DGB-X123-Photos Page 4 of 8 Appendix-2A8DGB-X123-Photos Page 5 of 8
Internal Photos
Appendix-2A8DGB-X123-Photos Page 6 of 8 2.2. EUT – Internal View Model X1 FCC ID: 2A8DGB-X123 Appendix-2A8DGB-X123-Photos Page 7 of 8 ANT Appendix-2A8DGB-X123-Photos Page 8 of 8
Test Report
SHENZHEN APPCON TECHNOLOGIES CO.,LTD Antenna specification DESCRIPTION : Helical antenna 433MHZ+/-10MHZ PART NO : D A T E : ANT-DG02 2022-08-29 1. The dimensions are shown below 2. Mechanical and electrical characteristics Frequency Range (MHz)434MHZ+/-10MHZ VSWR≤2.0 Gain (dBi)2 Input Impedance (Ω)50 Polarization Typevertical Power Capacity50 Working temp-40°C∽+85°C RadiatorCup 3. IMPEDANCE 4. VSWR
Test Report
Waltek Testing Group Co., Ltd. http://www.waltek.com.cn Page 1 of 19 TEST REPORT Reference No..................... : WTD22D08165451W FCC ID ................................ : 2A8DGB-X123 Applicant ........................... : Shenzhen Saiku Electronic Co.,Ltd. Address ............................. : 5F, Building C15, Fuyuan Industrial City, Jiuwei Community, Hangcheng Street, Shenzhen, China Manufacturer .................... : Shenzhen Saiku Electronic Co.,Ltd. Address ............................. : 5F, Building C15, Fuyuan Industrial City, Jiuwei Community, Hangcheng Street, Shenzhen, China Product .............................. : Collar Model(s). ............................ : X1, X2, X3 Standards .......................... : 47CFR, FCC Part 15 Subpart C Section 15.231 Date of Receipt sample .... : 2022-08-15 Date of Test ....................... : 2022-08-15 to 2022-08-26 Date of Issue ..................... : 2022-08-30 Test Result ........................ : Pass Remarks: The results shown in this test report refer only to the sample(s) tested, this test report cannot be reproduced, except in full, without prior written permission of the company. The report would be invalid without specific stamp of test institute and the signatures of compiler and approver. Prepared By: Waltek Testing Group Co., Ltd. Address: No. 77, Houjie Section, Guantai Road, Houjie Town, Dongguan City, Guangdong, China Tel: +86-769-2267 6998 Fax: +86-769-2267 6828 Compiled by: Approved by: James Cheng / Project Engineer Deval Qin /Designated Reviewer Reference No.: WTD22D08165451W Page 2 of 19 Waltek Testing Group Co., Ltd. http://www.waltek.com.cn 2 Contents Page 1 COVER PAGE ........................................................................................................................................... 1 2 CONTENTS ............................................................................................................................................... 2 3 REVISION HISTORY ................................................................................................................................. 3 4 GENERAL INFORMATION ....................................................................................................................... 4 4.1 GENERAL DESCRIPTION OF E.U.T.................................................................................................... 4 4.2 DETAILS OF E.U.T. ......................................................................................................................... 4 4.3 TEST MODE .................................................................................................................................... 4 5 EQUIPMENT USED DURING TEST ......................................................................................................... 5 5.1 EQUIPMENTS LIST ........................................................................................................................... 5 5.2 MEASUREMENT UNCERTAINTY ......................................................................................................... 6 5.3 TEST EQUIPMENT CALIBRATION ....................................................................................................... 6 5.4 TEST FACILITY ................................................................................................................................ 6 5.5 SUBCONTRACTED ........................................................................................................................... 6 6 TEST SUMMARY ...................................................................................................................................... 7 7 CONDUCTED EMISSION ......................................................................................................................... 8 7.1 E.U.T. OPERATION ......................................................................................................................... 8 7.2 EUT SETUP .................................................................................................................................... 8 7.3 MEASUREMENT DESCRIPTION .......................................................................................................... 8 7.4 CONDUCTED EMISSION TEST RESULT .............................................................................................. 9 8 RADIATED SPURIOUS EMISSIONS ..................................................................................................... 11 8.1 EUT OPERATION .......................................................................................................................... 11 8.2 TEST SETUP ................................................................................................................................. 12 8.3 SPECTRUM ANALYZER SETUP ........................................................................................................ 13 8.4 TEST PROCEDURE ........................................................................................................................ 14 8.5 SUMMARY OF TEST RESULTS ........................................................................................................ 14 9 PERIODIC OPERATION ......................................................................................................................... 16 10 EMISSION BANDWIDTH ........................................................................................................................ 18 10.1 TEST PROCEDURE ........................................................................................................................ 18 10.2 TEST RESULT ............................................................................................................................... 18 11 ANTENNA REQUIREMENT ................................................................................................................... 19 12 PHOTOGRAPHS –T…
Text truncated - open the document above for the full version.
Test Setup Photos
Appendix-2A8DGB-X123-Photos Page 1 of 8 1. Test Setup photos Model X1 FCC ID: 2A8DGB-X123 1.1. Photograph – Conducted Emission Test Setup Test Site 1# 1.2. Photograph –Spurious Emissions Radiated Test Setup Below 30MHz Test Site 2# Appendix-2A8DGB-X123-Photos Page 2 of 8 For 30MHz-1000MHz Test Site 2# For Above 1GHz Test Site 1#
Contact Information
Applicant
Yan Wang(Company Directors)
Test Firm
WALTEK TESTING GROUP CO., LTD.Joy Zhou
[email protected]0769-22676998
Technical Specifications
| # | Rule Parts | Frequency Range | Power Output |
|---|---|---|---|
| 1 | 15.231 | 433.05 MHz - 434.79 MHz | - |
Other Applications from Shenzhen Saiku Electronic Co., Ltd.
2A8DG-B2
Dec 16, 2025Pet Barrier Transmitter
Equipment Class
DCD - Part 15 Low Power Transmitter Below 1705 kHz