2AAUFWSCS01The WSCS is a charging station to enable wireless power transfer
eResearchTechnology GmbH
Click to zoom
Application Details
- Equipment Class
- 8CC - Part 18 Consumer Device
- Date of Grant
- Mar 24, 2020
- Application Purpose
- Original Equipment
- Date of Application
- Mar 24, 2020
- Equipment Note
- The WSCS is a charging station to enable wireless power transfer
- Frequency Range
- 0.11200000 - 0.20500000
- Company
- eResearchTechnology GmbH
- Country
- Germany
Documents & Files
Document Text
Text extracted from the exhibit documents filed with the FCC. Open a document above to read the original.
Users Manual
782126-WSSU Version 03.00 Instructions for Use MasterScope · Spirometry · ECG Page 2/233 MasterScope - Instructions for Use Version 03.00 • Date 19FEB2020 Please note that this study specific MasterScope device may only be used if the user attended a detailed training covering the applicable technical aspects of the MasterScope and the associated peripherals. Product names or services are trademarks of their respective companies. All rights, including those of translations, are reserved. Written permission of eResearchTechnology (ERT) shall be obtained for the reproduction of this manual or any excerpt thereof by any means, including printing, photo static duplication, microfilms, or any other processes. eResearchTechnology GmbH Sieboldstrasse 3 97230 Estenfeld, Germany Tel: +49 9305 720-9891 Fax: +49 9305 720-7891 www.ert.com © 2020 eResearchTechnology GmbH. All rights reserved. Page 3/233 MasterScope - Instructions for Use Version 03.00 • Date 19FEB2020 Table of Contents Indication for Use ..................................................................................................6 ERT Customer Care Contacts ................................................................................7 Notes on Safety in Instructions for Use ..................................................................9 Declaration of Conformity .....................................................................................9 Introduction ........................................................................................................10 What is MasterScope? ........................................................................................10 Printer ............................................................................................................11 Printer HP 200 ....................................................................................................12 1. The MasterScope Setup (Fujitsu E756) .............................................14 1.1 Installing the Battery in the Notebook ...................................................14 1.2 Removing the Battery from the Notebook .............................................15 1.3 Faulty/Damaged Batteries .....................................................................15 1.4 Connecting the MasterScope Accessories (Fujitsu E756) ........................16 2. Turning on the MasterScope ............................................................17 2.1 Login ....................................................................................................17 2.2 MasterScope First T ime Use ..................................................................18 2.2.1 MasterScope Online Setup ....................................................................18 2.2.2 MasterScope Of fline Setup ...................................................................32 2.3 MasterScope User Registration.............................................................. 44 3. The Wir eless Spirometry Sensor Solution (WSSS) ...........................51 3.1 W ireless Spirometry Charging Station ...................................................51 3.2 Charging the W ireless Spirometry Sensor Unit ......................................52 3.3 Switch on the W ireless Spirometry Sensor Unit .....................................54 3.4 Pr epare Wireless Spirometry Sensor Unit for a Measurement (Insert and Remove ER T PT) ...................................................................54 3.5 Device Management W ireless Spirometry Sensor Unit ...........................55 4. Subject, Pr oficiency and Training Mode ...........................................59 4.1 Subject Mode .......................................................................................59 4.2 Pr oficiency Mode ..................................................................................59 4.3 T raining Mode ......................................................................................59 4.4 Subject Mode Activation .......................................................................60 5. Pr ogram Access ..................................................................................62 5.1 Fingerprint Identification .......................................................................62 5.2 T emporary Password .............................................................................63 5.3 Remote Support ...................................................................................64 6. System Overview ..............................................................................65 6.1 Main Menu ..........................................................................................65 6.2 Dashboard ............................................................................................66 6.3 Sear ch/New Subject ..............................................................................67 6.3.1 Sear ch Subject ......................................................................................67 6.3.2 New Subject .........................................................................................69 6.4 W aiting Room ......................................................................................70 6.5 Utilities .................................................................................................71 6.5.1 The T ools Menu ....................................................................................72 6.6 Status Bar .............................................................................................74 7. Ambient Conditions and Calibration Check..................................... 75 7.1 Ambient Room Conditions ...................................................................75 7.1.1 Ambient Sensor (Automatic Ambient Condition Registration) ...............75 7.1.2 Manual Entry of Ambient Conditions ....................................................75 7.2 W ireless Spirometry Sensor Check ....…
Text truncated - open the document above for the full version.
Users Manual
Page 58/233 MasterScope - Instructions for Use Version 03.00 • Date 19FEB2020 Identify the correct Wireless Spirometry Sensor Unit by the serial number (see label on the backside of sensor) and select it from the list. Click <Continue> to start the pairing process. The bluetooth symbol indicates with dark blue that the sensor is currently connected. If the symbol is greyed out check if the sensor is turned on and connected. Page 59/233 MasterScope - Instructions for Use Version 03.00 • Date 19FEB2020 4. Subject, Proficiency and Training Mode Choose whether you would like to work in Subject Mode, Proficiency Mode or Training Mode. 4.1 Subject Mode The data from subjects entered in Subject Mode will be used for the study and transferred to the study database. In Subject Mode you will have to follow the time periods and study phases as outlined in the study protocol when testing a subject. All tests performed in Subject Mode pass through the corresponding QA processes. The Subject Mode is blocked for all users until successfully passed proficiency. See chapter “Subject Mode Activation” how to enable the Subject Mode per user. 4.2 Proficiency Mode In Proficiency Mode, measurements are performed for the purpose of user certification. The goal of the Proficiency Test is for the user to show that he/ she is capable of performing a designated number of acceptable spirometry measurements (tests). In Proficiency Mode, only Proficiency Test Subjects can be created or selected. All data entered or measured in Proficiency Mode will not be included in the study data. Proficiency tests should be performed on healthy, preferably PFT naïve volunteers. Please perform the requested number of proficiency tests and transfer the data. The quality of the tests will be reviewed and the results will be sent back to the site. Once you have passed the sufficient number of tests, you will receive a Proficiency Certificate. 4.3 Training Mode The Training Mode is for practice purposes only to get a major understanding of the look and feel of the MasterScope system with protocol specific customized visit workflows. Mainly the ideal workflow path can be worked through without considering criteria are met or not. However, if there are complex side workflow paths within the study specific visit configuration then these workflow paths are ONLY available if the criteria are fulfilled even in the Training Mode. Page 60/233 MasterScope - Instructions for Use Version 03.00 • Date 19FEB2020 4.4 Subject Mode Activation 1. Select Subject Mode and put your finger on the sensor twice. 2. Enter the Activation PIN for this user from the certification report. Click on <Activate>. Page 61/233 MasterScope - Instructions for Use Version 03.00 • Date 19FEB2020 3. The User can now access the Subject Mode and is allowed to perform spirometry measurements. Select the User Management tab of the Tools menu to check if the Subject Mode for each registered user is activated or not. Page 62/233 MasterScope - Instructions for Use Version 03.00 • Date 19FEB2020 5. Program Access System access to the MasterScope requires fingerprint identification. Your CRA and/or a representative of ERT will perform this registration at the training or during an onsite visit. The identification of the current user is necessary during start-up and before each measurement. 5.1 Fingerprint Identification To log in using the fingerprinting sensor, follow these steps: 1. Choose whether you would like to work in Subject Mode, Proficiency Mode or Training Mode (details see chapter “Subject, Proficiency and Training Mode”). 2. Place your r egistered finger flat and centered on the sensor, using moderate pressure. 3. The system will look for a match of your fingerprint against the one r egistered under your user name. 4. Your user name is shown on the screen. 5. If the User Name is corr ect, place your finger a second time on the sensor. 6. The system will verify your fingerprint. 7. The dialog box disappears. The following window appears: If the fingerprint identification device fails to recognize the fingerprint of a registered user, you may also use the “Temporary Password” tab to gain access (see chapter “Temporary Password”). Page 63/233 MasterScope - Instructions for Use Version 03.00 • Date 19FEB2020 5.2 Temporary Password If the fingerprint identification failed, you may use the “Temporary Password” tab. This temporary password is a unique eight-digit code which can be obtained from ERT International Help Desk. A temporary password can only be used for the next 24 hours. Please have the following information available when you call the Help Desk: • User Name • ER T StudyId • ER T SiteId • User Role Example screen Click <Log in> to enter the system. Following window appears: Click <Ok>. In order to gain access to the system, the user has to enter his registered user name (e.g. the initials) and the provided temporary password. Page 64/233 MasterScope - Instructions for Use Version 03.00 • Date 19FEB2020 5.3 Remote Support This function enables the ERT support personnel to remotely access your system. Click <Enable Remote Support>. Page 65/233 MasterScope - Instructions for Use Version 03.00 • Date 19FEB2020 6. System Overview 6.1 Main Menu The main menu guides you through the process of the clinical trial protocol and controls the access to all program functions. Dialog/work area Utilities bar Workflow elements or submenus Status bar Click <Search/New Subject> to select a subject to work with (also see “Search/New Subject”). In a visit workflow the screen content will change. Waiting room Current subject Page 66/233 MasterScope - Instructions for Use Version 03.00 • Date 19FEB2020 6.2 Dashboard The MasterScope offers a dashboard via the “Home” tab. Various information of the system can be found here depending on your product mix and features selected for your study. It will display e.g. Calibration, Data Transfer, Backup information or a Patient overview. More or ot…
Text truncated - open the document above for the full version.
Users Manual
Page 93/233 MasterScope - Instructions for Use Version 03.00 • Date 19FEB2020 8.4 Subject Details Shows all available subject details. Update the values as described in Chapter “System Overview” - “New Subject“. Click on <Save> to store the data as entered. Page 94/233 MasterScope - Instructions for Use Version 03.00 • Date 19FEB2020 9. Spirometry Measurement Spirometry consists of the Slow Spirometry and /or Forced Spirometry measurement. Activities that should be avoided prior to starting a measurement: • Smoking within at least 1 h of testing • Consuming alcohol within 4 h of testing • Performing vigorous exercise within 30 min of testing • W earing clothing that substantially restricts full chest and abdominal expansion • Eating a large meal within 2 h of testing. In order to perform high-quality measurements, the following conditions should be fulfilled: • A waiting time of 10 to 15 minutes prior to the first examination ensures normal ventilation as a prerequisite for a high reproducibility of the examination results. • To improve motivation, cooperation and coordination of the subject, the measurement procedure should be explained or, if necessary, demonstrated prior to starting the measurement. • The subject is always measured in a straight sitting position. • He/she should keep his/her head straight or slightly extended. • The nose-clip is put on the lower half of the nose. • The subject should slightly bite on the mouthpiece. • Make sure that the subject carefully seals his/her lips around the mouthpiece. • The subject’ s tongue should be below the mouthpiece. • Dentur es do not influence the measurement results. • Tongue piercings should be removed prior to the measurement. 9.1 Basic Conditions prior to starting a Measurement Page 95/233 MasterScope - Instructions for Use Version 03.00 • Date 19FEB2020 Definition of VC and IVC The VC is the volume change at the mouth between the position of full inspiration and complete expiration, expressed in litres at BTPS. The slow VC can be derived in two ways. The expiratory vital capacity (EVC) is the maximal volume of air from the point of maximal inhalation. The IVC or VCin is the maximal volume of air inhaled from the point of maximal exhalation, achieved by an unforced exhalation from end-tidal inspiration. These maneuvers are unforced, except at the point of reaching RV or TLC, respectively, where extra effort is required. 9.2 Slow Spirometry (VC and IC) Tracing of tidal breathing followed by an inspiratory maneuver to total lung capacity (TLC) followed by a full but not forceful expiration to residual volume (RV) to record EVC or VCex; FRC: functional residual capacity. Tracing of tidal breathing followed by an expiratory maneuver to residual volume (RV), followed by a full inspiration to total lung capacity (TLC) to record IVC or VCin. FRC: functional residual capacity; ERV: expiratory reserve volume. Page 96/233 MasterScope - Instructions for Use Version 03.00 • Date 19FEB2020 Tracing of tidal breathing followed by an inspiratory maneuver to total lung capacity (TLC) to record inspiratory capacity (IC). Definition of IC Inspiratory capacity (IC) is volume change recorded at the mouth when taking a full inspiration with no hesitation, from a position of passive end-tidal expiration, i.e. FRC, to a position of maximum inspiration, expressed in liters at BTPS. IC is an indirect estimate of the degree of lung hyperinflation at rest, and is useful to assess changes in FRC with pharmacological interventions and physical exercise. Page 97/233 MasterScope - Instructions for Use Version 03.00 • Date 19FEB2020 Start Spirometry by pressing the <Continue With ‘Pre PFT’> icon. 9.3 Perform a Slow Spirometry Measurement Make the proper preparations. (see “Basic Conditions prior to starting a Measurement“) Please observe the instructions for hygiene of your system. To ensure optimal subject safety, we recommend only the use of accessories which are distributed with the MasterScope. Page 98/233 MasterScope - Instructions for Use Version 03.00 • Date 19FEB2020 Put your finger on the fingerprint sensor to continue. As an alternative, click the <Use finger print to continue with measurement> icon to continue. Prior to starting the Spirometry measurement, the authorized investigator has to verify again. Please check and, if necessary, correct the ambient conditions shown on the screen by clicking <Change Ambient Conditions>. Please follow the notes on the screen. Page 99/233 MasterScope - Instructions for Use Version 03.00 • Date 19FEB2020 Any measurement starts with a zero adjustment of the pneumotach. Do not breathe through the pneumotach and do not move the pneumotach during zero adjustment. If the zeroing fails, a corresponding message will be displayed. Continue with <OK>. When the zero adjustment is complete, instruct the subject to close his/her nose with the nose-clip and to approach the mouthpiece. Make sure his/her lips seal around the mouthpiece. Instruct the subject to hold the sensor in one hand. Page 100/233 MasterScope - Instructions for Use Version 03.00 • Date 19FEB2020 The results of the Spirometry measurement depend on the subject’s cooperation. Explain the breathing exercise to your subject thoroughly. Start with <F1>. The subject should breathe normally until stable tidal breathing is shown. Page 101/233 MasterScope - Instructions for Use Version 03.00 • Date 19FEB2020 Wait longerCont.with <F1> (2 nd best) Continue with <F1> After some breaths, the <F1> icon will re-appear. Wait until the baseline is stable (indicated by the dFRC and dVT bars). Stability is achieved when both bars are green. Page 102/233 MasterScope - Instructions for Use Version 03.00 • Date 19FEB2020 Hint: Close the opening of the pneumotach during zero adjustment with the palm of your hand. The volume signal must run horizontally after the measurement was started (subject not yet breathing into device). If you observe curves going up or down (see example) dur…
Text truncated - open the document above for the full version.
Users Manual
Page 171/233 MasterScope - Instructions for Use Version 03.00 • Date 19FEB2020 How Web Upload Data Transfer Works 1. In the Utilities bar, click on the <Send Data> icon to initiate the data transfer process. 2. Select SD card as the method to transfer the clinical data and press the <Start> button. Please do not change this setting until you are instructed from the ERT Customer Care Helpdesk. 3. Ensure that the “Transfer” SD card is not in the write protected status (not applicable if USB Transfer Kit was delivered). Please use only SD cards or USB sticks provided by ERT which are labeled “Transfer” for a specific system for transferring MasterScope data. Do not use SD card or USB stick from another ERT device or any other SD card or USB stick. Transfer Transfer Writing/Erasing possibleWriting/Erasing impossible Write Protect Tab 4. Insert the SD card or USB stick to start transferring the data to the media. Transfer Page 172/233 MasterScope - Instructions for Use Version 03.00 • Date 19FEB2020 5. Confirm the formatting of the SD card or USB stick by pressing the <Continue> button. Please do not store any data except the MasterScope data files on the medium. 6. The progress of the data transfer process will be indicated in the screen below: Please do not remove the SD card or USB stick until instructed to ensure a correct and complete data transfer! Page 173/233 MasterScope - Instructions for Use Version 03.00 • Date 19FEB2020 7. Remove SD card or USB stick after the data is successfully copied to the external medium (indicated by the screen below). 8. Click < Continue> to proceed with the upload of the data on the web-based PC. How the Data Upload Works Using MyDataUploader™ 1. Please insert the SD card or connect the USB stick which includes the transfer file from the MasterScope to the web-enabled PC. Transfer Web-enabled PC USB stick Page 174/233 MasterScope - Instructions for Use Version 03.00 • Date 19FEB2020 2. Open your internet browser and go to the MyDataUploader TM webpage by entering the following address: https://mdu.ert.com Site computer In the case that the computer has no SD card slot, please use the provided USB SD card reader as shown below: Transfer SD card and USB SD card reader You will be guided step by step through the data upload process on the right side of the webpage with highlighted short instruction depending on the current step of the process. 3. Clicking the <Upload> button will start the data transfer. Page 175/233 MasterScope - Instructions for Use Version 03.00 • Date 19FEB2020 4. Please select the data transfer file for upload by selecting the <Choose File> button. In the following file, open the dialog of your browser, search and select the SD card or USB stick drive labeled “Transfer”. Then search and select the single data transfer file. The file name starts with “MScCT32_ “(see example below). 5. If the selected file is valid, the next screen will display your study information. See example below. Page 176/233 MasterScope - Instructions for Use Version 03.00 • Date 19FEB2020 6. If you would like to receive the Confirmation Code additionally via email, please enter your email address in the corresponding entry field below the study information. 7. Clicking the <Upload> button will start the data transfer. The duration of the upload depends on your internet connection and the size of the data transfer file. In case you experience any problems, please contact the ERT Customer Care Helpdesk. Please do not remove the SD card or USB stick to ensure a correct and complete data transfer! 8. After you successfully uploaded the data file, a confirmation code will be displayed. Page 177/233 MasterScope - Instructions for Use Version 03.00 • Date 19FEB2020 The confirmation code is a 8-digit alphanumeric code which is displayed when the data was successfully uploaded to the ERT data center. Example: ABCD1234 (as shown above) 9. Please record the code exactly as displayed, print it or it will be sent to you via email. • T o print the confirmation code, please click the <Print> button. This will open your standard printer dialog and you can proceed as usual. • If you have not already provided your email address you can enter it here to receive the confirmation code via email. Enter your valid email address into the field Email to get the confirmation code via email. 10. After you have r eceived the confirmation code, finish the data upload by clicking the <Finish> button. Page 178/233 MasterScope - Instructions for Use Version 03.00 • Date 19FEB2020 How to Confirm the Data Transfer on MasterScope 1. Please enter the confirmation code on the MasterScope (see screen on previous page). A detailed description on how to get the Confirmation Code can be found under “How the data Upload works using MyDataUploader TM ”. To avoid large data transfer files with the next data transfer, it is recommended to confirm the data transfer with the confirmation code immediately after the upload. In case a data transfer is not confirmed, the next data transfer will contain all data which have not yet been confirmed as well as all new data. 2. The following message will indicate the end of the successful data transfer via web upload. If the data transfer is not confirmed, you will be notified about the date and time of the not yet confirmed data transfer. Please enter the latest displayed or received confirmation code in the “Tools” section. Confirm web upload transfer at the next system start up or before the next data transfer. To enter the confirmation code, start with step 10 of the chapter “How the data Upload works using MyDataUploader TM ”. Page 179/233 MasterScope - Instructions for Use Version 03.00 • Date 19FEB2020 In case you want to confirm the web upload transfer via the tools section, please • Select <Tools> from the Utilities bar. • Choose <Confirm SD Card Transfer>. • Enter and confirm the confirmation code in the following screen. Data is transferred via an analog lin…
Text truncated - open the document above for the full version.
Users Manual
Page 171/233 MasterScope - Instructions for Use Version 03.00 • Date 19FEB2020 How Web Upload Data Transfer Works 1. In the Utilities bar, click on the <Send Data> icon to initiate the data transfer process. 2. Select SD card as the method to transfer the clinical data and press the <Start> button. Please do not change this setting until you are instructed from the ERT Customer Care Helpdesk. 3. Ensure that the “Transfer” SD card is not in the write protected status (not applicable if USB Transfer Kit was delivered). Please use only SD cards or USB sticks provided by ERT which are labeled “Transfer” for a specific system for transferring MasterScope data. Do not use SD card or USB stick from another ERT device or any other SD card or USB stick. Transfer Transfer Writing/Erasing possibleWriting/Erasing impossible Write Protect Tab 4. Insert the SD card or USB stick to start transferring the data to the media. Transfer Page 172/233 MasterScope - Instructions for Use Version 03.00 • Date 19FEB2020 5. Confirm the formatting of the SD card or USB stick by pressing the <Continue> button. Please do not store any data except the MasterScope data files on the medium. 6. The progress of the data transfer process will be indicated in the screen below: Please do not remove the SD card or USB stick until instructed to ensure a correct and complete data transfer! Page 173/233 MasterScope - Instructions for Use Version 03.00 • Date 19FEB2020 7. Remove SD card or USB stick after the data is successfully copied to the external medium (indicated by the screen below). 8. Click < Continue> to proceed with the upload of the data on the web-based PC. How the Data Upload Works Using MyDataUploader™ 1. Please insert the SD card or connect the USB stick which includes the transfer file from the MasterScope to the web-enabled PC. Transfer Web-enabled PC USB stick Page 174/233 MasterScope - Instructions for Use Version 03.00 • Date 19FEB2020 2. Open your internet browser and go to the MyDataUploader TM webpage by entering the following address: https://mdu.ert.com Site computer In the case that the computer has no SD card slot, please use the provided USB SD card reader as shown below: Transfer SD card and USB SD card reader You will be guided step by step through the data upload process on the right side of the webpage with highlighted short instruction depending on the current step of the process. 3. Clicking the <Upload> button will start the data transfer. Page 175/233 MasterScope - Instructions for Use Version 03.00 • Date 19FEB2020 4. Please select the data transfer file for upload by selecting the <Choose File> button. In the following file, open the dialog of your browser, search and select the SD card or USB stick drive labeled “Transfer”. Then search and select the single data transfer file. The file name starts with “MScCT32_ “(see example below). 5. If the selected file is valid, the next screen will display your study information. See example below. Page 176/233 MasterScope - Instructions for Use Version 03.00 • Date 19FEB2020 6. If you would like to receive the Confirmation Code additionally via email, please enter your email address in the corresponding entry field below the study information. 7. Clicking the <Upload> button will start the data transfer. The duration of the upload depends on your internet connection and the size of the data transfer file. In case you experience any problems, please contact the ERT Customer Care Helpdesk. Please do not remove the SD card or USB stick to ensure a correct and complete data transfer! 8. After you successfully uploaded the data file, a confirmation code will be displayed. Page 177/233 MasterScope - Instructions for Use Version 03.00 • Date 19FEB2020 The confirmation code is a 8-digit alphanumeric code which is displayed when the data was successfully uploaded to the ERT data center. Example: ABCD1234 (as shown above) 9. Please record the code exactly as displayed, print it or it will be sent to you via email. • T o print the confirmation code, please click the <Print> button. This will open your standard printer dialog and you can proceed as usual. • If you have not already provided your email address you can enter it here to receive the confirmation code via email. Enter your valid email address into the field Email to get the confirmation code via email. 10. After you have r eceived the confirmation code, finish the data upload by clicking the <Finish> button. Page 178/233 MasterScope - Instructions for Use Version 03.00 • Date 19FEB2020 How to Confirm the Data Transfer on MasterScope 1. Please enter the confirmation code on the MasterScope (see screen on previous page). A detailed description on how to get the Confirmation Code can be found under “How the data Upload works using MyDataUploader TM ”. To avoid large data transfer files with the next data transfer, it is recommended to confirm the data transfer with the confirmation code immediately after the upload. In case a data transfer is not confirmed, the next data transfer will contain all data which have not yet been confirmed as well as all new data. 2. The following message will indicate the end of the successful data transfer via web upload. If the data transfer is not confirmed, you will be notified about the date and time of the not yet confirmed data transfer. Please enter the latest displayed or received confirmation code in the “Tools” section. Confirm web upload transfer at the next system start up or before the next data transfer. To enter the confirmation code, start with step 10 of the chapter “How the data Upload works using MyDataUploader TM ”. Page 179/233 MasterScope - Instructions for Use Version 03.00 • Date 19FEB2020 In case you want to confirm the web upload transfer via the tools section, please • Select <Tools> from the Utilities bar. • Choose <Confirm SD Card Transfer>. • Enter and confirm the confirmation code in the following screen. Data is transferred via an analog lin…
Text truncated - open the document above for the full version.
Contact Information
Applicant
Juergen Kasprowitsch(Director, Quality Management)
Technical Contact
eResearchTechnology GmbHPhilipp Tiefenthaler
[email protected]0049 9305 720 6626
Sieboldstrasse 3 · Estenfeld · Germany
Test Firm
Eurofins Product Service GmbHMichael Howard
Technical Specifications
| # | Rule Parts | Frequency Range | Power Output |
|---|---|---|---|
| 1 | 18 | 0.112 MHz - 0.205 MHz | - |
Other Applications from eResearchTechnology GmbH
2AAUFSPS003
Oct 03, 2022SpiroSphere is a diagnostic compact device to measure inspiratory and expiratory lung function parameters
Equipment Class
8CC - Part 18 Consumer Device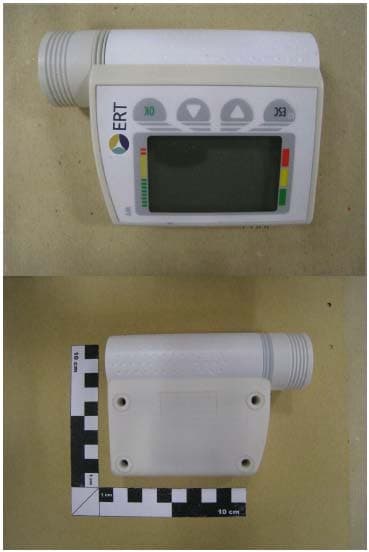
2AAUFAM3G01
Nov 07, 2013The Asthma Monitor AM3 is an electronic measurement device to monitor the lung function.
Equipment Class
JBP - Part 15 Class B Computing Device Peripheral