2AGNSCL030088Wireless Charging Clock
Marathon Watch Company Limited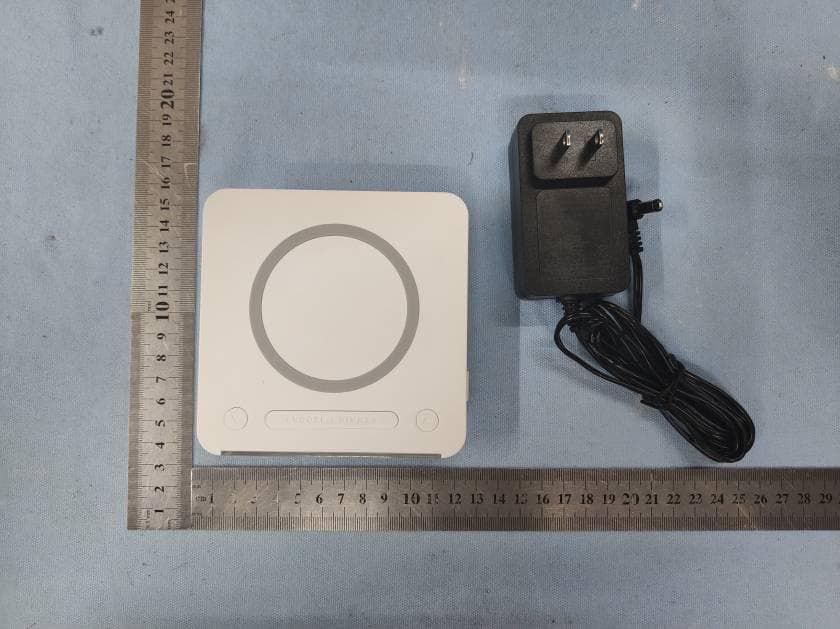
Click to zoom
Application Details
- Equipment Class
- 8CC - Part 18 Consumer Device
- Date of Grant
- Jun 15, 2020
- Application Purpose
- Original Equipment
- Date of Application
- Jun 15, 2020
- Equipment Note
- Wireless Charging Clock
- Frequency Range
- 0.11000000 - 0.20500000
- Country
- Canada
Documents & Files
Document Text
Text extracted from the exhibit documents filed with the FCC. Open a document above to read the original.
Users Manual
WIRELESS FAST DUAL CHARGING CLOCK USER MANUAL HORLOGE À DOUBLE RECHARGE RAPIDE SANS FIL MODE D’EMPLOI OROLOGIO A DOPPIA RICARICA VELOCE E SENZA FILI ISTRUZIONI PER L’USO INSTRUCCIONES DE FUNCIONAMIENTO DEL RELOJ INALÁMBRICO DE CARGA DUAL RÁPIDA SCHNELLER DRAHTLOSER DOPPELTER LADETAKT BENUTZERHANDBUCH OVERVIEW A2A7B1A3A1A6 A4A5 B2A10A9A8 Part A – Front and Back A1: Time A2: Icon A3: Icon A4: Icon A5: Alarm Time A6: Icon A7: Icon A8: USB Port A9: A/C Adapter Jack A10: Button Part B – Sides B1: Switch B2: / Switch EN C2D1 C4C3C1 FEATURES • Qi wireless charging: Simply place any Qi enabled wireless charging device on the charging pad. No cable connection required. • Digital clock with daily alarm function. • Crisp and vibrant full colour LED display. POWER SOURCE This unit uses 1 A/C power adapter and 1 x CR2032 battery for backup. Part C – Top C1: Button C2: Charging Pad C3: Button C4: Button Part D – Bottom D1: Battery Compartment GETTING STARTED 1. Plug in the A/C adaptor into the adaptor jack (A9), remove the battery tag from the rear compartment (D1) to activate the clock backup battery which is already installed in the clock when you first receive it. 2. When both the A/C adaptor and CR2032 battery have been installed, the unit will automatically switch to the external power supply. 3. The CR2032 battery will store all programmed settings in case the A/C adapter is unplugged. If the CR2032 battery is removed, all programmed settings will be lost immediately when the A/C adapter is unplugged. NOTE: The clock will not operate without the A/C adapter. SETTING THE TIME Hold the (C3) button for 2 seconds to select time display in 12-hour or 24-hour format. 1. Slide / switch (B2) to to enter time setting mode. 2. Press or button (C1 or C4) to adjust the time setting. Press and hold the or button to speed up the rate at which the value changes. 3. Slide / switch (B2) to LOCK to confirm the current displayed settings. NOTE: The HOUR value CANNOT be adjusted directly. The HOUR value can only be changed through the adjustment of the MINUTE value. DAYLIGHT SAVINGS TIME (DST) • To activate daylight savings time for the clock, press the button (A10). You will note that on the display, the time (A1) will increase by 1 hour and the icon (A3) will appear. • To deactivate daylight savings time, press the button (A10). You will note that on the display, the time (A1) will decrease by 1 hour and the icon (A3) will disappear. SETTING THE ALARM 1. Slide / switch (B2) to to enter alarm setting mode. 2. Press or button (C1 or C4) to adjust the alarm time setting, slide / switch (B2) to LOCK to confirm setting. 3. Press and hold the or button to speed up the rate at which the value changes. NOTE: The HOUR value CANNOT be adjusted directly. The HOUR value can only be changed through the adjustment of the MINUTE value. USING THE ALARM AND SNOOZE FUNCTION 1. Slide switch (B1) to activate or deactivate the alarm function. There are three options: HI (alarm sound will be louder), LO (alarm sound will be quieter), OFF (alarm will not sound at all). 2. When the alarm function is activated, the icon (A4) will appear on the display. 3. When the alarm sounds, press the button (C3) to pause it and enter snooze mode which will delay the alarm for 5 minutes. EN
Users Manual
4. The alarm will sound again after 5 minutes. The icon (A2) flashes on the display during the snooze time. This process can be repeated 7 times. After snoozing the clock 7 times, the alarm will not sound again. 5. When the alarm sounds, icon (A4) flashes on the display. 6. Slide switch (B1) to OFF to deactivate the alarm function or press any of the buttons to stop the alarm, with the exception of the button (C3). If no selection is made, the alarm signal will sound for 3 minutes and then stop automatically. USB PORT The maximum current output of USB port is 2A. NOTE: Only charge devices that self-regulate. BACKLIGHT Backlight Brightness Adjustment Press the button (C3) to switch the backlight brightness. There are three selectable options: Low, Medium, High. Every press of the button (C3) will alternate through the 3 options. LED Backlight Colour 1. Press the or button (C1 or C4) to select your preferred LED backlight colour. 2. To have the LED backlight colour change automatically, hold the or button for 2 seconds. Press the or button again to stop the color changing. QI WIRELESS CHARGING NOTE: You must have a Qi enabled device to use the Qi Wireless Charging function of this clock. If you have an iPhone 7 or older, you likely are not able to use this function. You must check your device’s user manual to confirm if your device is compatible with this feature. 1. Place your Qi enabled device at the center of the charging pad (C2). 2. When a successful link occurs between the clock and the device, the icon (A6) will appear on the screen. While the device is charging, the icon (A7) will continually flash on the screen. When the device is fully charged, the icon (A7) icon will stop flashing. 3. If an ERROR icon flashes on the screen, it means there is a problem which prevents the device from charging. Here are some possible fixes to try: o Remove any metallic object between the device and charging pad (C2), including metallic cases. o Remove the device from the charging pad (C2) and wait until the ERROR icon disappears. Place the obstruction free device at the center of the charging pad (C2) to try again. WARNING: Do not place any metallic object between the Qi enabled device and charging pad (C2), this may lead to overheating and cause damage to both the device and the charging pad (C2). EN CLEANING 1. Do not expose the unit to extreme temperatures, water, or severe shock. 2. Avoid cleaning the unit with any corrosive materials, such as perfume, alcohol, or cleaning agents. Always clean the unit with a damp cloth. Never spray any cleaning agents onto the unit directly. NOTE: You must unplug your clock from the electrical outlet before cleaning to avoid the risk of shock or damage. Our Products contain high quality components and are designed to facilitate recycling. Our products or product packaging are marked with the symbol below. The symbol indicates that the product must not be treated as municipal waste. It must be disposed of separately via the appropriate return and collection systems available. By following these instructions you ensure that this product is treated correctly and help to reduce potential impacts on the environment and human health, which could otherwise result from inappropriate handling. Recycling of products helps to conserve natural resources and protect the environment. For more detailed information on collection and recycling systems for this product, please contact the shop where you purchased it, your local dealer or sales / service representatives. FR VUE D’ENSEMBLE A2A7B1A3A1A6 A4A5 B2A10A9A8 Partie A – Recto et verso A1: Temps A2: Icône A3: Icône A4: Icône A5: Temps d’alarme A6: Icône A7: Icône A8: Port USB A9: Prise pour adaptateur de climatisation A10: Bouton Partie B – Côtés B1: Interrupteur B2: Interrupteur / C2D1 C4C3C1 CARACTÉRISTIQUES • Charge sans fil Qi: Il suffit de placer n’importe quel appareil de recharge sans fil compatible avec le Qi sur le bloc de recharge. Aucune connexion par câble n’est nécessaire. • Horloge numérique avec fonction d’alarme quotidienne. • Écran LED couleur vif et lumineux. Partie C – Haut C1: Bouton C2: Bloc de charge C3: Bouton C4: Bouton Partie D – Bas D1: Compartiment des piles
Users Manual
FR SOURCE D’ÉNERGIE Cet appareil utilise un adaptateur d’alimentation A/C et une pile CR2032 pour la sauvegarde. DÉMARRAGE 1. Branchez l’adaptateur A/C dans la prise d’adaptateur (A9), retirez l’étiquette de la batterie du compartiment arrière (D1) pour activer la batterie de secours de l’horloge qui est déjà installée dans l’horloge lorsque vous la recevez pour la première fois. 2. Lorsque l’adaptateur A/C et la pile CR2032 ont été installés, l’appareil passe automatiquement à l’alimentation électrique externe. 3. La pile CR2032 mémorise tous les paramètres programmés au cas où l’adaptateur A/C est débranché. Si la pile CR2032 est retirée, tous les paramètres programmés seront perdus immédiatement lorsque l’adaptateur A/C est débranché. REMARQUE : l’horloge ne fonctionnera pas sans l’adaptateur A/C. RÉGLAGE DE L’HEURE Maintenez la touche (C3) enfoncée pendant 2 secondes pour sélectionner l’affichage de l’heure au format 12 heures ou 24 heures. 1. Faites glisser l’interrupteur / (B2) sur pour entrer dans le mode de réglage de l’heure. 2. Appuyez sur le bouton ou (C1 ou C4) pour ajuster le réglage de l’heure. Appuyez et maintenez appuyé le bouton ou pour accélérer la vitesse à laquelle la valeur change. 3. Faites glisser l’interrupteur / (B2) sur LOCK pour confirmer les réglages actuels affichés. REMARQUE : La valeur de l’HEURE NE PEUT PAS être réglée directement. La valeur de l’HEURE ne peut être modifiée que par l’ajustement de la valeur des MINUTES. HEURE D’ÉTÉ (DST, PAR SES SIGLES EN ANGLAIS) • Pour activer l’heure d’été de l’horloge, appuyez sur le bouton (A10). Vous noterez que sur l’écran, l’heure (A1) augmentera d’une heure et l’icône (A3) apparaîtra. • Pour désactiver l’heure d’été, appuyez sur le bouton (A10). Vous noterez que sur l’écran, l’heure (A1) diminuera d’une heure et l’icône (A3) disparaîtra. RÉGLAGE DE L’ALARME 1. Faites glisser l’interrupteur / (B2) sur pour passer en mode de réglage de l’alarme. 2. Appuyez sur le bouton ou (C1 ou C4) pour ajuster le réglage de l’heure de l’alarme, faites glisser l’interrupteur / (B2) sur LOCK pour confirmer le réglage. 3. Appuyez et maintenez le bouton ou pour accélérer la vitesse à laquelle la valeur change. REMARQUE : La valeur de l’HEURE NE PEUT PAS être réglée directement. La valeur des HEURES ne peut être modifiée que par l’ajustement de la valeur des MINUTES. UTILISATION DE LA FONCTION D’ALARME ET DE RÉPÉTITION 1. Faites glisser l’interrupteur (B1) pour activer ou désactiver la fonction d’alarme. Il existe trois options : HI (le son de l’alarme sera plus fort), LO (le son de l’alarme sera plus faible), OFF (l’alarme ne sonnera pas du tout). 2. Lorsque la fonction d’alarme est activée, l’icône (A4) apparaît sur l’écran. 3. Lorsque l’alarme retentit, appuyez sur le bouton (C3) pour la mettre en pause et passer en mode “répétition” qui retardera l’alarme de 5 minutes. 4. L’alarme retentira de nouveau après 5 minutes. L’icône (A2) clignote sur l’écran pendant la durée de la répétition. Ce processus peut être répété 7 fois. Après 7 répétitions, l’alarme ne retentira plus. 5. Lorsque l’alarme retentit, l’icône (A4) clignote à l’écran. 6. Faites glisser l’interrupteur (B1) sur OFF pour désactiver la fonction d’alarme ou appuyez sur l’un des boutons pour arrêter l’alarme, à l’exception du bouton (C3). Si aucune sélection n’est effectuée, le signal d’alarme retentira pendant 3 minutes puis s’arrêtera automatiquement. PORT USB Le courant maximum du port USB est de 2A. REMARQUE : Ne chargez que les dispositifs qui s’autorégulent. FR RÉTRO-ÉCLAIRAGE Réglage de la luminosité du rétro-éclairage Appuyez sur le bouton (C3) pour changer la luminosité du rétro-éclairage. Il existe trois options sélectionnables : Faible, Moyen, Élevé. Chaque pression sur le bouton (C3) permet d’alterner entre les 3 options. Couleur du rétro-éclairage LED 1. Appuyez sur le bouton ou (C1 ou C4) pour sélectionner la couleur de rétro-éclairage LED de votre choix. 2. Pour que la couleur du rétro-éclairage change automatiquement, maintenez le bouton ou enfoncé pendant 2 secondes. Appuyez à nouveau sur le bouton ou pour arrêter le changement de couleur. CHARGEMENT SANS FIL QI REMARQUE : Vous devez disposer d’un appareil compatible avec Qi pour utiliser la fonction de recharge sans fil Qi de cette horloge. Si vous avez un iPhone 7 ou plus ancien, vous ne pourrez probablement pas utiliser cette fonction. Vous devez consulter le manuel d’utilisation de votre appareil pour confirmer si votre appareil est compatible avec cette fonction. 1. Placez votre appareil compatible avec Qi au centre du bloc chargement (C2). 2. Lorsque la liaison entre l’horloge et l’appareil est réussie, l’icône (A6) apparaît à l’écran. Pendant que l’appareil se charge, l’icône (A7) clignote en permanence sur l’écran. Lorsque l’appareil est complètement chargé, l’icône (A7) cesse de clignoter. 3. Si l’icône ERROR clignote sur l’écran, cela signifie qu’il y a un problème qui empêche l’appareil de se charger. Voici quelques solutions possibles à essayer : o Retirez tout objet métallique entre l’appareil et le bloc de charge (C2), y compris les boîtiers métalliques. o Retirez l’appareil du bloc de chargement (C2) et attendez que l’icône ERROR disparaisse. Placez le dispositif sans obstruction au centre du bloc de chargement (C2) pour réessayer. AVERTISSEMENT : Ne placez aucun objet métallique entre l’appareil compatible avec Qi et le bloc de charge (C2), cela peut entraîner une surchauffe et endommager à la fois l’appareil et le bloc de charge (C2). NETTOYAGE 1. N’exposez pas l’appareil à des températures extrêmes, à l’eau ou à un choc violent. 2. Évitez de nettoyer l’appareil avec des matériaux corrosifs, tels que du parfum, de l’alcool ou des produits de nettoyage. Nettoyez toujours l’appareil avec un chiffon humide. Ne vaporisez jamais de produits de nettoyage directement sur l’appareil. REMARQUE : Vous devez débrancher votre horloge de la prise électrique avant de la nettoyer pour éviter tout risque…
Text truncated - open the document above for the full version.
Users Manual
IT FARE I PRIMI PASSI 1. Collegare l’adattatore A/C al jack dell’adattatore (A9), rimuovere il tag della batteria dal vano posteriore (D1) per attivare la batteria di riserva dell’orologio che è già installata nell’orologio quando lo si riceve. 2. Quando sia l’adattatore A/C che la batteria CR2032 sono stati installati, l’unità passa automaticamente all’alimentazione esterna. 3. La batteria CR2032 memorizzerà tutte le impostazioni programmate nel caso in cui l’adattatore A/C venisse scollegato. Se la batteria CR2032 viene rimossa, tutte le impostazioni programmate verranno immediatamente perse se l’adattatore A/C viene scollegato. NOTA: L’orologio non funziona senza adattatore A/C. IMPOSTARE L’ORA Tenere premuto il pulsante (C3) per 2 secondi per selezionare la visualizzazione dell’ora a 12 ore o 24 ore. 1. Far scorrere l’interruttore / (B2) su per entrare in modalità di impostazione dell’ora. 2. Premere il pulsante o (C1 o C4) per regolare l’impostazione dell’ora. Tenere premuto il pulsante o per accelerare la velocità alla quale cambia il valore. 3. Far scorrere l’interruttore / (B2) su LOCK per confermare le attuali impostazioni visualizzate. NOTA: Il valore dell’ORA NON PUÒ essere regolato direttamente. Il valore dell’ORA può essere modificato solo con la regolazione del valore MINUTI. ORA LEGALE (DST) • Per attivare l’ora legale per l’orologio, premere il pulsante (A10). Noterete che sul display, l’ora (A1) aumenterà di 1 ora e l’icona (A3) apparirà. • Per disattivare l’ora legale, premere il pulsante (A10). Noterete che sul display, l’ora (A1) diminuirà di 1 ora e l’icona (A3) scomparirà. IMPOSTARE LA SVEGLIA 1. Far scorrere l’interruttore / (B2) su per accedere alla modalità di impostazione della sveglia. 2. Premere il pulsante o (C1 o C4) per regolare l’impostazione della sveglia, far scorrere l’interruttore / (B2) su LOCK per confermare l’impostazione. 3. Tenere premuto il pulsante o per accelerare la velocità alla quale cambia il valore. NOTA: Il valore dell’ORA NON PUÒ essere regolato direttamente. Il valore dell’ORA può essere modificato solo con la regolazione del valore MINUTI. UTILIZZARE LA FUNZIONE SVEGLIA E FUNZIONE SNOOZE 1. Far scorrere l’interruttore (B1) per attivare o disattivare la funzione sveglia. Ci sono tre opzioni: HI (il suono della sveglia sarà più forte), LO (il suono della sveglia sarà più basso), OFF (la sveglia non suonerà affatto). 2. Quando viene attivata la funzione sveglia, l’icona (A4) apparirà sul display. 3. Quando suona la sveglia, premere il pulsante (C3) per metterla in pausa e inserire la modalità snooze che ritarderà la sveglia per 5 minuti. 4. La sveglia suonerà di nuovo dopo 5 minuti. L’icona (A2) lampeggia sul display durante l’intervallo di snooze. Il processo può essere ripetuto 7 volte. Dopo che lo snooze entra in funzione 7 volte, l’allarme non suonerà più. 5. Quando la sveglia suona, l’icona (A4) lampeggia sul display. 6. Far scorrere l’interruttore (B1) su OFF per disattivare la funzione di sveglia o premere un qualsiasi pulsante per arrestare la sveglia, con l’eccezione del pulsante (C3). Se non viene effettuata alcuna selezione, la sveglia suonerà per 3 minuti e poi si arrestà automaticamente. PORTA USB La massima uscita in corrente della porta USB è 2A. NOTA: solo dispositivi di ricarica che si auto-regolano. RETROILLUMINAZIONE Regolazione luminosità della retroilluminazione Premere il pulsante (C3) per commutare la luminosità della retroilluminazione. Ci sono tre opzioni selezionabili: Basso, Medio, Alto. Ad ogni pressione del pulsante (C3) si alternerà tra le 3 opzioni. Colore LED della retroilluminazione 1. Premere il pulsante o (C1 o C4) per selezionare il colore della retroilluminazione a LED preferito. IT 2. Per far sì che il colore di retroilluminazione a LED cambi automaticamente, tenere premuto il pulsante o per 2 secondi. Premere di nuovo il pulsante o per fermare il cambiamento di colore. RICARICA WIRELESS QI NOTA: È necessario disporre di un dispositivo abilitato Qi per utilizzare la funzione di ricarica Qi wireless di questo orologio. Se si possiede un iPhone 7 o meno recente, è probabile che non sia in grado di utilizzare questa funzione. È necessario controllare il manuale utente del dispositivo per confermare se il vostro dispositivo è compatibile con questa funzione. 1. Posizionare il dispositivo abilitato Qi al centro del pad di ricarica (C2). 2. Quando avviene una connessione di successo tra l’orologio e il dispositivo, l’icona (A6) apparirà sullo schermo. Mentre il dispositivo è in carica, l’icona (A7) lampeggerà continuamente sullo schermo. Quando il dispositivo è completamente carico, l’icona (A7) smetterà di lampeggiare. 3. Se un’icona ERROR lampeggia sullo schermo, significa che c’è un problema che impedisce che al dispositivo di caricarsi. Ecco alcune possibili correzioni da provare: o Rimuovere oggetti metallici tra il dispositivo e il pad di ricarica (C2), comprese custodie metalliche. o Rimuovere il dispositivo dal pad di ricarica (C2) e attendere che l’icona ERROR scompaia. Posizionare il dispositivo libero da ostruzioni al centro del pad di ricarica (C2) per riprovare. IT ATTENZIONE: Non posizionare oggetti metallici tra il dispositivo abilitato Qi e il pad di ricarica (C2), questo può portare a surriscaldamento e provocare danni sia al dispositivo che al pad di ricarica (C2). PULIZIA 1. Non esporre l’unità a temperature estreme, acqua o forti shock. 2. Evitare di pulire l’unità con materiali corrosivi, come profumi, alcol o detergenti. Pulire sempre l’unità con un panno umido. Non spruzzare direttamente alcun detergente sull’unità. NOTA: Occorre scollegare il vostro orologio dalla presa elettrica prima di eseguire la pulizia per evitare il rischio di shock o danni. I nostri prodotti contengono componenti di alta qualità e sono progettati per facilitarne il riciclo. I nostri prodotti e le relative confezioni sono contrassegnati dal simbolo indicato di seguito. Il simbolo indica che il prodotto non dev…
Text truncated - open the document above for the full version.
Users Manual
GUÍA DE INICIO 1. Conecta el adaptador A/C en adaptador (A9), retira la etiqueta de la batería del compartimiento trasero (D1) para activar la batería de respaldo del reloj que ya está instalada cuando lo recibes por primera vez. 2. Cuando se hayan instalado el adaptador A/C y la batería CR2032, la unidad cambiará automáticamente a la fuente de alimentación externa. 3. La batería CR2032 almacenará todas las configuraciones programadas en caso de que el adaptador A/C se desconecte. Si se retira la batería CR2032, todos los ajustes programados se perderán inmediatamente si se desconecta el adaptador A/C. NOTA: el reloj no funcionará sin el adaptador A/C. AJUSTAR LA HORA Mantén presionado el botón (C3) durante 2 segundos para cambiar la visualización de la hora entre formato de 12 o 24 horas. 1. Desliza el interruptor / (B2) a para ingresar al modo de ajuste de hora. 2. Presiona el botón o (C1 o C4) para ajustar la configuración de la hora. Mantén presionado el botón o para acelerar la velocidad a la que cambia el valor. 3. Desliza el interruptor / (B2) a LOCK para confirmar la configuración mostrada. NOTE: NOTA: El valor de la HORA NO PUEDE ajustarse directamente. El valor de la HORA solo se puede cambiar al ajustar el valor MINUTO. ES HORARIO DE VERANO (DST) • Para activar el horario de verano para el reloj, presiona el botón (A10). Notarás que en la pantalla, la hora (A1) aumentará en 1 hora y aparecerá el ícono (A3). • Para desactivar el horario de verano, presiona el botón (A10). Notarás que en la pantalla, la hora (A1) disminuirá en 1 hora y el ícono (A3) desaparecerá. CONFIGURACIÓN DE LA ALARMA 1. Desliza el interruptor / (B2) a para ingresar al modo de configuración de la alarma. 2. Presiona el botón o (C1 o C4) para ajustar la configuración de la hora de la alarma, desliza el interruptor / (B2) a LOCK para confirmar la configuración. 3. Mantén presionado el botón o para acelerar la velocidad a la que cambia el valor. NOTA: El valor de la HORA NO PUEDE ajustarse directamente. El valor de la HORA solo se puede cambiar al ajustar el valor MINUTO. USO DE LA FUNCIÓN DE ALARMA Y SNOOZE 1. Desliza el interruptor (B1) para activar o desactivar la función de la alarma. Existen tres opciones: HI (el sonido de la alarma será más fuerte), LO (el sonido de la alarma será más silencioso), OFF (la alarma no sonará). 2. Cuando la función de alarma este activada, el icono (A4) aparecerá en la pantalla. 3. Al sonar la alarma, presiona el botón (C3) para pausarla e ingresar al modo Snooze, que retrasará la alarma por 5 minutos. 4. La alarma volverá a sonar después de 5 minutos. El icono (A2) parpadeará en la pantalla durante el tiempo de snooze. Este proceso puede repetirse hasta 7 veces. Después de posponer el reloj 7 veces, la alarma no volverá a sonar. 5. Cuando suene la alarma, el icono (A4) parpadeará en la pantalla. 6. Desliza el interruptor (B1) a OFF para desactivar la función de alarma o presiona cualquiera de los botones para detener la alarma, con la excepción del botón (C3). Si no se realiza ninguna acción, la señal de alarma sonará durante 3 minutos y luego se detendrá automáticamente. PUERTO USB La salida de corriente máxima del puerto USB es de 2A. NOTA: Solo cargue dispositivos que se autorregulen. LUZ DE FONDO Ajuste del brillo de luz de fondo Presiona el botón (C3) para cambiar el brillo de la luz de fondo. Hay tres opciones: Bajo, Medio, Alto. Cada vez que se presione el botón (C3), alternará entre las 3 opciones. Color de Luz de Fondo LED 1. Presiona el botón o (C1 o C4) para seleccionar tu color LED preferido para la luz de fondo. 2. Para que el color de la luz de fondo LED cambie
Users Manual
ERSTE SCHRITTE 1. Stecken Sie den A/C Adapter in den Adapteranschluss (A9), entfernen Sie das Batterieetikett von dem hinteren Fach (D1), um die Sicherheitsbatterie der Uhr zu aktivieren, die bereits in die Uhr eingesetzt ist, wenn Sie sie das erste Mal erhalten. 2. Wenn sowohl der A/C Adapter und die CR2032 Batterie eingesetzt sind, dann wird die Einheit automatisch auf die externe Stromquelle umschalten. 3. Die CR2032 Batterie wird alle programmierten Einstellungen speichern, falls A/C Adapter ausgesteckt ist. Falls die CR2032 Batterie entfernt ist, werden alle programmierten Einstellungen sofort verloren sein, sobald A/C Adapter ausgesteckt ist. HINWEIS: Die Uhr wird ohne den A/C Adapter nicht funktionieren. DIE ZEIT EINSTELLEN Halten Sie die (C3) Taste 2 Sekunden lang, um sich die Zeit im 12- oder 24-Stunden Format anzeigen zu lassen. 1. Schieben Sie den / Regler (B2) auf , um in den Zeiteinstellungsmodus zu gelangen. 2. Drücken Sie die oder Taste (C1 oder C4), um die Zeitangabe anzupassen. Drücken und halten Sie die oder Taste, um die Geschwindigkeit zu beschleunigen, in der sich der Wert ändert. 3. Schieben Sie den / Regler (B2) auf LOCK, um die aktuell angezeigten Einstellungen zu bestätigen. DE HINWEIS: Der STUNDENwert KANN NICHT direkt eingestellt werden. Der STUNDENwert kann nur durch die Anpassung des MINUTENwertes geändert werden. SOMMERZEIT (DST) • Um bei der Uhr die Sommerzeit einzustellen, müssen Sie auf die Taste (A10) drücken. Sie werden feststellen, dass die Zeit auf der Anzeige (A1) sich eine Stunde vorstellen wird und das Symbol (A3) wird erscheinen. • Um die Sommerzeit zu deaktivieren, müssen Sie den Knopf (A10) drücken. Sie werden feststellen, dass die Zeit (A1) sich um eine Stunde zurückstellen wird und das Symbol (A3) wird verschwinden. DEN WECKER STELLEN 1. Schieben Sie den / Regler (B2) auf , um zum Weckeinstellungsmodus zu gelangen. 2. Drücken Sie die oder Taste (C1 oder C4), um die Weckeinstellungen anzupassen, schieben Sie außerdem den / Regler (B2) auf LOCK, um die Einstellungen zu bestätigen. 3. Drücken und halten Sie den oder Knopf, um die Geschwindigkeit zu beschleunigen, in der sich der Wert ändert. HINWEIS: Der STUNDENwert KANN NICHT direkt eingestellt werden. Der STUNDENwert kann nur durch die Anpassung des MINUTENwertes geändert werden. DIE WECKER- UND SCHLUMMERN-FUNKTION VERWENDEN 1. Verschieben Sie den Regler (B1), um die DE Weckfunktion zu aktivieren oder zu deaktivieren. Es gibt drei Optionen: HI (Der Ton des Weckers wird lauter sein), LO (Der Ton des Weckers wird leiser sein), OFF (Der Ton des Weckers wird überhaupt nicht zu hören sein). 2. Wenn die Weckfunktion aktiviert ist, dann wird das Symbol (A4) auf der Anzeige erscheinen. 3. Wenn der Wecker klingelt, dann drücken Sie auf die Taste (C3), um ihn zu unterbrechen und in den Schlummermodus zu gelangen, welcher den Alarm auf 5 Minuten später einstellt. 4. Der Wecker wird nach 5 Minuten erneut klingeln. Das Symbol (A2) leuchtet während dem Schlummermodus auf dem Display auf. Dieser Vorgang kann 7 Mal wiederholt werden. Nachdem der Wecker 7 Mal auf Schlummern gestellt wurde, wird der Wecker nicht mehr klingeln. 5. Wenn der Wecker klingelt, leuchtet das Symbol (A4) auf dem Display auf. 6. Schieben Sie den Regler (B1) auf OFF, um die Weckfunktion zu deaktivieren oder drücken Sie auf irgendeinen der Knöpfe, um den Wecker auszuschalten, mit Ausnahme des Knopfes (C3). Falls keine Auswahl getroffen wurde, wird das Wecksignal 3 Minuten lang zu hören sein, bis es dann automatisch aufhört zu klingeln. USB ANSCHLUSS Die maximale, aktuelle Stromausgabe des USB Anschlusses beträgt 2A. HINWEIS: Lädt nur Geräte, die selbstreguliert sind. HINTERGRUNDBELEUCHTUNG Anpassung der Helligkeit der Hintergrundbeleuchtung Drücken Sie auf die Taste (C3), um die Helligkeit der Hintergrundbeleuchtung umzustellen. Es gibt drei wählbare Optionen: Schwach, Mittel, Hoch. Jedes Mal, wenn Sie auf den Knopf (C3) drücken, werden die drei Optionen durchgewechselt. Farbe der LED Hintergrundbeleuchtung 1. Drücken Sie auf den oder Knopf (C1 oder C4), um Ihre bevorzugte Farbe der Hintergrundbeleuchtung auszuwählen. 2. Damit sich die Farbe der LED Hintergrundbeleuchtung automatisch ändert, halten Sie den oder Knopf 2 Sekunden lang. Drücken Sie den oder Knopf noch einmal, damit sich die Farbe nicht mehr ändert. QI KABELLOSES LADEN HINWEIS: Sie müssen ein Qi fähiges Gerät haben, um die Qi kabellose Ladefunktion dieses Weckers zu verwenden. Wenn Sie ein iPhone 7 oder ein älteres Modell haben, dann werden Sie diese Funktion wahrscheinlich nicht nutzen können. Sie müssen die Bedienungsanleitung Ihres Gerätes überprüfen, um zu versichern, dass Ihr Gerät mit dieser Funktion kompatibel ist. 1. Legen Sie Ihr Qi fähiges Gerät auf die Mitte des Ladekissens (C2). 2. Wenn eine erfolgreiche Verbindung zwischen dem Wecker und dem Gerät hergestellt wurde,
Users Manual
DE dann erscheint das Symbol (A6) auf dem Bildschirm. Während das Gerät lädt wird das Symbol (A7) automatisch auf dem Bildschirm aufleuchten. Wenn das Gerät vollständig geladen ist, dann wird das Symbol (A7) aufhören aufzuleuchten. 3. Falls ein ERROR Symbol auf dem Bildschirm aufleuchtet, dann bedeutet es, dass es ein Problem beim Laden gibt, welches das Gerät vom Laden abhält. Hier sind ein paar mögliche Reparaturoptionen, die Sie ausprobieren können: o Entfernen Sie alle Metallobjekte, die sich zwischen dem Gerät und dem Ladekissen befinden (C2), inklusive Hüllen aus Metall. o Entfernen Sie das Gerät von dem Ladekissen (C2) und warten Sie bis das ERROR Symbol verschwindet. Legen Sie das störungsfreie Gerät in die Mitte des Ladekissens (C2), um es erneut zu versuchen. WARNUNG: Legen Sie keine Metallobjekte zwischen das Qi fähige Gerät und das Ladekissen (C2), das könnte zu Überhitzung führen und sowohl Ihr Gerät, als auch das Ladekissen beschädigen (C2). REINIGUNG 1. Setzen Sie das Gerät nicht extremen Temperaturen, Wasser oder einem schwerem Stromschlag aus. 2. Vermeiden Sie es, den Wecker mit jeglichem ätzendem Material, wie Parfüm, Alkohol oder Reinigungsmitteln zu reinigen. Reinigen Sie die Einheit immer mit einem feuchten Tuch. Sprühen Sie niemals irgendwelche Reinigungsmittel direkt auf das Gerät. HINWEIS: Sie müssen den Wecker von der Stromversorgung trennen, bevor Sie ihn reinigen, um einen Elektroschock oder andere Schäden zu vermeiden. Unsere Produkte enthalten qualitativ hochwertige Komponenten und sind für einfaches Recycling konzipiert. Unsere Produkte oder Produktverpackungen sind mit folgendem Symbol markiert. Das Symbol zeigt an, dass das Produkt nicht als Hausmüll behandelt werden darf. Es muss separat über die verfügbaren entsprechenden Rücklauf- und Sammlungssysteme entsorgt werden. Durch Befolgen dieser Anweisungen stellen Sie sicher, dass dieses Produkt richtig behandelt wird, und helfen, potenzie…
Text truncated - open the document above for the full version.
Contact Information
Applicant
Mitchell Wein(President)
Test Firm
Global United Technology Services Co. Ltd.Robinson Lo
Technical Specifications
| # | Rule Parts | Frequency Range | Power Output |
|---|---|---|---|
| 1 | 18 | 0.11 MHz - 0.205 MHz | - |