2AKBMPRC30controller for unmanned aircraft system
Powervision Tech Inc.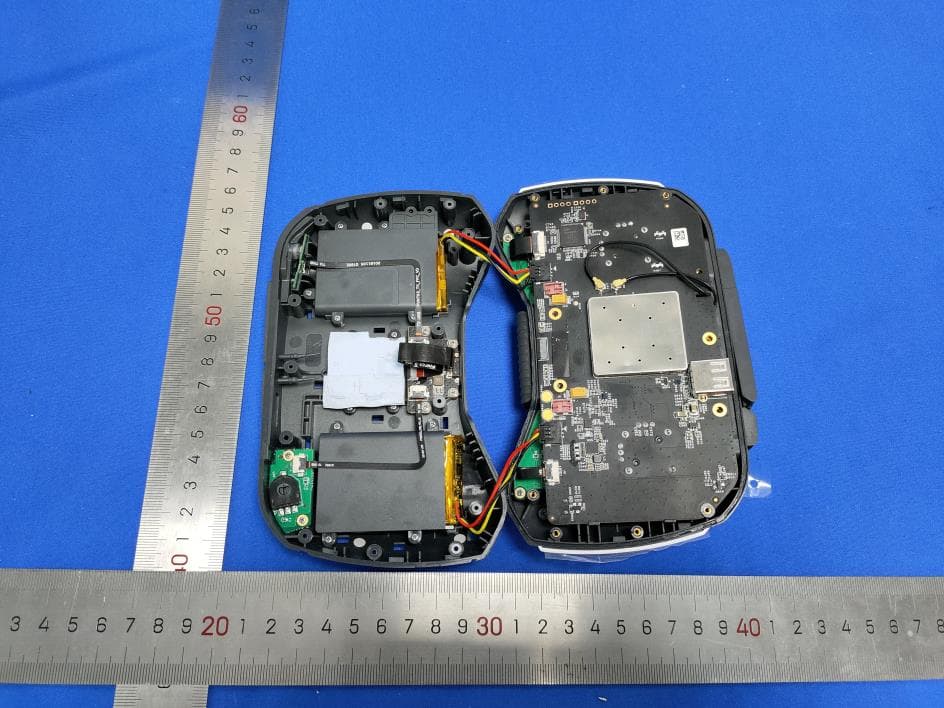
Click to zoom
Application Details
- Equipment Class
- DXX - Part 15 Low Power Communication Device Transmitter
- Date of Grant
- Aug 09, 2021
- Application Purpose
- Original Equipment
- Date of Application
- Aug 09, 2021
- Equipment Note
- controller for unmanned aircraft system
- Frequency Range
- 5731.00000000 - 5801.00000000
- Company
- Powervision Tech Inc.
- Country
- China
Documents & Files
Document Text
Text extracted from the exhibit documents filed with the FCC. Open a document above to read the original.
Users Manual
Quick Start Guide EN 快速入门指南 クイックスタートガイド Guide de démarrage rapide Kurzanleitung Guía rápida de inicio Guida rapida CN JP FR DE ES IT PowerEgg TM X 8K V1.0 TM CONTENTS /目录 快速入门指南 クイックスタートガイド Guide de démarrage rapide Kurzanleitung Guida rapida Guía rápida de inicio Quick Guide 01 12 23 34 45 56 67 CN EN JP FR DE IT ES 1 EN PowerEgg TM X 8K 1 Front visual system 2 Integrated gimbal camera 3 Mode indicator (headlight) 4 Motor 5 Front landing gear (including antennas) 6 Rear landing gear 7 Propeller 8 Battery cover 9 Battery level indicator 10 Power Button 9 8 7 6 5 4 3 2 1 10 PowerEgg X 8K works in Drone Mode or in AI-Camera Mode. 1. In Drone Mode, PowerEgg X 8K is equipped with a visual system both in the front and at the bottom as well as an ultrasonic sensor system * , which enables the drone to hover mid-air stably both indoors and outdoors. The drone also features auto-return, obstacle avoidance, and intelligent flight. Its high-precision, stability augmentation gimbal can record 8K UHD videos at 25 fps. Its maximum flight time is 34 minutes ** . 2. In AI-Camera Mode, PowerEgg X 8K can work without a remote controller. You can operate the camera and preview images or videos in real time in the specified App by connecting your phone or other mobile devices to the gimbal over a Wi-Fi network. Its maximum working time is 4 hours ** . * The visual and ultrasonic sensor systems both work under environmental requirements, for more information please read < Disclaimer and Safety Guidelines > and <User Manual >. Please watch the tutorial videos at App or PowerVision official website. ** The maximum flight time and the maximum working time are the test results in the laboratory environment, for reference only. 2 EN 11 Extended port (USB-Mini) 12 Bottom visual system 13 Ultrasonic sensor system 14 Aircraft status indicator (taillight) 15 Battery cover switch button 16 Wrist strap 17 Intelligent battery 18 Tripod converter 19 Aircraft arm installation groove 20 Block for groove 21 Camera micro-SD card slot 22 Data port (USB-C) 23 Auxillary Light Remove the protective case: Pull the label to remove the protective case. Remove the gimbal protector: Press the elastic buckles on both sides simultaneously and then pull them downwards to remove the protective cover. • Protective case and Gimbal protector Note: Install the PowerEgg X 8K's protective case and the gimbal protector when storing or transporting PowerEgg X 8K. * 16/18/20 exclusively use for AI-Camera Mode. 16 17 18 19 20 21 22 11 12 13 14 15 23 3 EN PowerEgg X 8K 8K's remote controller can remotely operate the aircraft and streaming HD images and videos on your mobile device via the specified App in real time. Additionally, the collapsible stand can hold your mobile device stably. Remote Controller 1 Mobile device stand 2 Antenna 3 Control stick 4 Flight mode switch button 5 P mode (Professional) 6 N mode (Normal) 7 E mode (Easy) 8 Emergency stop button 9 Intelligent return button 10 Custom button 11 Power button 12 Charging port (micro USB) 13 Photo button 14 Video button 15 Mobile device port (USB) 16 Gimbal control thumbwheel 16 15 14 13 12 11 10 9 8 765 4 3 2 1 4 EN • Charge the Battery Fully charge the battery to activate it for first time use. Press the buckles on both sides of the battery cover simultaneously, and the battery cover will automatically spring up. You can then take the battery out. Charge the Battery and Check the Battery Level Intelligent battery charging port Remote controller charging port Charger 1 1 2 • Check the Battery Level and Switch On/ Off 1. Intelligent Battery Short press once to check the battery level. Short press once and then press and hold for 2s to switch battery on/off. * For details about the battery and charging, please see Intelligent Battery Safety Guidelines. level Low High Remote controller (Battery level LED indicators) >60%<20% 20%-60% 2.Remote controller Press and hold to start the remote controller. 2 5 EN Please scan the QR code or go to the App store to install the Vision+ 2 App and watch tutorials. The Vision+ 2 App requires an OS version of iOS 10.0.2 and later or Android 5.0 and later. Download the App and Watch PowerEgg TM X 8K Tutorials 1. Prepare PowerEgg X 8K for Drone Mode Drone mode Install the arms and insert the battery into the battery compartment. Remove the protective case and the gimbal protector. Press the buckles on both sides of the battery cover simultaneously and remove the battery cover. Secure the battery cover into place.Unfold the arms and landing gears. Complete status. 1 2 Make sure to fully unfold the arms and propellers before starting drone. 6 EN • How to Replace a Propeller Attention: 1). Use T6 screwdriver and M2.5x3.5 screws coated with Teflon paste. 2). Please install the propeller according to the shape of propeller’s base. 3). Please do not reuse the screws. Insert one end of the data cable into the remote controller and the other into your mobile device. Place your mobile device on the stand. 2. Prepare the Remote Controller Unfold the antennas.Lift the mobile device stand. 1 2 3 7 EN Note: Make sure that the antennas directly face the aircraft to guarantee the strongest communication link. 3. Flight Preparations Short press once and then press and hold the power button for 2s to start the drone. Long press and hold the power button to power on the remote controller. Run the Vision+ 2 App. 4. Flight When the App screen indicated take off preparation completed. • Automatic take off/landing In the App: Automatic takeoff Automatic landing. Take Off Preparation Completed 8 EN • Manual take off/ landing OrControl stick operations: Start/Stop the motors. Takeoff: Push the throttle stick upwards slowly. Landing: Pull the throttle stick downwards till the aircraft lands. Keep the throttle stick at the lowest point for 2s, and the motors will stop. • Remote Controller Operations By default, the remote controller is in mode 2. The left control stick controls the f…
Text truncated - open the document above for the full version.
Users Manual
51 DE Hinweis: Stellen Sie sicher, dass die Antennen direkt zum Fluggerät zeigen, um die stärkste Kommunikationsverbindung zu gewährleisten. 3. Flugvorbereitungen Drücken Sie einmal ganz kurz, drücken Sie und halten Sie dann die Einschalttaste 2s gedrückt um das Fluggerät zu starten. Drücken Sie und halten Sie die Einschalttaste gedrückt, um die Fernsteuerung einzuschalten. Starten Sie die Vision+ 2 App. 4. Flug Wenn der App-Bildschirm anzeigt, dass die Abhebevorbereitung abgeschlossen ist. • Automatisches Abheben/Landen In der App: Automatisches Abheben Automatisches Landen. Abhebevorbereitung abgeschlossen 52 DE • Manuelles Abheben/Landen OderJoystick-Bedienung: Starten/Stoppen der Motoren. Abheben: Bewegen Sie den Beschleunigungshebel langsam nach oben. Landen: Bewegen Sie den Beschleunigungshebel nach unten bis das Fluggerät landet. Halten Sie den Beschlenigungshebel an der niedrigsten Position 2s lang bis die Motoren stoppen. • Fernsteuerungbedienung Standardmäßig befindet sich die Fernsteuerung im Modus 2. Der linke Joystick steuert die Flughöhe und -richtung, und der rechte Joystick steuert die Vorwärts-, Rückwärts-, Links- und Rechtsbewegungen. Der Gimbalsteuerung-Daumenrad steuert den Neigungswinkel der Kamera. Drücken Sie die Pause-Taste um das Fluggerät im Notfall in die Luft stabil schweben zu lassen. • Intelligente Flugfunktionen NormalSchnellschussHyperlapseAI-TrackPoint of Interest Links Links drehen/ Rechts drehen Nach oben/ Nach unten Nach vorne/ Nach hinten Nach links/ Nach rechts Rechts 53 DE 5. Flugsicherheit ! Starkes GPS-Signal In offenen Bereichen fliegen Unter 120 Meter fliegen Halten Sie immer Sichtkontakt zum Gerät Vorsichtsmaßnahmen während eines Fluges: 1. Vermeiden Sie Flüge über oder in der Nähe von Menschenmengen, Bäumen, Stromleitungen, hohen Gebäuden, Flughäfen, Signalsäulen usw. 2. Fliegen Sie nicht in der Nähe von starken elektromagnetischen Quellen, wie z.B. Funksendemasten, Hochspannungsleitungen, Umspannwerken und großen Blöcken aus magnetischem Metall, da sie das Fernsignal und den Kompass beeinflussen und somit die Flugsicherheit gefährden können. <120m Richtige Verwendung des PowerEgg X 8K 8K: Unerlaubte Flüge: Fliegen Sie nicht bei widrigen Wetterbedingungen wie Regen, Nebel, Schnee, Donner und starken Winden (Windgeschwindigkeit: 10m/s oder höher). Es wird empfohlen, das wasserdichte Gehäuse PowerEgg X 8K 8K zu kaufen, um bei Regenwetter zu fliegen; dabei eine konstante Sichtlinie einhalten. Halten Sie sich von den rotierenden Propellerblättern fern, um Personen- und Sachschäden zu vermeiden. Fliegen Sie nicht in einer FLUGVERBOTSZONE. 54 DE 1. Vorbereitung des PowerEgg X 8K für den AI-Kamera-Modus AI-Kameramodus Entfernen Sie das Schutzgehäuse und den Gimbalschutz. Sichern Sie die Akkuabdeckung an seinem Platz. Installieren Sie den Nutverschluss auf der linken Seite und die Handschlaufe auf der rechten Seite. Setzen Sie den Akku in das Akkufach ein. Drücken Sie die Verschlüsse an beiden Seiten der Akkuabdeckung gleichzeitig und entfernen Sie die Akkuabdeckung. • Stativbenutzung Stativkonverter installieren Benutzen Sie den Stativkonverter, das PowerEgg X 8K kann mit Kamerastative benutzt werden. Stativ installieren 1 2 55 DE * Sie können Ihr mobiles Gerät über ein Wi-Fi-Netzwerk oder ein zugelassenes Datenkabel der AI-Kamera verbinden. Für Details lesen Sie bitte die Anweisungen auf dem Bildschirm in der App oder schauen Sie sich die entsprechenden Tutorials an. * Weitere Funktionen werden in Zukunft durch Updates verfügbar sein. Weitere Informationen finden Sie in den Anweisungen der App. 2. Vorbereitungen zur Bildaufnahme Drücken Sie einmal ganz kurz, drücken Sie und halten Sie dann die Einschalttaste 2s gedrückt um die PowerEgg X 8Ks Gimbalkamera zu starten. Starten Sie die Vision+ 2 App und verbinden Sie den Gimbal mit dem PowerEgg X 8K gemäß den Anweisungen auf dem Bildschirm. 3. Bildaufnahme mit den Gimbalkamera-Funktionen Weitere Informationen finden Sie auf der offiziellen Website von PowerVision unter www.powervision.me. Sie können auch das Benutzerhandbuch herunterladen. Der Inhalt kann ohne Vorankündigung geändert werden. PowerEgg und PowerVision sind Markenzeichen von Powervision Tech Inc. Copyright @ 2021 PowerVision. Alle Rechte vorbehalten. Hyperlapse Zeitlupe * SSID: EggX_8K_xxxxxx Password:12345678 56 IT PowerEgg TM X 8K PowerEgg X 8K funziona sia nella modalità drone che nella modalità telecamera AI. 1. Nella modalità drone, PowerEgg X 8K è dotato di un sistema visivo sia nella parte anteriore che in quella inferiore e di un sistema di sensori a ultrasuoni * che consente al drone di librarsi stabilmente a mezz'aria, sia al chiuso che all'esterno. Il drone è anche caratterizzato dal ritorno automatico, dall'aggiramento degli ostacoli e dal volo intelligente. La sua sospensione cardanica ad alta precisione per aumentare la stabilità può registrare i video 8K UHD a 25 fps.Il suo tempo di volo massimo è di 34 minuti ** . 2. Nella modalità telecamera AI, PowerEgg X 8K può funzionare senza telecomando. È possibile utilizzare la telecamera e visualizzare in anteprima le immagini o i video in tempo reale nell'app specificata collegando il telefono o altri dispositivi mobili alla sospensione cardanica tramite una rete Wi-Fi. Il tempo di utilizzo massimo è di 3,5 ore ** . * I sistemi di sensori visivi e ad ultrasuoni funzionano entrambi conformemente ai requisiti ambientali. Per ulteriori informazioni, leggere la <Dichiarazione di non responsabilità e linee guida sulla sicurezza> e il <Manuale d’uso>. Guardare i video tutorial nell’App o sul sito Web ufficiale di PowerVision. ** Il tempo di volo massimo e il tempo di utilizzo massimo sono i risultati dei test nell'ambiente di laboratorio, e servono solo come riferimento. 1 Sistema visivo anteriore 2 Telecamera sospensione cardanica integrata 3 Indicatore modalità (fanale) 4 Motore 5 Carrello di atterraggio anteriore (comprese le antenne) 6 Carrello di atterraggio 7 Coperchio 8 Batteria …
Text truncated - open the document above for the full version.
Users Manual
PowerEgg TM X 8K Disclaimer and Safety Guidelines EU Avis de non-responsabilité et consignes de sécurité FR Haftungsausschluss und Sicherheitsrichtlinien DE Descargo de responsabilidad y pautas de seguridad ES Dichiarazione di non responsabilità per l’UE e linee guida sulla sicurezza IT 免责声明与安全操作指引 CN 免責事項と安全ガイドライン JP V2.0 TM 1 EN Dear user, in order to protect your safety and legitimate rights and interests, while getting to know your responsibilities,please read the following content carefully. This product requires special control. Please follow this document and any other safety guidelines released by PowerVision to properly configure the product before use. You shall be solely responsible for your conduct when using this product. PowerVision shall not be responsible for any consequence arising from your violation of this document or any other safety guidelines released by PowerVision. You must use this product safely and appropriately. When using this product, you assume all legal responsibilities for any conduct which violates local laws, regulations, disrupts social order, or endangers public safety. We provide no technical support or safety guarantee in the following circumstances: (1) An organization or individual obtains this product from a non-official agent or channel; (2) The product is refitted or debugged, or product parts are replaced without authorization; (3) The warranty card, serial number, or flight data of the product is lost. PowerVision takes no responsibility for any personal injury or property loss caused by your mis- operation or force majeure such as a natural disaster. By using this product, you shall be deemed as having understood, recognized, and accepted all terms and content of this document. You agree that you are solely responsible for your own conduct while using this product, and for any consequences thereof. PowerVision may update this document and the aforementioned policies or rules from time to time without further notice. Please visit www.powervision.me periodically for more detailed information and updates. Thank you. Disclaimer and Warning 2 EN • Safety at a Glance ! Strong GPS signalFly in open areas Properly use PowerEgg X: Fly below 120 metersMaintain the line of sight Precautions during a flight: 1. Avoid flying over or near crowds, trees, power lines, tall buildings, airports, signal towers, etc. 2. Do not fly near strong electromagnetic sources, such as radio transmitting towers, high voltage power lines, transformer substations, and large blocks of magnetic metal, as they may affect the remote signal and internal compass, endangering flight safety. No Fly conditions: Do not fly in adverse weather conditions such as rain, fog, snow, thunder, and high winds [wind speed: 10m/s (22mph) or higher]. It is recommended that the user purchase the PowerEgg X waterproof case to fly in rainy conditions, maintaining a constant line of sight. Keep the rotating propellers away from the bodies and property of yourself and others to avoid personal injuries and property damage. Do not fly in any NO FLY ZONE. <120m 3 EN • Pre-flight Checklist 1. Ensure that you use only genuine PowerVision parts and that all parts are in good condition. 2. Ensure that PowerEgg X has been configured to flight mode. Ensure that the arms on both sides of the aircraft are in place. Ensure that the battery and battery cover are secured in place. 3. Ensure that the arms and undercarriage of the aircraft have fully unfolded, that the aircraft is level and steady, and that the propellers have unfolded. Ensure that there are no obstacles in or around the fly zone. 4. Ensure that the remote controller, aircraft battery, and your mobile device are all sufficiently charged. 5. Ensure that there is no foreign object stuck to the camera lens or the visual system lens and that they have no damage (scratches, cracks, or chips). 6. Ensure that the gimbal protector is removed, that gimbal motors are clean and intact, and that the gimbal can rotate freely. 7. Ensure that the protective films are removed from the camera and visual system. 8. Ensure that the visual system lens is clean and spot free. 9. Ensure that the propellers are not damaged, worn, or deformed, and that they are securely mounted and tightened onto the motors. 10. Ensure that the aircraft motors are clean and intact, and that the motors can start and function normally. 11. Follow the on-screen instructions in the app to calibrate the compass or IMU. 12. Ensure that the firmware of the aircraft, the remote controller, as well as the app have been upgraded to the latest version. 13. Ensure that you are familiar with every flight mode, and that you are familiar with the behavior of the aircraft in out-of-control return mode. 14. Thoroughly familiarize yourself with all local laws and regulations regarding aircrafts. Be sure to apply for the authorization of using an aircraft from local authorities in pursuance to applicable laws and regulations. 15. Ensure that the app runs normally. PowerVision will not be able to provide you with warranty and other after-sales services and shall assume no liability to you if the Vision+ 2 App is not running during flight. 16. You need to agree to the terms of use of the Vision+ 2 App and PowerVision's privacy policy before using the Vision+ 2 App. The terms of use and privacy policy limit PowerVision's legal responsibilities. Please carefully read them in the app. 17. Please make sure that the smart battery of the drone is charged. 18. Please make sure the GPS or visual positioning system can receive proper information to navigate the drone. • Flight Operation Requirements 1. Do not start the motors before unfolding the arms/undercarriage; otherwise, the aircraft may become damaged. 2. Be careful of the battery buckles on each side when holding the aircraft; avoid pressing them simultaneously, as this will cause the battery cover to drop off. 3. Do not touch gimbal motors and aircraft intern…
Text truncated - open the document above for the full version.
Cover Letter(s)
We authorize MiCOM Labs Inc., 575 Boulder Court, Pleasanton, California 94566, USA, to act on our behalf on all matters concerning the certification of above named equipment. We declare that MiCOM Labs Inc. is allowed to forward all information related to the approval and certification of equipment to the regulatory agencies as required and to discuss any issues concerning the approval application. Any and all acts carried out by MiCOM Labs on our behalf shall have the same effect as acts of our own. Signature: Date: 2021.7.20 Name: Jiansheng Cao Title: Product Certification Manager Company: Powervision Tech Inc. Powervision Tech Inc. Agent Authorization Company: Powervision Tech Inc. Address: Zone E,Ocean Venture Valley, No.40, Yangguang Rd, Nanhai new District, Weihai, Shandong,China. 264200 Product Name: Remote Controller Model Number(s): PRC30 Product Description: controller for unmanned aircraft system
Cover Letter(s)
Powervision Tech Inc. Federal Communications Commission Date: 2021-07-27 Authorization and Evaluation Division 7435 Oakland Mills Road Columbia, MD 21046 SUBJECT: FCC SDoC declaration for FCC ID: 2AKBMPRC30 To Whom it may concern, We, as the grantee of this project, would like to declare that this device has been tested according to the FCC requirement and found compliant with the following standards: FCC Part 15 Subpart B. Sincerely, Signature: _________________________________ Product Name : Remote Controller Brand Name : Model Name : PRC30 Testing Lab : Centre Testing International (Suzhou) Co., Ltd Company Name : Powervision Tech Inc. Address : Zone E,Ocean Venture Valley, No.40, Yangguang Rd, Nanhai new District, Weihai, Shandong,China. 264200 Name : Jiansheng Cao Job Title : Product Certification Manager E-mail : [email protected] Tel. : +86-10-82263126
Cover Letter(s)
Powervision Tech Inc. Office of Engineering Technology Federal Communications Commission 7435 Oakland Mills Road Columbia, MD 21046 USA Date: 2021.7.20 Subject; Request for Confidentiality FCC ID: 2AKBMPRC30 To Whom It May Concern, Pursuant to the provisions of the Commission’s rules Title 47 Sections §0.457 and §0.459, we are requesting the Commission to withhold the following attachment(s) as confidential documents from public disclosure indefinitely. These documents contain detailed system and equipment descriptions and are considered as proprietary information in operation of the equipment. The public disclosure of these documents might be harmful to our company and would give competitors an unfair advantage in the market. Schematic Diagram Block Diagram Operational Description In additional to above mentioned documents, in order to comply with the marketing regulations in Title 47 CFR §2.803 and the importation rules in Title 47 CFR §2.1204, while ensuring that business sensitive information remains confidential until the actual marketing of newly authorized devices, we request Short Term Confidentiality of the following attachment(s); External Photos Test Setup Photos Internal Photos User Manual For 45 days, pursuant to Public Notice DA 04-1705. OR For 180 days pursuant to KDB 726920 D01. It is our understanding that all measurement test reports, FCC ID label format and correspondence during the certification review process cannot be granted as confidential documents and this information will be available for public review once the grant of equipment authorization is issued. Sincerely, Signature: Name: Jiansheng Cao Title: Product Certification Manager
External Photos
Report No. : EED39N80210201R2 Q/CTI LD-SUCEED-1007 Version 1.0 Page 54 of 66 APPENDIX 2 PHOTOGRAPHS OF EUT CONSTRUCTIONAL DETAILS Report No. : EED39N80210201R2 Q/CTI LD-SUCEED-1007 Version 1.0 Page 55 of 66 Report No. : EED39N80210201R2 Q/CTI LD-SUCEED-1007 Version 1.0 Page 56 of 66 Report No. : EED39N80210201R2 Q/CTI LD-SUCEED-1007 Version 1.0 Page 57 of 66
ID Label/Location Info
Label Location
Test Setup Photos
Report No. : EED39N80210201R2 Q/CTI LD-SUCEED-1007 Version 1.0 Page 42 of 55 APPENDIX 1 PHOTOGRAPHS OF TEST SETUP
Contact Information
Applicant
Jiansheng Cao(Product Certification Manager)
Technical Contact
Test Firm
CENTRE TESTING INTERNATIONAL (SUZHOU) CO., LTD.Coco Liu
[email protected]0512-50158288
Technical Specifications
| # | Rule Parts | Frequency Range | Power Output |
|---|---|---|---|
| 1 | 15C | 5.73 GHz - 5.80 GHz | - |
Other Applications from Powervision Tech Inc.
2AKBMPVS10
Jul 25, 2021PowerVision S1
Equipment Class
DCD - Part 15 Low Power Transmitter Below 1705 kHz