A3LDIRECTVDIRECTV DVR
Samsung Electronics Co Ltd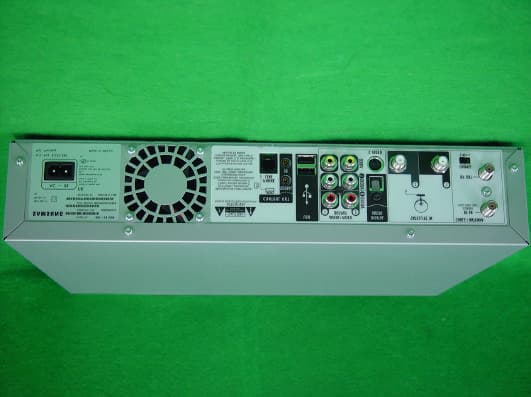
Click to zoom
Application Details
- Equipment Class
- HID - Part 15 TV Interface Device
- Date of Grant
- Aug 13, 2003
- Application Purpose
- Original Equipment
- Date of Application
- Aug 13, 2003
- Equipment Note
- DIRECTV DVR
- Frequency Range
- 67.75000000 - 71.75000000
- Company
- Samsung Electronics Co Ltd
- Country
- United States
Documents & Files
Document Text
Text extracted from the exhibit documents filed with the FCC. Open a document above to read the original.
Users Manual
1 0 2 3 7 9 8 4 6 5 R e c o r d M u t e I n f o W i n d o w L i v e T V E x i t P a g e Vol Chan S l o w S e l e c t TVSAT C l e a r T V P o w e r T V I n p u t E n t e r / L a s t ( ) - DIREC TV P l a y G u i d e L i s t DIREC TV Pr ess the DIRECTV b utton once to go to DIRECTV C entral, or twic e to go to the Now Playin g List. LIST brings you directly t o the Now Playin g List. Pr ess FWD (fast f or war d) and BACK (rewind) up to 3 times f or 3 speeds. Press them a fourth time to resume normal p lay. INSTANT REPLAY r eplays the last 8 seconds of a program. Pr ess CLEAR to delet e a title in a list (like the Now Playin g list) or to clear things that aren’t p ar t of the program you’re wat ching (like the channel b anner and stat us b ar). INFO brings up the channel b anner. Press the RIGHT arrow to swit ch among three ver sions of the banner, each with a differ ent amount of information. CHAN UP/DOWN does more than change the channel—it also pages up or down through lists of programs or menu items. Hints & Shortcut s DIRECTV B utton Window Arrow Buttons Exit Li st Select Thumbs Down Mut e Volume Pl ay Pause Back (r ewind) Slow In stant R eplay Number Buttons Clear Remote Active Light Live TV Info Guide Thumbs U p Chan Up/Down Recor d Fast F or war d Advance SAT/TV Swit ch Enter/Last TV P owerTV Input Pr ess GUIDE to see the DIRECTV Advanced Program Guide™, then pr ess INFO (while the guide is visib le) to see Guide Options and change the day or time, or show only a cat egor y of programs. EXIT clear s all menus and goes t o the last c hannel or recor ded pr ogram you wer e wat ching. If you press it while you are wat ching a program, it c lear s things that aren't p ar t of the pr ogram (like the channel b anner and stat us b ar). ADVANCE moves you quickly through saved programming. Press it while you are fast f or war ding or rewinding to jump to the next tick mark on the stat us b ar . When you’re wat ching “behind” live TV (f or example, if you paused live TV and lat er resumed wat ching from the paused spot), ADVANCE cat ches you up to the live broadcast. In a recor ded program, press it once to jump to the end of the pr ogram, then again to jump to the beginning. If you program your remote control (as e xplained in chapter seven), the TV POWER, VOLUME, MUTE, and TV INPUT buttons c an control your TV and A/V equipment. The SAT/TV Swit ch sets the remote control t o send channel changing signal s t o either the DVR (SAT) or the tel evision (TV). Many of the remote control’s b uttons are disabled when this swit ch is set t o TV (for example, SLOW, FAST FORWARD and PAUSE), so if your remote control doesn’t seem to be workin g, check t o make sur e this swit ch is set t o SAT. The WINDOW b utton is f or fut ur e use. In serting Batteries in the Remote Control Hold the remote with the batter y door facin g you. Place your thumb in the depression of the door and slide the door towar ds you. In sert two AA batteries (supplied). Be sur e to mat ch the + and - marks on the batteries t o the + and - marks in the compar tment. Replace the batter y door by s liding it b ack into the case with the tabs t owar ds the rear of the compar tment. You’ll hear a click when it’s secur ely b ack in place. To use the DIRECTV ® D VR's on-screen menus: Use the remote control’s arrow buttons t o move the highlight b ar onto the option you want, then press SELECT. The LEFT arrow button often takes you to a previous s creen. S e l e c t Select Arrow Buttons Two Types of On-Screen Arrows The On-Screen Menus and the Remote Control The arrows that appear beside or near the highlight bar show possib le directions. For example: on this screen, you could press the RIGHT arrow to highlight Options or the DOWN arrow to highlight E dit Keywor d WishList. Highlight B ar Arrows Near Highlight B ar When you see page up or page down arrows at the top or bottom of the screen (or a list), pr ess the CHAN UP/DOWN button to jump to more items an entire page at a time. Page Up Arrow Page Down Arrow Chan Up/Down Button P a g e Chan Welcome to DIRECTV ii SDOC-00072-501 Rev. A AH68-01335A SAMSUNG ELECTRONICS AMERICA, INC. HEADQUARTERS 105 Challenger Road, Ridgefield Park, NJ 07660-0511 TEL : 1-800-SAMSUNG SERVICE DIVISION 400 Valley Road, Suite 201, Mount Arlington, NJ 07856 1-800-SAMSUNG(1-800-726-7864) www.SAMSUNGUSA.com DIRECTV and the Cyclone Design logo, DIRECTV SPORTS THIS WEEK, and Advanced Program Guide are trademarks of DIRECT V, Inc., a unit of Hughes Electronics Corp., and are used with permission. All rights reserved. DIRECTV, 2230 East Imperial Hwy., El Segundo, CA 90245. TiVo and the TiVo logo are a registered tradem arks of TiVo Inc. The Instant Replay logo, the Jump logo, TiVolution Magazine, Season Pass, WishList, Overtime Scheduler, the Thumbs Down logo and text, the Thumbs Up logo and text, TiVo and Line Design (smile) are trademarks of TiVo Inc. 1999, 2000. All rights reserved. TiVo Inc., 2160 Gold Street, P. O. Box 2160, Alviso, CA 95002-2160. Manufactured under license from Dolby Laboratories. “Dolby” and the double-D symbol are trademarks of Dolby Laboratories. All other trademarks are the properties of their respective owners. © 1999, 2002 by TiVo Inc. Reproducti on in whole or in part without written permission is prohibited. iii Welcome to the DIRECTV family!DIRECTV offers you more Hollywood hits, classic movies, family programming, news, and a wide range of exciting spor ts action. Plus access to 36 co mmercial-free audio channels. And that’s only the beginning.More Choices than ever before.With access to over 225 channels, it’s eas y to see why DIRECTV has become the entertainment choice for millions of American families. And it’s all digitally delivered, so you get digital-quality sound and razor-shar p picture every time you turn on your TV! DIRECTV ® Pay Per View movies and events. With DIRECTV service, the main event is at your house! You’ll have access to great movies, exclusive special live spor…
Text truncated - open the document above for the full version.
Users Manual
30 Chapter 2 Guided Setup Phone SetupPress the DIRECTV button on your remote control to start Phone Setup.Final Steps . The last step of Guided Setup, Phone Setup, begins automatically the first time you press the DIRECTV button on your remote control. The DIRECTV DVR should be connected to a telephone line. The DVR occasionally makes a brief phone call to get updates to the DVR service and Showcases, and for pay per view functionality. By default, the DVR will not pick up the phone if the line is busy. If you pick up the phone while the DVR is using the line, the DVR’s modem will disconnect. To use the phone line you should hang up, wait at least 45 seconds, then pick up the phone again to get a dial tone.DVR Service Terms . This screen appears after the Final Steps screen. The DIRECTV Service Agreement is printed on your fi rst monthly statement from DIRECTV. We encourage you to read it.Area Code . The DVR service uses your area code to determine which local dial-in numbers are available. If you make a mistake, press LEFT arrow to correct it.Phone Dialing Options . Most people will not need to change the settings the DVR uses to dial out. However, if your phone system us es special dialing options, select “Yes.” See “Phone Dialing Options” on page 102 for help with the various settings.Update Dial-In Numbers . The DVR makes a toll-free call to get a list of local dial-in numbers. The call usually takes less than five minutes, and its status displays on the screen. If the call fails, check the Troubleshoo ting chapter of this guide, on page 132. Dial-In Numbers . The DVR uses the dial-in number you select from the list on this screen to make its daily calls to the DVR service. The list may be too long to fit on one screen. To see more numbers, press CHAN DOWN. 31 2 Phone Setup No Local Numbers . If you chose a local dial-in number, you will not see this screen. If you selected “None of the Above” on the Dial-In Nu mbers screen, select “Request 800 number authorization” here. Selecting this option te mporarily selects the toll-free number and submits a request to use the toll-free number. It is the current policy of DIRECTV to allow you to use the toll-free number if th ere are no local numbers available. Dialing Format . Choose the dialing format you n eed. For example, should the dial-in number be preceded by your ar ea code, and should a “1” precede the area code? In some areas, even local numbers must be dialed using the area code. Test Phone Connection Call . This screen appears while the DVR tests the phone dialing options and local dial-in number you have chosen. You should see a message that says “Test Successful!” Press SELECT or the RIGHT ar row to continue. If the phone test does not succeed, you may need to pi ck a different dial-in numb er, or change the dialing format. Use the LEFT arrow to go back to pr evious screens and make changes to dialing options.Congratulations! You’ve completed Guided Setup. You can now press the DIRECTV Button on your remote control to go to DIRECTV Central. Care of Your DIRECTV DVR . Your DVR should remain connected to your satellite dish antenna and plugged in to a live power source and a phone line at all times. This lets it record programs and make phone calls to keep its data up-to-date. Moving Your DVR . If you take your DVR with you to a location without satellite access— for example, on a weekend get-away to a mountain cabin—you will still be able to connect it to a television and watch programs saved in the Now Playing List. After completing Guided Setup one time, whenever you unplug the DVR and plug it back in, it will search for a satellite signal. When you see the message “Acquiring Satellite If your DVR is ha ving difficulty dialing out, try the following: Press LEFT arrow until you return to the Phone Dialing Option s screen. Select Set Dial Prefix, and enter the dialing prefix “,#034” (comma, pound, zero, three, four). Use the PAUSE button to enter a comma, and the ENTER button to enter a pound. This command sets the DVR’s modem to a slower speed, which helps phone calls succeed in some environments. The DVR does not dial the prefix as part of the number. 32 Chapter 2 Guided Setup Information,” you can press th e DIRECTV button on the remote control to go directly to DIRECTV Central. From DIRECTV Central, programs in your DVR’s Now Playing List are always available. If you start your DVR without properly connecting it to a DIRECTV satellite television signal, the DVR will not show live TV or provide any live TV functions.Your DVR should NOT be used with any digital PBX phone system. Doing so may permanently damage your DVR’s modem and will void your warranty. Digital PBX phone systems allow many phon es to share a single telephone number and are usually used in hotels and offices. If you are instal ling the DVR in your home, it is unlikely you are using a digital PBX phone system.Next Up, the 5 Tours . Now that you are finished with Guided Setup, you’re ready to have fun with your DVR! We suggest you start w ith the five short tours provided in “The Basics in 5 Short Tours” on page 33. These will guide you through the basics and show you some fun features of the DIRECTV DVR. C HAPTER 3 The Basics in 5 Short Tours Tour 1: Play with Live TV 34 Tour 2: DIRECTV Advanced Program Guide™ 36 Tour 3: Find and Record Your Favorite Programs 38 Tour 4: Search for New Programs 40 Tour 5: Now Playing List 42 Cool Things You Can Do 43 34 Chapter 3 The Basics in 5 Short Tours Tour 1: Play with Live TVIn this tour, you’ll take a look at how you can control live TV. So grab your remote!First, press the PAUSE button—the progr am you’re watching pauses. Now you can stand up and stretch, or go to the kitchen an d get a snack. You can pause live TV for up to 30 minutes! With Dual Tuner, you can switch between two channels in live TV without losing the saved portion of either one.But for now, press PLAY and the program resumes. Next, press BACK and the…
Text truncated - open the document above for the full version.
Users Manual
80 Chapter 5 Finding and Recording Programs When there is empty space in the Now Playing List, the DVR service may record TiVo Suggestions for you. Suggestions are marked in the Now Playing List with a TiVo icon ( ). The DVR never deletes a program you requested to make room for a suggestion. Instead, suggestions are deleted to make room for recordings you schedule. A preference that prevents TiVo Suggestions from record ing automatically is described on page 97. TiVo Suggestions that have been recorded once will not record again for at least 28 days. ShowcasesLooking for the biggest shows on TV? Showcases are your shortcut to the most exciting events and the best movies. Whether you’re lo oking for a hit comedy or want to get the most from your subscription to the premiu m channels, Showcases offer you a quick, interactive way to get what you want. You’ll always find something fun and unusual in the TiVolution Magazine Show case. Showcases are updated several times weekly during the DVR’s daily phone call.To explore Showcases and schedule recordings:1. Press the DIRECTV button to see DIRECTV Central. 2. Select Showcases. A collec tion of Showcases appears. 3. All of the showcases may not fit on the screen. You can use the CHAN DOWN button to see showcases that are not visible at first. Each showcase is represented by a graphic. A white box appears around the highlighted showcase and a graphic displays at the top of the screen. Use the navigati on buttons, RIGHT, LEFT, UP and DOWN, to highlight the showcase you want and then press SELECT. A list of themes in that Showcase appears. DIRECTV Central Showcases 81 5 Help Me Find New Programs 4. Use the CHAN DOWN button to see themes that are not visible at first. When you highlight a theme, a short description of it appears at the top of the screen. Select a theme. A list of programs appears. 5. You can use the CHAN DOWN button to see pr ograms that are not visible at first. When you highlight a program, a short description of it appears at the top of the screen. Select a program to see its Program Information sc reen. If the channel that carries the program is included in your “Channels you Receive” list, you can schedule a recording from the Prog ram Information screen. DIRECTV Central Showcases 82 Chapter 5 Finding and Recording Programs C HAPTER 6 Messages and Setup Messages from DIRECTV 84 Purchases 85 My Preferences 89 Recorder & Phone Setup 99 System Information 106 Troubleshooting 107 Restart or Reset System 108 84 Chapter 6 Messages and Setup Messages from DIRECTVFrom time to time DIRECTV may send you me ssages about updates to your service and other important notices. Thes e messages are important, useful and easy to get to—we made them that way because we really want you to read them. When you receive a new message, a message icon ( ) appears on the channel banner and in DIRECTV Central. To read a message:1. From DIRECTV Central, select “Messages and Setup.”2. Select “Messages.”3. Select the message you want to read. Use the CHAN DOWN button to see text that does not fit on the screen. When you are finished reading a message, sel ect “Done” or “Delete Message.” Selecting the message icon in the channel banner will take you to your list of messages. The message list will display No Messages if there are no messages to read. DIRECTV Central Messages and Setup 85 6 Purchases PurchasesTo see the Purchases screen, first press the DIRECTV Button, then Messages and Setup, then select “Purchases.” The Purchases screen displays a list of all pay per view programs you have purchased, along with their date and time. Each program in the list is also marked either “Upcoming,” “Purchas ed,” “Canceled,” or “Unviewed.” • Upcoming. These programs are scheduled to be pur chased but have not aired yet. You have not yet been charged for them. You can cancel upcoming purchases by selecting them. The Purchase Info screen, described below, will appear. • Purchased. These programs have been view ed. You were charged for them. • Canceled. Purchase of these programs was cancel ed before the programs aired. You were not charged for them. • Unviewed. These programs were scheduled to be purchased but were not viewed and not recorded. You were not charged for them. Purchase Info. The Purchase Info screen shows a selected pay per view event’s date, time, channel and purchase pr ice. You can cancel upcoming purchases on this screen. Canceling a scheduled pay per view recordin g in another place—for example, the To Do List—does not cancel the purchase. You must cancel the purchase from the Purchases screen. To see Purchase Info, highlight a program and press SELECT. To cancel an upcoming purchase:• On the Purchases screen, highlight an upcoming purchase and press SELECT. The Purchase Info screen appears. • Select “Cancel this purchase.” A confirmation screen appears. DIRECTV Central Messages and Setup Purchases 86 Chapter 6 Messages and Setup • Press SELECT. The purchase is canceled. Y ou return to the Purchases screen. If you cancel a purchase that is scheduled to record, the recording is also canceled. Pay Per ViewYour DIRECTV ® DVR makes buying and recording pay per view events a snap. You can order them when they are prom oted on live TV, or during a search for programs. You can order them to watch, or to be recorded. And the whole transaction can be handled using your remote control.The Purchases screen keeps a record of all your pay per view purchases. You can also go to the Purchases screen to cancel purchases of pay per view events that have not yet aired. Ordering from live TV. While watching live TV, you may see a promotion for a pay per view event, including instructions to press SELECT for ordering information. If you press SELECT, you will see the Program In formation screen for pay per view. If the promotion happens when you are not caught up to live TV, a small message that says “Press Select” and “Next Showing” will appear. If you press SELECT, you…
Text truncated - open the document above for the full version.
Users Manual
123 8 Questions About Live TV (Including Satellite Signal) When I power on my TV, I see the messa ge “Searching for satellite signal....” Your DVR is having trouble tuning to the chan nel you are on. Follow these steps to restore the video:• Try changing channels. If you see the sa me message on every channel, your video cable may have come loose. Check to make sure all the cable conn ections on the back of your DVR are secure. • If multiple channel changes do not work, try restarting your DVR. From DIRECTV Central, choose “Messages & Setup,” then “R estart or Reset System,” then “Restart the Recorder.” Follow the instructions on the screen to restart the DVR. • In unusual circumstances, stormy weather ma y interfere with your satellite signal. If this is the case, the signal should return when the weather changes. • Try replacing your video cables to determine if one of your cables is bad. • The position of your satellite dish antenn a may have changed and you may have to re- position it. Professional installers are available in most areas to position satellite dishes. You can also find positioning information by repeating Satellite Dish Guided Setup, available by pressing the DIRECTV button, then selecting “Messages & Setup” and then “Recorder & Phone Setup.” • There may be an obstruction (for example, trees) between the satellite dish antenna and the sky. If this is the case, you may ha ve to change the position of your satellite dish antenna. The channel I want to watch has the message “This program is not available in your area,” and the image is blacked out.• Some sports events may be blacked out in ar eas that are considered local areas for the events. 124 Chapter 8 Troubleshooting The audio and video are out of sync.• Try changing channels. • Press the PAUSE button on the remote control, then press BACK to move back a frame or two, then press PA USE again to resume play. • Press the DIRECTV button; then press the LIVE TV button to return to live television. • Restart your DVR. From Messages & Setup select “Restart or Reset System,” then “Restart the Recorder.” You will see the Welcome screen and the system will restart within about 45 seconds. My DVR was working, but now the picture does not move. • First, press PLAY to be sure the video is not paused. • Try to restart your DVR. From Messages & Setup select “Restart or Reset System,” then “Restart the Recorder.” You will s ee the Welcome screen and the system will restart within about 45 seconds. I don’t get a picture now, even though I have been able to get one in the past. • Any time you have a problem with your system, you can run a system test. To run the test, from Messages & Setup, select “Syste m Test.” The system test checks the DVR’s signal, tuning, access card and phone connection. • You may be able to fix the problem your self. Try restarting the DVR: From Messages & Setup select “Restart or Reset System,” th en “Restart the Record er.” If you cannot fix the problem, call DIRECTV Customer Care at 1-800-DIRECTV (1-800-347-3288). 125 8 Questions About Pick Programs to Record Questions About Pick Programs to RecordThere are very few or no shows listed when I press GUIDE or look for programs to record. I can’t find my program in th e listings, although I know it's on. • Your DVR may not have all its program guide data yet. When you first begin to use your DVR, it begins to download guide info rmation from the DIRECTV satellites. It takes a day or two before complete information (up to 14 days) is available for you to use. If you cannot find a specific show that you know is on, information for that show may not have been downloaded and indexed yet. Wait a few hours and then try to find your program again. • The guide may be using a channel list that does not include the channel you are looking for. You can change th e channels in a channel list , and change the channel list that the guide uses. See page 36. What do the different icons on th e Now Playing List screen mean? • For a description of each icon’s meaning, s ee the Glossary of Icons on the inside back cover of this guide. Can I record multiple programs simultaneously?• It depends on how many satellite Inputs you have connected to your DVR. With one input, you can only record one program at a time. With two inputs, you can utilize the dual tuner and record 2 programs at the same time, or record one program while watching another. 126 Chapter 8 Troubleshooting Can I recover a recorded program that was deleted?How can I save a program longer?• Unfortunately, there is no way to bring back a program that has been deleted from the Now Playing List. You can, however, choose to save programs longer. From the Now Playing List, highlight the program you wi sh to save longer and press SELECT to display the Program Information screen. Here you can choose “Save until I delete,” or choose “Save Until...” to set the number of days before a program may be deleted. • Be sure also that you pay attention to co nflicts. You may choose not to approve any conflict that says it will delete a program sooner than you want. • If the program was a Season Pass, you may have too many Season Pass items. In order to accommodate all of your Season Pass requ ests, programs may occasionally be saved for as little as one day. Try deleting some Season Pass requests. • You can archive special recordings to a videotape to preserve them longer. From the Program Information screen, choos e “Save to VCR.” See page 66. How do I check the upcoming programs that I’ve scheduled to record?• From the DIRECTV Central screen, select “Pick Programs to Reco rd.” From there, select the To Do List. How do I cancel a recording?• If you change the channel while a program is recording, you will be given the option to cancel the recording. • To cancel a scheduled recording: In the To Do List, highlight the program and press the “Clear” button. 127 8 Questions About Pick Programs to Record What happens if a sports event I…
Text truncated - open the document above for the full version.
External Photos
SIR-S4120R PHOTOGRAPHS Top View Bottom View SIR-S4120R PHOTOGRAPHS Front View Rear View
ID Label/Location Info
FCC ID SAMPLE LABEL & LOCATION LABELLING REQUIREMENTS PER §§ 2.925 & §§ 15.19 The Label shown shall be permanently affixed at a conspicuous location on the device and be readily visible to the user at the time of purchase. (SEE NEXT PAGE)
Internal Photos
SIR-S4120R PHOTOGRAPHS Top View (Top cover open) Main Board Top View SIR-S4120R PHOTOGRAPHS Main Board Bottom View
Test Report
Project No. : LBE031621 Page 1 of 23 Project No. :LBE031621 Product :DIRECTV DVR Model No. :SIR-S4120R Date of test :July 23 ~ August 08, 2003 Issued Date :August 08, 2003 Tested by: Kyung Chul , Min / Test Engineer Reviewed by: No Cheon, PARK / Test Engineer Authorized by: Kyu Baek, CHUNG / Chief of EMC Lab. SAMSUNG ELECTRONICS Co., Ltd. EMC Test Laboratory 416 Maetan-3 Dong, Paldal-Ku, Suwon City, Kyungki-Do, Korea,442-742 Tel. : 81-31-200-2185 Fax. : 81-31-200-2189 This reports shall not be reproduced except in full, without the written approval of SEC EMC Testing laboratory. EMC TEST REPORT Project No. : LBE031621 Page 2 of 23 Table of Contents 1. Introduction & Summary 1.1 Description of the EUT 1.2 Test facility 1.3 Test mode 1.4 Measuring instrument setup 1.5 Test rule and Procedure 1.6 Test Summary 2. Test Results 2.1 RADIATED EMISSION MEASUREMENT 2.2 AC POWERLINE CONDUCTED EMISSION MEASUREMENT 2.3 OUTPUT SIGNAL LEVEL MEASUREMENT 2.4 OUTPUT TERMINAL CONDUCTED SPURIOUS EMISSION MEASUREMENT 2.5 ANTENNA TRANSFER SWITCH ISOLATION MEASUREMENT 3. Test Equipment 3.1 Test Equipment List This reports shall not be reproduced except in full, without the written approval of SEC EMC Testing laboratory. Project No. : LBE031621 Page 3 of 23 1. Introduction & Summary 1.1 Description of the EUT Applicant Project Number Equipment Under Test Trade Name Model Number Variant Model Type of RF Output Connector FCC ID Number CH.3 CH.4 Mains input LNB Input 1.2 Test facility The EMI/EMS measurement facilities used to collect the tested data are located at 416 Maetan 3 Dong, Paldal-Ku, Suwon City, Kyungki Do, Korea. The sites are constructed in conformance with the requirements of ANSI C63.4 and CISPR 16-1 & 16-2. SAMSUNG Electronics Co.,Ltd is accredited by Korea Laboratory Accreditation Scheme(KOLAS) which signed the International Laboratory Accreditation Cooperation (ILAC) Mutual Recognition Arrangement (MRA) for the above test item(s) and test method(s). Measured in Semi-anechoic chamber #1 that is FCC Registration Number 98856. This reports shall not be reproduced except in full, without the written approval of SEC EMC Testing laboratory. LNB Input 950 ~ 2150MHz (75 Ohm Unbalanced) None SAMSUNG SAMSUNG ELECTRONICS Co., Ltd. LBE031621 DIRECTV DVR SIR-S4120R Operating(RF Modulator) Frequency Type "F" Connector 75ohm(Unbalanced) A3LDIRECTV AC 100 ~ 120V, 50/60Hz Visual Carrier 61.25MHz Aural Carrier 65.75MHz Visual Carrier 67.25MHz Aural Carrier 71.75MHz Project No. : LBE031621 Page 4 of 23 1.3 Test mode The EUT was tested in the following operating modes(at both channel 3 and 4) for the tests mention in this report: HDD Play + Time Shift Recording According to the requirements in Subpart B of Part 15, the measurement is made at each function of the EUT being connected with appropriate cables and peripherals. This model has video/audio output terminals in RCA-type plugs, LNB antenna input, TV antenna input and RF output terminal. The LNB input of the EUT was connected to a digital stream system directly. 1.4 Measuring instrument setup The explanation of measuring instrument setup when respective function is used in any frequency band is as following: Frequency Band InstrumentDetectorResolutionVideo [MHz]functionBandwidthBandwidth Spectrum analyzerPeak 100kHz (1MHz) 1MHz EMI Test receiverQuasi-Peak120kHz- Above 1000EMI Test receiverAverage1MHz- This reports shall not be reproduced except in full, without the written approval of SEC EMC Testing laboratory. 30 to 1000 Project No. : LBE031621 Page 5 of 23 1.5 Test rule and Procedure FCC Rule Part 15, Subpart B : Unintentional Radiators TV Interface Devices. Test Procedure : ANSI C63.4-1992 1.6 Test Summary Result Pass Pass Pass Pass Pass * N/A : Test not applicable This reports shall not be reproduced except in full, without the written approval of SEC EMC Testing laboratory. Test item OUTPUT TERMINAL CONDUCTED SPURIOUS EMISSION ANTENNA TRANSFER SWITCH ISOLATION AC POWERLINE CONDUCTED EMISSION RADIATED EMISSION OUTPUT SIGNAL LEVEL ANSI C63.4-1992 ANSI C63.4-1992 Applied Standards ANSI C63.4-1992 ANSI C63.4-1992 ANSI C63.4-1992 Project No. : LBE031621 Page 6 of 23 2. Test Results 2.1 RADIATED EMISSION MEASUREMENT 2.1.1 Test Procedure Configurate the EUT System in accordance with ANSI C63.4-1992section 8 and 12.2. Power cords for the EUT System are connected the receptacle on the ground plane. The output ports are connected to the cable provided with the device and the ending port of the cable are terminated in the proper impedance. To find out the maximum emission, change the position of the cable, and the EUT operation mode under normal usage of the EUT. The spectrum analyzer are scanned from 30MHz to 2000MHz in channel 3 and 4. 2.1.2 Setup Photograph This reports shall not be reproduced except in full, without the written approval of SEC EMC Testing laboratory. Project No. : LBE031621 Page 7 of 23 2.1.3 Test Results EUT Mode : HDD Play + Time Shift RecordingModulator CH : CH3 This reports shall not be reproduced except in full, without the written approval of SEC EMC Testing laboratory. Project No. : LBE031621 Page 8 of 23 EUT Mode : HDD Play + Time Shift RecordingModulator CH : CH3 Frequency Range : 30 ~ 1000MHz Frequency Range : 1000 ~ 2000MHz This reports shall not be reproduced except in full, without the written approval of SEC EMC Testing laboratory. Project No. : LBE031621 Page 9 of 23 EUT Mode : HDD Play + Time Shift RecordingModulator CH : CH4 This reports shall not be reproduced except in full, without the written a…
Text truncated - open the document above for the full version.
Contact Information
Applicant
Jenni Chun(General Manager)
Technical Contact
PCTEST Engineering Lab., Inc.Randy Ortanez
[email protected]410-290-6652
6660-B Dobbin Road · Columbia, Maryland · United States
Test Firm
SAMSUNG ELECTRONICS CO., LTD.No Cheon Park
Technical Specifications
| # | Rule Parts | Frequency Range | Power Output |
|---|---|---|---|
| 2 | 15B | 67.75 MHz - 71.75 MHz | - |
Other Applications from Samsung Electronics Co Ltd
A3LSMS741B
Aug 05, 2026Portable Handset
Equipment Class
6VL - 15E 6 GHZ Very Low Power DeviceA3LSMX940
Jul 31, 2026BT,BLE Tablet DTS,UNII a,b,g,n,ac,ax,be and digitizer
Equipment Class
DTS - Digital Transmission SystemA3LSMS741U
Jul 30, 2026Portable Handset
Equipment Class
6CD - 15E 6 GHz Low Power Dual ClientA3LSMX840
Jul 27, 2026BT,BLE Tablet DTS,UNII a,b,g,n,ac,ax and Digitizer
Equipment Class
DSS - Part 15 Spread Spectrum TransmitterA3LSMX848U
Jul 27, 2026WCDMA, LTE, 5G NR Tablet BT,BLE, DTS,UNII a b g n ac ax and Digitizer
Equipment Class
JBP - Part 15 Class B Computing Device Peripheral