A3LS900Notebook PC
Samsung Electronics Co Ltd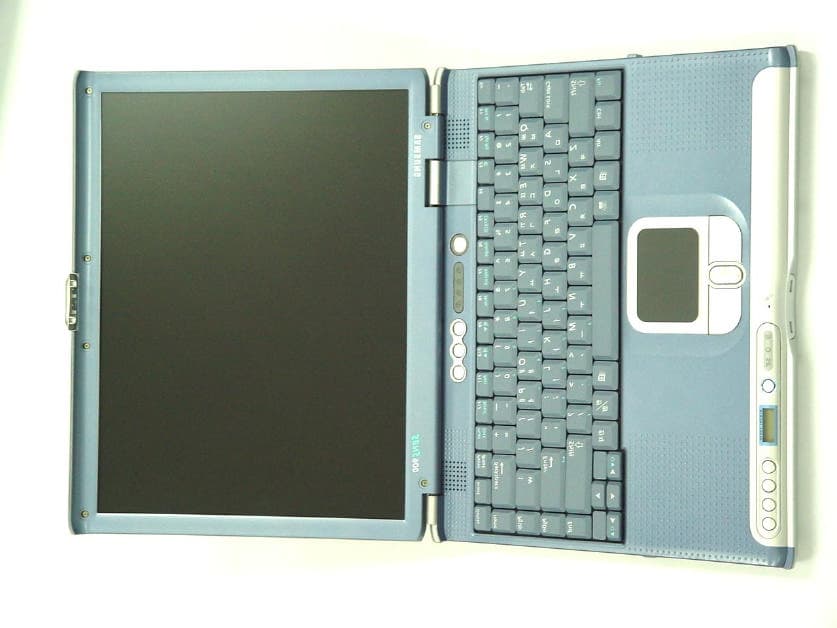
Click to zoom
Application Details
- Equipment Class
- JBC - Part 15 Class B Computing Device/Personal Computer
- Date of Grant
- Sep 25, 2001
- Application Purpose
- Original Equipment
- Date of Application
- Sep 25, 2001
- Equipment Note
- Notebook PC
- Company
- Samsung Electronics Co Ltd
- Country
- United States
Documents & Files
Document Text
Text extracted from the exhibit documents filed with the FCC. Open a document above to read the original.
Users Manual
Notices i Notices No part of this publication may be reproduced, stored in a retrieval system, or transmitted, in any form or by any means, mechanical photocopying, recording or otherwise, without the prior written permission of the manufacturer. The information within this manual is subject to change without notice. The manufacturer shall not be held liable for technical or editorial errors or omissions contained in herein; nor for incidental or consequential damages resulting from the furnishing, performance or use of this material. Microsoft Windows is a registered trademark of the Microsoft Corporation. Product names mentioned herein are for identification purposes only, and may be trademarks and/or registered trademarks of their respective companies. Macrovision Statement If your computer has a DVD drive and an analog TV Out port, the following paragraph applies: This product incorporates copyright protection technology that is protected by method claims of certain U.S. patents and other intellectual property rights owned by Macrovision Corporation and other rights owners. Use of this copyright protection technology must be authorized by Macrovision Corporation, and is intended for home and other limited viewing uses only unless otherwise authorized by Macrovision Corporation. Reverse engineering or disassembly is prohibited. Copyright2001 All rights are reserved Maverick Plus - Notices & Safety - English.fm Page i Friday,August 17,2001 10:21 AM ii Users Manual Important Safety Information Safety Instructions Your system is designed and tested to meet the latest standards for safety of information technology equipment. However, to ensure safe use of this product, it is important that the safety instructions marked on the product and in the documentation are followed. Always follow these instructions to help guard against personal injury and damage to your system. i Setting Up your System • Read and follow all instructions marked on the product and in the documentation before you operateyour system. Retain all safety andoperating instructions for future use. • Do not use this product nearwater or a heat sourcesuch as a radiator. • Set up the system on a stable work surface. • The product should be operated only with the type of power source indicated on the rating label. • Ensure that the electrical outlet you are using to power your equipment is easily accessible in case of fire or short circuit. • If your computer has a voltage selector switch, make sure that the switch is in the proper position for your area. • Openings in the computer case are provided for ventilation. Do not block or cover these openings. Make sure you provide adequate space, at least 6 inches (15 cm), around the system for ventilation when you set up your work area. Never insert objects of any kind into the computer ventilation openings. • Ensure that the fan vents on the bottom of the casing are clear at all times. Do not place the computer on a soft surface, doing so will block the bottom vents. • The computer product is equipped with a three-wire power cord to make sure that the product is properly grounded when in use. The plug on this cord will fit only into a grounding-type outlet. This is a safety feature. If you are unable to insert the plug into an outlet, contact an electrician to install the appropriate outlet. Maverick Plus - Notices & Safety - English.fm Page ii Friday,August 17,2001 10:21 AM Important Safety Information iii • If you use an extension cord with this system, make sure that the total ampere rating on the productsplugged into the extension cord does not exceed the extension cord ampere rating. Care During Use • Do not walk on the power cord or allow anything to rest on it. • Do not spill anything on the system. The best way to avoid spills is to not eat or drink near your system. • Some products have a replaceable CMOS battery on the system board. There is a danger of explosion if the CMOS battery is replaced incorrectly. Replace the battery with the same or equivalent type recommended by the manufacturer. Dispose of batteries according to the manufacturer’s instructions. If the CMOS battery requires replacement insure that a qualified technician performs the task • When the computer is turned off, a small amount of electrical current still flows through the computer. To avoid electrical shock, always unplug all power cables, remove the battery and modem cables from the wall outlets before cleaning the system. • Unplug the system from the wall outlet and refer servicing to qualified personnel if: – The power cord or plug is damaged. – Liquid has been spilled into the system. – The system does not operate properly when the operating instructions are followed. – The system was dropped or the casing is damaged. – The system performance changes. Replacement Parts and Accessories Use only replacement parts and accessories recommended by manufacturer. To reduce the risk of fire, use only No. 26 AWG or larger telecommunications line cord. Do not use this product in areas classified as hazardous. Such areas include patient care areas of medical and dental facilities, oxygen rich environments, or industrial areas. Maverick Plus - Notices & Safety - English.fm Page iii Friday, August 17,2001 10:21 AM iv Users Manual Battery Disposal Do not put rechargeable batteries or products powered by non-removable rechargeable batteries in the garbage. Contact the Samsung Helpline for information on how to dispose of batteries that you cannot use or recharge any longer. Follow all local regulations when disposing of old batteries. Maverick Plus - Notices & Safety - English.fm Page iv Friday, August 17, 200110:21 AM Federal Communications Commission (FCC) v Federal Communications Commission (FCC) This device complies with Part 15 of the FCC Rules. Operation is subject to the following two conditions:(1) this device may not cause harmful interference, and (2) this device must accept any interference received…
Text truncated - open the document above for the full version.
Users Manual
Notices i Notices No part of this publication may be reproduced, stored in a retrieval system, or transmitted, in any form or by any means, mechanical photocopying, recording or otherwise, without the prior written permission of the manufacturer. The information within this manual is subject to change without notice. The manufacturer shall not be held liable for technical or editorial errors or omissions contained in herein; nor for incidental or consequential damages resulting from the furnishing, performance or use of this material. Microsoft Windows is a registered trademark of the Microsoft Corporation. Product names mentioned herein are for identification purposes only, and may be trademarks and/or registered trademarks of their respective companies. Macrovision Statement If your computer has a DVD drive and an analog TV Out port, the following paragraph applies: This product incorporates copyright protection technology that is protected by method claims of certain U.S. patents and other intellectual property rights owned by Macrovision Corporation and other rights owners. Use of this copyright protection technology must be authorized by Macrovision Corporation, and is intended for home and other limited viewing uses only unless otherwise authorized by Macrovision Corporation. Reverse engineering or disassembly is prohibited. Copyright2001 All rights are reserved Maverick Plus - Notices & Safety - English.fm Page i Friday,August 17,2001 10:21 AM ii Users Manual Important Safety Information Safety Instructions Your system is designed and tested to meet the latest standards for safety of information technology equipment. However, to ensure safe use of this product, it is important that the safety instructions marked on the product and in the documentation are followed. Always follow these instructions to help guard against personal injury and damage to your system. i Setting Up your System • Read and follow all instructions marked on the product and in the documentation before you operateyour system. Retain all safety andoperating instructions for future use. • Do not use this product nearwater or a heat sourcesuch as a radiator. • Set up the system on a stable work surface. • The product should be operated only with the type of power source indicated on the rating label. • Ensure that the electrical outlet you are using to power your equipment is easily accessible in case of fire or short circuit. • If your computer has a voltage selector switch, make sure that the switch is in the proper position for your area. • Openings in the computer case are provided for ventilation. Do not block or cover these openings. Make sure you provide adequate space, at least 6 inches (15 cm), around the system for ventilation when you set up your work area. Never insert objects of any kind into the computer ventilation openings. • Ensure that the fan vents on the bottom of the casing are clear at all times. Do not place the computer on a soft surface, doing so will block the bottom vents. • The computer product is equipped with a three-wire power cord to make sure that the product is properly grounded when in use. The plug on this cord will fit only into a grounding-type outlet. This is a safety feature. If you are unable to insert the plug into an outlet, contact an electrician to install the appropriate outlet. Maverick Plus - Notices & Safety - English.fm Page ii Friday,August 17,2001 10:21 AM Important Safety Information iii • If you use an extension cord with this system, make sure that the total ampere rating on the productsplugged into the extension cord does not exceed the extension cord ampere rating. Care During Use • Do not walk on the power cord or allow anything to rest on it. • Do not spill anything on the system. The best way to avoid spills is to not eat or drink near your system. • Some products have a replaceable CMOS battery on the system board. There is a danger of explosion if the CMOS battery is replaced incorrectly. Replace the battery with the same or equivalent type recommended by the manufacturer. Dispose of batteries according to the manufacturer’s instructions. If the CMOS battery requires replacement insure that a qualified technician performs the task • When the computer is turned off, a small amount of electrical current still flows through the computer. To avoid electrical shock, always unplug all power cables, remove the battery and modem cables from the wall outlets before cleaning the system. • Unplug the system from the wall outlet and refer servicing to qualified personnel if: – The power cord or plug is damaged. – Liquid has been spilled into the system. – The system does not operate properly when the operating instructions are followed. – The system was dropped or the casing is damaged. – The system performance changes. Replacement Parts and Accessories Use only replacement parts and accessories recommended by manufacturer. To reduce the risk of fire, use only No. 26 AWG or larger telecommunications line cord. Do not use this product in areas classified as hazardous. Such areas include patient care areas of medical and dental facilities, oxygen rich environments, or industrial areas. Maverick Plus - Notices & Safety - English.fm Page iii Friday, August 17,2001 10:21 AM iv Users Manual Battery Disposal Do not put rechargeable batteries or products powered by non-removable rechargeable batteries in the garbage. Contact the Samsung Helpline for information on how to dispose of batteries that you cannot use or recharge any longer. Follow all local regulations when disposing of old batteries. Maverick Plus - Notices & Safety - English.fm Page iv Friday, August 17, 200110:21 AM Federal Communications Commission (FCC) v Federal Communications Commission (FCC) This device complies with Part 15 of the FCC Rules. Operation is subject to the following two conditions:(1) this device may not cause harmful interference, and (2) this device must accept any interference received…
Text truncated - open the document above for the full version.
Users Manual
Using Your Computer for the First Time 11 •Do not remove the memory-module compartment door, or try to install a memory module when the computer is on. (For information on installing memory modules, see “Installing a Memory Module” on page 68.) •Set up your computer work area to avoid physical strain. Sit with your back straight and supported by your chair. Adjust your chair or work table so that your arms and wrists can remain in a relaxed position, parallel with the floor. Avoid bending or twisting your wrists as you work. Your hands should “float” slightly above the keyboard. Refer to a book on office ergonomics for more information on setting up your work area. •Take frequent breaks from working at the computer to rest your eyes and stretch your muscles. •Remember to save your data files frequently and to make backup copies of your files. Travelling with Your Computer If you are travelling by air, follow these tips: •Take the computer with you as carry-on luggage. Do not check the computer with your baggage. •Allow the computer and disks to go through the X-ray security devices. Do not hand-carry disks through the walk-through metal detectors, which can cause loss of data. •Please collect your computer immediately after X-ray scanning, this is a high theft area for portable computers. •Make sure that the battery is charged or the power cord is easily accessible. You may be required to turn on the computer for airport security personnel. •Be prepared to turn off the computer during take off and landing. Locking your Computer As a precaution, when you are travelling or leaving your computer unattended, you should keep your computer as safe as possible. A way to do this is a Security Lock System. Follow the Security Lock System manufacturer’s instructions for specific installation and use. The figures below show generally how to use the security lock. Matrix II (Windows XP) - English.fm Page 11 Thursday, September 13, 2001 11:42 AM 12 Users Manual Make sure that the object you lock your computer to cannot be easily disassembled or broken, such as steel post or a secure part of a desk. Handling Spills Do not spill anything on your computer. The best way to avoid spills is to avoid eating and drinking around your computer. If you do spill something on your computer, turn off your computer, unplug it immediately, and do the following: •If you spill liquid on the keyboard, drain as much of the liquid from the keyboard as possible. Be careful not to let the liquid drip onto the LCD panel. Allow the system to dry for several days before trying to use it. •If you spill liquid on an external keyboard or keypad, unplug it and drain as much of the liquid as possible. Allow the keyboard to sit at room temperature for a full day before trying to use it. Sweet liquids leave a sticky residue that may jam the keyboard despite your efforts to dry it. •If you spill liquid on the LCD panel, clean it immediately with a soft cloth and denatured alcohol or a proprietary LCD screen cleaner. Do not use water, window cleaner, acetone, aromatic solvent, or dry, rough towels to clean it. 1 3 2 From Lock To Lock Matrix II (Windows XP) - English.fm Page 12 Thursday, September 13, 2001 11:42 AM Using Your Computer for the First Time 13 Some liquids damage the polarized LCD screen. If your screen is damaged, contact your authorized manufacturer’s service center for a replacement. Storing the Computer for Long Periods If possible, leave the power cord connected to the computer and an electrical outlet when the computer is not in use. This extends the life of the battery and keeps the battery fully charged. If you will not be using the computer for a long period of time (a month or more), you should charge the battery until it is completely full. After you have done so, remove the battery from the unit. Matrix II (Windows XP) - English.fm Page 13 Thursday, September 13, 2001 11:42 AM 14 Users Manual Using the Keyboard Your computer has an 87/88-key keyboard. By pressing designated key combinations, you can have access to all the key functions of a full-sized keyboard. Although the layout of the keys on your computer’s keyboard is different from that on a desktop computer’s keyboard, the keyboard feels like a full-sized keyboard when you use it. The keys on the keyboard can be grouped into the following categories: •Full-sized Alphanumeric typewriter keys are arranged like a standard typewriter keyboard and are used for text entry. The Windows keys on either side of the spacebar open Windows menus and perform other special functions. •Function keys, when pressed together with the <Fn> key, enable special functions. •Cursor and Screen control keys move the cursor. They may perform other functions, depending on your software. To clean the computer keyboard, use slightly damp cotton swabs. Scrub the keys and the surface around the keys. Function & Special Purpose Keys Embedded Numeric Keypad Application Key Cursor/Screen Control Keys Windows KeyFunction Key Matrix II (Windows XP) - English.fm Page 14 Thursday, September 13, 2001 11:42 AM Using the Keyboard 15 Do not allow liquid to drip into the keyboard or you may damage the keyboard. Using the Numeric Keypad Your keyboard includes a numeric keypad, which is a group of keys that you can set to type numbers and mathematical symbols, such as the plus sign. A number or symbol on the right corner of each keypad key shows its numeric function. Press to turn on the embedded numeric keypad. The numeric functions of the keypad are enabled and the Num Lock light turns on. While the numeric functions are enabled, you can temporarily return a key to its normal function by pressing and the key. For example to type the letter m, press . To turn the numeric keypad off, press again. The Num Lock light turns off. Num Lock LED Num Lock Key + Matrix II (Windows XP) - English.fm Page 15 Thursday, September 13, 2001 11:42 AM 16 Users Manual Using Special Function Keys The <Fn> key activates…
Text truncated - open the document above for the full version.
Users Manual
Using the Flex-Bay 31 4.Slide and hold the device latch toward the front of the computer. 5.Slide the device out. 6.Slide the new device in 7.Click OK. The message “Please wait until the system processes the device change” appears again. 8.Click OK to close the Softex Bay Manager Utility. Swap a Flex-Bay Device - Power Off Device Swap To remove a device with the power off proceed as follows: 1.Turn the computer’s power off. 2.Tilt the computer up & locate the smart bay latch. 3.Slide and hold the device latch toward the front of the computer. 4.Slide the device out. 5.Carefully slide the new device into the bay. 6.Push the device in until it is flush with the chassis and the Flex-Bay latch snaps into place. Your computer’s operating system automatically recognizes the device in the Flex-Bay and configures your computer accordingly when power is restored. Matrix II (Windows XP) - English.fm Page 31 Thursday, September 13, 2001 11:42 AM 32 Users Manual Using the Disk Drives To use the Floppy drive or the CD-ROM drive you must verify it is installed in the flex- bay slot. To swap devices see “Using the Flex-Bay” on page 29. Using the Floppy Disk Drive Your computer comes with a 1.44 MB, 3.5-inch, flex-bay floppy drive. To use a floppy disk in your computer, insert it into the floppy drive. To remove a floppy disk, press the floppy disk eject button on the front of the floppy drive. To protect the data on your floppy disks, follow the manufacturers guidelines. Floppy Disk Eject Button Matrix II (Windows XP) - English.fm Page 32 Thursday, September 13, 2001 11:42 AM Using the Disk Drives 33 Using the CD/DVD-ROM Drive Compact discs are designed so that you can easily insert one into the computer when you need it, and then remove it. See “Using the Flex-Bay” on page 29 for information on installing the DVD-ROM drive into the computer. DVD Notes: A DVD player is a factory option and if you ordered this option you will have to install the provided DVD software to view the DVD Title. 1.Press the button on the CD-ROM or DVD-ROM drive, and the tray slides out. (Do not lean on the tray; because it will not support much weight.) CD/DVD Drive Warnings: Do not place reflective objects other than the CD/DVD disks in the disk slot because of possible hazardous laser emissions. The laser beam used in this CD/DVD-ROM drive is harmful to the eyes. Do not attempt to disassemble the CD/DVD-ROM drive. Refer servicing to your authorized service center. Do not touch the CD/DVD lens, doing so may damage the device. CD/DVD Precautions: The tray may be stuck, in which case straighten out a paper clip, insert it into the Emergency Eject hole in the front of the CD/DVD-ROM and push it until the tray ejects. A LED on the drive tray is on when the computer is reading from a CD. Do not remove a disc when this LED is on. To clean a CD/DVD, wipe from the center outwards with clean and dry cloth. Remove the CD/DVD when the drive activity LED is off. 2.Insert a CD/DVD, label side up (or remove a disc, if you have finished using it). Matrix II (Windows XP) - English.fm Page 33 Thursday, September 13, 2001 11:42 AM 34 Users Manual 3.Push the tray in gently to close the drive tray. Install and/or start a CD-based program as you would run a program on a floppy disk. Eject Button CD-ROM Light Emergency eject button Matrix II (Windows XP) - English.fm Page 34 Thursday, September 13, 2001 11:42 AM Working with PC Cards 35 Working with PC Cards When you install PC Cards, you can add a multitude of functions to your notebook computer similar to those found on add-in boards for desktop computers. There are many PC Cards on the market, the supported PC Cards are listed below: •Input/output, such as modem, network, video capture, and SCSI cards. •Storage, such as hard drive and flash memory cards. Your computer includes the following PC Card support: •Two PC-Card slots: You can install Type I, II, or III cards in the slots. TYPE III Cards: Type III cards are thicker than Types I and II. If you install a Type III card in the bottom slot, you cannot install a card in the top slot. •CardBus hardware and software: CardBus enables the computer to use 32-bit PC Cards. Windows XP supports 32-bit and 16-bit PC Cards. •Zoomed video: Both PC Card slots and the video chip on your computer support zoomed video. When you install a zoom video PC Card in the upper or lower slot, data can be transferred directly from the PC Card to video and audio systems without going through the microprocessor. Video conferencing and real-time multimedia devices, such as video cameras, are supported by zoomed video. Maintaining PC Cards To maintain your PC Cards, follow these guidelines: •Keep cards away from excessive heat, direct sunlight, and liquids. •Do not drop, bend, flex, or crush cards when handling. •Keep dust, magnets, and static electricity away from PC Cards. •When a card is not in use, carry it in its protective carrying case. •Some PC Cards include cables that extend from the back of the cards. Be careful not to bend or put excessive strain on these cables. Matrix II (Windows XP) - English.fm Page 35 Thursday, September 13, 2001 11:42 AM 36 Users Manual Using PC Cards To insert a PC Card into a slot: 1.Push the slot door in with the PC Card. 2.Align the card with a slot and insert the card into the slot until it locks in place. Windows automatically assigns computer resources (such as communication ports and memory addresses) to a PC Card installed in your computer. To remove a PC Card from your computer: Use the following procedures to remove PC Cards, or you may lose data that is being stored to a card. 1.Click icon on the Windows taskbar. 2.Select the card currently in use, and click the Stop button. PC Card Eject Buttons PC Card: (Example) Insert PC Card with product information facing up Matrix II (Windows XP) - English.fm Page 36 Thursday, September 13, 2001 11:42 AM Working with PC Cards 37 The eject button for the card slot operates in two step…
Text truncated - open the document above for the full version.
Block Diagram
-BlockDiagram CPU-Tualatin (uFCPGA/SocketI/F) Almador-M GMCH-M 82830M 625-pinmBGA ICH3-M 82801CAM 421-pinmBGA MICOM HD64F2169 SwappableBay (CD,DVD,Zip, 2ndHDD& FDD) &2ndBattery Power& ChargingCircuits 1.25V, 133MHz 15-pinVGAConn. Internal Battery Kinnereth 82561ET 133MHz3.3V SDRAM DVOA Docking Connector RJ-45 4/8MbitFlash FWH-Intel 32-pinPLCC SUBB'D MAINCHIP SUBCHIP UNIT CPUPower Supply(IMVP) VCH 82807 CPUPower DC/DCBoard SystemMemory SODIMM(2EA) AudioCont. ES1980 CardBusCont. PCI1420 AC97 S/WModem MiniPCIConn. TypeIIIA LCDPanel 14.1"TFT(SEC) XGA SerialConn. ParallelConn. SuperIOCont. NS PC87393 100-pinTQFP HDD DCIn External PS/2Conn. Bluetooth Audio Codec ES1921 & Audio Amplifiers Microphone Headphone Line-in S/PDIFOut Docking Conn. 2ndCodec ES1921 PCIBUS CK-Titan Clocking PCIBUS RJ-11 HOSTBUS LVDS USB 2,3 USB 0,1 USB4 FDDBus IDEBus(UDMA 66/100) Ext.USB Conn. LPCBus InternalKeyb'd &TouchPad PS/2MS&KBD ToDocking Conn. PORT(User accessibleitems) HubInterface 1.8V,66MHz Internal Speakers Internal Microphone Primary Secondary AudioDJ OZ165 LocalGfxMemory DRDRAM16M RAMBUS 400MHz TVEncoder CH7007 Comp.Video Conn. DVOC
Block Diagram
-BlockDiagram CPU-Tualatin (uFCPGA/SocketI/F) Almador-M GMCH-M 82830M 625-pinmBGA ICH3-M 82801CAM 421-pinmBGA MICOM HD64F2169 SwappableBay (CD,DVD,Zip, 2ndHDD& FDD) &2ndBattery Power& ChargingCircuits 1.25V, 133MHz 15-pinVGAConn. Internal Battery Kinnereth 82561ET 133MHz3.3V SDRAM DVOA Docking Connector RJ-45 4/8MbitFlash FWH-Intel 32-pinPLCC SUBB'D MAINCHIP SUBCHIP UNIT CPUPower Supply(IMVP) VCH 82807 CPUPower DC/DCBoard SystemMemory SODIMM(2EA) AudioCont. ES1980 CardBusCont. PCI1420 AC97 S/WModem MiniPCIConn. TypeIIIA LCDPanel 14.1"TFT(SEC) XGA SerialConn. ParallelConn. SuperIOCont. NS PC87393 100-pinTQFP HDD DCIn External PS/2Conn. Bluetooth Audio Codec ES1921 & Audio Amplifiers Microphone Headphone Line-in S/PDIFOut Docking Conn. 2ndCodec ES1921 PCIBUS CK-Titan Clocking PCIBUS RJ-11 HOSTBUS LVDS USB 2,3 USB 0,1 USB4 FDDBus IDEBus(UDMA 66/100) Ext.USB Conn. LPCBus InternalKeyb'd &TouchPad PS/2MS&KBD ToDocking Conn. PORT(User accessibleitems) HubInterface 1.8V,66MHz Internal Speakers Internal Microphone Primary Secondary AudioDJ OZ165 LocalGfxMemory DRDRAM16M RAMBUS 400MHz TVEncoder CH7007 Comp.Video Conn. DVOC
Block Diagram
-BlockDiagram CPU-Tualatin (uFCPGA/SocketI/F) Almador-M GMCH-M 82830M 625-pinmBGA ICH3-M 82801CAM 421-pinmBGA MICOM HD64F2169 SwappableBay (CD,DVD,Zip, 2ndHDD& FDD) &2ndBattery Power& ChargingCircuits 1.25V, 133MHz 15-pinVGAConn. Internal Battery Kinnereth 82561ET 133MHz3.3V SDRAM DVOA Docking Connector RJ-45 4/8MbitFlash FWH-Intel 32-pinPLCC SUBB'D MAINCHIP SUBCHIP UNIT CPUPower Supply(IMVP) VCH 82807 CPUPower DC/DCBoard SystemMemory SODIMM(2EA) AudioCont. ES1980 CardBusCont. PCI1420 AC97 S/WModem MiniPCIConn. TypeIIIA LCDPanel 14.1"TFT(SEC) XGA SerialConn. ParallelConn. SuperIOCont. NS PC87393 100-pinTQFP HDD DCIn External PS/2Conn. Bluetooth Audio Codec ES1921 & Audio Amplifiers Microphone Headphone Line-in S/PDIFOut Docking Conn. 2ndCodec ES1921 PCIBUS CK-Titan Clocking PCIBUS RJ-11 HOSTBUS LVDS USB 2,3 USB 0,1 USB4 FDDBus IDEBus(UDMA 66/100) Ext.USB Conn. LPCBus InternalKeyb'd &TouchPad PS/2MS&KBD ToDocking Conn. PORT(User accessibleitems) HubInterface 1.8V,66MHz Internal Speakers Internal Microphone Primary Secondary AudioDJ OZ165 LocalGfxMemory DRDRAM16M RAMBUS 400MHz TVEncoder CH7007 Comp.Video Conn. DVOC
ID Label/Location Info
Page 15 of 16 Project No. : SE-01-0344 5. FCC Label Configuration and Location 5.1 Label Configulation 5.2 Location of Label This report shall not be reproduced except in full, without the written approval of SEC EMC Testing laboratory.
ID Label/Location Info
Page 15 of 16 Project No. : SE-01-0344 5. FCC Label Configuration and Location 5.1 Label Configulation 5.2 Location of Label This report shall not be reproduced except in full, without the written approval of SEC EMC Testing laboratory.
ID Label/Location Info
Page 15 of 16 Project No. : SE-01-0344 5. FCC Label Configuration and Location 5.1 Label Configulation 5.2 Location of Label This report shall not be reproduced except in full, without the written approval of SEC EMC Testing laboratory.
Test Report
Page 1 of 16 Project No. : SE-01-0344 Product :Notebook PC Model No. :SENS Pro 900 FCC ID : A3LS900 1. This test reports shall not be reproduced except in full, without the written approval of SEC EMC Testing laboratory. 2. This test reports does not constitute an endorsement by NIST/NVLAP or U.S Government. 3. This test report is to certify that the tested device properly complies with the requirements of FCC Rules and Regulations Part 15 Subpart B Unintentional Radiators. All tests necessary to show compliance to the requirements were and these results met the specifications requirement. Date of test : August 27, 2001 ~ August 29, 2001 Issued Date : September 5, 2001 Tested by: Jay Yong, PARK / Test Engineer Reviewed by: Seung Kyu, CHA / Manager of EMC Lab Authorised by: Taek Jeong, Shin / Chief of EMC Lab This laboratory is registered by the NIST/NVLAP, U.S.A. The test reported herein have been performed in accordance with its terms of registration. EMI TEST REPORT According to FCC Part 15 Subpart B/Class B NVLAP Code: 200447 Page 2 of 16 Project No. : SE-01-0344 Table of Contents 1. General Information 1.1 Product Description 1.2 Configuration of EUT and peripherals 1.3 Used Cable Description 1.4 System Block Diagram of Test Configuration 1.5 Test Facility 2. System Test Configuration 2.1 Configuration of Radiated and Conducted Interference Measurement 2.2 Operation Enviroment 2.3 Test Procedure 3. Conducted Emission Test Data 4. Radiated Emission Test Data 5. Label Configuration and Location 6. Test Equipment Used Distribution This test report has been made available as follows: CS Management Center, EMC Laboratory1 original Computer Division1 copy This report shall not be reproduced except in full, without the written approval of SEC EMC Testing laboratory. Page 3 of 16 Project No. : SE-01-0344 1. General Information Applicant :Samsung Electronics Co., Ltd. CS Man…
Text truncated - open the document above for the full version.
Contact Information
Applicant
Jenni Chun(General Manager)
Technical Contact
PCTEST Engineering Lab., Inc.Randy Ortanez
[email protected]410-290-6652
6660-B Dobbin Road · Columbia, Maryland · United States
Test Firm
Samsung Electronics Co., Ltd.T. Shin
Technical Specifications
| # | Rule Parts | Frequency Range | Power Output |
|---|---|---|---|
| 1 | 15B | - | - |
Other Applications from Samsung Electronics Co Ltd
A3LSMS741B
Aug 05, 2026Portable Handset
Equipment Class
6VL - 15E 6 GHZ Very Low Power DeviceA3LSMX940
Jul 31, 2026BT,BLE Tablet DTS,UNII a,b,g,n,ac,ax,be and digitizer
Equipment Class
DTS - Digital Transmission SystemA3LSMS741U
Jul 30, 2026Portable Handset
Equipment Class
6CD - 15E 6 GHz Low Power Dual ClientA3LSMX840
Jul 27, 2026BT,BLE Tablet DTS,UNII a,b,g,n,ac,ax and Digitizer
Equipment Class
DSS - Part 15 Spread Spectrum TransmitterA3LSMX848U
Jul 27, 2026WCDMA, LTE, 5G NR Tablet BT,BLE, DTS,UNII a b g n ac ax and Digitizer
Equipment Class
JBP - Part 15 Class B Computing Device Peripheral