A3LSQ10Notebook Personal Computer
Samsung Electronics Co Ltd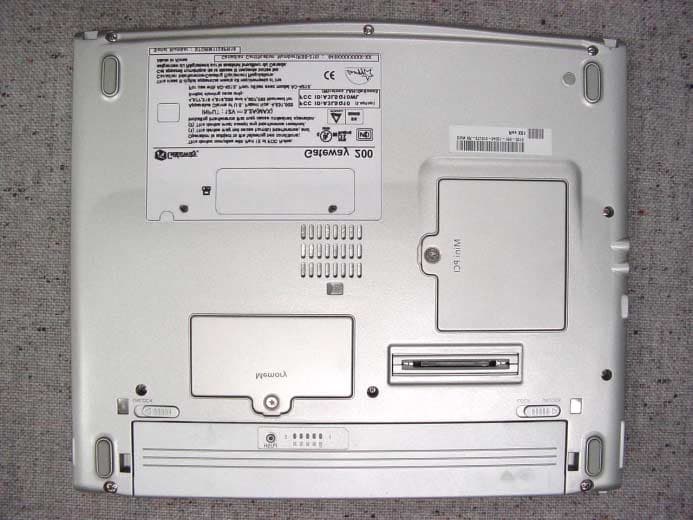
Click to zoom
Application Details
- Equipment Class
- JBC - Part 15 Class B Computing Device/Personal Computer
- Date of Grant
- Dec 16, 2001
- Application Purpose
- Original Equipment
- Date of Application
- Dec 16, 2001
- Equipment Note
- Notebook Personal Computer
- Company
- Samsung Electronics Co Ltd
- Country
- United States
Documents & Files
Document Text
Text extracted from the exhibit documents filed with the FCC. Open a document above to read the original.
Users Manual
Notices i Notices No part of this publication may be reproduced, stored in a retrieval system, or transmitted, in any form or by any means, mechanical photocopying, recording or otherwise, without the prior written permission of the manufacturer. The information within this manual is subject to change without notice. The manufacturer shall not be held liable for technical or editorial errors or omissions contained in herein; nor for incidental or consequential damages resulting from the furnishing, performance or use of this material. Microsoft Windows is a registered trademark of the Microsoft Corporation. Product names mentioned herein are for identification purposes only, and may be trademarks and/or registered trademarks of their respective companies. Copyright2001 All rights are reserved Notices & Safety (English).fm Page i Thursday,August 23, 2001 8:36 AM ii Users Manual Important Safety Information Safety Instructions Your system is designed and tested to meet the latest standards for safety of information technology equipment. However, to ensure safe use of this product, it is important that the safety instructions marked on the product and in the documentation are followed. Always follow these instructions to help guard against personal injury and damage to your system. i Setting Up your System •Read and follow all instructions marked on the product and in the documentation before you operate your system. Retain all safety and operating instructions for future use. •Do not use this product near water or a heat source such as a radiator. •Set up the system on a stable work surface. •The product should be operated only with the type of power source indicated on the rating label. •Ensure that the electrical outlet you are using to power your equipment is easily accessible in case of fire or short circuit. •If your computer has a voltage selector switch, make sure that the switch is in the proper position for your area. •Openings in the computer case are provided for ventilation. Do not block or cover these openings. Make sure you provide adequate space, at least 6 inches (15 cm), around the system for ventilation when you set up your work area. Never insert objects of any kind into the computer ventilation openings. •Ensure that the fan vents on the bottom of the casing are clear at all times. Do not place the computer on a soft surface, doing so will block the bottom vents. •If you use an extension cord with this system, make sure that the total ampere rating on the products plugged into the extension cord does not exceed the extension cord ampere rating. Notices & Safety - English.fm Page ii Thursday, October 11, 2001 8:45 AM Important Safety Information iii Care During Use •Do not walk on the power cord or allow anything to rest on it. •Do not spill anything on the system. The best way to avoid spills is to not eat or drink near your system. •Some products have a replaceable CMOS battery on the system board. There is a danger of explosion if the CMOS battery is replaced incorrectly. Replace the battery with the same or equivalent type recommended by the manufacturer. Dispose of batteries according to the manufacturer’s instructions. If the CMOS battery requires replacement insure that a qualified technician performs the task •When the computer is turned off, a small amount of electrical current still flows through the computer. To avoid electrical shock, always unplug all power cables, remove the battery and modem cables from the wall outlets before cleaning the system. •Unplug the system from the wall outlet and refer servicing to qualified personnel if: –The power cord or plug is damaged. –Liquid has been spilled into the system. –The system does not operate properly when the operating instructions are followed. –The system was dropped or the casing is damaged. –The system performance changes. Replacement Parts and Accessories Use only replacement parts and accessories recommended by manufacturer. To reduce the risk of fire, use only No. 26 AWG or larger telecommunications line cord. Do not use this product in areas classified as hazardous. Such areas include patient care areas of medical and dental facilities, oxygen rich environments, or industrial areas. Notices & Safety - English.fm Page iii Thursday, October 11, 2001 8:45 AM iv Users Manual Battery Disposal Do not put rechargeable batteries or products powered by non-removable rechargeable batteries in the garbage. Contact the Samsung Helpline for information on how to dispose of batteries that you cannot use or recharge any longer. Follow all local regulations when disposing of old batteries. Notices & Safety (English).fm Page iv Thursday, August 23, 2001 8:36 AM Federal Communications Commission (FCC) v Federal Communications Commission (FCC) This device complies with Part 15 of the FCC Rules. Operation is subject to the following two conditions:(1) this device may not cause harmful interference, and (2) this device must accept any interference received, including interference that may cause undesired operation. This equipment has been tested and found to comply with the limits for a Class B digital device pursuant to Part 15 of the FCC Rules. These limits are designed to provide reasonable protection against harmful interference in a residential installation. This equipment generate uses and can radiate radio frequency energy and if not installed and used in accordance with the instructions may cause harmful interference will not occur in a particular installation. If this equipment does cause harmful interference to radio or television reception, which can be determined by turning the equipment off and on, the user is encouraged to try to correct the interference by one or more of the following measures: • Reorient or relocate the receiving antenna. • Increase the separation between the equipment and receiver. • Connect the equipment into an outlet on a circuit different from that to which the receiver is connected. …
Text truncated - open the document above for the full version.
Users Manual
Using Your Documentation 1 Using Your Documentation Congratulations on your purchase of a notebook computer with the Windows® XP operating system. Whether you are new to using a portable computer or are an experienced user, this user’s manual can help you get the most from your computer. Manual Documentation Conventions Information Icons Three icons and their associated messages appear in this manual. The information icons are placed before the step/information they apply to: Warning: Indicates the possibility of personal injury. Caution: Warns you of possible damage to equipment or data. Note: Informs you of special circumstances. Keyboard Conventions Keys that you need to press to perform certain functions are displayed in the manual using a small graphic of the button. For example: indicates the control key (Ctrl on the keyboard). If you need to press two keys at the same time, the key names are shown joined by a plus sign. For example: means that you should press the Alt key and hold it and then press the Pg Up key. + 2 Users Manual CD-ROM Device Naming Convention In many installation programs you will have to get a program from the CD-ROM device. The program installation sequence assumes that the CD is drive d:\, however this is not always the case. The name of the CD-ROM drive is the letter following the letter assigned to your last HDD. For instance, if you have one HDD with two partitions, the HDD is drives C: and D: and the CD-ROM drive is then drive E. Touchpad Conventions You may be asked to click or double-click on items on the display screen. As a general note the touchpad actions act much in the same way as a wheel mouse, any differences are explained fully. The object that needs to be clicked upon will be displayed in Bold text or shown in a small figure such as the “Start Button” shown on the right => . Table 1. Touchpad Click Conventions Almost all "Windows" programs will display the name/function of a button or icon if you place the touchpad pointer on the item you want information about. Software User Documentation Your computer is shipped from the factory with several software programs installed. The software may include its own online or printed documentation. Refer to the documentation or the Help options in the software for more information. The figures and illustrations in this manual may not be identical to those on your system. General Icon Note: Some of the Icons used in Windows XP may be placed on the taskbar by selecting (ex: Place the volume icon in the taskbar) in the properties dialog box. ActionProcess ClickDepress the touchpad left button and release Double-ClickQuickly click the left touchpad button two times Introducing Your Computer 3 Introducing Your Computer Your lightweight portable notebook computer includes many features to meet your computing needs at home and/or on the road. The computer is a very slim lightweight notebook computer with a docking station that has peripheral devices that allow it to perform all of the functions of a desktop computer. Where Everything Is The following sections, PC Equipment Locations and Docking Station Equipment Locations will explain the details of the notebook computer and the docking station as well as other basic operations to dock and undock the computer. Docking Station Notebook Computer + 4 Users Manual Notebook Equipment Location Front Side Unavailable Ports while Notebook is docked The Lan and Video ports are unavailable on the Notebook while it is docked due to the configuration of the docking station, however they are duplicated on the docking station. Internet Button LEDs Touchpad Speakers Touchpad Buttons Keyboard Power Button LCD Display Fan Vent Video Port LCD Latch USB Connection Introducing Your Computer 5 Left Side Right Side Back Side Bottom Side The figure below is the bottom view of the PC without the Docking Station attached. PC Card Slot LAN Port PC DC-in Port USB PortIEEE 1394 Port (6 Pin) Modem Port Microphone Port Headphone Port Fan Vent USB Port External Monitor Port Security Lock Slot Battery Battery Latch Mini PCI Compartment Docking Connector Battery Latch Memory Module Compartment 6 Users Manual Docking Station Equipment Location Front Side The figures in this section show you the location of important items on the docking station. See “Using the Multi-Bays in the Docking Station” on page 34. Back Side 3.5" Multi-Bay Release Latch 5.25" Multi-Bay Release Latch Docking Connector Undock Computer Button 5.25 Multi-Bay (CD/DVD ROM Drive installed) 3.5 Multi-Bay (FDD installed) Docking HookDocking Hook Security Lock Port LAN Port DC-in Port Docking Hooks PS/2 Port USB Ports (2) 1394 Port (4 Pin) Security Lock Latch Serial PortPrinter Port Docking Connector External Monitor Port Introducing Your Computer 7 Top Side Bottom Side Speaker Docking Hook Docking Hook Undock Computer Button 5.25 Multi-Bay (CD/DVD ROM Drive installed) 3.5 Multi-Bay (FDD installed) 3.5" Multi-Bay Release Latch 5.25" Multi-Bay Release Latch Docking Release Lever SPDIF Port Speaker (Woofer) Speaker 8 Users Manual Docking/Undocking your Computer The docking station allows you to use this system as a desktop PC. Connect the AC adapter to the docking station when it is connected to the computer. Docking your Computer You may dock your computer while the computer is off or on, however the preferred and safer method is with the power off. To install your computer into the docking station with the power off, complete the following: 1.Disconnect the AC adapter from the system. 2.Place the front part of a system onto the docking hooks at the front of the docking station. 3.Press down on the rear of the computer until it clicks fully home into the docking station To dock your computer with the power on simply place the computer on the docking hooks and press down on the area above the keyboard. Dock Change When the docking station is connected properly the Icon is displayed in the start menu. Press the system on both sides, …
Text truncated - open the document above for the full version.
Users Manual
Using Your Computer for the First Time 11 Using Your Computer for the First Time This section gives you detailed information on using your computer for the first time. Installing the Battery The first step in using your notebook computer is to determine the normal use for your computer. Two batteries (Standard and Long Life) come with the computer and both go into the same slot. The standard battery may be used whether the computer is in the docking station or not. the long life battery may only be used when the PC is not in the docking station. Ensure that both battery latches are slid fully toward the center of the computer. The long life battery cannot be used with the PC in the docking station. Long Life Battery Standard Battery 11 or 22 11 22 12 Users Manual AC Adapter Your computer runs on power from the battery in the computer or from an electrical outlet. The first time that you use your computer, fully charge the battery using the AC adapter. To attach the power cord complete the following: Power Cords: Many countries have different power cord configurations. Your computer should be supplied with the correct one for your area. If not contact the supplier. DO NOT wind the DC Output cable around the AC Adapter to prevent damage to AC adapter while operating your computer. 1.Plug the AC adapter into the power connector on the side of the computer. 2.Connect the power cord to the AC adapter and then to an electrical outlet. The power connector may be plugged into either the computer or the docking station. The preferred method when docked is to plug into the docking station. The battery starts charging as soon as you plug the power cord into an electrical outlet. The battery charges faster if the computer is turned off during charging. Ensure you charge the battery fully the first time you use it. See “Using the Battery” on page 42 for more information on using your computer’s battery. Power Cord AC Adapter Using Your Computer for the First Time 13 Turning On the Computer To turn on the computer’s power for the first time: 1.Slide the LCD latch, located on the front of the cover to the right. 2.Lift up the LCD display. 3.Press and then release the power button. The power LED is on when the computer’s power is on. Initial computer startup The first time you start your computer you will see the operating system registration screens. There are several screens in the registration process. Simply read each screen and follow the simple directions. You must complete this process in order to use your computer. A tutorial is provided if you require it. Power LED Power Button 14 Users Manual Turning Off Your Computer Prior to shutting down your computer ensure all of your data and current work are saved. The system will ask if you wish to save any unsaved work, saving your work first will speed the shutdown process. To turn off the computer, complete the following steps: 1.Click on the taskbar. If you need to restart your computer after software (re)installation or because it is not responding, select the Restart option in step 3 below. 2.Click Shut Down Computer to display the shutdown popup window shown below. 3.Click Turn Off to complete the shutdown sequence. If the system does not power off, then press and hold the power button for over 4 seconds. See “Using Power Management Options” on page 53. You can also perform a soft boot by saving your files and pressing to pop-up the “Windows Task Manager” window. Click Shut Down > Restart. You can perform a cold boot by pressing the power button for more than 4 seconds to turn the computer off, waiting more than 5 seconds, and then pressing the power button to turn the computer on. The power button has several functions other than just turning on and off your computer, see “Using Power Management Options” on page 53. + + Using Your Computer for the First Time 15 Using the LCD Display This section will discuss using/changing the LCD display: The LCD display brightness adjustment is divided into 8 levels. •The key combination decreases LCD brightness. •The key combination increases LCD brightness. The LCD display will automatically dim when you remove AC power to conserve battery power. If required, adjust the LCD brightness to a higher level when you are on battery power, however this will decrease battery life. LCD Cleaning: Cleaning the LCD display should only be done with a soft cloth dampened with denatured alcohol or a proprietary LCD screen cleaner. Even if you change the default LCD display brightness settings, the defaults listed above will be restored once you power off and then back on. Notice:The limits of LCD manufacturing technology allow a maximum of 10 abnormal/bad pixels. Tips for Using Your Computer The following information helps you avoid potential problems as you use your computer: Do not try to disassemble your computer. Opening the system chassis voids your warranty. Only an authorized manufacturer service center can replace or add any parts inside the chassis. •Follow all the instructions and cautions in your computer user documentation. •The LCD display has a polarized surface and can be damaged easily. To prevent damage, avoid touching the LCD display screen. •Because a notebook computer is small and has restricted air flow around components, it is more likely to overheat than a desktop computer. A fan inside your computer runs when needed to help eliminate heat. Make sure the fan vent on the right side of your computer is not blocked when you use the computer. Occasionally check the vents and remove any accumulated dust on the outside. + + 16 Users Manual •Use only approved AC adapters, auto adapters, memory modules and other options. •Avoid using or storing the computer in extremely hot or cold areas, such as a car on a hot day. Keep the computer away from heaters and out of direct sunlight. Exposure to excessive heat may damage computer components. If you have left your computer in a hot place, let it cool down slowly …
Text truncated - open the document above for the full version.
Users Manual
Using the Keyboard 21 Using the Numeric Keypad Your keyboard includes a numeric keypad, which is a group of keys that you can set to type numbers and mathematical symbols, such as the plus sign. A number or symbol on the right corner of each keypad key shows its numeric function. Press to turn on the embedded numeric keypad. The numeric functions of the keypad are enabled and the Num Lock LED turns on. (See “Reading the System Status LEDs” on page 27 for the location of the Num Lock LED.) While the numeric functions are enabled, you can temporarily return a key to its normal function by pressing and the key. For example to type the letter m, press , this operation displays the letter m. To turn the numeric keypad off, press again. The Num Lock LED turns off. Num Lock LED + 22 Users Manual Using Special Function Keys The function key in combination with another key activates special functions. Table 2. Description of Special Function Key Combinations When you press a function key combination, the system sound may be temporarily muted. Key Combinations Key Name Key Function F1 Prt Sc Print screen:Takes a picture of the open screen, which you can paste into many graphics programs. F2 Sys Rq System request:Reserved for use in software programs. F3Euro key:This key combination can generate Euro Mark as other Eurokey. ✯Configuration Dependant F4SENS keyboard:Gives the user the ability to quick launch a program using the SENS keyboard key combination. F5 CRT/LCD CRT/LCD:Switches the display between the LCD, the external monitor, and simultaneous display on both the LCD and the external monitor. F6 Mute Mute: Turns the audio output on and off. F7Volume down:Decreases the audio volume. F8Volume up: Increases the audio volume. F9 Rest Rest: Puts the computer into Suspend mode. To resume normal operation, press the power button. (See “Power Management” on page 43.) F10Brightness down:Decreases the LCD brightness. F11Brightness up: Increases the LCD brightness. F12 Scroll Scroll: In some applications, sets the cursor-control keys to scroll the page up or down while the cursor position does not change. Pressing key combination again turns off the scrolling function. PgUpPgUp: In some applications, moves cursor up one screen, not necessarily a full page. PgDnPgDn: In some applications, moves cursor down one screen, not necessarily a full page. + + + + + + + + + + + + + + Using the Keyboard 23 Internet Quick Start Button Use the internet quick start button to start your connection to the internet just by pressing one button. User Defined Key (SENS Keyboard) You may program the key combination or the “Internet Quick Start Button” to start any program you have installed on your computer. To reprogram the Sens Keyboard, follow the steps below: 1.Double-Click icon on the Windows taskbar, the Key Setting window is displayed. 2.Select Button you wish to reprogram from the drop down menus in the Key Setting window. 3.Use the Browse button to locate the program you wish to assign to the SENS Keyboard button selected. 4.Click on your program choice to select it. 5.Click Open. 6.Click OK to close window and complete programming the Sens Keyboard. Internet Quick Start Button + 24 Users Manual Using the Touchpad Your computer is equipped with a touchpad, which is an integrated-pointing device that is used to perform standard mouse functions. The touchpad is an advanced and reliable pointing device that works with a touch of your finger. Touchpad Precautions: Do not use sharp, magnetic or heavy items on your touchpad doing so may cause damage. Press on the touchpad gently. The touchpad responds to light pressure. The following sections will basically explain how to use the touchpad. Table 3. Using the Touchpad ActionProcess and Comment Click/Tap Process Depress the touchpad left button and release or position the pointer over the object and Quickly tap the touchpad once with your finger. This action is called clicking. Comment This will cause a process to begin or select an object on the screen. Touchpad buttons Touchpad Using the Touchpad 25 PS/2 Mouse: You may change the setup in Setup > Advanced Menu Disabled prevents both the touchpad and external PS/2 port from functioning. Single mouse (default) enables the external PS/2 port or the touchpad, and external PS/2 port has priority. Dual Mouse allows the use of both the touchpad and PS/2 port. Drag (Move) To move a window to change the view on the desktop, complete the following: 1.Click the window title bar or icon in the bottom of the window which you want to drag using the touchpad. 2.Press the left touchpad button and hold it. Double-Click/Tap Process Quickly click the left touchpad button two times or position the pointer over the object and Quickly tap the touchpad twice with your finger. This action is called Double-clicking. Comment This will cause a process to begin or open a file folder. Click-Hold Process Depress the left touchpad button and do not release. Comment This is used to move/drag objects to new locations. See “Drag (Move)” on page 25. Right-Click Process Position the pointer over the object. Quickly press and release the right button once. This action is called Right-clicking. Comment This is usually used to obtain information about an object or access a short cut menu. ActionProcess and Comment 26 Users Manual 3.Drag the window using the touchpad. Area or multiple item selection: The drag function may be used to select an area or multiple items in an area by clicking in one area and then dragging to create a selection window. The items inside the window will be selected. Scroll The touchpad has a scroll function. Scroll along the right edge of the touchpad to scroll up and down. Scroll along the bottom edge of the touchpad to scroll right and left. However, this function may not work in some programs. Touchpad Buttons: You can use the buttons below the touchpad in the same way you would use standard wheel mouse buttons. For more information…
Text truncated - open the document above for the full version.
Users Manual
Connecting to the Internet 31 4.Select Internet Protocol (TCP/IP) in the “This connection uses the following items:” box. 5.Click Properties. The TCP/IP Properties window opens. 6.Click “Use the following IP address” in the General tab 7.In the “Use the following IP address” box, enter your IP address:, subnet mask: and Default Gateway:. 8.In the “Use the following DNS server addresses” box, Enter your Preferred DNS server: and Alternate DNS server:. 9.Click OK when you finish the TCP/IP set-up. Step 8 Step 7 32 Users Manual Wireless Connection (Factory Option) Your computer’s wireless LAN adapter is ready to use for most situations, however if your system does not have a DHCP server or you wish to personally configure your wireless LAN connection, proceed as outlined in “Configuring Network Environment” below. The table below shows the Windows taskbar icons for the wireless LAN. To display relative Signal Strength: 1.Double Click the icon in the taskbar to display the Wireless Network Connection Status window. This window also displays connection Status, Speed, Duration and Activity. Network Protocols: You may need to consult your System Administrator if their network network protocols and settings are required for your wireless LAN environment. Configuring Network Environment Configure the Wireless Network Adapter as follows: 1.Click Start > Control Panel > Network and Internet Connections 2.Click icon (Network Connections) IconNameDescription Connection Established Displays if connection is available. Connection Unavailable Displays if connection is unavailable. Connecting to the Internet 33 3.Double-Click the Wireless Network Connection icon. The Connect to Wireless Network window pops up. 4.Select one of the available networks in the Available networks section, if displayed. No networks are displayed Office - Consult your system administrator. Home - Verify your access point is working properly. 5.Click the Connect button. The Wireless Network Connection icon in the control panel will show your connection is Enabled. You may proceed using the network as normal wired LAN connections. Change Wireless Network Access Point as follows: 1.Right Click the Wireless Network Connection icon. 2.Click View Available Wireless Networks. The Connect to Wireless Network window pops up. 3.Select the new network from the available networks in the Available networks section, if displayed. 4.Click Connect button. The Wireless Network Connection icon in the control panel will show your connection is Enabled. You may proceed using the network as normal wired LAN connections 44 x 49 34 Users Manual Using the Multi-Bays in the Docking Station Your computer includes the docking station that holds a 5.25" and a 3.5" device in the two multi-bays. Below is a listing of the device types you may install in your docking station. The default system is purchased with CD-ROM and FDD devices. 5.25” Devices:CD-ROM driveDVD-ROM driveCD/DVD-Combo CD-RW/DVD Combo 2nd HDD 3.50” Devices:FDD Changing Devices This section will discuss changing the 5.25" and 3.5" devices. Changing a 5.25” Device To change from one 5.25” device to another simply follow the steps below: 1.Turn off the system. 2.Detach the system from the docking station. 3.Slide the 5.25” multi-bay latch toward the middle of the multi-bay. 4.The device will pop out approximately 2cm. 5.Remove the device. 6.Insert the new 5.25” device into the multi-bay until the multi-bay latch clicks. 5.25" Device Using the Multi-Bays in the Docking Station 35 Changing a 3.5” Device The method of changing a 3.5” device is same as changing a 5.25” device except you have to use 3.5” multi-bay latch instead of 5.25”s. 3.5" Device 36 Users Manual Using the Disk Drives Using the Floppy Disk Drive Your computer comes with a 1.44 MB, 3.5-inch, floppy drive. To use a floppy disk in your computer, insert it into the floppy drive. To remove a floppy disk, press the floppy disk eject button on the front of the floppy drive. To protect the data on your floppy disks, follow the manufacturers guidelines. Using the CD/DVD-ROM Drive Compact discs are designed so that you can easily insert one into the computer when you need it, and then remove it. DVD Notes: A DVD player is a factory option and if you ordered this option you will have to install the provided DVD software to view the DVD Title. 1.Press the button on the CD-ROM or DVD-ROM drive, and the tray slides out. (Do not lean on the tray; because it will not support much weight.) Floppy Disk Eject Button Using the Disk Drives 37 CD/DVD Drive Warnings: Do not place reflective objects other than the CD/DVD disks in the disk slot because of possible hazardous laser emissions. The laser beam used in this CD/DVD-ROM drive is harmful to the eyes. Do not attempt to disassemble the CD/DVD-ROM drive. Refer servicing to your authorized service center. Do not touch the CD/DVD lens, doing so may damage the device. CD/DVD Precautions: The tray may be stuck, in which case straighten out a paper clip, insert it into the Emergency Eject hole in the front of the CD/DVD-ROM and push it until the tray ejects. A LED on the drive tray is on when the computer is reading from a CD. Do not remove a disc when this LED is on. To clean a CD/DVD, wipe from the center outwards with clean and dry cloth. Remove the CD/DVD when the drive activity LED is off. 2.Insert a CD/DVD, label side up (or remove a disc, if you have finished using it). 3.Push the tray in gently to close the drive tray. Install and/or start a CD-based program as you would run a program on a floppy disk. See your operating system documentation for more information on running programs. Eject Button Emergency Eject Hole CD/DVD-ROM LED 38 Users Manual Working with PCMCIA (PC) Cards By installing PC Cards, you can add functions to your notebook computer similar to those found on add-in boards for desktop computers. Available PC Cards include: •Input/output, such as modem, network, video capture, and SCS…
Text truncated - open the document above for the full version.
Contact Information
Applicant
Jenni Chun(General Manager)
Technical Contact
Rhein Tech laboratories, Inc.Bruno Clavier
[email protected]703 689 0368
360 Herndon Parkway · Herndon, Virginia · United States
Test Firm
Rhein Tech Laboratories, Inc.Rick McMurray
Technical Specifications
| # | Rule Parts | Frequency Range | Power Output |
|---|---|---|---|
| 1 | 15B | - | - |
Other Applications from Samsung Electronics Co Ltd
A3LSMS741B
Aug 05, 2026Portable Handset
Equipment Class
6VL - 15E 6 GHZ Very Low Power DeviceA3LSMX940
Jul 31, 2026BT,BLE Tablet DTS,UNII a,b,g,n,ac,ax,be and digitizer
Equipment Class
DTS - Digital Transmission SystemA3LSMS741U
Jul 30, 2026Portable Handset
Equipment Class
6CD - 15E 6 GHz Low Power Dual ClientA3LSMX840
Jul 27, 2026BT,BLE Tablet DTS,UNII a,b,g,n,ac,ax and Digitizer
Equipment Class
DSS - Part 15 Spread Spectrum TransmitterA3LSMX848U
Jul 27, 2026WCDMA, LTE, 5G NR Tablet BT,BLE, DTS,UNII a b g n ac ax and Digitizer
Equipment Class
JBP - Part 15 Class B Computing Device Peripheral