AK8DCRIP55Digital Video Camera Recorder DCR-IP55
Sony Group Corporation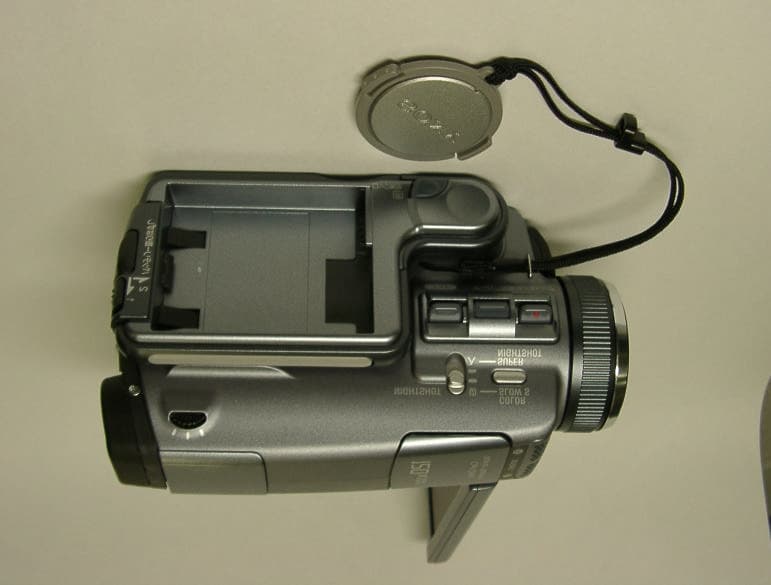
Click to zoom
Application Details
- Equipment Class
- DSS - Part 15 Spread Spectrum Transmitter
- Date of Grant
- Apr 15, 2002
- Application Purpose
- Original Equipment
- Date of Application
- Apr 15, 2002
- Equipment Note
- Digital Video Camera Recorder DCR-IP55
- Frequency Range
- 2402.00000000 - 2480.00000000
- Company
- Sony Group Corporation
- Country
- Japan
Documents & Files
Document Text
Text extracted from the exhibit documents filed with the FCC. Open a document above to read the original.
Users Manual
4 Table of contents Main Features............................................... 6 Introduction – Basic operations ................. 8 Quick Start Guide – Recording on a tape ........................ 10 Quick Start Guide – Recording on a “Memory Stick” ... 12 Getting started Using this manual ..................................... 14 Checking supplied accessories ................ 16 Step 1 Preparing the power supply ........ 17 Installing the battery pack................. 17 Charging the battery pack ................. 18 Connecting to a wall outlet ............... 20 Step 2 Setting the date and time .............. 22 Step 3 Inserting a cassette ......................... 25 Step 4 Using the touch panel ................... 27 Recording – Basics Recording a picture ................................... 29 After recording ................................... 30 Adjusting the LCD screen ................. 31 Adjusting the brightness of the LCD screen............................................. 32 Adjusting the viewfinder .................. 33 Using the zoom feature ..................... 34 Shooting with the Mirror Mode ....... 35 Indicators displayed in the recording mode .............................................. 36 Shooting a backlit subject – BACK LIGHT ............................ 37 Shooting in the dark – NightShot/Super NightShot/ Color Slow Shutter ...................... 38 Self-timer recording ........................... 40 Checking the recording – END SEARCH ................................. 41 Playback – Basics Playing back a tape.................................... 42 To display the screen indicators – Display function ....................... 43 Various playback modes ................... 45 Viewing the recording on TV .................. 47 If your TV is already connected to the VCR ......................................... 47 If your TV or VCR is a monaural type ................................................ 48 Advanced Recording Operations Recording still images in the CAMERA mode ..................................................... 49 Adjusting the white balance manually .. 54 Using the wide mode ................................ 56 Using the fader function ........................... 58 Using special effects – Picture effect ....... 61 Using special effects – Digital effect ....... 62 Using the PROGRAM AE ........................ 65 Adjusting the exposure manually ........... 68 Using the spot light-metering mode – Flexible Spot Meter ......................... 69 Focusing manually .................................... 70 Using the spot focus mode – Spot Focus......................................... 72 Using the viewfinder ................................ 73 Advanced Playback Operations Playing back a tape with picture effects. 75 Playing back a tape with digital effects .. 76 Enlarging images recorded on tapes – Tape PB ZOOM ............................... 77 Searching for a scene – Multi-picture search ........................ 79 Searching the boundaries of recorded tape by title – Title search .......................... 83 Searching a recording by date – Date search ....................................... 84 Editing Dubbing a tape ........................................... 85 Recording video or TV programmes ...... 88 Superimposing a title ................................ 92 Making your own titles ............................ 97 The Micro Cassette Memory .................. 100 Labelling a cassette .................................. 101 5 Table of contents “Memory Stick” operations Using a “Memory Stick” – introduction .................................... 103 Recording still images on a “Memory Stick” – Memory photo recording ............. 114 Recording an image from a tape as a still image ................................... 122 Superimposing a still image in a “Memory Stick” on a moving picture – MEMORY MIX............................... 125 Recording moving pictures on “Memory Stick”s – MPEG movie recording ................ 129 Recording a picture from a tape as a moving picture.................................. 132 Viewing a still image – Memory photo playback .............. 135 Viewing a moving picture – MPEG movie playback ................. 138 Copying still images recorded on “Memory Stick”s to tape ................. 140 Enlarging still images recorded on “Memory Stick”s – Memory PB ZOOM ....................... 142 Playing back images continuously – SLIDE SHOW ................................. 144 Preventing accidental erasure – Image protection ............................ 146 Deleting images – DELETE .................... 147 Writing a print mark – PRINT MARK . 150 Viewing Images Using your Computer Viewing images on your computer – Introduction ................................... 151 Connecting your camcorder to your computer using the i.LINK jack ..... 154 Connecting your camcorder to your computer using the USB cable – For Windows users ....................... 155 Viewing images recorded on a “Memory Stick” on your computer – For Windows users ....................... 159 Connecting your camcorder to your computer using the USB cable – For Macintosh users ...................... 162 Using the Network function Accessing the network (DCR-IP55 only)................................ 165 Customising Your Camcorder Changing the menu settings .................. 167 Troubleshooting Types of trouble and how to correct trouble ................................................ 176 Self-diagnosis display ............................. 183 Warning indicators and messages ........ 184 Additional Information Usable cassettes ....................................... 187 About the “InfoLITHIUM” battery pack ....................................... 189 About i.LINK ........................................... 191 Using your camcorder abroad ............... 193 Maintenance information and precautions ........................................ 194 Specifications................................…
Text truncated - open the document above for the full version.
Users Manual
51 Advanced Recording Operations Recording still images in the CAMERA mode Recording images with the flash The flash pops up automatically. The default setting is auto (no indicator). To change the flash mode, press (flash) repeatedly until the flash mode indicator appears on the screen. Each press of (flash) changes the indicator as follows: t t t No indicator Auto red-eye reduction: The flash fires before recording to reduce red-eye. Forced flash:The flash fires regardless of the surrounding brightness. No flash:The flash does not fire. The flash is automatically adjusted to the appropriate brightness. You can also change FLASH LVL to the desired brightness in the menu settings (p. xx). Try recording various images to find the most appropriate setting for FLASH LVL. Notes •The recommended shooting distance using the built-in flash is 0.3 m to 2.5 m (31/32 feet to 8 1/3 feet). • (auto red-eye reduction) may not produce the desired effect depending on individual differences, the distance to the subject, the subject not looking at the pre- recording flash or other conditions. •A flash effect cannot be obtained easily when you use forced flash in a bright location. •When you record images with the flash, sound may not be recorded clearly. •When recording with the flash, it takes longer to prepare for image capture. This is because your camcorder starts to charge power for firing after the flash pops up. Darken the surroundings by covering the lens, and press PHOTO lightly so that your camcorder starts to charge power after the flash pops up. •If it is not easy to focus on the subject automatically, for example, when recording in the dark, use the focal distance information (p. xx) for focusing manually. When you record images with the flash The allowed shooting distance is shorter than when you record on a “Memory Stick” in Memory Photo recording. (flash) 52 Recording still images in the CAMERA mode When playing back the image recorded with the flash on another VCR The image may flutter. If you leave your camcorder for five or more minutes after disconnecting the power source Your camcorder returns to the default setting (auto). You cannot shoot images with the flash during the following operations: -Super Nightshot -Digital effect –Fader –Recording The flash does not fire even if you select auto (no indicator) and (auto red-eye reduction) during the following operations: –Exposure –NightShot –Spotlight of PROGRAM AE –Sunset & moon of PROGRAM AE –Landscape of PROGRAM AE 53 Advanced Recording Operations Recording still images in the CAMERA mode PHOTO 3 1 FN PAGE2 PHOTO Self-timer recording You can record still images with the self-timer. You can also use the Remote Commander for this operation. Before operation Insert a "Memory Stick" into your camcorder. (1)In the standby mode, press FN and select PAGE2. (2)Press SELFTIMER. The (self-timer) indicator appears on the screen. (3)Press PHOTO deeper. The self-timer starts counting down from 10 with a beep. In the last two seconds of the countdown, the beep gets faster, then the recording starts automatically. To cancel self-timer recording Press SELFTIMER so that the (self-timer) indicator disappears from the screen while your camcorder is in the standby mode. You cannot cancel the self-timer recording using the Remote Commander. Note The self-timer recording mode is automatically cancelled when: –Self-timer recording is finished. –The POWER switch is set to OFF (CHG) or VCR. During recording to the tape You cannot use self-timer recording. 54 2 FN 3 1 MANUAL SET PROGRAM AE P EFFECT FLASH MODE FLASH LVL WHT BAL N. S. LIGHT AUTO SHTR EXIT RET. EXEC AUTO HOLD OUTDOOR INDOOR You can manually adjust and set the white balance. This adjustment makes white subjects look white and allows more natural color balance. Normally white balance is automatically adjusted. (1)Set the POWER switch to CAMERA or MEMORY/NETWORK for DCR-IP55 (MEMORY for DCR-IP45). (2)Press FN to display PAGE1. (3)Press MENU, then select WHT BAL in in the menu settings to select a desired white balance mode (p. xx). HOLD : Recording a single-colored subject or background (OUTDOOR) : •Recording a sunset/sunrise, just after sunset, just before sunrise, neon signs, or fireworks •Under a color matching fluorescent lamp n (INDOOR) : •When lighting conditions change quickly •In too bright places such as photography studios •Under sodium lamps or mercury lamps To return to FN Press EXIT. To return to the automatic white balance mode Set WHT BAL to AUTO in the menu settings. Adjusting the white balance manually 55 Advanced Recording Operations If the picture is being taken in a studio lit by TV lighting We recommend that you record in the n INDOOR. When you record under fluorescent lighting Select AUTO or HOLD. Your camcorder may not adjust the white balance correctly in the n INDOOR mode. In the AUTO mode Point your camcorder at the white subject for about 10 seconds after setting the POWER switch to CAMERA to get better adjustment when: –You detach the battery for replacement. –You bring your camcorder from indoors to outdoors holding the exposure, or vice versa. In the HOLD mode Set the white balance to AUTO and reset to HOLD after few seconds when: –You change the PROGRAM AE mode. –You bring your camcorder from indoors to outdoors, or vice versa. Adjusting the white balance manually 56 You can record a 16:9 wide picture to watch on the 16:9 wide-screen TV (16:9WIDE). If you connect a TV compatible with the ID-1/ID-2 system, the screen size is automatically sellected. Black bands appear on the screen during recording in 16:9WIDE mode [a]. The picture during playing back on a normal TV [b] or a wide -screen TV [c] are compressed in the widthwise direction. If you set the screen mode of the wide-screen TV to the full mode, you can watch pictures of normal images [d]. (1)Set the POWER switch to CAMERA. (2)Press FN to display PAGE1. (3)Press MENU, then set 16:9WIDE to ON in in the menu settin…
Text truncated - open the document above for the full version.
Users Manual
Editing 101 Labelling a cassette The label can consist of up to 16 characters and is stored in cassette memory. When you insert the labelled cassette and set the POWER switch to CAMERA or VCR, the label is displayed for about 5 seconds. (1)Insert the cassette you want to label. (2)Set the POWER switch to CAMERA or VCR. (3)Press FN to display PAGE1. (4)Press MENU, then select TAPE TITLE in in the menu setting, then press EXEC (p. xx). (5)Select a desired character. Repeat pressing a key to select the desired character on the key. (6)Press t to move the cursor for the next character. Repeat the same procedure as step 5 and 6 to complete the label. (7)Press SET. The label is stored in memory. To return to FN Press EXIT. To erase the label you have made Select C in step 6. The last character is erased. To change the label you have made Insert the cassette to change the label, and operate in the same way to make a new label. 4,5 3 FN r R EXEC 2 CM SET TITLE T I TLEERASE T I TLE DSPL CM SEARCH TAPE T I TLE ERASE ALL 6,7 EXIT RET. EXEC Rr &? !ABCDEF Tt 678 90 123 45 MNOJKLGH I SET’ . , /– WXY Z TUVPQR S [ GRADU _____] EXIT TAPE TITLE &? !ABCDEF Tt 678 90 123 45 MNOJKLGH I SET’ . , /– WXY Z TUVPQR S [ GRADUATION ] EXIT TAPE TITLE SET CM SET TITLE T I TLEERASE T I TLE DSPL CM SEARCH TAPE T I TLE ERASE ALL ––––––––– EXIT RET. EXEC Rr &? !ABCDEF Tt 678 90 123 45 MNOJKLGH I SET’ . , /– WXY Z TUVPQR S [__________] EXIT TAPE TITLE 102 Labelling a cassette If you set the write-protect tab of the tape to lock You cannot label the tape. Slide the write-protect tab to release the write protection. To erase the title Press T. The last character is erased. To enter a space Press t. To enter the character on the same button in succession Press t to move the cursor to the next position, and enter the character. Erasing all the data in Micro Cassette Memory You can delete all the data (cassette title, date, photo, thumbnail, and cassette information) in Micro Cassette Memory at once. (1)Set the POWER switch to CAMERA or VCR. (2)Press FN to display PAGE1. (3)Press MENU, then select ERASE ALL in in the menu settings, then select OK. (4)Select ERASE OK? and the press EXEC. (5)Select EXECUTE and then press EXEC. “ERASING” flashes on the screen. Once deleting is completed, “COMPLETE” is displayed. To return to FN Press EXIT. To cancel deleting Select RETURN in step 4, then press EXEC. Note Once you delete all the data in the Micro Cassette Memory, the following operations do not work: –Multi-picture search –Title search –Date search Note on the ID number This item cannot be deleted. 103 “Memory Stick” operations Terminal Write-protect tab Labelling position — “Memory Stick” operations — Using a “Memory Stick”– introduction You can record and play back images on a “Memory Stick” supplied with your camcorder. You can easily play back, record or delete images. You can exchange image data with other equipment such as your computer etc., using the USB cable for “Memory Stick” supplied with your camcorder. File format Still image (JPEG) Your camcorder compresses image data in JPEG format (extension .jpg). Moving picture (MPEG) Your camcorder compresses picture data in MPEG format (extension .mpg). Typical image data file name Still image 100-0001:This file name appears on the screen of your camcorder. DSC00001.jpg: This file name appears on the display of your computer. Moving picture MOV10001:This file name appears on the screen of your camcorder. Mov10001.mpg: This file name appears on the display of your computer. Using a “Memory Stick” •You cannot record or erase images when the write-protect tab on the “Memory Stick” is set to LOCK. •The position and shape of the write protect tab may be different depending on the model. •We recommend backing up important data on the hard disk of your computer. •Image data may be damaged in the following cases: –If you remove the “Memory Stick”, turn the power off or detach the battery for replacement when the access lamp is flashing –If you use “Memory Stick”s near magnets or magnetic fields such as those of speakers and televisions •Prevent metallic objects or your finger from coming into contact with the metal parts of the connecting section. •Stick its label on the labelling position. •Do not bend, drop or apply strong shock to “Memory Stick”s. •Do not disassemble or modify “Memory Stick”s. •Do not let “Memory Stick”s get wet. •Do not use or keep “Memory Stick”s in locations that are: –Extremely hot such as in a car parked in the sun or under the scorching sun –Under direct sunlight –Very humid or subject to corrosive gases •When you carry or store a “Memory Stick”, put it in its case. 104 Using a “Memory Stick” – introduction “Memory Stick” slot “Memory Stick”s formatted by a computer “Memory Stick”s formatted by Windows OS or Macintosh computers do not have a guaranteed compatibility with this camcorder. Notes on image data compatibility •Image data files recorded on “Memory Stick”s by your camcorder conform with the Design Rules for Camera File Systems universal standard established by the JEITA (Japan Electronics and Information Technology Industries Association). On your camcorder, you cannot play back still images recorded on other equipment (DCR-TRV890E/TRV900/TRV900E or DSC-D700/D770) that does not conform to this universal standard. (These models are not sold in some areas.) •If you cannot use the “Memory Stick” that is used with other equipment, format it with this camcorder (p. xx). Note that formatting erases all information on the “Memory Stick.” •“Memory Stick” and are trademarks of Sony Corporation. •Windows and Windows Media are either registered trademarks or trademarks of Microsoft Corporation in the United States and/or other countries. •Macintosh and Mac OS, QuickTime are trademarks of Apple Computer, Inc. •Pentium is either registered trademarks or trademarks of Intel Corporation in the United States and/or other countries. •All other product names mentioned…
Text truncated - open the document above for the full version.
Users Manual
151 Viewing Images Using your Computer There are the following ways of connecting the camcorder to a computer in order to view images saved on a “Memory Stick” or recorded on tape on your computer. To view images on a computer which has a “Memory Stick” slot, first remove the “Memory Stick” from the camcorder and then insert it into the computer’s “Memory Stick” slot. When connecting to a computer via the USB jack, complete installation of the USB driver before connecting the camcorder to the computer. If you connect the camcorder to the computer first, you will not be able to install the USB driver correctly. For details about your computer’s connecters and editing software, contact the computer manufacturer. Viewing images recorded on a tape When connecting to a computer via the USB jack For more information, see page xxx. CamcorderConnection Computer environment Connection jackcablerequirements USB jack USB cableUSB connector, (supplied)editing software Tape stills and i. LINK cablei. LINK (IEEE1394) movies MICROMV jack(DV connectingconnector cable ) (optional)editing software “Memory Stick” USB jack USB cableUSB connector, stills and movies(supplied)editing software — Viewing Images Using your Computer — Viewing images on your computer – Introduction (USB) jack USB connecter USB cable (supplied) Push into the end 152 When connecting to a computer via the MICROMV jack Your computer must have a DV connector and editing software installed that can read video signals. Viewing images recorded on a “Memory Stick” When connecting to a computer via the USB jack See page xxx when using Windows and page xxx when using Macintosh. You can also use a Memory Stick Reader/Writer (optional). When connecting to a computer without a USB jack Use an optional floppy disk adaptor for Memory Sticks or a PC card adaptor for Memory Sticks. When purchasing an accessory, check its catalog beforehand for the recommended operating environment. Viewing images on your computer – Introduction : Signal flow i.LINK cable (optional) i.LINK (MICROMV) is marked on this side USB cable (supplied) (USB) jack 153 Viewing Images Using your Computer Viewing images on your computer – Introduction Notes on using your computer “Memory Stick” •“Memory Stick” operations on your camcorder cannot be assured if a “Memory Stick” formatted on your computer is used on your camcorder, or if the “Memory Stick” in your camcorder was formatted from your computer when the USB cable was connected. •Do not compress the data on the “Memory Stick.” Compressed files cannot be played back on your camcorder. Software •Depending on your application software, the file size may increase when you open a still image file. •When you load an image modified using retouching software from your computer to your camcorder or when you directly modify the image on your camcorder, the image format will differ so a file error indicator may appear and you may be unable to open the file. Communications with your computer Communications between your camcorder and your computer may not recover after recovering from Suspend, Resume, or Sleep. 154 You can view or edit the images recorded on a tape using your computer. You can record images edited with the computer on the tape. To view images on your computer, the application software MovieShaker Ver. 3.1 for MICROMV (supplied) is required. Note To view images on your computer, you have to install the i.LINK driver and the application software into your computer. They are included in the supplied application software MovieShaker Ver. 3.1 for MICROMV. Before installing the i.LINK driver and the application software into your computer, be sure not to connect the camcorder to the computer. For details on installing and on an i.LINK connection, refer to the operating instructions supplied with MovieShaker Ver. 3.1 for MICROMV. Recommended computer environment Recommended Windows environment OS:Microsoft Windows MillennuiumEdition, Windows 2000 Professional, Windows XP Home/Professional (support to be provided). Standard installation is required. Operation is not assured if the above environment is an upgraded OS. CPU:MMX Pentium III 600 MHz or faster (Required) MMX Pentium III 800 MHz or faster (Recommended) Main memory: 128 MB or larger (Required) 256 MB or larger (Recommended) Display:800 × 600 or larger screen size/1024 × 480 or larger screen size, 16-bit color or higher Hard disk:100 MB hard disk space (for installation), ATA66 or higher speed (required for capturing an image) The i.LINK (IEEE1394) connector must be provided as standard. Note Operations are not guaranteed for all the recommended computer environments mentioned above. Connecting your camcorder to your computer using the i.LINK jack i.LINK connector Computer i.LINK cable i.LINK (MICROMV) : Signal flow 155 Viewing Images Using your Computer Connecting your camcorder to your computer using the USB cable – For Windows users Complete installation of the USB driver before connecting the camcorder to the computer. If you connect the camcorder to the computer first, you will not be able to install the USB driver correctly. When connecting to a computer via the USB jack You must install a USB driver onto your computer in order to connect the camcorder to the computer’s USB connector. The USB driver can be found on the CD-ROM supplied, along with the application software required for viewing images. If you connect your camcorder and your computer using the USB cable, you can view pictures live from your camcorder and pictures recorded on a tape on your computer (USB streaming function). Furthermore, if you download pictures from your camcorder to your computer, you can process or edit them in image processing software and append them to e-mail. You can view images recorded on a “Memory Stick” on your computer. Recommended computer usage environment when connecting via USB cable and viewing tape images on the computer OS: Microsoft Windows 98SE, Windows Me, Window…
Text truncated - open the document above for the full version.
Users Manual
DCR-TRV50 Network 3-074-603-11(1).US 3-074-603-11 (1) Network Function Operating Instructions © 2002 Sony Corporation Registration code (for a detailed explanation of this cord, see page 28.) 2 DCR-TRV50 Network 3-074-603-11(1).US On trademarks • ImageStation is the registered trademark of Sony Corporation. • “Memory Stick” and are registered trademarks of Sony Corporation. • The BLUETOOTH trademarks are owned by their proprietor and used by Sony Corporation under license. • NetFront by Access Co., Ltd. is adopted for the Internet function of this product. NetFront is a registered trademark of Access Co., Ltd in Japan. Copyright © 1996 – 2001 ACCESS CO., LTD. • Portions of the supplied software are based partially on the work of the Independent JPEG Group. All other product names mentioned herein may be the trademarks or registered trademarks of their respective companies. Furthermore, “™” and “®” are not mentioned in each case in this manual. No compensation for your recordings Any recording contents or downloaded files cannot be compensated for being lost due to redording/playback malfunction or storage media problems. Precautions • Before using the network function, make sure to set the clock on the camcorder. For details, refer to the operating instructions of the camcorder. If you use the network function without setting the clock, you may not be able to send/receive email, or view a web page. • Do not remove the battery pack or disconnect the AC power adaptor while operating in NETWORK mode. The setup for the NETWORK mode may be lost. Also, exit the NETWORK mode when setting the POWER switch to OFF (CHG) or switching the mode. These are to prevent the NETWORK mode setup from being lost. • It is recommended that you make backup copies of your email messages and your network preferences. These may be lost from time to time due to memory corruption. To save the network preferences, write them down on paper, or use “Setup memo,” described (p. 108). Also, this data may be lost when the camcorder is repaired by services. • The network function with this product is available only in the U.S. • The reset button cannot reset the network preferences. Note on network operation when using the battery pack When the remaining battery time is insufficient in NETWORK mode, use the AC power adaptor or replace the battery pack with a fully charged battery pack. Before connecting the AC power adaptor or replacing the battery pack, be sure to exit the NETWORK mode. 3 Introduction DCR-TRV50 Network 3-074-603-11(1).US Table of contents Introduction The network function on the camcorder ... 4 Basic operations in the NETWORK mode .................................................................. 6 How to use the Network Menu .......... 6 How to hold your camcorder when operating in the NETWORK mode ................................................ 7 How to use the stylus .......................... 8 How to input characters ...................... 9 Character input display ..................... 11 The available characters list .............. 12 Character input setting ...................... 17 Preparation Using the NETWORK functions .............. 18 Overview of the Bluetooth wireless technology ............................................ 19 Registering a Bluetooth device ......... 20 Using your Modem Adaptor with Bluetooth Function ...................... 20 When the registration has failed ...... 24 Displaying information on your camcorder ..................................... 24 Radio wave indication ....................... 26 Selecting other Bluetooth devices from the list .................................. 26 Deleting a registered Bluetooth device from the list ...................... 26 Customer registration ................................ 28 DI customer registration .................... 28 Online registration using your PC ... 28 Online registration with your camcorder ..................................... 28 Registering your album on the Web ........ 31 Internet service provider ........................... 32 Registering with “So-net” ......................... 33 Setting network preferences ..................... 34 Entering your DI customer ID and password ...................................... 34 Setting your provider preferences ... 36 Network Operation Making your album on the Web .............. 45 Uploading images to your album on the Web .................................... 45 Viewing or editing your album on the Web .................................... 52 Deleting images from your album ... 57 Finishing viewing or editing the album ............................................ 57 Using email .................................................. 58 Sending email ...................................... 58 Using the address book ..................... 69 Receiving email ................................... 75 Deleting unnecessary email .............. 80 Viewing web pages .................................... 82 Viewing web pages ............................ 82 How to use the menu bar on the browser ......................................... 84 Storing the web page into a “Memory Stick” – Page Memo ................................ 90 Shutting down the browser .............. 95 Additional Information File storage destinations and file names ................................................................ 96 Troubleshooting .......................................... 97 Trouble accessing the Internet .......... 97 Trouble with email ............................. 98 Trouble viewing web pages .............. 99 Troubles about the album on the Web .............................................. 100 Adjusting the LCD screen (CALIBRATION) ....................... 100 Specifications ............................................. 101 Messages .................................................... 102 General ............................................... 102 Album on the Web ........................... 103 Email .........…
Text truncated - open the document above for the full version.
Contact Information
Applicant
Kazuyuki Hori(Chief EMC/RF Compliance Specialist)
Test Firm
Kansai Electronic Industry Dev. Ct.Eizo Hariya
Technical Specifications
| # | Rule Parts | Frequency Range | Power Output |
|---|---|---|---|
| 1 | 15C | 2.40 GHz - 2.48 GHz | 26.00 µW |
Other Applications from Sony Group Corporation
AK8WW81782
Aug 21, 2026Radio Equipment
Equipment Class
DSS - Part 15 Spread Spectrum TransmitterAK8CFIZCP2
Aug 03, 2026Wireless Controller
Equipment Class
DSS - Part 15 Spread Spectrum TransmitterAK8OEV321MUH
Apr 14, 2026LCD Monitor
Equipment Class
JAD - Part 15 Class A Digital DeviceAK8OEV431MUH
Apr 14, 2026LCD Monitor
Equipment Class
JAD - Part 15 Class A Digital DeviceAK8OEV271MUH
Apr 14, 2026LCD Monitor
Equipment Class
JAD - Part 15 Class A Digital Device