B94SDGOB1191802.11a/b/g/n WLAN MODULE
HP Inc.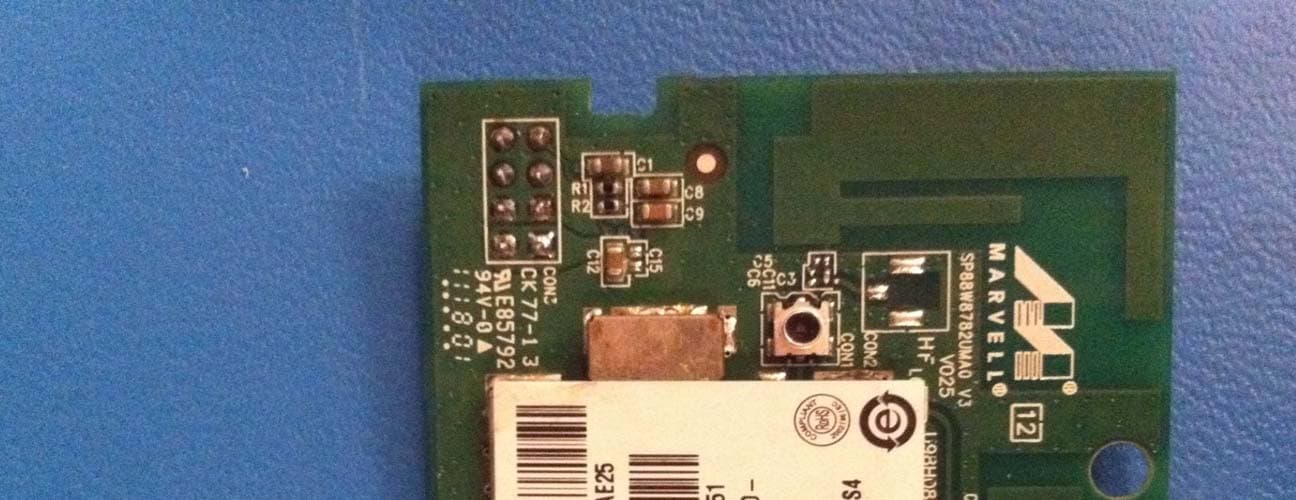
Click to zoom
Application Details
- Equipment Class
- DTS - Digital Transmission System
- Date of Grant
- Sep 06, 2011
- Application Purpose
- Original Equipment
- Date of Application
- Sep 06, 2011
- Equipment Note
- 802.11a/b/g/n WLAN MODULE
- Frequency Range
- 5755.00000000 - 5795.00000000
- Company
- HP Inc.
- Country
- United States
Documents & Files
Document Text
Text extracted from the exhibit documents filed with the FCC. Open a document above to read the original.
Users Manual
HP Deskjet 3520 eAll- in-One series DRAFT DRAFT Contents 1How Do I?......................................................................................................................3 2 Get to know the HP All-in-One Printer parts....................................................................................................................5 Control panel features......................................................................................................6 Wireless Settings.............................................................................................................7 Status Lights....................................................................................................................8 Auto Power-Off ..............................................................................................................9 3Print Print photos...................................................................................................................11 Print documents.............................................................................................................12 Print Quick Forms..........................................................................................................13 Print envelopes..............................................................................................................13 Tips for print success......................................................................................................14 4 ePrint from anywhere ePrint from anywhere.....................................................................................................17 5Paper basics Recommended papers for printing...................................................................................19 Load media..................................................................................................................21 6 Copy and scan Copy...........................................................................................................................25 Scan to a computer........................................................................................................26 Tips for copy success.....................................................................................................29 Tips for scan success......................................................................................................30 7Work with cartridges Check the estimated ink levels.........................................................................................31 Order ink supplies.........................................................................................................32 Replace the cartridges....................................................................................................33 Cartridge warranty information.......................................................................................34 8 Connectivity WiFi Protected Setup (WPS – requires WPS router)............................................................37 Traditional wireless connection (requires router)................................................................38 USB Connection (non-network connection)........................................................................38 Change from a USB connection to a wireless network........................................................39 Connect a new printer....................................................................................................39 Change network settings................................................................................................39 Tips for setting up and using a networked printer...............................................................39 Advanced printer management tools (for networked printers)..............................................40 1 Contents DRAFT 9 Solve a problem Improve print quality......................................................................................................43 Clear a paper jam.........................................................................................................45 Unable to print..............................................................................................................46 Networking..................................................................................................................53 HP support....................................................................................................................53 10 Technical information Notice..........................................................................................................................57 Cartridge chip information..............................................................................................57 Specifications................................................................................................................58 Environmental product stewardship program.....................................................................60 Regulatory notices.........................................................................................................63 Index.................................................................................................................................69 2 Contents DRAFT 1How Do I? Learn how to use your HP All-in-One • Printer parts • Load media • Replace the cartridges • Clear a paper jam How Do I?3 How Do I? DRAFT Chapter 1 4How Do I? How Do I? DRAFT 2Get to know the HP All-in-One • Printer parts • Control panel features • Wireless Settings • Status Lights • Auto Power-Off Printer parts • Front and top views of the HP All-in-One 1Display 2Control panel 3Paper tray 4Paper tray extender (also referred to as the tray extender) 5Glass 6Lid-backing 7Lid 8Cartridge door 9Cartridge access area 10 Cleanout door Get to know the HP All-in-One5 Get to know the HP All-in-One DRAFT • Rear view of the HP All-in-One 11…
Text truncated - open the document above for the full version.
Users Manual
Printer failure Resolve printer failure. ▲ If you have already turned the printer off and then on, and this does not solve your problem, contact HP support. Please contact HP support for help . Printhead failure The printhead in this product has failed. Please contact HP support for help . Ink cartridge problem First try removing and reinserting the cartridges. If this does not work, clean the cartridge contacts. If your problem is still not resolved, Replace the cartridges. Clean the ink cartridge contacts CAUTION:The cleaning procedure should take only a few minutes. Make sure that the ink cartridges are reinstalled in the product as soon as possible. It is not recommended to leave the ink cartridges outside of the product longer than 30 minutes. This could result in damage to both the printhead and the ink cartridges. 1.Check that power is on. 2.Open cartridge access door. Wait for print carriage to move to right side of product. 3.Press tab on cartridge indicated in the error message, then remove it from slot. Chapter 9 50Solve a problem Solve a problem DRAFT 4.Hold the ink cartridge by its sides with the bottom pointing up and locate the electrical contacts on the ink cartridge. The electrical contacts are four small rectangles of copper or gold-colored metal on the bottom of the ink cartridge. 5.Wipe only the contacts with a dry swab or lint-free cloth. CAUTION:Be careful to touch only the contacts, and do not smear any of the ink or other debris elsewhere on the cartridge. 6.On the inside of the product, locate the contacts in the printhead. The contacts look like a set of four copper or gold-colored pins positioned to meet the contacts on the ink cartridge. 7.Use a dry swab or lint-free cloth to wipe the contacts. 8.Reinstall the ink cartridge. 9.Close the access door, and check if the error message has gone away. 10 . If you still receive the error message, turn the product off, and then on again. Click here to go online for more information. Setup Cartridges When you first setup the printer, you must install the cartridges that shipped in the box with the printer. These cartridges are labeled SETUP, and they calibrate your printer before the first print job. Failure to install the SETUP cartridges during the initial product setup causes an error. If you installed a set of regular cartridges, remove them and install Setup Cartridges51 Solve a problem DRAFT the SETUP cartridges to complete printer setup. After printer setup is complete, the printer can use regular cartridges. WARNING!You must replace the orange caps on the regular cartridges you remove, or they will quickly dry out. Some ink will still evaporate, but less than if the cartridges are uncapped. You can use the orange caps from the SETUP cartridges if necessary. Please contact HP support for help . Cartridge Supply Upgrade Try to get the printer to recognize the supply upgrade cartridge. 1.Remove the supply upgrade cartridge. 2.Insert the original cartridge in the carriage. 3.Close the access door, then wait until the carriage stops moving. 4.Remove the original cartridge, then replace with the supply upgrade cartridge. 5.Close the access door, then wait until the carriage stops moving. If you still receive a supply upgrade problem error message contact HP support. Please contact HP support for help . Older Generation Cartridge You will need to use a newer version of this cartridge. To identify a newer version of the cartridge, look at exterior of the cartridge package and find the Warranty Ends date. Chapter 9 52Solve a problem Solve a problem DRAFT If it says ‘v1’ several spaces to the right of the date, then the cartridge is the updated newer version. Please contact HP support for help . Networking • Learn how to find your network security settings. Click here to go online for more information. • Learn about the Network Diagnostic Utility and other troubleshooting tips. Click here to go online for more information. • Learn how to change from a USB to wireless connection. Click here to go online for more information. • Learn how to work with your firewall and anti-virus programs during printer setup. Click here to go online for more information. HP support • Register the product • Support process • HP support by phone • Additional warranty options Register the product By taking just a few quick minutes to register, you can enjoy quicker service, more efficient support, and product support alerts. If you did not register your printer while installing the software, you can register now at http://www.register.hp.com. Support process If you have a problem, follow these steps: 1.Check the documentation that came with the product. 2.Visit the HP online support Web site at www.hp.com/support. HP online support is available to all HP customers. It is the fastest source for up-to-date product information and expert assistance and includes the following features: • Fast access to qualified online support specialists • Software and driver updates for the product • Valuable product and troubleshooting information for common problems • Proactive product updates, support alerts, and HP newsgrams that are available when you register the product 3.Call HP support. Support options and availability vary by product, country/region, and language. HP support by phone Phone support options and availability vary by product, country/region, and language. HP support53 Solve a problem DRAFT This section contains the following topics: • Phone support period • Placing a call • Support phone numbers • After the phone support period Phone support period One year of phone support is available in North America, Asia Pacific, and Latin America (including Mexico). To determine the duration of phone support in Europe, the Middle East, and Africa, go to www.hp.com/support. Standard phone company charges apply. Placing a call Call HP support while you are in front of the computer and the product. Be prepared to provide the following information: • Pro…
Text truncated - open the document above for the full version.
Users Manual
Printer failure Resolve printer failure. ▲ If you have already turned the printer off and then on, and this does not solve your problem, contact HP support. Please contact HP support for help . Printhead failure The printhead in this product has failed. Please contact HP support for help . Ink cartridge problem First try removing and reinserting the cartridges. If this does not work, clean the cartridge contacts. If your problem is still not resolved, Replace the cartridges. Clean the ink cartridge contacts CAUTION:The cleaning procedure should take only a few minutes. Make sure that the ink cartridges are reinstalled in the product as soon as possible. It is not recommended to leave the ink cartridges outside of the product longer than 30 minutes. This could result in damage to both the printhead and the ink cartridges. 1.Check that power is on. 2.Open cartridge access door. Wait for print carriage to move to right side of product. 3.Press tab on cartridge indicated in the error message, then remove it from slot. Chapter 9 50Solve a problem Solve a problem DRAFT 4.Hold the ink cartridge by its sides with the bottom pointing up and locate the electrical contacts on the ink cartridge. The electrical contacts are four small rectangles of copper or gold-colored metal on the bottom of the ink cartridge. 5.Wipe only the contacts with a dry swab or lint-free cloth. CAUTION:Be careful to touch only the contacts, and do not smear any of the ink or other debris elsewhere on the cartridge. 6.On the inside of the product, locate the contacts in the printhead. The contacts look like a set of four copper or gold-colored pins positioned to meet the contacts on the ink cartridge. 7.Use a dry swab or lint-free cloth to wipe the contacts. 8.Reinstall the ink cartridge. 9.Close the access door, and check if the error message has gone away. 10 . If you still receive the error message, turn the product off, and then on again. Click here to go online for more information. Setup Cartridges When you first setup the printer, you must install the cartridges that shipped in the box with the printer. These cartridges are labeled SETUP, and they calibrate your printer before the first print job. Failure to install the SETUP cartridges during the initial product setup causes an error. If you installed a set of regular cartridges, remove them and install Setup Cartridges51 Solve a problem DRAFT the SETUP cartridges to complete printer setup. After printer setup is complete, the printer can use regular cartridges. WARNING!You must replace the orange caps on the regular cartridges you remove, or they will quickly dry out. Some ink will still evaporate, but less than if the cartridges are uncapped. You can use the orange caps from the SETUP cartridges if necessary. Please contact HP support for help . Cartridge Supply Upgrade Try to get the printer to recognize the supply upgrade cartridge. 1.Remove the supply upgrade cartridge. 2.Insert the original cartridge in the carriage. 3.Close the access door, then wait until the carriage stops moving. 4.Remove the original cartridge, then replace with the supply upgrade cartridge. 5.Close the access door, then wait until the carriage stops moving. If you still receive a supply upgrade problem error message contact HP support. Please contact HP support for help . Older Generation Cartridge You will need to use a newer version of this cartridge. To identify a newer version of the cartridge, look at exterior of the cartridge package and find the Warranty Ends date. Chapter 9 52Solve a problem Solve a problem DRAFT If it says ‘v1’ several spaces to the right of the date, then the cartridge is the updated newer version. Please contact HP support for help . Networking • Learn how to find your network security settings. Click here to go online for more information. • Learn about the Network Diagnostic Utility and other troubleshooting tips. Click here to go online for more information. • Learn how to change from a USB to wireless connection. Click here to go online for more information. • Learn how to work with your firewall and anti-virus programs during printer setup. Click here to go online for more information. HP support • Register the product • Support process • HP support by phone • Additional warranty options Register the product By taking just a few quick minutes to register, you can enjoy quicker service, more efficient support, and product support alerts. If you did not register your printer while installing the software, you can register now at http://www.register.hp.com. Support process If you have a problem, follow these steps: 1.Check the documentation that came with the product. 2.Visit the HP online support Web site at www.hp.com/support. HP online support is available to all HP customers. It is the fastest source for up-to-date product information and expert assistance and includes the following features: • Fast access to qualified online support specialists • Software and driver updates for the product • Valuable product and troubleshooting information for common problems • Proactive product updates, support alerts, and HP newsgrams that are available when you register the product 3.Call HP support. Support options and availability vary by product, country/region, and language. HP support by phone Phone support options and availability vary by product, country/region, and language. HP support53 Solve a problem DRAFT This section contains the following topics: • Phone support period • Placing a call • Support phone numbers • After the phone support period Phone support period One year of phone support is available in North America, Asia Pacific, and Latin America (including Mexico). To determine the duration of phone support in Europe, the Middle East, and Africa, go to www.hp.com/support. Standard phone company charges apply. Placing a call Call HP support while you are in front of the computer and the product. Be prepared to provide the following information: • Pro…
Text truncated - open the document above for the full version.
Cover Letter(s)
Authorizationon Behalf of Hewlett-Packard Company For the US Federal Communications Commission Office of Engineering and TechnologyandOther FCC Programs and Offices 1. I, David P. Adams, am Canada/USA Technical Regulations Manager for Hewlett-Packard Company (“Hewlett-Packard”) and Applicant/Grantee Contact of Recordfor Hewlett-Packard together with its subsidiaries and affiliates worldwide (collectively,“HP”) for HP’s dealings withthe United States Federal Communications Commission (“FCC”). I amduly authorized by HP to make this Authorization on HP’s behalf. 2. This Authorization will designate the person named below to act on my behalf and HP’s behalf as authorized agent and representative, until further notice, with the additional power todesignate one or more third partyagents for HP with regard to particular matters and applications. Allacts carried out and requests made by this named representativerelating to any matter before the FCC, including requests for confidentiality,shall have the same effect as mine. Name:Julio Correa Title:Product RegulationsEngineer Address:Hewlett-Packard Company Attention: Julio Correa Mailstop 8-90 16550 West Bernardo Dr. San Diego, CA 92127-1899 Telephone:858-655-3017 E-mail:[email protected] 3. Questions about the scope and effect ofthis Authorization should be addressed as follows: David P. Adams Canada/USA Region Technical Regulations Manager 1501 Page Mill Road, MS1222 Palo Alto, CA 94304-1126 650.857.4423 Telephone 650.857.4882 Fax [email protected] 4. I declare under penalty of perjury that the foregoing is true and correct, and that this Authorization was executed atPalo Alto, California, on the date indicated below my signature. ____________________________ Signature David P. Adams Canada/USA Technical Regulations Manager Hewlett-Packard Company 14 January 2009_______________ Date
Cover Letter(s)
Applicant/Grantee Hewlett Packard Company FCC ID: B94SDGOB1191 Section 15.212 Modular Transmitters Request for Modular Approval Request for Limited Modular Approval Requirements EUT Conditions Comply (Y/N) Single Modular Approval Requirements 1 The radio elements of the modular transmitter must have their own shielding. The physical crystal and tuning capacitors may be located external to the shielded radio elements. Refer to external photos. Shield is over the radio circuit module. Y 2 The modular transmitter must have buffered modulation/data inputs (if such inputs are provided) to ensure that the module will comply with Part 15 requirements under conditions of excessive data rates or over-modulation. All inputs to the modules are buffered through logic or microprocessor inputs. Refer to Schematics. Y 3 The modular transmitter must have its own power supply regulation. Internal 3.3V power regulator. Refer to schematics. Y 4 The modular transmitter must comply with the antenna and transmission system requirements of Sections 15.203, 15.204(b) and 15.204(c). The antenna must either be permanently attached or employ a “unique” antenna coupler (at all connections between the module and the antenna, including the cable). The “professional installation” provision of Section 15.203 is not applicable to modules but can apply to limited modular approvals under paragraph (b) of this section. Module contains a hirose connector. The module will go inside final product where the antenna(s) will be integral to the end product, which can be considered permanently attached. Y 5 The modular transmitter must be tested in a stand-alone configuration, i.e., the module must not be inside another device during testing for compliance with Part 15 requirements. Unless the transmitter module will be battery powered, it must comply with the AC line conducted requirements found in Section 15.207. AC or DC power lines and data input/output lines connected to the module must not contain ferrites, unless they will be marketed with the module (see Section 15.27(a)). The length of these lines shall be the length typical of actual use or, if that length is unknown, at least 10 centimeters to insure that there is no coupling between the case of the module and supporting Module was tested outside. Refer to test setup photos in test report. Y equipment. Any accessories, peripherals, or support equipment connected to the module during testing shall be unmodified and commercially available (see Section 15.31(i)). 6 The modular transmitter must be equipped with either a permanently affixed label or must be capable of electronically displaying its FCC identification number. (A) If using a permanently affixed label, the modular transmitter must be labeled with its own FCC identification number, and, if the FCC identification number is not visible when the module is installed inside another device, then the outside of the device into which the module is installed must also display a label referring to the enclosed module. This exterior label can use wording such as the following: “Contains Transmitter Module FCC ID: XYZMODEL1” or “Contains FCC ID: XYZMODEL1.” Any similar wording that expresses the same meaning may be used. The Grantee may either provide such a label, an example of which must be included in the application for equipment authorization, or, must provide adequate instructions along with the module which explain this requirement. In the latter case, a copy of these instructions must be included in the application for equipment authorization. (B) If the modular transmitter uses an electronic display of the FCC identification number, the information must be readily accessible and visible on the modular transmitter or on the device in which it is installed. If the module is installed inside another device, then the outside of the device into which the module is installed must display a label referring to the enclosed module. This exterior label can use wording such as the following: “Contains FCC certified transmitter module(s).” Any similar wording that expresses the same meaning may be used. The user manual must include instructions on how to access the electronic display. A copy of these instructions must be included in the application for equipment authorization. Refer to label provided. Y 7 The modular transmitter must comply with any specific rules or operating requirements that ordinarily apply to a complete transmitter and the manufacturer must provide adequate instructions along with the module to explain any such requirements. A copy of these instructions must be included in the application for equipment authorization. Refer to manual Y 8 The modular transmitter must comply with any applicable RF exposure requirements in its final configuration. Refer to MPE calculation in the Test report Y A limited modular approval may be granted for single or split modular transmitters that do not comply with all of the above requirements, e.g., shielding, minimum signaling amplitude, buffered modulation/data inputs, or power supply regulation, if the manufacturer can demonstrate by alternative means in the application for equipment authorization that the modular transmitter meets all the applicable Part 15 requirements under the operating conditions in which the transmitter will be used. Limited modular approval also may be granted in those instances where compliance with RF exposure rules is demonstrated only for particular product configurations. The applicant for certification must state how control of the end product into which the module will be installed will be maintained such that full compliance of the end product is always ensured.
Cover Letter(s)
Inkjet Consumer Solutions (ICS) Division 16399 West Bernardo Drive San Diego CA 92127-1899, USA _______________________________________________________________ GENERAL DECLARATION We, Hewlett Packard Company, declares that the device does not have “Ad Hoc on non-US frequencies” and/or “on DFS frequencies” while applying for the following product. Model Name: 802.11 a/b/g/n WLAN Module Model Number: SDGOB-1191 & SDGOB-1192 FCC ID: B94SDGOB1191 If you have any questions regarding the declaration, please don’t hesitate to contact us. Thank you! Sincerely yours, 10 June, 2011 Julio Correa Date Product Regulations Engineer 858-655-3017 (tel) 858-655-3961 (fax) [email protected]
Cover Letter(s)
D esi gn a ti on of T h i r d P a r ty R epr esen ta ti v e B y A u th or i z ed A gen t of H ewl ett-Pack ar d C ompany 1. I am an authorized agent and representative of Hewlett-Packard Company together with its subsidiaries and affiliates (collectively, “HP”), designated as such by David P. Adams as HP’s Applicant/Grantee Contact of Record for the FCC, pursuant to his Authorization as attached hereto. My name, address and contact information appear below. Any questions about the scope of this Designation of Third Party Representative should be directed to me. 2. Pursuant to this authority, I designate the third party identified below as HP’s agent for the matters and applications specified below, for the term specified below, unless earlier terminated by HP. a. Name, address and contact information of third party: Compliance Certification Services ( Certification Division) 47173 Benicia Street Fremont, CA 94538, USA b. Matters and applications covered (product and/or model identification, FCC ID where available): Product name: 802.11 a/b/g/n WLAN Module Model name: SDGOB-1191 & SDGOB-1192 FCC ID: B94SDGOB1191 c: Term of designation, unless earlier terminated by HP: 1 year(s). 3. All invoices for FCC’s services should be sent as specified in paragraph 2a, above. Licenses and test reports generated for HP should be sent as specified in paragraph 2a but copied to the undersigned. No access should be granted to any HP file or project information except as necessary in connection with the matters and applications specified in paragraph 2b. All acts carried out and requests made by the third party representative relating to any matter before the FCC, including requests for confidentiality, shall have the same effect as HP’s own. Signature Name: Julio Correa Title: Product Regulations Engineer Address: Hewlett-Packard Company Attention: Julio Correa, Mailstop 65-220 16399 West Bernardo Dr. San Diego, CA 92127-1899 Telephone: 858-655-3017 E-mail: [email protected] June 10, 2011 Date
Cover Letter(s)
1. Please provide a document that addresses each of items 1-6 below as required by FCC for this type of device. Please respond to each question with required information, a brief explanation of how the requirement is met, or to a specific location in another document included in this filing. Single word answers like "yes" and "no" are not sufficient. 1-1) Provide a channel/frequency plan for this device showing the channels that have active scanning or passive scanning. Active scanning is where the device can transmit a probe (beacon) and passive scanning is where the device is can listen only with no probes. Channel 1‐11 in 2.4 Ghz and channels 36, 40, 44, 48, 52, 56, 60, 64, 100, 104, 108, 112, 116, 136, 140, 149, 153, 157, 161 and 165 in 5Ghz. It does active scanning in all the channels it supports unless it is configured to do only passive scanning for certain channels. It does passive scanning when 802.11d is enabled for certain number of times the probe request is sent based on the region it is operated. Active scanning is not permitted on DFS channels in all modes: channels 52, 56, 60, 64, 100, 104, 108, 112, 116, 136 and 140. 1-2) Verify that this device does not have ad-hoc mode Ad‐hoc mode is not supported. Please refer to the ad‐hoc mode letter. 1-3) Verify that this application contains a complete User's Manual and/or Professional Installers Manual. If the manual is not complete, provide an updated User's Manual exhibit. Please find the final document as a separate attachment. 1-4) Can this device act as an access point on the non-DFS legacy frequencies (5.15-5.25 MHz) Yes this device can act as an access point on the non‐DFS legacy frequencies. And, access point operation in DFS frequencies i…
Text truncated - open the document above for the full version.
Contact Information
Applicant
Richard P Tarsio(US Canada Technical Regulations)
Technical Contact
Compliance Certification ServicesAliza Zaffar
[email protected](510) 771-1000
47173 Benicia Street · Fremont, California
Non-Technical Contact
Compliance Certification ServicesAliza Zaffar
[email protected](510) 771-1000
Test Firm
Compliance Certification ServicesThu Chan
Technical Specifications
| # | Rule Parts | Frequency Range | Power Output |
|---|---|---|---|
| 6 | 15C | 5.75 GHz - 5.79 GHz | 36.98 mW |
Other Applications from HP Inc.
B94HNI70CBVN
Aug 14, 2026Model HSN-I70C
Equipment Class
CBE - Citizens Band End User DevicesB94HNQ38C3BEK
Jun 03, 2026Notebook PC
Equipment Class
TNB - Licensed Non-Broadcast Station TransmitterB94HNI65C4BLV
Apr 23, 2026Notebook Computer HSN-I65C-4
Equipment Class
PCB - PCS Licensed TransmitterB94HNI67C4BLV
Apr 23, 2026Notebook Computer HSN-I67C-4
Equipment Class
CBE - Citizens Band End User DevicesB94HNI66C4SPY
Feb 03, 2026Model HSN-I66C-4
Equipment Class
PCB - PCS Licensed Transmitter