EW780-6101-00Cordless Telephone System with BT Enabled Base
VTech Telecommunications Ltd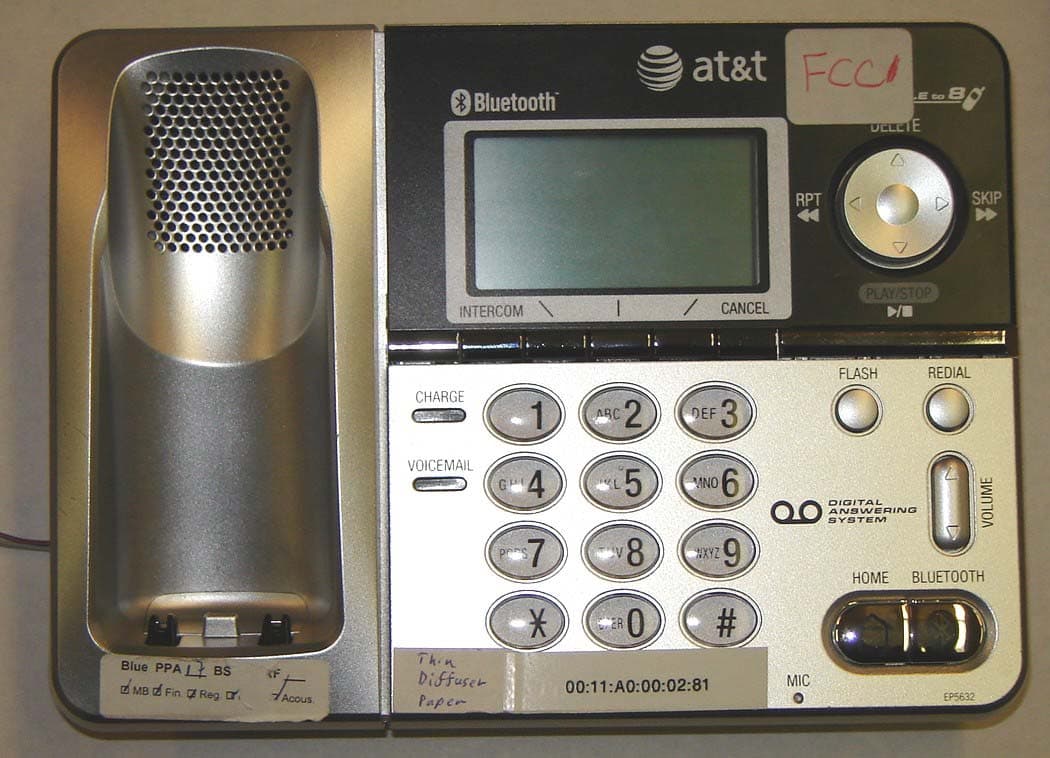
Click to zoom
Application Details
- Equipment Class
- DSS - Part 15 Spread Spectrum Transmitter
- Date of Grant
- Mar 08, 2007
- Application Purpose
- Original Equipment
- Date of Application
- Mar 08, 2007
- Equipment Note
- Cordless Telephone System with BT Enabled Base
- Frequency Range
- 5744.73600000 - 5825.95200000
- Company
- VTech Telecommunications Ltd
- Country
- Hong Kong
Documents & Files
Document Text
Text extracted from the exhibit documents filed with the FCC. Open a document above to read the original.
Users Manual
User’s manual 5.8 GHz Cordless telephone/speakerphone answering system with Bluetooth functions EP5632/EP5632-2 with caller ID & call waiting Congratulations on your purchase of this AT&T product. Before using this AT&T product, please read the Important safety instructions on pages 47-50 of this manual. Please thoroughly read this user’s manual for all the feature operations and troubleshooting information necessary to install and operate your new AT&T product. You can also visit our web site at www.telephones.att.com Model #: EP5632/EP5632-2 Type: 5.8GHz cordless telephone/answering system Serial #: (found on the bottom of the telephone base) Purchase date: Place of purchase: Copyright © 2007 Advanced American Telephones. All rights reserved. AT&T and the Globe symbol are trademarks of AT&T Knowledge Ventures, licensed to Advanced American Telephones. 3 Please read and follow these instructions carefully: • Use only the supplied rechargeable battery or replacement battery. • Do not dispose of the battery in a fire. Check with local codes for special disposal instructions. • Do not open or mutilate the battery. Released electrolyte is corrosive and may cause damage to the eyes or skin. It may be toxic if swallowed. • Exercise care in handling batteries in order not to create a short circuit with conductive materials such as rings, bracelets, and keys. The battery or conductor may overheat and cause harm. • Charge the battery provided with or identified for use with this product only in accordance with the instructions and limitations specified in this manual. • Observe proper polarity orientation between the battery and battery charger. • Do not disassemble your telephone. There are no user-serviceable parts inside. Refer to qualified service personnel for servicing. STOP! See page 8 for easy instructions. You must install and charge the battery before using the telephone. For customer service or product information, visit our website at www.telephones.att.com Add new handsets to make your telephone more versatile (see page 65) Your telephone can accommodate up to twelve cordless handsets. You can add new handsets (AT&T EP562, purchased separately) at anytime, but each must be registered with the telephone base before use. The handset provided with your telephone is automatically registered as handset 1. Additional handsets will be assigned numbers in the order they are registered (2, 3, 4, etc.). You can register a maximum of 12 handsets. Handset 1Handset 2Handset 3 Handset 4 Telephone base Handset 5 Handset 8 Handset 6 Handset 11 Handset 10 Handset 9Handset 12 Handset 7 NOTES: 1. A maximum of four handsets and the telephone base can be connected to the sameA maximum of four handsets and the telephone base can be connected to the same external call at the same time. 2. The EP5632 has one pre-registered handset. You can purchase and register elevenThe EP5632 has one pre-registered handset. You can purchase and register eleven additional handsets (EP562) to the telephone base of EP5632. 3. The EP5632-2 has two pre-registered handsets. You can purchase and register tenThe EP5632-2 has two pre-registered handsets. You can purchase and register ten additional handsets (EP562) to the EP5632-2 system. 1 Table of contents Getting started Quick reference guide .....................2 Parts checklist .....................................5 Before you begin ...............................6 Telephone base installation .........7 Battery installation & charging ...8 Wall mounting .....................................9 Belt clip & optional headset .....10 Telephone setup Handset screen images ...............11 Handset sounds ...............................12 Handset messages .........................14 Handset settings .............................15 Base settings ....................................19 Telephone operation Basic handset operation .............23 Basic base operation ....................25 Options while on calls .................27 Intercom calls ...................................28 Handset directory New directory entries ...................30 Directory search ..............................32 Editing or deleting an entry ......33 Base directory New directory entries ...................36 Directory search ..............................38 Editing or deleting an entry ......39 Handset call log and redial Reviewing your call log ...............42 Dialing a call log entry ................44 Reviewing your redial log ...........45 Reviewing voice messages ........47 Base call log & redial Reviewing your call log ...............49 Dialing a call log entry ................51 Reviewing your redial log ...........52 Answering system operation Setting answering system ..........55 Outgoing announcements ..........58 Message playback ..........................59 Recording & playing memos .....60 Message window displays ..........61 Remote access .................................62 Appendix Display screen status icons .......63 Alert tones & indicator lights ...64 Adding new handsets ...................65 Replacing a handset .....................66 Charging spare battery pack ....68 Troubleshooting ..............................69 Important safety information....75 FCC Part 68 and ACTA .................78 FCC Part 15 .......................................80 Limited warranty .............................81 Index .....................................................84 Technical specifications ...............86 Remote access wallet card ........87 User’s manual 5.8 GHz Cordless telephone/speakerphone answering system with Bluetooth functions EP5632/EP5632-2 with caller ID & call waiting 2 Getting started Quick reference guide NavKey Press the CENTER NavKey to display menus or select a high- lighted item. Press the UP or DOWN NavKey or to navigate through menus (see page 3). Press the CENTER NavKey to select a highlighted menu item. SPEAKER Press to activate the handset speakerphone. Press again to re…
Text truncated - open the document above for the full version.
Users Manual
5 Getting started Telephone base with mounting bracket installed Cordless telephone handset (1 for EP5632) (2 for EP5632-2) Battery (1 for EP5632) (2 for EP5632-2) Belt clip (1 for EP5632) (2 for EP5632-2) Battery compartment cover (1 for EP5632) (2 for EP5632-2) Base adapterTelephone line cord Parts checklist Save your sales receipt and original packaging in case it is necessary to ship your telephone for warranty service. Check to make sure the telephone package includes the following. The model number of your telephone can be found on the label located on the bottom of the telephone base. User's manualQuick start guide Charger for handset (Only for EP5632-2) User’s manual 5.8 GHz Cordless telephone/speakerphone answering system with Bluetooth functions EP5632/EP5632-2 with caller ID & call waiting Quick start guide 5.8 GHz Cordless telephone/speakerphone answering system with Bluetooth functions EP5632/EP5632-2 with caller ID & call waiting 6 Getting started Telephone base installation Choose a central location close to a telephone jack and a power outlet not connected to a wall switch. The telephone base can be placed on a flat surface or mounted on a standard wall plate. For optimum range and better reception, place the telephone base in a high and open loca- tion. Avoid placing the telephone base too close to: • Communication devices such as: personal computers, computer rout- ers, television sets, VCRs, wireless routers (wireless broadband, wi-fi, or 802.11) or other cordless telephones. • Excessive heat sources. • Noise sources such as a window with traffic outside, motors, micro- wave ovens, refrigerators, or fluorescent lighting. • Excessive dust sources such as a workshop or garage. • Excessive moisture. • Extremely low temperatures. • Mechanical vibration or shock such as on top of the washing machine or work bench. 7 Getting started Telephone base installation NOTES: 1. Use only the power cord supplied with this product. If you need a replacement, visit our web site at www.telephones.att.com or call 1 (800) 222-3111; in Canada dial 1 (866) 288-4268. 2. Be sure to use an electrical outlet not controlled by a wall switch. 3. This power adapter is intended to be plugged into a vertical wall outlet or a floor outlet. The prongs are not designed to hold the plug in place if it is plugged into a ceiling, under-the-table or cabinet outlet. 4. If you receive high speed internet through your telephone line (commonly referred to as DSL), and you are experiencing inference during telephone conversations and/or your caller ID features are not functioning properly, install a DSL filter to the telephone line between the telephone base and the telephone wall jack. Contact your DSL service provider for a DSL filter. Telephone line cord DSL filter Optional for DSL users (see number four in the NOTES section below.) Power adapter 8 Getting started FCC ID:EW780-6101-00 IC: 1135A-80610100 CAUTION: To Reduce Risk of Fire, Use Only Supplied Battery or Battery 103 Battery installation & charging After installation, place the handset in the telephone base and allow the battery to charge for 16 hours before use. You can keep battery charged by returning the handset to the telephone base after each use. When the bat- tery power is completely depleted, a full recharge takes about 16 hours. Place handset in telephone base to charge for at least 16 hours before first use. Press tab and slide cover away from the battery compartment. Insert supplied battery as indicated. Insert the top edge (contacts and tab) first, then push down on the lower portion. Caution: Use only the supplied rechargeable battery or replacement battery (Model 103, part number 89-0429-00-00). Low battery indicator Return handset to telephone base to recharge when this symbol flashes. (Handset will beep when battery is low.) Replace battery compartment cover. 12:00AM REDIAL CALLER ID HANDSET 2 Low Battery NOTES: 1. When fully charged, the battery in the handset can provide 5 hours of talk time or 3 days of standby time (when idle and away from the telephone base). 2. For installation of the spare battery into the spare battery compartment on the telephone base, please see page XX. 1. 2. 9 Getting started Installation options 1. To remove the mounting bracket, hold the telephone base in both hands. Press the two bracket tabs and lift the mounting bracket away from slots and . 2. Connect the telephone line cord and power adapter to the jacks on the bottom of the telephone base. Bundle the telephone cord, and secure it with a twist tie before placing it inside the mounting bracket. Wall mounting The telephone base comes with the mounting bracket already installed for tabletop use. If wall mounting is desired, a telephone outlet wall mounting plate with mounting studs is required. This mounting plate with studs may be available for purchase from many hardware or consumer electronics retailers and may require professional installation. Tabletop mountWall mount Telephone outlet mounting plate with mounting studs
Users Manual
10 Getting started 3. To attach the mounting bracket for wall mounting, insert the tabs of the bracket into slots and on the telephone base, then press the other bracket tabs into slots and as shown on the right. 4. Plug the power adapter into an electrical outlet not controlled by a wall switch. Plug the telephone line cord into a telephone wall jack. To mount the telephone on the wall, position the mounting holes and over the telephone outlet mounting studs. Press and slide the bracket down firmly so the telephone is held securely on the telephone outlet mounting studs. Telephone outlet mounting studs Installation options Tabletop mounting To change back from the wall mounting to tabletop mounting position, follow the directions below. 1. Remove the telephone base from the wall. Unplug the cords from the wall jacks. Remove the mounting bracket from the telephone base. 2. Insert the bracket tabs into slots and on the telephone base, then press the other bracket tabs into the slots and . 3. Route cords through slots. Plug the other end of the telephone line cord into a telephone wall jack. Plug the large end of the power adapter into an electrical outlet not controlled by a wall switch. 11 Getting started Belt clip & optional headset Install belt clip as shown below if desired. Snap belt clip into notches on both sides of handset. Plug 2.5 mm headset into the jack on the side of the handset (beneath small rubber flap). To release belt clip from handset, press on both flaps of the clip (as shown). Pull and unlock one flap from the notch first before detaching the whole belt clip from handset. For handsfree telephone conversations, use any industry standard 2.5 mm headset (purchased separately). For best results, use an AT&T 2.5 mm headset. To purchase a headset, visit our website at www.telephones.att.com or con- tact our customer service representatives at 1 (800) 222-3111. In Canada, dial 1 (866) 288-4268. 12 Telephone setup Handset screen images The Pictures and Animations settings allow you to select an image or design as wallpaper for the background of the handset screen. These images can also be programmed for indi- vidual callers in the directory so that different images will show when there are incoming calls from different callers (see page 31). Press the center NavKey to display the menu. Use the up or down NavKey or to highlight Animations or Pictures, then press the center NavKey again to select this option. Browse through the options using the up or down NavKey or , then press the softkey set or center NavKey to select an image. To change the wallpaper display, repeat the above steps. 12:00AM REDIAL CALLER ID HANDSET 1 Browse through listings. Press the SET softkey or the center NavKey to select the desired image. x 1x 2or Animations Pictures Pictures Animations SET Pictures SET 13 Telephone setup Handset ringers Press the center NavKey to enter the main menu, and press the up NavKey three times to enter the Ringers menu, then press the center NavKey to activate the menu. Select the desired originating telephone line (HOME, CELL 1, CELL 2) by pressing the up or down NavKey or to highlight it. When the desired originating telephone line (HOME, CELL 1, CELL 2) is highlighted, press the center NavKey to confirm selection. After selecting any option, press the center NavKey or the softkey SET to confirm. Ringer volume At this menu, the ringer volume can be set between levels 1 and 6, or set the ringer off by pressing the OFF softkey so the telephone does not ring at all with incoming calls. When the ringer on the handset is turned off, the flashing icon is shown on the screen of the handset. Press the left or down NavKey or to lower the ringer volume. Press the right or up NavKey or to increase the ringer volume. Press the SET softkey or the center NavKey to confirm your choice. Ringer melody This feature allows you to customize the ring- ers. The menu includes options for 8 ringer styles and 13 preloaded musical melodies. A sample of each ringer melody will be played when scrolling through the choices. Press the up or down NavKey or to change the ringer melody. Press the SET softkey or the center NavKey to confirm. • From the Settings menu, Press three times to enter the Ringer Melody menu. Press the SELECT softkey to confirm. • The system will start by showing the name and a sample of the current ringer melody. Melody 2 Melody 3 Melody 4 Ringer Melody SET Ringers x 3 12:00AM REDIAL CALLER ID HANDSET 1 Ringer for CELL 1 Ringer for CELL 2 Record New Ringer Ringer for HOME Ringers Ringer Melody Ringer for HOME Ringer Volume Melody 1 DELETE 14 Telephone setup Handset ringers • Use or keys to scroll through the 8 ringer styles and musical melodies. • Press the SELECT softkey to confirm. A confirmation tone will sound and Choice saved will be displayed briefly. Record ringer You can also customize the ringer by recording tunes or messages up to 15 seconds. Press the RECORD softkey to start recording. The screen will show Record ringer after tone. Start recording the new ringer after the tone. When finished recording, press the STOP soft- key. Press the PLAY softkey to listen to the recorded ringer. Then press the SAVE softkey to enter the name of this recording using the table on page 30. Enter up to ten characters for the name of this recording (See table on page 30). Press the SAVE softkey to save this ringer. The record- ing with the programmed name will then be added to the list of ringer melodies. If neither the SAVE nor PLAY softkey is pressed, the new recording will be discarded. More than one ringer can be recorded as long as there is recording time remaining. The total recording time can be extended if some of the preset musical ringers are deleted. If there is not enough time left to record a new ringer, Ringer memory full will be displayed after pressing the RECORD softkey. NOTE: The microphone used when recording a ringer is located at the bottom front of the handset. If …
Text truncated - open the document above for the full version.
Users Manual
22 Telephone setup Base settings Keypad tone The base is preset to beep with the pressing of each key. The keypad tones can be turned on or off in this menu. • Press the MENU softkey to enter the main menu. Press four times to reach the Set- tingsmenu and press the SELECT softkey to confirm. • Press the twice to highlight Keypad Tone and press the SELECT softkey to confirm. • Use the or to select whether you prefer the keypad tone to be On or Off. • Press the SET softkey to confirm. • The screen will show Choice saved to confirm the new setting. Ringer for HOME Set Ringer Melody Ringer Volume SELECT Ringer for HOME Ringer Volume Ringer Melody Ringer Melody SELECT 23 Telephone setup Base settings Language In this menu, you can select the language used in all menus and screen displays. The choices are English, Español or Français.Français.. • From the Settings menu, press three times to enter the Language menu, and press the SELECT softkey to confirm. • Press the or to scroll through the lan- guages available: English, Español and Fran-Fran- çais. • Press the SET softkey to confirm your selec- tion. • The screen will show Choice saved to confirm the new setting. LCD Contrast This setting allows you to adjust the contrast of the display on the telephone base to your liking. • From the Settings menu, press four times to highlight LCD Contrast and press the SELECT softkey to confirm. • When the contrast bar appears on the screen, press or to change the contrast of the display. A sample of the contast is displayed on screen during the adjustment. • Press the SET softkey to confirm your selection. There will be a confirmation tone and Choice saved is displayed on the screen to confirm the new setting. Clear Voice Mail If you subscribe to voicemail services provided by your local telephone company, there will be a text message on the handset and the VOICEMAIL light on the telephone base will light when there is new voicemail. To manually turn off the new voicemail indication: Language Set Spanish French English SET Clear Voice Mail Clear Voice Mail Indication? YESNO Voice Mail Indication Cleared Choice Saved Choice saved LCD Contrast SET 24 Telephone setup Base settings • Press the MENU softkey to enter the main menu. Press four times to reach the Set- tingsmenu and press the SELECT softkey to confirm. • From the Settings menu, press three times to enter the Clear Voice Mail menu. Press the SELECT softkey to confirm. • Press the YES softkey if it is decided to turn off the VOICEMAIL light, or press the NO softkey to keep the VOICEMAIL on until all voicemail have been reviewed. Default settings This menu allows you to restore the default settings for all menu and answering system settings. It will not clear the directory, call log, redial log, or messages menu. • Press the MENU softkey to enter the main menu. Press three times to reach the Set- tings and press the SELECT softkey to confirm. • From the Settings menu, press twice to enter the Default Settings menu and press the SELECT softkey to confirm. • Press the Yes softkey to confirm, or press the No softkey to keep all settings. Delete handsets A handset must be de-registered first before it can be registered to another telephone base. • Press the center NavKey on the hand- set. • Press the up or down NavKey or four times for Settings. • Press the center NavKey to enter into the Settings menu. • Press the up NavKey once to select Delete Registration. • Press the center NavKey and you will be prompted to select YES/NO for handset de- registration. NOTES: 1. This feature removes theThis feature removes the VOICEMAIL indication from all handsets and the tele- phone base. 2. Unreviewed voicemail will not be deleted. Default Settings Restore Default Settings? YESNO Default Settings Restored 25 Telephone operation Ringers Ringer volume At this menu, you can set the ringer volume level (1 - 6), or turn off the ringer. • In the Main Menu, press five times to reach Ringers. • Press the SELECT softkey and a volume indica- tion with six levels appears. Adjust the volume by pressing or to decrease or or to increase the volume or press the OFF softkey to turn the ringer off. • Press the SET softkey to confirm your selection and the screen will show Choice saved. The icon will flash on the screen of the telephone base if its ringer is turned off. Ringer melody This feature allows you to customize the ringer on the telephone base. The menu includes options for eight ringer melodies. There will be a sample of each ringer melody when scrolling through the choices. • Press the MENU softkey to enter the main menu. Press five times to reach the Ring- ers menu and press the SELECT softkey to confirm. 26 Telephone operation Basic handset operation Making, answering and ending calls To make a call, press HOME/FLASH or SPEAKER, then dial the number. Press OFF/CANCEL to hang up. To answer a call on the home line, press HOME/FLASH or SPEAKER or any dial pad key to make or answer a call on the cellular line, press CELLULAR. To predial (preview numbers before dialing), enter numbers first, then press HOME/FLASH orSPEAKERto dial. Press the OFF/CANCEL to delete. Pressing # for about two seconds when predialing will bring out a P on the screen to signify a two-second pause. Handsfree speakerphone calls To make a call using the handsfree speaker- phone, press SPEAKER, then dial a number. To answer an incoming call, press SPEAKER. During a call, press SPEAKER to alternate between handsfree speakerphone and the normal handset use. Press OFF/CANCEL to hang up. Mute Press the softkey MUTE to silence the microphone while on a call. Microphone Muted is displayed on the handset screen. You will be able to hear the other party, but the other party will not be able to hear you until you press the UNMUTE softkey to resume the con- versation. 12:00AM HOLD MUTE Phone 0:41 27 Telephone operation Basic handset operation Hold Press the HOLD softkey to place a call on hold. Press HOME/FLAS…
Text truncated - open the document above for the full version.
Users Manual
64 Base call log & redial Reviewing your call log How caller ID works If you subscribe to caller ID service, informa- tion about each caller will be displayed after the first or second ring. You can review the call log to find out who has called, return the call by pressing HOME or CELLULAR, or copy the caller’s name and number into your directory. The call log can store up to 50 entries. Calls are displayed in chronological order (the earli- est unreviewed call first). When the log is full, the earliest reviewed entry is automatically deleted to make room for new incoming call information. If you answer a call before the information appears on the screen, the caller ID will not be saved in the call log. Reviewing your call log • Press the CID softkey on the telephone base to enter the call log. • Use or to scroll through the list. The latest call is displayed first. Returning a call • Press the CID softkey to enter the call log. • Use or to scroll through the list until the desired entry is displayed. • Press HOME to call the number currently displayed (see page 51). Caroline 908-266-4794 12/6 5:38 AM NOTE: Names of call- ers are displayed only if the information is provided by your local telephone com- pany. If the telephone num- ber of the caller matches an entry in the directory of that handset, the name shown on screen will match the name in the directory. (Example: If "Christine Smith" calls, her name will appear as "Chris" if this is how you entered it.) 65 Base call log & redial Reviewing your call log Saving an entry • Press the CID softkey once to enter the call log. •Use or to scroll through the list until the desired entry is displayed. • Press the OPITIONS softkey to bring out the Call Log OPTIONS. • When the screen shows Save to Di- rectory, press the SELECT softkey to save that number in the directory. • A confirmation tone will sound and the screen will show Entry saved to Direc- tory. Deleting an entry • Press the CID softkey once to enter the call log. • Press or to scroll through the list until the desired entry is displayed. • Press the DELETE softkey to bring out the Delete Options. Press Delete Entry. • Press or to confirm the deletion. • Press the SELECT softkey to confirm dele- tion. • A confirmation tone will sound after that entry is deleted. Deleting all entries • Press or to highlight Delete All Entries. • Press the SELECT softkey to confirm deletion. • The screen will ask whether you want to delete all calls. • Press the YES softkey to confirm deletion, or press the NO softkey to keep all call log entries. Call Log OPTIONS Save to Dir Call Log OPTIONS Dial Number Call Log OPTIONS Delete Entry Call Log OPTIONS Delete ALL Entries NOTES:All entries canAll entries can also be deleted using the Delete Options shown when the DELETE softkey is pressed while review- ing the call log. When in idle mode, press the CID softkey to activate the call log. Press DELETE key to bring up the DELETE OPTIONS. Press twice to highlight Delete. Press the SELECT softkey and the screen will display Delete All Calls. Press the YES softkey if you wish to delete all calls. Press the NO softkey if you wish to keep all message. 66 Base call log & redial Dialing a call log entry When any caller ID screen is displayed, press HOME or CELLULAR to dial the exact num- ber on the screen. Dialing options Caller ID numbers may appear with an area code which may not be required for local calls. If the number displayed is not in the correct format, change it by pressing the # key on and off to view different options. Caroline 908-266-4794 12/6 5:38 AM 67 Base call log & redial Reviewing your redial log About the redial memory You can review the redial log to see the last 10 numbers recently dialed, redial or save the number into your directory. When there are already 20 entries in the redi- al memory, the earliest entry is automatically deleted to make room for the new one if the redial log is full. Each time you make a call, the earliest entry is automatically deleted to make room for the latest one. Reviewing your redial log • Press the REDIAL softkey to enter the re- dial log. The latest dialed call is displayed first. • Use the or to scroll through the list. Dialing a number from the redial log • Press the REDIAL softkey to enter the redial log. The earlist unreviewed call is displayed first. • Use the or to scroll through the list until the desired entry is shown. • Press HOME or CELLULAR to directly redial the displayed number. Saving an entry • Press the REDIAL softkey to enter the redial log. • Use the or to scroll through the list until the desired entry is highlihgted. • Press the SAVE softkey to confirm. • When the screen prompts you to enter the name for that entry, enter the caller’s name using the table on page 36. • Press the DONE softkey to confirm the name. A confirmation tone will sound and the screen will show Entry saved to Direc- tory. REDIAL OPTIONS Save to Dir REDIAL OPTIONS Dial Number REDIAL 266-4794 68 Base call log & redial Reviewing your redial log Deleting an entry • Press the REDIAL softkey to enter the redial log. • Use the or to scroll through the list until the entry to be deleted is highlighted. • Press the DELETE softkey to reach the De- lete Options screen. • When Delete Entry is highlighted, press the SELECT softkey. • A confirmation tone will sound after that entry is deleted. Deleting all entries • Press the REDIAL softkey to enter the redial log. • Press to highlight Delete All En- tries, then press the softkey DELETE. • When Delete All Entries is high- lighted, press the SELECT softkey. • When Delete all Redial num- bers? appears on screen, press the Yes softkey. Redial list deleted will appear on the screen of the telephone base and a confirmation tone will sound. REDIAL OPTIONS Delete Entry REDIAL OPTIONS Delete ALL Entries Answering system operation Announcement The announcement is the message callers hear when calls are answered by the answering system. •…
Text truncated - open the document above for the full version.
Users Manual
94 Appendix FCC Part 15 This equipment has been tested and found to comply with the requirements for a Class B digital device under Part 15 of the Federal Communications Commission (FCC) rules. These requirements are intended to provide reasonable protection against harmful interference in a residential instal- lation. This equipment generates, uses and can radiate radio frequency energy and, if not installed and used in accordance with the instructions, may cause harmful interference to radio communications. However, there is no guarantee that interference will not occur in a particular instal- lation. If this equipment does cause harmful interference to radio or television reception, which can be determined by turning the equipment off and on, the user is encouraged to try to correct the interference by one or more of the following measures: • Reorient or relocate the receiving antenna. • Increase the separation between the equipm…
Text truncated - open the document above for the full version.
Contact Information
Applicant
Michael Tsui(Approbation Supervisor)
Technical Contact
Non-Technical Contact
Nemko Canada Inc.Joanna Olszanowska
[email protected]613 737 9680
Test Firm
Nemko Canada Inc. (Ottawa)Charles Neal
Technical Specifications
| # | Rule Parts | Frequency Range | Power Output |
|---|---|---|---|
| 3 | 15C | 5.74 GHz - 5.83 GHz | 326.00 mW |
Other Applications from VTech Telecommunications Ltd

EW780-2531-01
Sep 12, 2024Video Baby Monitor
Equipment Class
DSS - Part 15 Spread Spectrum Transmitter
EW780-2531-00
Sep 12, 2024Video Baby Monitor
Equipment Class
DXX - Part 15 Low Power Communication Device Transmitter
EW780-2792-00A
Sep 09, 2024Video Baby Monitor
Equipment Class
DSS - Part 15 Spread Spectrum Transmitter
EW780-H0HQ-13
Aug 20, 2024SIP cordless hotel phone
Equipment Class
PUB - Part 15 Unlicensed PCS Base Station
EW780-2365-00A
Aug 19, 2024Video Baby Monitor
Equipment Class
DSS - Part 15 Spread Spectrum Transmitter