JNZMRBY1252.4GHz Cordless Mouse
Logitech Far East Ltd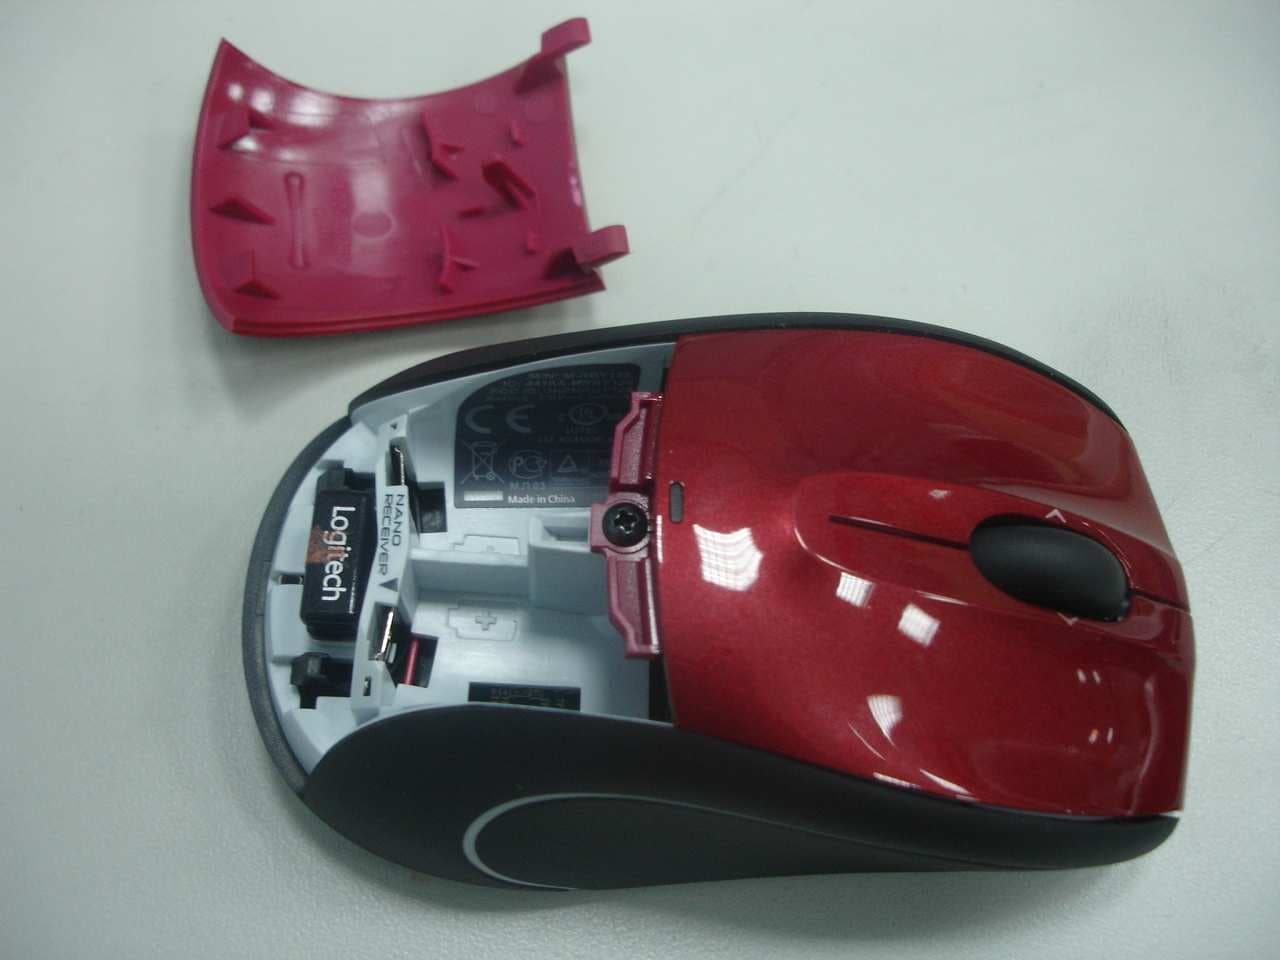
Click to zoom
Application Details
- Equipment Class
- DXX - Part 15 Low Power Communication Device Transmitter
- Date of Grant
- Feb 24, 2008
- Application Purpose
- Original Equipment
- Date of Application
- Feb 24, 2008
- Equipment Note
- 2.4GHz Cordless Mouse
- Frequency Range
- 2405.00000000 - 2474.00000000
- Company
- Logitech Far East Ltd
- Country
- Taiwan
Documents & Files
Document Text
Text extracted from the exhibit documents filed with the FCC. Open a document above to read the original.
Users Manual
Package contents Setting up the mouse Thank you! Merci! Grac i as ! Obr ig ado ! 1 2 3 EnglishPackage contents1 . Mouse 2 . USB Plug-and-Forget Nano-receiver 3 . Desktop USB extension stand 4 . Two AA alkaline batteries 5 . Quick start guide EspañolEsta caja contiene1 . Ratón 2 . Nanorreceptor USB de tipo "conectar y olvidar" 3 . Base de extensión USB de sobremesa 4 . Dos pilas alcalinas AA 5 . Guía de inicio rápido FrançaisContenu1 . Souris 2 . Nano-récepteur USB ultra-discret 3 . Support d'extension USB pour le bureau 4 . Deux piles alcalines de type AA 5 . Guide de démarrage rapide PortuguêsConteúdo da embalagem1 . Rato 2. Nano-Receptor USB “Ligar e Esquecer” 3. Suporte de secretária de extensão USB 4. Duas pilhas AA alcalinas 5. Guia de iniciação rápida EnglishThank you for purchasing the Logitech ® V450 Nano Cordless Laser Mouse for Notebooks. Follow the easy steps in this guide to begin enjoying the features of your new mouse. EspañolLe agradecemos la adquisición de Logitech ® V450 Nano Cordless Laser Mouse for Notebooks. El sencillo procedimiento detallado en esta guía le permitirá empezar a disfrutar de las funciones de su nuevo ratón. FrançaisNous vous remercions d'avoir acheté la souris Logitech ® V450 Nano Cordless Laser Mouse for Notebooks. Suivez les étapes de ce guide pour commencer à apprécier les fonctionnalités de votre nouvelle souris. PortuguêsObrigado por ter adquirido o Rato Laser Sem Fios Logitech ® V450 Nano para Portáteis. Siga os passos simples neste guia para começar a desfrutar das funcionalidades do novo rato. 1 2 3 ON 1 Quick start guide 4 5 EnglishSetting up the mouse1 . Turn on the computer. 2 . Slide the Release button on the bottom of the mouse to release the battery door. 3 . Remove the battery door. 4 . Insert the two AA alkaline batteries in the mouse battery compartment. 5 . Replace the battery door. 6 . Insert the USB Plug-and-Forget Nano-receiver into a notebook USB port. So small, the USB Nano-receiver can stay attached to your notebook permanently. 7 . The green LED light on the mouse bottom should be on. (If the green LED light is not on, go to the Troubleshooting section for more information.) Congratulations! You can now enjoy the basic functions of your mouse, including the left- and right-mouse buttons, up and down scrolling with the wheel, and the middle mouse button (the wheel button). In Microsoft ® Windows ® , the function assigned to the middle button depends on the application you are using. In Macintosh ® OS X, the middle button typically does not have a function unless the software is installed. EspañolConfiguración del ratón1 . Encienda el ordenador. 2 . Deslice el botón situado en la parte inferior del ratón para abrir el compartimiento de las pilas. 3 . Quite la tapa. 4. Coloque las dos pilas alcalinas AA en el compartimento. 5. Coloque la tapa en su sitio. 6. Conecte el nanorreceptor USB a un puerto USB del portátil. El nanorreceptor es de tipo "conectar y olvidar", tan pequeño que puede seguir conectado al portátil permanentemente. 7. Debería iluminarse el diodo verde, en la parte inferior del ratón. De no ser así, consulte la sección de resolución de problemas. ¡Enhorabuena! Ya puede disfrutar de las funciones básicas del ratón: con los botones izquierdo y derecho, el botón rueda para desplazamiento vertical y dicho botón también utilizable como botón central, mediante pulsación. En Microsoft ® Windows ® , la función asignada al botón central depende de la aplicación en uso. En Macintosh ® OS X, el botón central no suele realizar ninguna función a menos que se haya instalado el software. FrançaisConfiguration de la souris1 . Mettez l'ordinateur sous tension. 2. Faites glisser le bouton d'ouverture situé sous la souris pour ouvrir le clapet du compartiment à piles. 3. Otez le clapet du compartiment. 4. Insérez les deux piles alcalines de type AA dans le compartiment. 5. Remettez le clapet en place. 6. Insérez le nano-récepteur USB ultra-discret dans l'un des ports USB de l'ordinateur portable. Le nano-récepteur est si petit que vous pouvez le laisser relié à l'ordinateur portable en permanence. 7. Le témoin vert situé sous la souris doit être illuminé. Si ce n'est pas le cas, accédez à la section de dépannage pour en savoir plus. Félicitations! Vous pouvez maintenant profiter des fonctions élémentaires de la souris, comme les boutons gauche et droit, la roulette de défilement vertical et le bouton central (bouton de la roulette). Sous Microsoft ® Windows ® , la fonction attribuée au bouton central dépend de l'application en cours d'utilisation Sous Macintosh ® OS X, le bouton central ne possède généralement aucune fonction, à moins que le logiciel ne soit installé. PortuguêsConfigurar o rato1 . Ligue o computador. 2. Desloque o botão Release na parte inferior do rato para libertar a porta do compartimento das pilhas. 3. Remova o compartimento das pilhas. 4. Introduza as duas pilhas alcalinas AA no compartimento de pilhas do rato. 5. Volte a colocar a porta das pilhas. 6. Introduza o Nano-Receptor USB “Ligar e Esquecer” numa porta USB do portátil. Devido à sua pequena dimensão, o Nano-Receptor USB pode estar permanentemente ligado ao portátil. 7. O LED verde na parte inferior do rato deve estar ligado. (Se o LED verde não estiver ligado, consulte a secção Resolução de Problemas para obter mais informações.) Parabéns! Agora pode desfrutar das funções básicas do rato, incluindo botões esquerdo e direito do rato, deslocamento para cima e para baixo com a roda e o botão central do rato (o botão da roda). No Microsoft ® Windows ® , a função atribuída ao botão central depende da aplicação que estiver a usar. No SO Macintosh ® X, o botão central geralmente não tem uma função, a menos que seja instalado o software. USB 2 3 4 5 6 7 Downloading the mouse software + www.logitech.com/support [email protected] WWW EnglishFAQsTroubleshootingDownloadsForumsRegistrationWarranty informationEspañol Preguntas más habitualesResolución de problemas…
Text truncated - open the document above for the full version.
Users Manual
Troubleshooting EnglishMouse features1. Tilt wheel. Tilt the wheel left or right to scroll side to side. (The mouse software must be installed to enable this function.)• Windows : Press the wheel down to activate Document Flip • Macintosh : Press the wheel down to activate Exposé. • The mouse software must be installed to enable these functions. 2 . Battery LED. The LED flashes red when batteries are low. 3 . Left and right mouse buttons. Use the mouse software to change functions. 4 . Battery door release button . Slide the button to open the battery door to store the USB Nano-receiver in the battery compartment or to insert batteries in the mouse. 5. Power LED. The LED glows green briefly when the mouse is turned on. 6 . Power button. To conserve battery power while the mouse is not in use and the USB Nano-receiver is plugged into your notebook, press the Power button for two seconds to turn off the mouse. The Power LED turns off. 7 . USB Nano-receiver storage. 8 . USB Nano-receiver. Leave the USB Nano-receiver plugged into a notebook USB port, or store it inside the mouse battery compartment. When stored inside the battery compartment, the mouse turns off automatically. When removed from the battery compartment, the mouse turns on automatically. When plugged into your notebook, exercise care when handling your notebook to avoid damage to the USB Nano-receiver or notebook. CAUTION: CHOKING HAZARD. HARMFUL OR FATAL IF SWALLOWED. Package contains small parts. Not for children under 6 years. 9. Desktop USB extension stand. Use this stand with a desktop computer for easier access to your computer’s USB port. EspañolCaracterísticas del ratón1. Botón rueda inclinable. Mueva el botón rueda inclinable hacia la derecha o la izquierda para desplazamientos horizontales. El software de ratón debe estar instalado para disponer de esta función.• Windows: Pulse el botón rueda para activar el cambio rápido de documentos • Macintosh: Pulse el botón rueda para activar Exposé. • El software de ratón debe estar instalado para disponer de estas funciones. 2. Diodo de estado de pilas. El diodo emite destellos rojos si la carga de pila es baja. 3 . Botones izquierdo y derecho. Utilice el software de ratón para cambiar funciones. 4. Botón de compartimento de pilas. Deslice el botón para abrir el compartimento de las pilas, para guardar el nanorreceptor USB o para colocar las pilas del ratón. 5. Diodo de encendido. El diodo emite luz verde brevemente cuando se enciende el ratón. 6. Botón de encendido. Para ahorrar energía de las pilas mientras el ratón no se utiliza y el nanorreceptor USB está conectado al portátil, pulse durante dos segundos el botón de encendido para apagar el ratón. El diodo de encendido se apagará. 7 . Almacenamiento del nanorreceptor USB. 8. Nanorreceptor USB. Puede tener el nanorreceptor USB conectado a un puerto USB del portátil o guardarlo en el compartimento de las pilas del ratón. Cuando el microrreceptor se guarda dentro del ratón, éste se apaga automáticamente. Al sacar el microrreceptor del compartimento de las pilas, el ratón se enciende automáticamente. Si el nanorreceptor está conectado al portátil, tenga cuidado al manipular el ordenador para evitar dañar tanto éste como el receptor. PRECAUCIÓN: RIESGO DE ASFIXIA. PUEDE RESULTAR PERJUDICIAL O MORTAL SI SE INGIERE. El paquete contiene piezas pequeñas. No recomendado para niños menores de 6 años. 9. Base de extensión USB de sobremesa. Utilice esta base con un ordenador de sobremesa para facilitar el acceso al puerto USB del ordenador. Information FrançaisFonctions de la souris1. Roulette multidirectionnelle. Inclinez la roulette vers la droite ou vers la gauche pour faire défiler le contenu de l'écran latéralement. Pour utiliser cette fonction, vous devez avoir installé le pilote de la souris.• Windows: appuyez sur la roulette pour activer la fonction de changement rapide de document. • Macintosh: appuyez sur la roulette pour activer la fonction Exposé. • Pour utiliser ces fonctions, vous devez avoir installé le pilote de la souris. 2. Témoin lumineux des piles. Le témoin lumineux clignote en rouge lorsque le niveau de charge des piles est faible. 3 . Boutons droit et gauche de la souris. Utilisez le logiciel de la souris pour changer les fonctions. 4. Bouton d'ouverture du compartiment à piles. Faites glisser le bouton d'ouverture du compartiment à piles afin d'y ranger le nano-récepteur USB ou d'y insérer des piles pour la souris. 5. Témoin d'alimentation. Le témoin s'illumine brièvement en vert lorsque la souris est sous tension. 6. Bouton d'alimentation. Afin d'économiser la charge des piles lorsque la souris n'est pas en cours d'utilisation et lorsque le nano-récepteur USB est branché sur l'ordinateur, appuyez sur le bouton Power pendant deux secondes pour désactiver la souris. Le témoin d'alimentation s'éteint. 7 . Boîtier du nano-récepteur USB. 8. Nano-récepteur USB. Laissez le nano-récepteur branché sur le port USB de l'ordinateur portable ou rangez-le dans le comparti-ment à piles. La souris est alors automatiquement désactivée. Une fois le nano-récepteur retiré du compartiment à piles, la souris est automatiquement réactivée. Lorsque le nano-récepteur est branché sur l'ordinateur portable, manipulez l'ordinateur et le nano-récepteur avec précaution, afin de ne pas les endommager. ATTENTION: RISQUE D'ETOUFFEMENT. NOCIF VOIRE MORTEL EN CAS D'INGESTION. Le coffret contient de petits composants. Tenez-le hors de portée des enfants de moins de six ans. 9. Support de rallonge USB pour bureau. Utilisez ce support avec un ordinateur de bureau pour accéder plus facilement au port USB. PortuguêsFuncionalidades do rato1. Roda de inclinação. Incline a roda para a esquerda ou direita para deslocar na horizontal. (O software do rato deverá estar instalado para activar esta função.)• Windows: Prima a roda para activar a Rotação de Documentos • Macintosh: Prima a roda para activar Exposé. • O software do rato deverá estar instalado pa…
Text truncated - open the document above for the full version.
Cover Letter(s)
LOGITECH FAR EAST LTD. #2 Creation Rd. 4, Science-Based Ind. Park Hsinchu Taiwan, R.O.C. TEL: 886-3-5778241 FAX: 886-3-5792393 POWER OF ATTORNEY To whom it may concern: We, the undersigned LOGITECH FAR EAST LTD. hereby authorize Advance Data Technology Corporation (ADT) of Taiwan to act on our behalf in all matters relating to all processes required in the FCC Part 15B&C approval and any communication needed with the national authority. Any and all acts carried out by ADT on our behalf shall have the same effects as acts of our own. If you have any questions regarding the authorization, please don’t hesitate to contact us. Thank you! Product type: 2.4GHz Cordless Mouse Model name: M-RBY125 Trade name: Logitech Sincerely yours, Signature: ------------------------------------------------------------------- T.C. Chang / Sr. Manager AP Region Compliance LOGITECH FAR EAST LTD. Tel: +886 3 5778241* 2146 Fax: +886 3 5772393 E-mail: [email protected] 2008/2/25
Cover Letter(s)
LOGITECH FAR EAST LTD. #2 Creation Rd. 4, Science-Based Ind. Park Hsinchu Taiwan, R.O.C. TEL: 886-3-5778241 FAX: 886-3-5792393 Federal Communications Commission 7435 Oakland Mills Road Columbia MD 21046 Subject: Request for Confidentiality FCC ID: JNZMRBY125 To Whom It May Concern: Pursuant to the provisions of Sections 0.457 and 0.459 of the Commission’s rules (47 CFR §§ 0.457, 0.459), we are requesting the Commission to withhold the following attachments as confidential document from public disclosure indefinitely. Schematic Diagram Block Diagram Theory of Operation Above mentioned document contains detailed system and equipment description are considered as proprietary information in operation of the equipment. The public disclosure of above documents might be harmful to our company and would give competitor an unfair advantage in the market. In additional to above mentioned documents, pursuant to Public Notice DA 04-1705 of the Commission’s policy, in order to comply with the marketing regulations in 47 CFR §2.803 and the importation rules in 47 CFR §2.1204, while ensuring that business sensitive information remains confidential until the actual marketing of newly authorized devices. We are requesting the commission to grant short-term confidentiality request on the following attachments for 45 days after the grant letter released External Photos Internal Photos Test Setup Photos User Manual It is our understanding that all measurement test reports, FCC ID label format and correspondent during certification review process cannot be granted as confidential documents and those information will be available for public review once the grant of equipment authorization is issued. Best Regards T.C. Chang / Sr. Manager AP Region Compliance LOGITECH FAR EAST LTD. Tel: +886 3 5778241* 2146 Fax: +886 3 5772393 E-mail: [email protected] 2008/2/25
External Photos
Page 1 CONSTRUCTION PHOTOS OF EUT Page 2
External Photos
(Fig.1) FCC ID: JNZMRBY125 FCC LABEL LOCATION The label will be permanently affixed at a conspicuous location on the device. Label FCC ID 1.8cm 2 cm
ID Label/Location Info
M/N: M-RBY125 IC: 4418A-MRBY125 FCC ID: JNZMRBY125 PDM-640-000849 001 Ibiza Nano WW
Internal Photos
Page 3 Page 4 Page 5 Page 6 Page 7
Test Report
Report No.: RF970129H06 1 Report Format Version 2.0.6 FCC TEST REPORT REPORT NO.: RF970129H06 MODEL NO.: M-RBY125 RECEIVED: Jan. 29, 2008 TESTED: Jan. 30 to Feb. 14, 2008 ISSUED: Feb. 19, 2008 APPLICANT: LOGITECH FAR EAST LTD. ADDRESS: #2 Creation Rd. 4, Science-Based Ind. Park Hsinchu Taiwan, R.O.C. ISSUED BY: Advance Data Technology Corporation LAB LOCATION: No. 81-1, Lu Liao Keng, 9 Ling, Wu Lung Tsuen, Chiung Lin Hsiang, Hsin Chu Hsien, Taiwan, R.O.C. This test report consists of 21 pages in total. It may be duplicated completely for legal use with the approval of the applicant. It should not be reproduced except in full, without the written approval of our laboratory. The client should not use it to claim product endorsement by TAF, A2LA or any government agencies. The test results in the report only apply to the tested sample. No. 2177-01 Report No.: RF970129H06 2 Report Format Version 2.0.6 Table of Contents 1 CERTIFICATION.............................................................................................3 2 SUMMARY OF TEST RESULTS.....................................................................4 2.1 MEASUREMENT UNCERTAINTY..................................................................4 3 GENERAL INFORMATION.............................................................................5 3.1 GENERAL DESCRIPTION OF EUT................................................................5 3.2 DESCRIPTION OF TEST MODES..................................................................6 3.3 GENERAL DESCRIPTION OF APPLIED STANDARDS.................................6 3.4 DESCRIPTION OF SUPPORT UNITS............................................................7 3.5 CONFIGURATION OF SYSTEM UNDER TEST.............................................7 4 TEST PROCEDURES AND RESULTS...........................................................8 4.1 CONDUCTED EMISSION MEASUREMENT..................................................8 4.2 RADIATED EMISSION MEASUREMENT.......................................................8 4.2.1 LIMITS OF RADIATED EMISSION MEASUREMENT.....................................8 4.2.2 TEST INSTRUMENTS..................................................................................10 4.2.3 TEST PROCEDURES....................................................................................11 4.2.4 DEVIATION FROM TEST STANDARD..........................................................11 4.2.5 TEST SETUP................................................................................................12 4.2.6 EUT OPERATING CONDITIONS..................................................................12 4.2.7 TEST RESULTS............................................................................................13 4.3 BAND EDGES MEASUREMENT..................................................................17 4.3.1 LIMITS OF BAND EDGES MEASUREMENT...............................................17 4.3.2 TEST INSTRUMENTS..................................................................................17 4.3.3 TEST PROCEDURE.....................................................................................17 4.3.4 DEVIATION FROM TEST STANDARD.........................................................17 4.3.5 EUT OPERATING CONDITION....................................................................17 4.3.6 TEST RESULTS............................................................................................18 5 INFORMATION ON THE TESTING LABORATORIES..................................20 6 APPENDIX-A- MODIFICATIONS RECORDERS FOR ENGINEERING CHANGES TO THE EUT BY THE LAB............................................................21 Report No.: RF970129H06 3 Report Format Version 2.0.6 1 CERTIFICATION PRODUCT : 2.4GHz Cordless Mouse BRAND NAME : Logitech MODEL NO : M-RBY125 TESTED: Jan. 30 to Feb. 14, 2008 APPLICANT : LOGITECH FAR EAST LTD. STANDARDS : 47 CFR Part 15, Subpart C (Section 15.249), ANSI C63.4-2003 The above equipment (Model: M-RBY125) has been tested by Advance Data Technology Corporation, and found compliance with the requirement of the above standards. The test record, data evaluation & Equipment Under Test (EUT) configurations represented herein are true and accurate accounts of the measurements of the sample’s EMC characteristics under the conditions specified in this report. PREPARED BY : , DATE: Feb. 19, 2008 ( Midoli Peng, Specialist ) TECHNICAL ACCEPTANCE : , DATE: Feb. 19, 2008 Responsible for RF ( Hank Chung, Deputy Manager ) APPROVED BY : , DATE: Feb. 19, 2008 (May Chen, Deputy Manager ) Report No.: RF970129H06 4 Report Format Version 2.0.6 2 SUMMARY OF TEST RESULTS The EUT has been tested according to the following specifications: APPLIED STANDARD: 47 CFR Part 15, Subpart C Standard Paragraph Test Type Result Remark 15.207 Conducted Emission Test NA Power supply is 3VDC from battery 15.249 Radiated Emission Test PASS Minimum passing margin is –8.56dB at 7341.00MHz 15.249 Band Edge Measurement PASS Meet the requirement of limit 2.1 MEASUREMENT UNCERTAINTY Where relevant, the following measurement uncertainty levels have been estimated for tests performed on the EUT as specified in CISPR 16-4: This uncertainty represents an expanded uncertainty expressed at approximately the 95% confidence level using a coverage factor of k=2. Measurement Value Radiated emissions (30MHz-1GHz) 3.94 dB Radiated emissions (1GHz -18GHz) 2.33 dB Radiated emissions (18GHz -40GHz) 2.55 dB Report No.: RF970129H06 5 Report Format Version 2.0.6 3 GENERAL INFORMATION 3.1 GENERAL DESCRIPTION OF EUT PRODUCT 2.4GHz Cordless Mouse MODEL NO. M-RBY125 FCC ID JNZMRBY125 POWER SUPPLY 3VDC from batteries MODULATION TYPE GFSK CARRIER FREQUENCY OF EACH CHANNEL 2405MHz ~ 2474MHz NUMBER OF CHANNEL 24 ANTENNA TYPE PCB printed antenna quarter-wave with -0.14dBi antenna gain DATA CABLE NA I/O PORTS NA ASSOCIATED DEVICES NA NOTE: 1. The above EUT information was declared by the manufacturer and for more detailed…
Text truncated - open the document above for the full version.
Test Setup Photos
1 PHOTOGRAPHS OF THE TEST CONFIGURATION RADIATED EMISSION TEST
Contact Information
Applicant
Rick Lien(Head of Product Compliance)
Technical Contact
Advance Data Technology Corporation (Hsin Chu)Eric Lin
[email protected]886-3-593-5343
81-1 Luliaoken, 9th Lin, Wulung Tsuen Chiunglin · Hsinchu · Taiwan
Non-Technical Contact
Advance Data Technology CorporationEric Lin
[email protected]886-3-593-5343
Test Firm
Bureau Veritas CPS (H.K.) Ltd. Taoyuan BranchRichard Chen
Technical Specifications
| # | Rule Parts | Frequency Range | Power Output |
|---|---|---|---|
| 1 | 15C | 2.40 GHz - 2.47 GHz | - |
Other Applications from Logitech Far East Ltd
JNZYR0126
Jul 30, 2026Wireless Keyboard
Equipment Class
DTS - Digital Transmission SystemJNZYR0116
Jul 30, 2026Wireless Keyboard
Equipment Class
DTS - Digital Transmission SystemJNZYR0115
Jul 30, 2026Wireless Keyboard
Equipment Class
DTS - Digital Transmission SystemJNZMR0143
Jul 21, 2026Wireless Mouse
Equipment Class
DTS - Digital Transmission SystemJNZMR0136
Jul 09, 2026Wireless Mouse
Equipment Class
DTS - Digital Transmission System