JPZ0144RF Roller Shade
Lutron Electronics Company Inc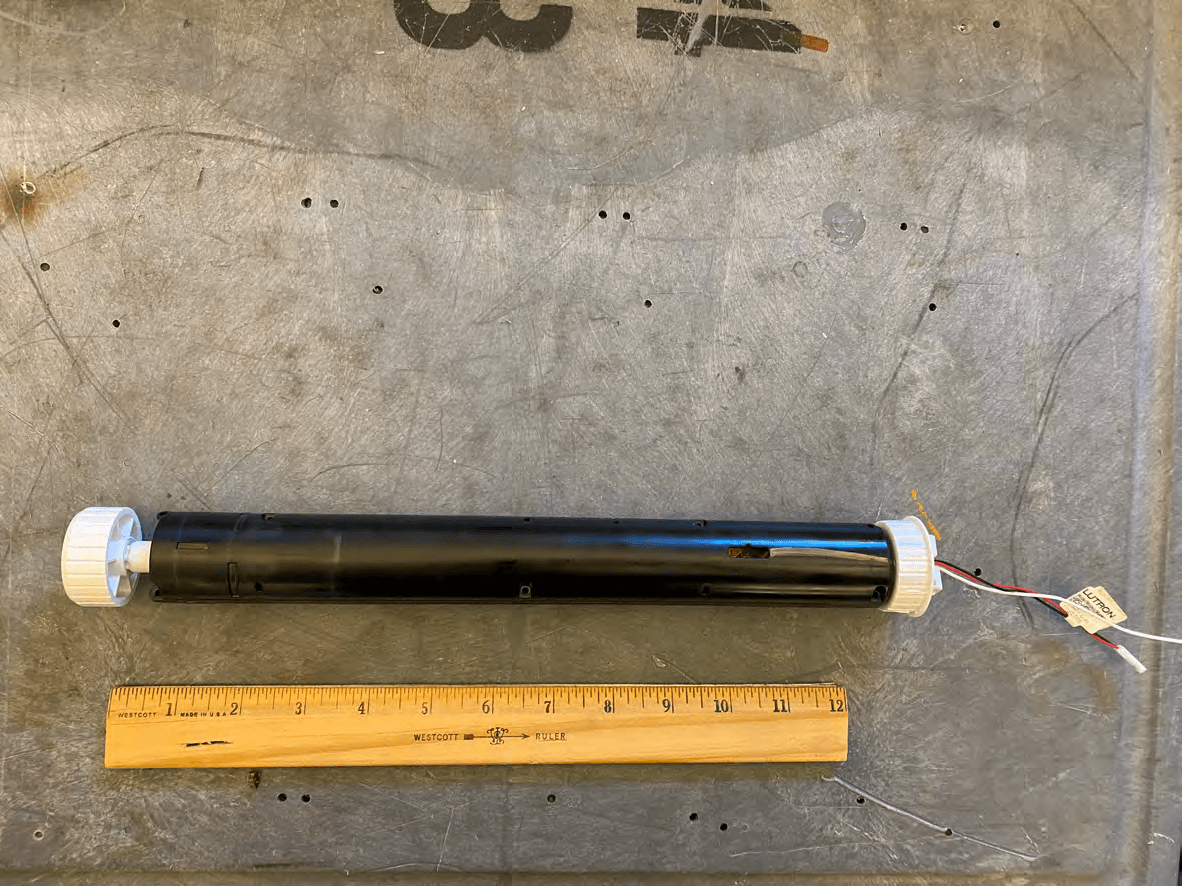
Click to zoom
Application Details
- Equipment Class
- DSC - Part 15 Security/Remote Control Transmitter
- Date of Grant
- Sep 27, 2022
- Application Purpose
- Original Equipment
- Date of Application
- Sep 27, 2022
- Equipment Note
- RF Roller Shade
- Frequency Range
- 431.50000000 - 436.60000000
- Country
- United States
Documents & Files
Document Text
Text extracted from the exhibit documents filed with the FCC. Open a document above to read the original.
Users Manual
QSFC-J-EDU-R2 Label Placement
Attestation Statements
! CAUTION: RISK OF FALLING OBJECTS. Read and follow all instructions for mounting the shade system. Failure to follow these instructions could result in minor to moderate injury. 1 in (25 mm) 1 2 1 2 Lutron Electronics Co., Inc.7200 Suter RoadCoopersburg, PA 18036-1299, U.S.A. 09/2019P/N 045803 Rev. A O Lutron and Triathlon are trademarks of Lutron Electronics Co., Inc., registered in the U.S. and other countries Duracell is a registered trademark of Duracell U.S. Operations, Inc. RAYOVAC is a registered trademark of Spectrum Brands, Inc. Battery-Powered Roller Shade Shade Mounting Guide—Please Read Before Installing English IMPORTANT: There must be a distinct “CLICK” at both ends of the shade. Fabric Wrapped Fascia:Attached to the shade at the factory; leave the individual white-paper wraps (indicated above) in place during shade mounting Architectural Fascia: Packaged separately in the shade box; attach according to the installation guide packaged with the end caps before hanging the shade (Sec 5) 1 Prepare to Install: 1.1 Unpack the box and verify contents Roller Shade Assembly Paper Wraps Bracket Heels Perforation 1 in (25 mm) 2 Prepare the Mounting Rail: 3 Install the Mounting Rail: Mounting Rails wider than 48 in (1219 mm) must be installed by 2 people a. Plan mounting screw locations so that the screws will drive into solid material. Add blocking if necessary. Ensure fasteners are appropriate for the mounting surface. b. Mark a mounting screw location 3-5 in(76-127 mm) from each end of the Mounting Rail. c. For shades wider than 48 in (1219 mm), mark two additional screw locations between the marks made in step b . Leave at least 10 in (254 mm) between screws. d. Pre-drill the Mounting Rail at the pencil marks, using a 3/16 in (4.8 mm) drill bit. 3.2 Install the Center Support:NOTE: If the shade is less than 48 in (1219 mm) wide, skip this step.Position the Center Support midway across the installed Mounting Rail as shown and lock it into the Mounting Rail with an audible “click.” 3.1 Fasten the Mounting Rail to the mounting surface using appropriate fasteners. Ensure the Mounting Rail is level, centered on, and parallel to the window. When mounting on trim, align the top of the Mounting Rail with the top edge of the trim When mounting above trim, use spacers to add clearance. With shallow trim, or a small or reverse-roll shade, you may be able to mount the shade without using the spacers. 5 1/4 in (133 mm) min. Wall Reverse roll Trim Spacer Equal depth, both sides Mounting Option: INSIDE MOUNT Mounting Option: OUTSIDE MOUNT ON TRIM Mounting Option: OUTSIDE MOUNT ABOVE TRIM qty. varies with shade size included only when outside mount above trim is specifi ed Shade without Fascia: Remove all packing materials. with Bracket Locks included only with shades 48 in (1219 mm) & wider Mounting Rail Spacers Mounting Screws Fascia Options: Center Support Minimum Clearance “A” Shade with fascia: 1 ⁄ 4 in (6 mm) Shade without fascia: 1 ⁄ 8 in (3 mm) 1.2 View video (recommended) CLICK! Hold the Mounting Rail up to the mounting surface, approximating its fi nal mounting position.IMPORTANT: VERIFY MINIMUM CLEARANCE A IMPORTANT: ENSURE SECURE MOUNTING CRITICAL POINTS OFBRACKET ENGAGEMENT Verify that Minimum Clearance “A” is available at both ends of the Mounting Rail to allow for attachment of the shade . 4 Remove the Bracket Lock Labels: Left Bracket LockFRONT VIEW a. Remove the top portion of the label that holds the left Bracket Lock in place (tear at perforation). b. Ensure the Bracket Lock is positioned at least 1 in (25 mm) from the end of the Mounting Rail to allow for attachment of the shade c. Repeat steps a. and b. on the right Bracket Lock 5 Attach the Shade to the Mounting Rail: Shades wider than 48 in (1219 mm) must be installed by 2 people 5.1 Rest both Bracket Heels on the lower shelf of the Mounting Rail. 5.2 Rotate the shade up and back into the Mounting Rail as shown, locking the brackets with an audible “click” at each end. = Optional Fascia (Fabric-Wrapped version shown) CLICK! CLICK! Mounting Rail Bracket Heel Engage the shade brackets heel-fi rst. DO NOT engage the shade brackets top-fi rst. PROFILE VIEW(Bracket locks and labels are omitted for clarity) 1.3 Other items you’ll need • Pencil • Tape Measure • Level • Power Drill with 1/4 in (6 mm) Hex Driver Bit (6 in [152 mm] extension recommended) • 3/16 in (4.8 mm) Drill Bit • 1.5 V D-Cell Alkaline Batteries (6 or 8 depending on shade size; 12 or 16 with Battery Boost option) Lutron recommends Duracell ® or RAYOVAC ® batteries (Bracket locks are omitted for clarity.) ! CAUTION: RISK OF FALLING OBJECTS. Read and follow all instructions for mounting the shade system. Failure to follow these instructions could result in minor to moderate injury. Lutron Electronics Co., Inc.7200 Suter RoadCoopersburg, PA 18036-1299, U.S.A. 09/2019P/N 045803 Rev. A O Lutron and Triathlon are trademarks of Lutron Electronics Co., Inc., registered in the U.S. and other countries Duracell is a registered trademark of Duracell U.S. Operations, Inc. RAYOVAC is a registered trademark of Spectrum Brands, Inc. Battery-Powered Roller Shade Mounting Guide Page 2 6 Lock the Shade in the Mounting Rail: How to Remove the ShadeSetup and Programming 7 Install Batteries: 8 Final Inspection: Without Optional Fascia: rotate the top section forward. OR 6.1 Open the battery holder at the top of the shade. Slide each Bracket Lock (left shown) all the way to the end of the Mounting Rail until it completely covers the Bracket Release Tab (shaded blue) and clicks into place, engaging the lock and securing the shade. 7.1 With the battery holder open, insert new 1.5 V D-cell alkaline batteries (quantity and orientation are specifi ed on the battery holder). Do not mix brands or types. Lutron recommends Duracell ® or R AYOVAC ® . 7.2 Return the battery holder to the closed position. With Optional Fascia: pull out, then down on the fascia. After the shade is installed, to r…
Text truncated - open the document above for the full version.
Cover Letter(s)
LUTRON ELECTRONICS CO., INC. 9 September 2022 Page 1 of 1 Antenna Specification Applicable Model Numbers: (herein referred to as DUT) QSFC-J-EDU-R2, SYC-J-EDU-R2, QSFC-EDU-R2-J, SYC-EDU-R2-J Antenna construction: The antenna is a monopole type on a printed circuit board. The antenna connection on DUT cannot be modified or be replaced by the user as it is soldered and underneath the plastic enclosure. For further information on Antenna construction please see Operational Description. Frequency range capability: 431MHz-437MHz Antenna Photos:
External Photos
Lutron Electronics Co., Inc. Confidential 09-01-2022 QSFC-J-EDU-R2 Exterior Photos Top View Lutron Electronics Co., Inc. Confidential 09-01-2022 Top View Lutron Electronics Co., Inc. Confidential 09-01-2022 Bottom View
ID Label/Location Info
Product Model Similarities and Differences for QSFC-J-EDU-R2 Date: 22-Sep-22 To: Federal Communications Commission 7435 Oakland Mills Road Columbia MD 21046 c.c. Eurofins MET Labs 914 West Patapsco Avenue Balt imore, MD 21230 T his letter is to confirm the following regarding the similarities and differences for the family certification under JPZ0144: Models: Q SFC-J-EDU-R2 SYC-J-EDU-R2 QSFC-EDU-R2-J SYC-EDU-R2-J Model Number Differences: All of the models listed above have the same radio communication frequency and protocol. They may differ in software or mechanical aspects. The first prefix section of the model number is either QSFC or SYC which denotes the type of system these devices communicate with. QSFC denotes compatibility with Lutron’s Triathlon QS product family, while SYC denotes compatibility with Lutron’s Serena product family. The communication protocol, data packet type, etc. are all the same, the only difference is a software bit that tells the device whether it is part of one of these two systems. EDU represents Electronic Drive Unit. The J reference of the model number describes the operating frequency which is 434MHz band. The R2 section of the model number denotes the load capability of the drive, which is 2 in-lbs. The order of J and R2 is to differentiate customer ordering schemes. Applicant Company Name: Lutron Electronics Co., Inc. Address: 7200 Suter Rd. Coopersburg, PA 18036 U.S.A. Telephone No.: 610-282-3800 Fax No.: 610-282-7611 Email: [email protected] Certification/Registration Number: FCC ID: JPZ0144 Model Numbers: QSFC-J-EDU-R2, SYC-J-EDU-R2, QSFC-EDU-R2-J, SYC-EDU-R2-J S incerely Yours, Daniel J. Schlegel Lutron Electronics Co., Inc.
Internal Photos
Lutron Electronics Co., Inc. Confidential 01-09-2022 QSFC-J-EDU-R2 Interior Photos Top View Lutron Electronics Co., Inc. Confidential 01-09-2022 Top PCB Lutron Electronics Co., Inc. Confidential 01-09-2022 Bottom PCB (Antenna Location)
Parts List/Tune Up Info
�FLEXCON PRODUCT INFORMATIO THE.R lLfihn SELECT ® 21940 Product Description: THERMLfilm SELECT 21940 is a UL-recognized/CSA-accepted, 2.0 mil gloss topcoated thermal transfer printable, white polye ter coated with an aggressive, permanent acrylic adhesive, and backed with a roll fom1 rel ease liner. • THERMLfi.lm PM 200 \l, ..................................................... 2.0 mil gloss white polyester desi gn ed for high-performru1ce label applications.
Schematics
Open Preset Close Open Preset Close Open Preset Close Open Preset Close Open Preset Close Open Preset Close Open Preset Close Open Preset Close Open Preset Close Open Close ShadeAll 1 2 3 4 Open Close ShadeAll 1 2 3 4 Open Close ShadeAll 1 2 3 4 Movie Entertain Relax Clean Off Open Preset Close Open Preset Close Open Preset Close Movie Entertain Relax Clean Off Open Preset Close Open Preset Close Open Preset Close Movie Entertain Relax Clean Off Open Preset Close Open Preset Close Open Preset Close Open Close ShadeAll 1 2 3 4 Open Close ShadeAll 1 2 3 4 Open Close ShadeAll 1 2 3 4 f.f.f. Sivoia QS Triathlon Roller ShadeStore à enrouleur Sivoia QS TriathlonSivoia QS Triathon persiana enrollable Battery Powered Window Shade • Setup and Operation GuideStore de fenêtre à pile • Guide d’installation et d’exploitation Persiana de ventana energizada con baterías • Guía de confi guración y funcionamiento Lutron Electronics Co., Inc. 7200 Suter Road Coopersburg, PA 18036-1299, U.S.A. 08/2017 P/N 045507 Rev. B O Lutron, Sivoia, Triathlon, Pico, RadioRA, Homeworks, seeTouch, and GRAFIK Eye are trademarks of Lutron Electronics Co., Inc., registered in the U.S. and other countries EnglishFrançaisEspañol The shade features a single “Shade Button” with an LED which is used to activate and indicate various steps while assigning and programming the shade for compatible handheld or system-based remote control. a. If the Lutron Smart Bridge is installed, use the Lutron App to program and control the shade. b. If the shade is to be controlled by a RadioRA 2 system, use the RadioRA 2 Essentials or Inclusive software to program your shade. If you don't have RadioRA 2 design and programming software, refer to the RadioRA 2 setup guide for instructions. The guide is available at www.lutron.com/radiora2. c. If the shade is to be controlled by a HomeWorks QS system, use the HomeWorks QS Design and Programming software to program your shade. d. If the shade is to be controlled by a Pico wireless control, proceed to section 1.2. e. If the shade is to be controlled by a Serena 4-Group RF remote control, proceed to section 1.3. La persiana incluye un único “Botón Persiana” con un LED (a la derecha), que se utiliza para activar e indicar varios pasos mientras se asigna y programa la persiana para un control remoto portátil compatible o basado en el sistema. a. Si se ha instalado el Lutron Smart Bridge, utilice el Lutron App para programar y controlar la cortina. b. Si el ciego va a ser controlado por un sistema RadioRA 2, utilice “RadioRA 2 Essentials” de software. Si usted no tiene el software RadioRA 2, consulte la guía de confi guración RadioRA 2 para obtener instrucciones. La guía está disponible en www.lutron.com/radiora2. c. Si la persiana va a ser controlada por un sistema HomeWorks QS, utilice para programar su persiana el software “HomeWorks QS Design and Programming.” d. Si la persiana va a ser controlada por un control inalámbrico Pico, diríjase a la sección 1.2. e. Si la persiana va a ser controlada por un control remoto de RF Lutron 4-Group, diríjase a la sección 1.3. Le store possède un « bouton de store » unique avec une DEL (à droite), utilisé pour activer et indiquer les différentes étapes de programmation du store avec une télécommande compatible portable ou un système. a. Si la Lutron Smart Bridge est installé, utilisez l’App Lutron pour programmer et contrôler le store. b. Si le store doit être commandé par un système RadioRA 2, utilisez le logiciel RadioRA 2 Essentials pour programmer votre store. Si vous n’avez pas de logiciel de RadioRA 2, consultez le guide de confi guration du RadioRA 2 pour les instructions. Le guide est disponible sur www.lutron.com/radiora2. c. Si le store doit être commandé par un système HomeWorks QS, utilisez le logiciel de conception et de programmation HomeWorks QS pour programmer votre store. d. Si le store doit être commandé par une commande sans fi l Pico, allez à la section 1.2. e. Si le store doit être commandé par une télécommande RF Serena à 4 boutons, allez à la section 1.3. Shade Button with LED Botón Persiana con LED Bouton du store avec DEL 1 Assigning a control: 1 Asignación de un control: 1 Attribuer une commande : seeTouch keypadteclado seeTouchclavier seeTouchGRAFIK EyeGRAFIK EyeGRAFIK Eye Lutron 4-Group RF remote control Control remoto de RF Lutron 4-Group Commandes compatibles (vendues séparément) Open Close Shade Groups Grupos de persianas Groupes de stores Lower Baisser PresetPreset All Shade Groups Tous les groupes de stores Raise Monter Pico wireless controlControl inalámbrico PicoCommande sans fi l Pico Open Ouvrir Ouvrir Preset Preselec- cionado Preselec- cionado Close LowerBajar Raise Compatible Controls (sold separately)Controles compatibles (vendidos por separado)Compatible Controls (sold separately) 1.1 Determine control intent. 1.1 Determine el propósito del control. 1.1 Déterminer la fonction de la commande. 1.2 Assign a Pico Wireless Control 1.2 Asigne un control inalámbrico Pico 1.2 Attribuer une commande sans fi l Pico c. Press and hold the Close button. a. Tap the Shade Button. a. Appuyez sur le bouton du store. b. The Shade Button lights. b. The Shade Button lights. d. The Shade Button fl ashes. Assignment is complete. d. Le bouton du store clignote. L’attribution est terminée. d. The Shade Button fl ashes. Assignment is complete. e. Repeat for additional assignments. e. Recommencez pour des attributions supplémentaires. e. Repeat for additional assignments. 1.3 Assign a Lutron 4-Group RF Remote Control 1.3 Asigne un control remoto de RF Lutron 4-Group 1.3 Attribuer une télécommande RF Lutron à 4 boutons c. Choose a Shade Group button. Press and hold. a. Tap the Shade Button. 2 Adjusting shade limits (OPTIONAL): 2 Ajuste de los límites y preselecciones de la persiana (OPCIONAL): 2 Régler la limite supérieure et inférieure (OPTIONNEL) : The shade’s upper and lower limits are pre-programmed based on the window dimensions and mounting opt…
Text truncated - open the document above for the full version.
Test Report
HEADQUARTERS: 914 WEST PATAPSCO AVENUE • BALTIMORE, MARYLAND 21230 • PHONE (410) 354-3300 • FAX (410) 354-3313 Maryland | California | Texas www.metlabs.com September 20, 2022 Lutron Electronics Co., Inc. Geri Gonzalez 7200 Suter Road Coopersburg, PA 18036 Dear Geri Gonzalez, Enclosed is the EMC Wireless test report for compliance testing of the Lutron Electronics, QSFC-J-EDU- R2 as tested to the requirements of Title 47 of the CFR, Ch. 1 (10-1-06 ed.), FCC Part 15 Subpart C for Intentional Radiators. Thank you for using the services of Eurofins Electrical and Electronic Testing NA, Inc. If you have any questions regarding these results or if Eurofins Electrical and Electronic Testing NA, Inc. can be of further service to you, please feel free to contact me. Sincerely, Michelle Tawmging Documentation Department Eurofins Electrical and Electronic Testing NA, Inc. Reference: (\Lutron Electronics\ WIR121493-FCC231 Rev. 1) Certificates and reports shall not be reproduced except in full, without the written permission of Eurofins Electrical and Electronic Testing NA, Inc. While use of the A2LA logo in this report reflects Eurofins Electrical and Electronic Testing NA, Inc. accreditation under these programs, the report must not be used by the client to claim product certification, approval, or endorsement by A2LA, or any agency of the Federal Government. This letter of transmittal is not a part of the attached report. HEADQUARTERS: 914 WEST PATAPSCO AVENUE • BALTIMORE, MARYLAND 21230 • PHONE (410) 354-3300 • FAX (410) 354-3313 Report: WIR121493-FCC231 Rev. 1 © 2022, Eurofins Electrical and Electronic Testing NA, Inc. Page ii of vii Maryland | California | Texas www.metlabs.com Electromagnetic Compatibility Criteria Test Report for the Lutron Electronics QSFC-J-EDU-R2 Tested under the FCC Certification Rules contained in Title 47 of the CFR, Part 15.231 Subpart C for Intentional Radiators Report: WIR121493-FCC231 Rev. 1 September 20, 2022 Prepared For: Lutron Electronics 7200 Suter Road Coopersburg, PA 18036 Prepared By: Eurofins Electrical and Electronic Testing NA, Inc. 914 W. Patapsco Avenue Baltimore, MD 21230 HEADQUARTERS: 914 WEST PATAPSCO AVENUE • BALTIMORE, MARYLAND 21230 • PHONE (410) 354-3300 • FAX (410) 354-3313 Report: WIR121493-FCC231 Rev. 1 © 2022, Eurofins Electrical and Electronic Testing NA, Inc. Page iii of vii Maryland | California | Texas www.metlabs.com Electromagnetic Compatibility Criteria Test Report for the Lutron Electronics QSFC-J-EDU-R2 Tested under the FCC Certification Rules contained in Title 47 of the CFR, Part 15.231 Subpart C for Intentional Radiators Report: WIR120411-FCC231 Donald Salguero, Project Engineer Wireless Lab Engineering Statement: The measurements shown in this report were made in accordance with the procedures indicated, and the emissions from this equipment were found to be within the limits applicable. I assume full responsibility for the accuracy and completeness of these measurements, and for the qualifications of all persons taking them. It is further stated that upon the basis of the measurements made, the equipment tested is capable of operation in accordance with the requirements of FCC Rules Part 15.231 under normal use and maintenance. Michael Griffiths Manager, Wireless Lab HEADQUARTERS: 914 WEST PATAPSCO AVENUE • BALTIMORE, MARYLAND 21230 • PHONE (410) 354-3300 • FAX (410) 354-3313 Report: WIR121493-FCC231 Rev. 1 © 2022, Eurofins Electrical and Electronic Testing NA, Inc. Page iv of vii Maryland | California | Texas www.metlabs.com Report Status Sheet Revision Report Date Reason for Revision September 12, 2022 Initial Issue. 1 September 20, 2022 Frequency Range Typo Fixed HEADQUARTERS: 914 WEST PATAPSCO AVENUE • BALTIMORE, MARYLAND 21230 • PHONE (410) 354-3300 • FAX (410) 354-3313 Report: WIR121493-FCC231 Rev. 1 © 2022, Eurofins Electrical and Electronic Testing NA, Inc. Page v of vii Maryland | California | Texas www.metlabs.com Table of Contents I. Executive Summary ...................................................................................................................................... 1 A. Purpose of Test ......................................................................................................................................... 2 B. Executive Summary ................................................................................................................................. 2 II. Equipment Configuration ............................................................................................................................. 3 A. Overview .................................................................................................................................................. 4 B. References ................................................................................................................................................ 4 C. Test Site.................................................................................................................................................... 4 D. Description of Test Sample ...................................................................................................................... 5 E. Equipment Configuration ......................................................................................................................... 5 F. Support Equipment ................................................................................................................................... 5 G. Mode of Operation ................................................................................................................................... 5 H. Monitoring Method .................................................................................................................................. 5 I. Modifications .................................................................................................................................…
Text truncated - open the document above for the full version.
Test Setup Photos
HEADQUARTERS: 914 WEST PATAPSCO AVENUE • BALTIMORE, MARYLAND 21230 • PHONE (410) 354-3300 • FAX (410) 354-3313 Maryland | California | Texas www.metlabs.com Report: WIR121493-Test Setups © 2022, Eurofins Electrical and Electronic Testing NA, Inc. Page 1 of 21 Figure 1. 121493 CEV AC_DC setup Figure 2. Radiated Emissions - Test Setup, 1-5GHz HEADQUARTERS: 914 WEST PATAPSCO AVENUE • BALTIMORE, MARYLAND 21230 • PHONE (410) 354-3300 • FAX (410) 354-3313 Maryland | California | Texas www.metlabs.com Report: WIR121493-Test Setups © 2022, Eurofins Electrical and Electronic Testing NA, Inc. Page 2 of 21 Figure 3. Radiated Emissions - Test Setup, 30-1000MHz
Contact Information
Applicant
Daniel Schlegel(Standards Compliance Supervisor)
Technical Contact
Eurofins E&E North AmericaMichael Griffiths
[email protected]410-949-1851
914 W. Patapsco Ave. · Baltimore, Maryland · United States
Non-Technical Contact
Lutron Electronics Co., Inc.Geri Gonzalez
[email protected]484-224-6899
Test Firm
EUROFINS ELECTRICAL AND ELECTRONIC TESTING NA, INCGreg Kovolenko
Technical Specifications
| # | Rule Parts | Frequency Range | Power Output |
|---|---|---|---|
| 1 | 15.231 | 431.5 MHz - 436.6 MHz | - |
Other Applications from Lutron Electronics Company Inc
JPZ0161
Sep 03, 2026Wireless Interface
Equipment Class
DTS - Digital Transmission SystemJPZ0159
Aug 12, 2026Wireless Processor
Equipment Class
DTS - Digital Transmission SystemJPZ0158
Jul 27, 2026Copy of Wireless Processor
Equipment Class
DTS - Digital Transmission SystemJPZ0157
Mar 26, 2026LED Downlight
Equipment Class
DTS - Digital Transmission SystemJPZ0155
Sep 30, 2024LED Lighting Controller
Equipment Class
DTS - Digital Transmission System