KA2WA126A1High Power Wireless N 150 USB Adapter
D-Link Corporation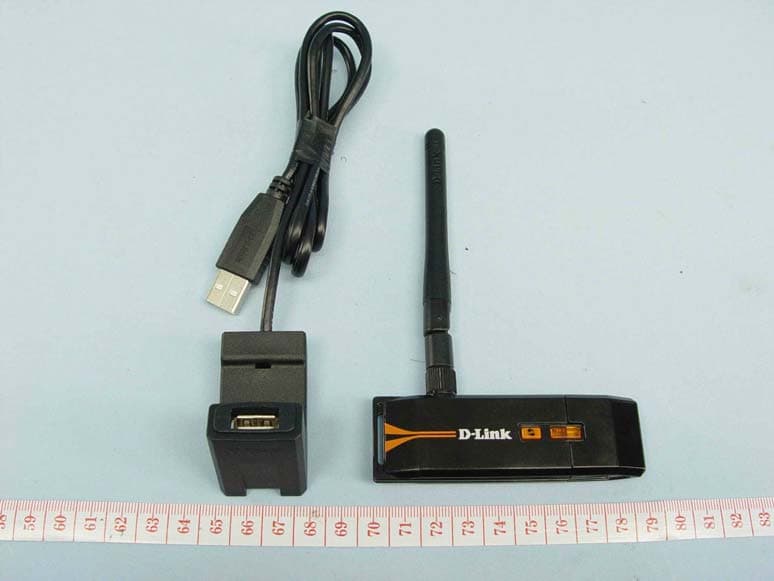
Click to zoom
Application Details
- Equipment Class
- DTS - Digital Transmission System
- Date of Grant
- Dec 07, 2009
- Application Purpose
- Original Equipment
- Date of Application
- Dec 07, 2009
- Equipment Note
- High Power Wireless N 150 USB Adapter
- Frequency Range
- 2412.00000000 - 2462.00000000
- Company
- D-Link Corporation
- Country
- United States
Documents & Files
Document Text
Text extracted from the exhibit documents filed with the FCC. Open a document above to read the original.
Users Manual
2D-Link DWA-126 User Manual Table of Contents Product Overview ........................................................3 Package Contents ...................................................3 System Requirements .............................................3 Introduction ..............................................................4 Features ..................................................................5 Hardware Overview .................................................6 Installation ....................................................................7 Getting Started ........................................................7 Remove Existing Installations ............................7 Disable Other Wireless Adapters .......................8 Wireless Installation Considerations ......................10 Adapter Installation ................................................11 Configuration .............................................................17 D-Link Wireless Connection Manager ...................17 Wireless Networks ...........................................18 Wi-Fi Protected Setup (WPS) ..........................19 My Wireless Networks .....................................23 Add Profile ...................................................24 Modify Profile ...............................................25 Support ............................................................26 About ...............................................................27 Connect to a Wireless Network ................................28 Using Windows ® 7 .................................................28 Connect to a Wireless Network ................................30 Using Windows ® Vista ™ .........................................30 Using Windows ® XP ...............................................32 Wireless Security.......................................................33 What is WPA? .......................................................33 Configure WPA/WPA2 Passphrase .......................34 Using the D-Link Wireless Connection Manager ...........................................................34 Using Windows ® Vista/Windows 7 ...................36 Using the Windows ® XP Utility .........................38 Configure WPA/WPA2 (RADIUS) ..........................40 Using the D-Link Wireless Connection Manager ...........................................................40 Troubleshooting ........................................................41 Wireless Basics .........................................................45 Wireless Modes .....................................................49 Networking Basics ....................................................50 Check your IP address ..........................................50 Windows ® XP/2000 Users................................50 Windows Vista ™ /Windows 7 Users ..................50 Statically Assign an IP address .............................51 Windows ® XP/2000 Users................................51 Windows Vista ™ /Windows 7 Users ..................52 Technical Specifications...........................................53 Table of Contents 3D-Link DWA-126 User Manual Section 1 - Product Overview System Requirements • A computer or laptop with an available USB 2.0 port • Windows Vista ® , 2000 (Service Pack 4), XP (Service Pack 2), or Windows 7 • CD-ROM Drive • 300MHz processor and at least 64MB of RAM • A 802.11n or 802.11g access point or wireless router Product Overview Package Contents • D-Link DWA-126 High-Power Wireless N 150 USB Adapter • Cradle • Manual and Warranty on CD • D-Link Wireless Connection Manager on CD • Quick Installation Guide 4D-Link DWA-126 User Manual Section 1 - Product Overview Introduction The DWA-126 High-Power Wireless N 150 USB Adapter is a convenient wireless connectivity solution for desktop or notebook PCs. Instead of stringing Ethernet cables to your PC or dismantling your desktop computer case, the DWA- 126 can enable 802.11n wireless connectivity by simply utilizing your desktop or notebook PC’s USB port. Powered by Wireless N 150 technology, this High-Power Wireless USB Adapter provides higher transmit data rate and better coverage than normal 802.11g*. Maximize wireless performance by connecting this USB Adapter to a Wireless N ™ router and stay connected from virtually anywhere in the home. This USB Adapter supports WPA and WPA2 encryption to prevent outside intrusion and protect your personal information from being exposed. D-Link’s Quick Setup Wizard guides you step-by-step through the installation process. You’ll be able to configure this USB Adapter without having to call the teenager from down the street to help you. The D-Link Wireless Manager is included with this product to keep track of all your most frequently accessed networks. DWA-126 with portable size, powerful reception coverage that is easy for installation and convenient to use. It provides high performance wireless connectivity to your desktop or notebook PC. Enjoy the many benefits of wireless connectivity today! * Maximum wireless signal rate derived from IEEE Standard 802.11g and 802.11n specifications. Actual data throughput will vary. Network conditions and environmental factors, including volume of network traffic, building materials and construction, and network overhead, lower actual data throughput rate. Environmental conditions will adversely affect wireless signal range. 5D-Link DWA-126 User Manual Section 1 - Product Overview Features • Detachable external antenna wireless coverage. • Convenience of Plug & Play installation. • Fully 802.11g compatible. • 802.11n compliant. • Powered by the USB port; no external power source required. • USB 2.0 standard * . • You can securely connect to a wireless network using WPA/WPA2 (Wi-Fi Protected Access) providing you a much higher level of security for your data and communication than has previously been available. • Position the DWA-126 almost anywhere in your workspace to achieve the…
Text truncated - open the document above for the full version.
Users Manual
11D-Link DWA-126 User Manual Section 2 - Installation Warning: Do NOT install the DWA-126 USB Adapter into your computer before installing the driver software from the D-Link CD. Turn on the computer and Insert the D-Link DWA-126 Driver CD in the CD-ROM drive. If the CD Autorun function does not automatically start on your computer, go to Start > Run. In the run box type “D:\ DWA126.exe” (where D: represents the drive letter of your CD-ROM drive). When the autorun screen appears, click Install Drivers. Adapter Installation Click Install Drivers 12D-Link DWA-126 User Manual Section 2 - Installation The InstallShield Wizard window will appear. By default setup will install to the default location: C:\Program Files\D-Link\DWA-126, where C: represents the drive letter of your hard drive. To install to a different location click Browse and specify the location. Click Next Click Next Please select your language from the list and click Next to continue. Click Next 13D-Link DWA-126 User Manual Section 2 - Installation The Wireless Connection Wizard will now appear. If you want to manually connect to a wireless network, refer to page 15. The following instructions will connect you to a wireless network using Wi-Fi Protected Setup (WPS). Insert the adapter into an available USB port on your computer. If the Found New Hardware Wizard appears, click Cancel. Click Next Click Next 14D-Link DWA-126 User Manual Section 2 - Installation To connect to your network using the WPS push button configuration method, click the virtual button as shown in the screenshot. Press the WPS button on your access point or wireless router within 2 minutes to establish connectivity. When this screen appears, you have successfully connected to your wireless network. Click Next to complete your setup. Click Next Push Button Configuration (PBC) 15D-Link DWA-126 User Manual Section 2 - Installation To manually connect to your wireless network, select Manually connect to a wireless network and then click Next. Click Next Click the Scan button to display a list of wireless networks (site survey). Click on the network name (SSID) and click Next. Click Next Enter the network name (SSID) manually. If you enter the SSID incorrectly, you will automatically be brought to the site survey page. Click Scan to display the site survey page. Click Next 16D-Link DWA-126 User Manual Section 2 - Installation Click Finish to continue. If you are prompted to reboot your computer, select Yes, I want to restart my computer now. Click Finish 17D-Link DWA-126 User Manual Section 3 - Configuration Configuration This section will show you how to configure your new D-Link wireless adapter using the D-Link Utility as well as the Windows ® XP Zero Configuration Utility and Vista WLAN Autoconfiguration. D-Link Wireless Connection Manager The D-Link DWA-126 uses the Wireless Connection Manager as the management software. The manager provides the user an easy interface to change any settings related to the wireless adapter. Clicking on the Wireless Connection Manager icon on the desktop will start the Configuration. If you are using Windows ® Vista ™ please skip to page 30 or Windows ® XP skip to page 32. Double-click the Wireless Connection Manager icon on your desktop. 18D-Link DWA-126 User Manual Section 3 - Configuration Wireless Networks The SSID (Service Set Identifier) is the name of the wireless network. Displays the MAC address of the wireless device. Displays the Link Quality of the wireless connection. If there is a “lock” icon, this means the wireless network is secure. You must know the encryption key/security settings to connect. Displays the channel of the wireless network. Connect to a wireless network using Wi-Fi Protected Setup. Refer to the next page. Rescans for available wireless networks in your area. Highlight a wireless network and click the Connect button. If the network is secure, a pop-up window will appear. Enter the security information to connect (refer to the Wireless Security section for more information). Select a wireless network profile from the drop-down menu and click Activate to connect. Allow up to 30 seconds to connect. MAC: SSID: Channel: Signal: Security: Refresh Button: Connect Button: Activate Button: The Wireless Networks (Site Survey) page will display all wireless networks that are available in your area. To connect to a network, simply highlight the wireless network (SSID) and click Connect. WPS Button: 19D-Link DWA-126 User Manual Section 3 - Configuration Wi-Fi Protected Setup (WPS) Wi-Fi Protected Setup (WPS) System is designed for easy setup of security-enabled Wi-Fi networks. It is recommended to have the access point or wireless router nearby during setup. For more information on WPS, visit the Wi-Fi Alliance website at www.wi-fi.org. “Push Button Configuration” (PBC) is a virtual button in the utility that connects you to other WPS-enabled devices. A connection can be established by clicking on the virtual button, then pushing the physical button on the access point or wireless router within 120 seconds. Refer to page 14. “Personal Identification Number” (PIN) is a unique number generated randomly by the wireless adapter’s utility. Entering this number in the utility of the WPS-enabled wireless router or access point connects you with the intended wireless network. Refer to the next page for more information. 20D-Link DWA-126 User Manual Section 3 - Configuration Push Button 1. To connect to your network, press the WPS button on the adapter and hold for two seconds until the wizard screen appears. 2. Press the WPS button located on your access point or router to continue. This screen will appear once you have successfully established connection with your network.
Users Manual
21D-Link DWA-126 User Manual Section 3 - Configuration If you want to connect using the PBC method, refer to page 14. To use the PIN method, select PIN (Personal Identification Number) and click Next. Click Next Make sure your access point or wireless router is close by. Write down the number on the screen. Enter this number in your access point or wireless router. Please refer to the manufacture’s manual for instructions. Once you click Next, you will have 2 minutes to enter this number in your access point or wireless router. Click Next Personal Identification Number (PIN) 22D-Link DWA-126 User Manual Section 3 - Configuration The adapter will try to establish connectivity to your access point or wireless router. When this screen appears, you have successfully established connectivity. Click Finish to complete your setup. Click Finish 23D-Link DWA-126 User Manual Section 3 - Configuration My Wireless Networks The My Wireless Networks page will allow you to create, edit, and delete wireless network profiles. Every time you connect to a network using the Wireless Networks page, a profile will automatically be created. New Button: Modify: Click New to create a new wireless network profile (refer to page 23). Click Modify to edit a current profile (refer to page 24). Click Delete to remove a profile. Click Activate to use a profile. Allow up to 30 seconds to connect to the wireless network. The Profile Details section will display information about the wireless network such as the network name (SSID), network type (Infrastructure), and if the network is secured. Delete: Activate: Profile Details: 24D-Link DWA-126 User Manual Section 3 - Configuration Add Profile You may add a new network by clicking the New button from the My Wireless Networks page. Profile Name: SSID: Enter a name for your profile (e.g. Home, Office, Coffee Shop). Enter the SSID of the wireless network. Select the network type. If you are connecting to a wireless router or access point, select Infrastructure. (Ad-hoc mode is not supported) Select the type of security used. Please refer to the Wireless Security section for more information. Click OK to save your settings. Network Type: Security Type: OK Button: 25D-Link DWA-126 User Manual Section 3 - Configuration Modify Profile You may edit an existing profile by selecting the profile and clicking the Modify button from the My Wireless Networks page. Profile Name: SSID: Enter a name for your profile (e.g. Home, Office, Coffee Shop). Displays the SSID of the network. Displays the network type. Select the type of security used. Please refer to the Wireless Security section for more information. Click OK to save your settings. Network Type: Security Type: OK Button: 26D-Link DWA-126 User Manual Section 3 - Configuration Support If you need help, click the Support button. A panel will appear to the right of the utility which will display information about the utility. 27D-Link DWA-126 User Manual Section 3 - Configuration The About screen gives you information about the Firmware and Utility Versions of the DWA-126. About 28D-Link DWA-126 User Manual Section 3 - Configuration Connect to a Wireless Network Using Windows ® 7 Windows ® 7 users may use the built-in wireless utility. If you are using another company’s utility or Windows ® 2000, please refer to the user manual of your wireless adapter for help with connecting to a wireless network. Most utilities will have a “site survey” option similar to the Windows ® 7 utility as seen below. Right-click on the wireless computer icon in your system tray (lower-right corner next to the time). Select Connect to a network. If you receive the Wireless Networks Detected bubble, click on the center of the bubble to access the utility. or The utility will display any available wireless networks in your area. Click on a network (displayed using the SSID) and click the Connect button. If you get a good signal but cannot access the Internet, check you TCP/IP settings for your wireless adapter. Refer to the Networking Basics section in this manual for more information. 29D-Link DWA-126 User Manual Section 3 - Configuration Enter the same security key or passphrase that is on your router and click Connect. It may take 20-30 seconds to connect to the wireless network. If the connection fails, please verify that the security settings are correct. The key or passphrase must be exactly the same as on the wireless router. 30D-Link DWA-126 User Manual Section 3 - Configuration Connect to a Wireless Network Using Windows ® Vista ™ Windows ® Vista ™ users may use the built-in wireless utility. If you are using another company’s utility or Windows ® 2000, please refer to the user manual of your wireless adapter for help with connecting to a wireless network. Most utilities will have a “site survey” option similar to the Windows ® Vista ™ utility as seen below. Right-click on the wireless computer icon in your system tray (lower-right corner next to the time). Select Connect to a network. If you receive the Wireless Networks Detected bubble, click on the center of the bubble to access the utility. or The utility will display any available wireless networks in your area. Click on a network (displayed using the SSID) and click the Connect button. If you get a good signal but cannot access the Internet, check you TCP/IP settings for your wireless adapter. Refer to the Networking Basics section in this manual for more information. 31D-Link DWA-126 User Manual Section 3 - Configuration Enter the same security key or passphrase that is on your router and click Connect. It may take 20-30 seconds to connect to the wireless network. If the connection fails, please verify that the security settings are correct. The key or passphrase must be exactly the same as on the wireless router. 32D-Link DWA-126 User Manual Section 3 - Configuration Connect to a Wireless Network Using Windows ® XP Windows ® XP users may use the built-in wireless utility (Zero Configuration…
Text truncated - open the document above for the full version.
External Photos
Page 1 CONSTRUCTION PHOTOS OF EUT Page 2
ID Label/Location Info
S/N:QB1R1ymXXXXXX MAC ID:XXXXXXXXXXXX Model No.:DWA-126 P/N:IWA126AU.....A1G H/W Ver.:A1 F/W Ver.:1.00 FCC ID:KA2WA126A1
ID Label/Location Info
FCC ID .: KA2WA126A1 Label Location
Internal Photos
Page 3 Page 4 Page 5
Operational Description
FCC ID: KA2WA126A1 Report No.: RF981013L09 Operational Description This device is a High Power Wireless N 150 USB Adapter, which operates in the 2.4GHz frequency spectrum with throughput of up to 150Mbps which OFDM technique will be applied. If the signal to noise radio is too poor which could not support 150Mbps, the 11Mbps data rate with DSSS technique will be applied. The transmitter of the EUT is powered by host equipment. The antenna is dipole antenna with R-SMA connector. The other instruction, please have a look at the users manual.
RF Exposure Info
Report No.: SA981013L09 1 Report Format Version 3.0.0 SAR TEST REPORT REPORT NO.: SA981013L09 MODEL NO.: DWA-126 RECEIVED: Oct. 13, 2009 TESTED: Nov. 09, 2009 ISSUED: Nov. 18, 2009 APPLICANT: D-Link Corporation ADDRESS: 17595 Mt. Herrmann, Fountain Valley, CA 92708, U.S.A. ISSUED BY: Bureau Veritas Consumer Products Services (H.K.) Ltd., Taoyuan Branch LAB ADDRESS: No. 47, 14th Ling, Chia Pau Tsuen, Lin Kou Hsiang, Taipei Hsien 244, Taiwan, R.O.C. TEST LOCATION: No. 19, Hwa Ya 2nd Rd, Wen Hwa Tsuen, Kwei Shan Hsiang, Taoyuan Hsien 333, Taiwan, R.O.C. This test report consists of 43 pages in total except Appendix. It may be duplicated completely for legal use with the approval of the applicant. It should not be reproduced except in full, without the written approval of our laboratory. The client should not use it to claim product endorsement by TAF or any government agencies. The test results in the report only apply to the tested sample. Report No.: SA981013L09 2 Report Format Version 3.0.0 TABLE OF CONTENTS 1. CERTIFICATION ..................................................................................................................3 2. GENERAL INFORMATION ..................................................................................................4 2.1 GENERAL DESCRIPTION OF EUT.....................................................................................4 2.2 GENERAL DESCRIPTION OF APPLIED STANDARDS ......................................................5 2.3 GENERAL INOFRMATION OF THE SAR SYSTEM ............................................................6 2.4 GENERAL DESCRIPTION OF THE SPATIAL PEAK SAR EVALUATION ...........................9 3. DESCRIPTION OF SUPPORT UNITS...............................................................................12 4. DESCRIPTION OF TEST MODES AND CONFIGURATIONS ...........................................13 4.1. DESCRIPTION OF ANTENNA LOCATION ........................................................................13 4.2. DESCRIPTION OF ASSESSMENT POSITION .................................................................14 4.3. CHECK FOR SCAN RESOLUTION ...................................................................................15 4.4. DESCRIPTION OF TEST MODE .......................................................................................16 4.5. SUMMARY OF TEST RESULTS........................................................................................18 5. TEST RESULTS .................................................................................................................20 5.1 TEST PROCEDURES ........................................................................................................20 5.2 MEASURED SAR RESULTS .............................................................................................22 5.3 SAR LIMITS .......................................................................................................................26 5.4 RECIPES FOR TISSUE SIMULATING LIQUIDS ...............................................................27 5.5 TEST EQUIPMENT FOR TISSUE PROPERTY.................................................................30 6. SYSTEM VALIDATION.......................................................................................................31 6.1 TEST EQUIPMENT ............................................................................................................31 6.2 TEST PROCEDURE ..........................................................................................................32 6.3 VALIDATION RESULTS .....................................................................................................34 6.4 SYSTEM VALIDATION UNCERTAINTIES .........................................................................35 7. MEASUREMENT SAR PROCEDURE UNCERTAINTIES .................................................36 7.1. PROBE CALIBRATION UNCERTAINTY ............................................................................36 7.2. ISOTROPY UNCERTAINTY...............................................................................................37 7.3. BOUNDARY EFFECT UNCERTAINTY ..............................................................................37 7.4. PROBE LINEARITY UNCERTAINTY .................................................................................38 7.5. READOUT ELECTRONICS UNCERTAINTY .....................................................................38 7.6. RESPONSE TIME UNCERTAINTY....................................................................................38 7.7. INTEGRATION TIME UNCERTAINTY ...............................................................................39 7.8. PROBE POSITIONER MECHANICAL TOLERANCE ........................................................40 7.9. PROBE POSITIONING ......................................................................................................40 7.10. PHANTOM UNCERTAINTY ...............................................................................................41 7.11. DASY4 UNCERTAINTY BUDGET .....................................................................................42 8. INFORMATION ON THE TESTING LABORATORIES.......................................................43 APPENDIX A: TEST CONFIGURATIONS AND TEST DATA APPENDIX B: ADT SAR MEASUREMENT SYSTEM APPENDIX C: PHOTOGRAPHS OF SYSTEM VALIDATION APPENDIX D: SYSTEM CERTIFICATE & CALIBRATION Report No.: SA981013L09 3 Report Format Version 3.0.0 1. CERTIFICATION PRODUCT: High Power Wireless N 150 USB Adapter MODEL: DWA-126 BRAND: D-Link APPLICANT: D-Link Corporation TESTED: Nov. 09, 2009 TEST SAMPLE: ENGINEERING SAMPLE STANDARDS: FCC Part 2 (Section 2.1093) FCC OET Bulletin 65, Supplement C (01-01) RSS-102 The above equipment (model: DWA-126) has been tested by Bureau Veritas Consumer Products Services (H.K.) Ltd., Taoyuan Branch, and found compliance with the requirement of the above standards. The tes…
Text truncated - open the document above for the full version.
RF Exposure Info
D2: DOSIMETRIC E-FIELD PROBE D3: DAE D4: SYSTEM VALIDATION DIPOLE
Test Report
Report No.: RF981013L09 1 Report Format Version 3.0.0 FCC TEST REPORT REPORT NO.: RF981013L09 MODEL NO.: DWA-126 RECEIVED: Oct. 13, 2009 TESTED: Nov. 11 ~ Nov. 13, 2009 ISSUED: Nov. 17, 2009 APPLICANT: D-Link Corporation ADDRESS: 17595 Mt. Herrmann, Fountain Valley, CA 92708, U.S.A. ISSUED BY: Bureau Veritas Consumer Products Services (H.K.) Ltd., Taoyuan Branch LAB ADDRESS: No. 47, 14th Ling, Chia Pau Tsuen, Lin Kou Hsiang, Taipei Hsien 244, Taiwan, R.O.C. TEST LOCATION: No. 19, Hwa Ya 2nd Rd, Wen Hwa Tsuen, Kwei Shan Hsiang, Taoyuan Hsien 333, Taiwan, R.O.C. This test report consists of 67 pages in total. It may be duplicated completely for legal use with the approval of the applicant. It should not be reproduced except in full, without the written approval of our laboratory. The client should not use it to claim product endorsement by TAF or any government agencies. The test results in the report only apply to the tested sample. Report No.: RF981013L09 2 Report Format Version 3.0.0 TABLE OF CONTENTS 1. CERTIFICATION ......................................................................................................... 4 2. SUMMARY OF TEST RESULTS................................................................................. 5 2.1 MEASUREMENT UNCERTAINTY .............................................................................. 5 3. GENERAL INFORMATION ......................................................................................... 6 3.1 GENERAL DESCRIPTION OF EUT............................................................................ 6 3.2 DESCRIPTION OF TEST MODES.............................................................................. 7 3.2.1 CONFIGURATION OF SYSTEM UNDER TEST......................................................... 7 3.2.2 TEST MODE APPLICABILITY AND TESTED CHANNEL DETAIL.............................. 8 3.3 GENERAL DESCRIPTION OF APPLIED STANDARDS ........................................... 10 3.4 DESCRIPTION OF SUPPORT UNITS...................................................................... 10 4. TEST TYPES AND RESULTS ................................................................................... 11 4.1 RADIATED EMISSION MEASUREMENT ................................................................. 11 4.1.1 LIMITS OF RADIATED EMISSION MEASUREMENT .............................................. 11 4.1.2 TEST INSTRUMENTS .............................................................................................. 12 4.1.3 TEST PROCEDURES ............................................................................................... 13 4.1.4 DEVIATION FROM TEST STANDARD ..................................................................... 13 4.1.5 TEST SETUP ............................................................................................................ 14 4.1.6 EUT OPERATING CONDITIONS.............................................................................. 14 4.1.7 TEST RESULTS ........................................................................................................ 15 4.2 CONDUCTED EMISSION MEASUREMENT ............................................................ 28 4.2.1 LIMITS OF CONDUCTED EMISSION MEASUREMENT ......................................... 28 4.2.2 TEST INSTRUMENTS .............................................................................................. 28 4.2.3 TEST PROCEDURES ............................................................................................... 29 4.2.4 DEVIATION FROM TEST STANDARD ..................................................................... 29 4.2.5 TEST SETUP ............................................................................................................ 30 4.2.6 EUT OPERATING CONDITIONS.............................................................................. 30 4.2.7 TEST RESULTS ........................................................................................................ 31 4.3 6dB BANDWIDTH MEASUREMENT ........................................................................ 33 4.3.1 LIMITS OF 6dB BANDWIDTH MEASUREMENT...................................................... 33 4.3.2 TEST INSTRUMENTS .............................................................................................. 33 4.3.3 TEST PROCEDURE ................................................................................................. 33 4.3.4 DEVIATION FROM TEST STANDARD ..................................................................... 33 4.3.5 TEST SETUP ............................................................................................................ 34 4.3.6 EUT OPERATING CONDITIONS.............................................................................. 34 4.3.7 TEST RESULTS ........................................................................................................ 35 Report No.: RF981013L09 3 Report Format Version 3.0.0 4.4 MAXIMUM OUTPUT POWER................................................................................... 39 4.4.1 LIMITS OF MAXIMUM OUTPUT POWER MEASUREMENT ................................... 39 4.4.2 INSTRUMENTS ........................................................................................................ 39 4.4.3 TEST PROCEDURES .........................................................................…
Text truncated - open the document above for the full version.
Contact Information
Applicant
Brett Adair(General Counsel)
Technical Contact
Bureau Veritas CPS (H.K.) Ltd. Taoyuan BranchGary Chang
[email protected]886-3-3183232
No. 19, Hwa Ya 2nd Rd., Kwei Shan Hsiang · Taoyuan Hsien · Taiwan
Non-Technical Contact
Bureau Veritas CPS (H.K.) Ltd. Taoyuan BranchEllis Wu
[email protected]886-3-3183232
Test Firm
Bureau Veritas CPS (H.K.) Ltd. Taoyuan BranchRichard Chen
Technical Specifications
| # | Rule Parts | Frequency Range | Power Output |
|---|---|---|---|
| 1 | 15C | 2.41 GHz - 2.46 GHz | 204.00 mW |
Other Applications from D-Link Corporation
KA2CS6012A1
Jul 07, 20262K Fixed Indoor Cloud Camera, 2K Fixed Indoor Wi-Fi Camera
Equipment Class
DTS - Digital Transmission SystemKA2AE65UA1
Mar 02, 2026Wi-Fi 7 BE6500 USB 3.0 Dongle
Equipment Class
NII - Unlicensed National Information Infrastructure TXKA2APE9560A1
Nov 17, 2025BE9500 Celling mount Access Point
Equipment Class
6ID - 15E 6 GHz Low Power Indoor Access PointKA2AX9UA1
Dec 04, 2024AX900 Wi-Fi 6 USB Adapter, Wi-Fi 6 AX900 USB 2.0 Dongle
Equipment Class
DSS - Part 15 Spread Spectrum TransmitterKA2AC13UA1
Dec 04, 2024AC1300 Wi-Fi 5 USB Adapter, Wi-Fi 5 AC1300 USB 2.0 Dongle
Equipment Class
DTS - Digital Transmission System