OTA44231RX2.4GHz FHSS Video Baby Monitor - Parent Unit
Jakks Pacific (HK) Ltd.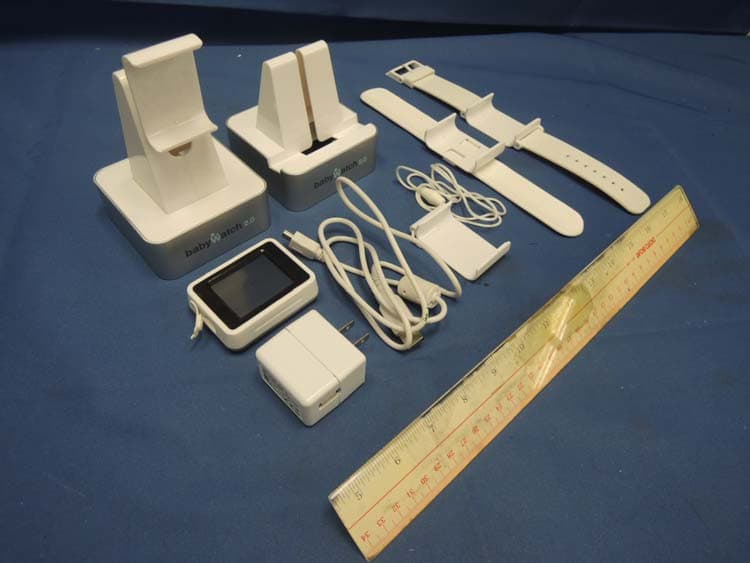
Click to zoom
Application Details
- Equipment Class
- DXX - Part 15 Low Power Communication Device Transmitter
- Date of Grant
- Dec 12, 2012
- Application Purpose
- Original Equipment
- Date of Application
- Dec 12, 2012
- Equipment Note
- 2.4GHz FHSS Video Baby Monitor - Parent Unit
- Frequency Range
- 2410.00000000 - 2476.00000000
- Company
- Jakks Pacific (HK) Ltd.
- Country
- Hong Kong
Documents & Files
Document Text
Text extracted from the exhibit documents filed with the FCC. Open a document above to read the original.
Users Manual
BABYWATCH 2.0 CAMERA VIEWER MOUNTING HARDWARE USB CABLE USB ADAPTOR ELECTRICAL CORD HOLDERS 6X AC/DC ADAPTOR VIEWER FRAME STAND & BELT CLIP CLASPS WRIST WATCH BAND SNAP WRIST BAND VIEWER CLIP VIEWER NECKLACE NECKLACE CLIP VIEWER STAND SMART DEVICE STAND TM & © 2013 MANUFACTURED BY JAKKS PACIFIC, INC., 22619 PCH, MALIBU,CA 90265 U.S.A. MADE IN CHINA. Contents may vary in style, color, shape and decoration from images shown on package or in advertising. Questions or comments? www.jakks.com, [email protected], 1-877-875-2557 in North America. INSTRUCTION GUIDE CONTENTS 16 2X 2X Children have STRANGLED in cords. Keep this cord out of reach of children (more than 3 ft (0.9m) away). Do not remove this tag. WARNING: STRANGULATION HAZARD PAIRING SET UP Select a method to hold the Viewer VIEWER STAND - Insert the VIEWER into the VIEWER STAND. Viewing angle is adjustable. SNAP WRIST BAND - Slap the SNAP WRIST BAND onto your wrist. Insert the VIEWER into the VIEWER CLIP. WRIST WATCH BAND - Insert the VIEWER into the VIEWER CLIP. NECKLACE - Insert the VIEWER into the NECK LACE CLIP. - Open the CLASPS, place around your neck and close the CLASPS. FRAMESTAND / BELT CLIP - Insert the VIEWER into the FRAME/BELT CLIP. - FRAME Open the FRAME STAND and set unit on flat surface. - BELT Open the BELT CLIP and attach unit to BELT. AC/DC ADAPTOR - Secure the cord to the wall using the 6 ELECTRICAL CORD HOLDER included to keep cord away from the baby’s reach. - Plug the AC/DC ADAPTOR into the back of the BABYWATCH CAMERA as shown. - Plug the other end into a 110V AC outlet. VIEWER STAND REAR VIEW OF CAMERA WRIST WATCH BAND NECKLACE TILT DOWN OR UPROTATE LEFT OR RIGHT FRAME STANDBELT CLIP AC/DC ADAPTOR110 V AC OUTLET SNAP WRIST BAND WI-FI AND WEBSITE SET UP - Move the ON/OFF Switch on Babywatch camera to ON position. - Plug the USB CABLE into the USB PORT on the back of the CAMERA. - Plug the other end into your computer. Click on the FLASH DRIVE ICON. - For Macintosh, Open the SET UP ICON in the MacOSX directory and follow the directions. - For Windows, Open the SET UP ICON in the MS Windows directory and follow the directions. - For more detail, please go to the website “www.babywatchmonitor.com”. (Unplug the USB cable after set up is completed.) - Set the Babywatch 2.0 Camera on a flat surface with an unobstructed view of your child. - Once the camera is connected with either your computer or the VIEWER, you can TILT or ROTATE camera through camera controls on the Viewer or website to get the best view. You may also use your compatible iDevice, Smart Phone or Smart Tablet but requires download of the BABYWATCH APP. - For the best performance, do not place the Viewer within 18 inch of the Babywatch Camera. SET UP Set up the Babywatch 2.0 Camera Flat Surface Mounting CLASPS USB CABLE VIEWER 23 WARNING Never place camera or cords within 3 feet of the crib. PAIRING A M 00:00 01.01.2012 - Plug the USB CORD into the side of the CAMERA VIEWER as shown. - Plug the other end into your computer or a USB adaptor. - BATTERY ICON in VIEWER SCREEN will show when fully charged. - Remove USB CORD. Battery charge will last approximately 12 hours. (Sleep mode) *USB port on viewer is used for charging purpose only. VIEWER CHARGING STEP 5STEP 6 STEP 2STEP 1 STEP 4STEP 3 Wall Mounting 1/4” HOLE BATTERY ICONS LOWFULL - STEP DRILL a 1/4” HOLE in the wall. Insert wall anchor into the hole. Insert screw into the wall anchor. - STEP Place the BABYWATCH CAMERA on the SCREW and LOWER slightly to secure. - STEP Plug the AC/DC ADAPTOR into the back of the BABYWATCH CAMERA as shown. - STEP Plug the other end into a 110V AC outlet. - STEP Remove the BACKING from the ELECTRICAL CORD HOLDER. - STEP Use the ELECTRICAL CORD HOLDERS to attach the AC/DC ADAPTOR CORD to the wall. The Babywatch 2.0 Camera can be mounted on a wall overlooking your baby. Once the camera is connected with your WI-FI system, you can TILT or ROTATE camera through camera controls on the Viewer, iDevice, Smart phone or Website to get the best view. SET UP Set up the Babywatch 2.0 Camera Charge the Babywatch 2.0 Camera Viewer Babywatch 2.0 Camera CONTROLS LIGHT SENSOR POWER ON LIGHT CAMERA LENS MICROPHONE WI-FI INDICATOR USB PORT PAIRING BUTTON ON/OFF SWITCH AD/DC ADAPTOR PLUG SPEAKER Camera Viewer USB PORT VIEWING SCREEN MENU / BACK MICROPHONE RESET BUTTON SPEAKER 2.4GHZ SIGNAL STRENGTH TIME DATE CAMERA NUMBER BATTERY LEVEL 1 3 4 2 56789 10 45 12 7 8 9 3456 10 11 ADULT ASSEMBLY ONLY Always keep unattached screws away from young children to avoid risk of small component and sharp end. 1 1 2 3 4 5 6 1 2 3 4 5 6 7 8 9 10 7 8 9 10 11 2 3 4 5 6 PAIRING STEP 1STEP 2 STEP 3STEP 4 Apple: Go to the Appstore on your device Search for BABYWATCH Press the FREE button to the left of the app icon to begin download. ANDROID: Go to the Google Play market on your device Search for BABYWATCH Press the INSTALL button to the right of the app icon to begin download. DOWNLOADING APP STEP 1STEP 2 Download the BABYWATCH APP from the iTunes App Store or Google Play market. Use the SMART DEVICE STAND to hold your SMART DEVICE. STEP Be sure Babywatch 2.0 Camera is plugged into AC adaptor and powered. Insert the CHARGING CORD through the bottom of the SMART DEVICE STAND. (CHARGING CORD is not included) STEP Plug the CHARGING CORD into your SMART DEVICE and insert the DEVICE into the STAND. Wind the cable under the stand. Plug the other end of the CHARGING CORD into a 110V AC OUTLET. Wind the cable under the base. SMART DEVICES Monitor your Baby with a Smart Device OUT OF THE BOX: Both units are factory PAIRED, but if you have pressed the RESET BUTTON on the VIEWER, or if they are not paired: STEP Move the ON/OFF Switch on the Babywatch Camera to the ON position. Press and hold in the POWER BUTTON on the VIEWER for 3 seconds. STEP Press menu button, then access the VIEWER MENU (Touch Quadrant 3). STEP Select ADD CAMERA (Touch Quadrant 2). The VIEWER will display “SCANNING”. STEP Press the PAIRING B…
Text truncated - open the document above for the full version.
External Photos
INTERTEK TESTING SERVICES External Photos FCC ID: OTA44231RX IC: 7783A-44231RX external photos - 1 of 2 HK12100535 Job Number HK12100535 Job Number INTERTEK TESTING SERVICES External Photos FCC ID: OTA44231RX IC: 7783A-44231RX external photos - 2 of 2 HK12100535 Job Number
ID Label/Location Info
65mm 48mm
Internal Photos
INTERTEK TESTING SERVICES Internal Photos FCC ID: OTA44231RX IC: 7783A-44231RX Internal photos - 1 of 5 Internal Photo - 1 Internal Photo - 2 INTERTEK TESTING SERVICES Internal Photos FCC ID: OTA44231RX IC: 7783A-44231RX Internal photos - 2 of 5 Internal Photo - 3 Internal Photo - 4 INTERTEK TESTING SERVICES Internal Photos FCC ID: OTA44231RX IC: 7783A-44231RX Internal photos - 3 of 5 Internal Photo - 5 Internal Photo - 6 INTERTEK TESTING SERVICES Internal Photos FCC ID: OTA44231RX IC: 7783A-44231RX Internal photos - 4 of 5 Internal Photo - 7 Internal Photo - 8 INTERTEK TESTING SERVICES Internal Photos FCC ID: OTA44231RX IC: 7783A-44231RX Internal photos - 5 of 5 Internal Photo - 9
Test Report
Issuing Laboratory: Intertek Testing Services Hong Kong Limited Hong Kong Accreditation Service (HKAS) has accredited this laboratory under the Hong Kong Laboratory Accreditation Scheme (HOKLAS) for specific laboratory activities as listed in the HOKLAS directory of accredited laboratories. The results shown in this report were determined by this laboratory in accordance with its terms of accreditation. Test Report Number: HK12100535-5 Page 1 of 28 FCC ID: OTA44231RX IC: 7783A-44231RX Intertek Testing Services Hong Kong Ltd. 2/F., Garment Centre, 576 Castle Peak Road, Kowloon, Hong Kong. Tel: (852) 2173 8888 Fax: (852) 2785 5487 Website: www.hk.intertek-etlsemko.com GENERAL INFORMATION Applicant Name: JAKKS Pacific (HK) Ltd. Applicant Address: 12/F., Wharf T&T Centre, 7 Canton Road, Tsim Sha Tsui, Kowloon, Hong Kong. FCC Specification Standard: FCC Part 15, October 1, 2011 Edition FCC ID: OTA44231RX FCC Model(s): 44231RX IC Specification Standard: RSS-210 Issue 8, December 2010 RSS-Gen Issue 3, December 2010 IC: 7783A-44231RX IC Model(s): 44231RX Type of EUT: Transceiver Description of EUT: 2.4GHz Frequency Hopping Spread Spectrum Video Baby Monitor - Parent Unit Serial Number: N/A Sample Receipt Date: October 22, 2012 Date of Test: November 06 - 09, 2012 Report Date: November 26, 2012 Environmental Conditions: Temperature: +10 to 40°C Humidity: 10 to 90% Issuing Laboratory: Intertek Testing Services Hong Kong Limited Hong Kong Accreditation Service (HKAS) has accredited this laboratory under the Hong Kong Laboratory Accreditation Scheme (HOKLAS) for specific laboratory activities as listed in the HOKLAS directory of accredited laboratories. The results shown in this report were determined by this laboratory in accordance with its terms of accreditation. Test Report Number: HK12100535-5 Page 2 of 28 FCC ID: OTA44231RX IC: 7783A-44231RX Intertek Testing Services Hong Kong Ltd. 2/F., Garment Centre, 576 Castle Peak Road, Kowloon, Hong Kong. Tel: (852) 2173 8888 Fax: (852) 2785 5487 Website: www.hk.intertek-etlsemko.com Table of Contents 1.0 Test Results Summary & Statement of Compliance.............................................. 4 1.1 Summary of Test Results ........................................................................................ 4 1.2 Statement of Compliance ........................................................................................ 4 2.0 General Description................................................................................................. 6 2.1 Product Description ................................................................................................. 6 2.2 Test Methodology.................................................................................................... 6 2.3 Test Facility............................................................................................................. 6 3.0 System Test Configuration...................................................................................... 8 3.1 Justification ............................................................................................................. 8 3.2 EUT Exercising Software......................................................................................... 9 3.3 Details of EUT and Description of Accessories...................................................... 10 3.4 Measurement Uncertainty ..................................................................................... 10 4.0 Test Results............................................................................................................ 12 4.1 Field Strength Calculation...................................................................................... 12 4.2 Radiated Emissions............................................................................................... 13 4.2.1 Radiated Emission Configuration Photograph ..................................................... 13 4.2.2 Radiated Emission Data ..................................................................................... 13 4.2.3 Transmitter Duty Cycle Calculation ..................................................................... 18 4.3 Radiated Emission on the Bandedge..................................................................... 21 4.4 AC Power Line Conducted Emission ..................................................................... 24 4.4.1 AC Power Line Conducted Emission Configuration Photograph.......................... 24 4.4.2 AC Power Line Conducted Emission Data .......................................................... 24 5.0 Equipment List...................................................................................................... 28 Issuing Laboratory: Intertek Testing Services Hong Kong Limited Hong Kong Accreditation Service (HKAS) has accredited this laboratory under the Hong Kong Laboratory Accreditation Scheme (HOKLAS) for specific laboratory activities as listed in the HOKLAS directory of accredited laboratories. The results shown in this report were determined by this laboratory in accordance with its terms of accreditation. Test Report Number: HK12100535-5 Page 3 of 28 FCC ID: OTA44231RX IC: 7783A-44231RX Intertek Testing Services Hong Kong Ltd. 2/F., Garment Centre, 576 Castle Peak Road, Kowloon, Hong Kong. Tel: (852) 2173 8888 Fax: (852) 2785 5487 Website: www.hk.intertek-etlsemko.com EXHIBIT 1 TEST RESULTS SUMMARY & STATEMENT OF COMPLIANCE Issuing Laboratory: Intertek Testing Services Hong Kong Limited Hong Kong Accreditation Service (HKAS) has accredited this laboratory under the Hong Kong Laboratory Accreditation Scheme (HOKLAS) for specific laboratory activities as listed in the HOKLAS directory of accredited laboratories. The results shown in this report were determined by this laboratory in accordance with its terms of accreditation. Test Report Number: HK12100535-5 Page 4 of 28 FCC ID: OTA44231RX IC: 7783A-44231RX Intertek Testing Services Hong…
Text truncated - open the document above for the full version.
Test Setup Photos
INTERTEK TESTING SERVICES The Worst Case Configuration Photographs - Mode: Transmission FCC ID: OTA44231RX IC: 7783A-44231RX config photos (radiated emission - parent unit) - 1 of 1 Radiated Emission - Parent Unit Front View Rear View INTERTEK TESTING SERVICES The Worst Case Configuration Photographs - Mode: Transmitting Sounds and Video (PC’s AC Main) FCC ID: OTA44231RX IC: 7783A-44231RX config photos (conducted emission) - 1 of 2 Conducted Emission Front View Right Side View INTERTEK TESTING SERVICES The Worst Case Configuration Photographs - Mode: Transmitting Sounds and Video (PC’s AC Main) FCC ID: OTA44231RX IC: 7783A-44231RX config photos (conducted emission) - 2 of 2 Conducted Emission Left Side View
Contact Information
Applicant
Dick Au(Senior Manager , Product Integrity)
Technical Contact
Intertek Testing Services Hong Kong Ltd.Melvin Nip
[email protected](852)21738888
Flat D, 5/F., Garment Centre · Kowloon · Hong Kong
Non-Technical Contact
Intertek Testing Services Hong Kong Ltd.Melvin Nip
[email protected](852)21738888
Test Firm
Intertek Testing Services Hong KongBilly Chow
Technical Specifications
| # | Rule Parts | Frequency Range | Power Output |
|---|---|---|---|
| 1 | 15C | 2.41 GHz - 2.48 GHz | - |
Other Applications from Jakks Pacific (HK) Ltd.
OTA78969TXNT
Mar 24, 2024Mario Kart Mini Motorcycle RC Racer
Equipment Class
DXX - Part 15 Low Power Communication Device TransmitterOTA78969RXNT
Mar 24, 2024Mario Kart Mini Motorcycle RC Racer
Equipment Class
DXX - Part 15 Low Power Communication Device Transmitter
OTA41822RX
Jan 05, 2023Super Mario Rumble RCC
Equipment Class
DXX - Part 15 Low Power Communication Device Transmitter
OTA41822TX
Dec 29, 2022Super Mario Rumble RC
Equipment Class
DXX - Part 15 Low Power Communication Device Transmitter
OTA71207RX
Aug 25, 2021RNR Lightning Luna-AA
Equipment Class
DXX - Part 15 Low Power Communication Device Transmitter