Q9DAP65802.11 a/b/g Wireless Access Point
Hewlett Packard Enterprise Company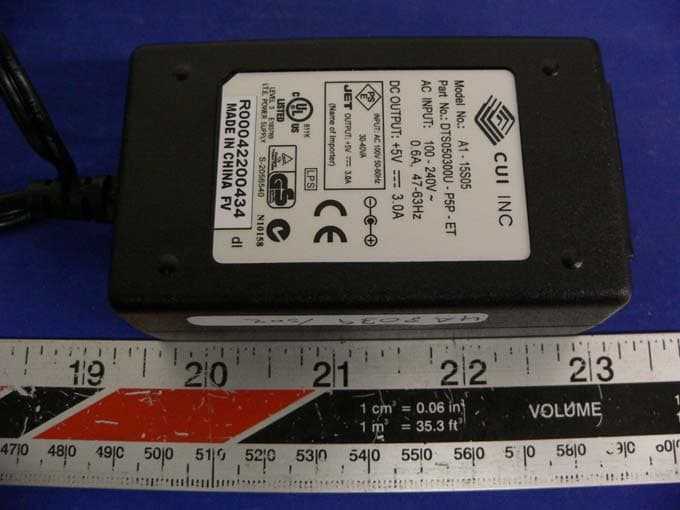
Click to zoom
Application Details
- Equipment Class
- DTS - Digital Transmission System
- Date of Grant
- Oct 18, 2005
- Application Purpose
- Original Equipment
- Date of Application
- Oct 18, 2005
- Equipment Note
- 802.11 a/b/g Wireless Access Point
- Frequency Range
- 5725.00000000 - 5850.00000000
- Country
- United States
Documents & Files
Document Text
Text extracted from the exhibit documents filed with the FCC. Open a document above to read the original.
Users Manual
PACKAGE CONTENTS • 1 x Aruba 65 Wireless Access Point • 1 x Quick Installation Guide (this document) Inform your supplier if there are any incorrect, missing or damaged parts. If possible, retain the carton, including the original packing materials. Use them to repack the product in case there is a need to return it. 1 Install two screws in the wall or shelf. If attaching the device to drywall, we recommend using appropriate wall anchors (not included). 2 Align the Aruba 65 mount-ing slots to capture the surface screws. 3 Orient the antenna. For best per-formance, swivel the antenna so that it is oriented vertically. Figure 0-1: Aruba 65 Mounting Aruba 41 10/100 Mbps Ethernet RJ-45 FemalePin-Out *POE UnusedUnusedUnusedUnused 12345678 ETH Rx+ (POE negative*) ETH Rx– (POE negative*) ETH Tx+ (POE positive*) ETH Tx– (POE positive*) Direction Input Output Figure 0-2: Aruba 65 FE Port Aruba 65 Wireless Access Point Quick Installation Guide 2 1 BEFORE GETTING STARTED Before installing your Aruba 65 wirless access point, please ensure you have the following: • 1 x Fast Ethernet cable of required length • 1 x 802.3af compliant Power over Ethernet source (PSE) - Aruba Mobility Controller or Midspan device • 1 x Aruba Mobility Controller provisioned on the network: - with Layer 2/3 network connectivity your Aruba 65 - One of the following network services: - Aruba Discovery Protocol (ADP) - DNS server with an “A” record (see section 1; Provisioning the Aruba 65) - DHCP Server with vendor specifi c options (see section 1; Provisioning the Aruba 65) Optional: • Mounting screws (not supplied) Provisioning using DHCP with Vendor Specific Options A standards compliant DHCP server can be confi gured to return the host Aruba Mobility Controller’s IP address through Vendor Specifi c Options (option 43) in the DHCP reply. If the host Mobility Controller’s IP address is obtained via DHCP, it will be used for uploading the Aruba access point’s software image and confi guration. NOTE: If you have location-specifi c confi gurations for your Access Points, you will need to apply this confi guration information using AP Reprovisioning. AP Reprovisioning Once an AP is associated to an Aruba Mobility Controller, it is capable of being Reprovisioned if necessary. AP Reprovisioning is the process by which APs are assigned unique confi guration characteristics, for example, location codes. Location codes are important for recalibration and triangulation. For details on AP Reprovisioning, see the ArubaOS User Guide. AP Provisioning Recommended only in instances where APs require to be pre-staged or provisioned in advance of shipment and fi nal network installation (suchas as Remote Access Point (RAP) deployments), in AP programming mode, AP confi guration parameters are defi ned on the Aruba Mobility Controller via command line interface or web interface, where they can then be uploaded to individual access points as required. Installing the Aruba 65 Select a location as close as possible to the center of the intended coverage area. The service location should be free from obstructions or obvious sources of interference. Normally, the higher you place an access point or air monitor, the better its performance.The Aruba 65 can be mounted on a wall using the mounting slots on the bottom of the unit.NOTE: For dimensions, see “Product Specifi cations” . Allow 5 cm (2”) additional space on the right-hand side for cables and ensure enough space for antenna articulation. Using the Built-In Ceiling Tile Rail Mounting Slots The snap-in tile rail slots on the back of the Aruba 65 can be used to attach the device directlyto a 1” wide, standard ceiling tile rail.CAUTION: Do not use the mounting slots to hang the Aruba 65 from the ceiling, sideways, or in any place where it could fall on people or equipment. For more secure installation, use one of the optional mounting kits.To hang the Aruba 65 upright using the mounting slots, perform the following steps: Connecting Required Cables NOTE: Aruba 65 Access Points are intended only for installation in Environment A as defi ned in IEEE 802.3.af, Power over Ethernet. All interconnected equipment must be contained within the same building, including the interconnected equipment’s associ-ated LAN connections.The 10/100 Mbps Ethernet (FE) port is used to connect the AP to a 10Base-T/100Base-TX (twisted-pair) Ethernet LAN segment. Use a 4- or 8-conductor, Category 5 UTP, straight-through FE cable.X and automatically adjusts for straight-through or cross-over cables. The maximum length for FE cables is 100 meters (325 feet). Install cables in accordance with all applicable local and national regulations and practices. Connecting Cables & Power 1 Connect one end of the FE cable directly to the Aruba 65 FE port 2 Connect the other end of the FE cable to one of the following: - To a network port on the Mobility Controller, or - To a network mid-span device that supports 802.3af compliant port FE Port Specifi cations The 10/100 Mbps Ethernet (FE) port is located on the right-hand side of the Aruba 65 and has an RJ-45 female connector. The port pin-outs are shown in Figure 0-2: Verifying Successful Installation The integrated LEDs on the AP 65 may be used at this point to verify the AP is receiving power and initializing successfully. LED behavior indicated status as follows: Configuring the Aruba 65 Once the Aruba 65 has been provisioned and installed, it will be capable of discovery and association to an Aruba Mobility Controller where the wireless and security parameters can be set. For AP confi guration information, refer to the ArubaOS User Guide AAAruArub Installation instructions for the deployment and installation of your Aruba 65 802.11a/b/g wireless access point. About the Aruba 65 The Aruba 65 is part of a comprehensive wireless network solution. The device works only in conjunction with an Aruba Mobility Controller, and provides the following capabilities: • Wireless transceiver • Pr…
Text truncated - open the document above for the full version.
External Photos
EXHIBIT C - EUT EXTERNAL PHOTOGRAPHS EUT Front View EUT Rear View Antenna View EUT – Port View 1 EUT – Port View 2 Power Adapter View
ID Label/Location Info
EXHIBIT A - FCC ID LABEL INFORMATION Proposed FCC ID Label Proposed Label Location on EUT Rear Side of EUT / Label Location Industry Canada Industrie Canada IC: 4675A-AP65 FCC ID: Q9DAP65 This device complies with Part 15 o the FCC Rules. Operation is subject to the following two conditions: (1) this device may not cause harmful interference, and (2) this device must accept any interference received, including interference that may cause undesired operation.
Internal Photos
EXHIBIT C - EUT INTERNAL PHOTOGRAPHS EUT – Component View 1 EUT – Component View 2 EUT – Solder View 1 EUT – Solder View 2
Test Report
Note: The test report is specially limited to the use of the above client company and this particular sample only. It may not be duplicated without prior written consent of Bay Area Compliance Laboratory Corporation. This report must not be used by the client to claim product certification, approval, or endorsement by NVLAP, NIST or any agency of the U.S. Government. FCC PART 15.247 & 15.407 EMI MEASUREMENT AND TEST REPORT For Aruba Networks 1322 Crossman Avenue Sunnyvale, CA 94089 FCC ID: Q9DAP65 This Report Concerns: Original Report Equipment Type: 802.11a/b/g Access Point Test Engineer: Daniel Deng Report No.: R0508183 Report Date: 2005-09-08 Reviewed By: Richard Lee Prepared By: Bay Area Compliance Laboratory Corporation (BACL) 230 Commercial Street Sunnyvale, CA 94085 Tel: (408) 732-9162 Fax: (408) 732 9164 Aruba Networks FCC ID: Q9DAP65 Report # R0508183Rpt-a Page 2 of 100 FCC Part 15.247 & 15.407 Test Report TABLE OF CONTENTS GENERAL INFORMATION.......................................................................................................................................4 PRODUCT DESCRIPTION FOR EQUIPMENT UNDER TEST (EUT) ....................................................................................4 OBJECTIVE...................................................................................................................................................................4 RELATED SUBMITTAL(S)/GRANT(S).............................................................................................................................4 TEST METHODOLOGY..................................................................................................................................................4 TEST FACILITY.............................................................................................................................................................4 SYSTEM TEST CONFIGURATION ..........................................................................................................................6 JUSTIFICATION.............................................................................................................................................................6 EUT EXERCISE SOFTWARE..........................................................................................................................................6 SPECIAL ACCESSORIES.................................................................................................................................................6 SCHEMATICS / BLOCK DIAGRAM.................................................................................................................................6 EQUIPMENT MODIFICATIONS.......................................................................................................................................6 LOCAL SUPPORT EQUIPMENT LIST AND DETAILS........................................................................................................6 POWER SUPPLY INFORMATION.....................................................................................................................................6 EXTERNAL I/O CABLING LIST AND DETAILS...............................................................................................................6 CONFIGURATION OF TEST SYSTEM..............................................................................................................................7 TEST SETUP BLOCK DIAGRAM.....................................................................................................................................7 SUMMARY OF TEST RESULTS ...............................................................................................................................8 §1.1307(B)(1) & §2.1091 - RF EXPOSURE.................................................................................................................9 §15.203 - ANTENNA REQUIREMENT....................................................................................................................10 STANDARD APPLICABLE............................................................................................................................................10 §15.205, §15.209(A), §15.407(B)(5), §15.407(B)(6) - SPURIOUS RADIATED EMISSION..................................11 MEASUREMENT UNCERTAINTY..................................................................................................................................11 EUT SETUP................................................................................................................................................................12 SPECTRUM ANALYZER SETUP....................................................................................................................................12 TEST EQUIPMENT LIST AND DETAILS.........................................................................................................................12 TEST PROCEDURE......................................................................................................................................................13 CORRECTED AMPLITUDE & MARGIN CALCULATION.................................................................................................13 SUMMARY OF TEST RESULTS.....................................................................................................................................13 §15.207(A) - CONDUCTED EMISSIONS.................................................................................................................24 MEASUREMENT UNCERTAINTY..................................................................................................................................24 EUT SETUP................................................................................................................................................................24 RECEIVER SETUP...............................…
Text truncated - open the document above for the full version.
Test Setup Photos
EXHIBIT B - TEST SETUP PHOTOGRAPHS Conducted Emission Radiated Setup
Contact Information
Applicant
Mark Hill(Principal Engineer)
Test Firm
Bay Area Compliance LaboratoryJohn Chan
Technical Specifications
| # | Rule Parts | Frequency Range | Power Output |
|---|---|---|---|
| 2 | 15C | 5.72 GHz - 5.85 GHz | 94.00 mW |
Other Applications from Hewlett Packard Enterprise Company
Q9DAPINH721
Jul 17, 2026Access Point
Equipment Class
6ID - 15E 6 GHz Low Power Indoor Access PointQ9DASIN0307
Dec 22, 2025HPE Aruba User Experience Sensor
Equipment Class
DTS - Digital Transmission SystemQ9DASIN0308
Nov 23, 2025HPE Aruba User Experience Sensor
Equipment Class
DTS - Digital Transmission SystemQ9DAPEX0764
Nov 20, 2025ACCESS POINT
Equipment Class
DTS - Digital Transmission SystemQ9DAPIN0763
Sep 29, 2025ACCESS POINT
Equipment Class
NII - Unlicensed National Information Infrastructure TX