SS3-HG8001501RONIN-M
SZ DJI TECHNOLOGY CO., LTD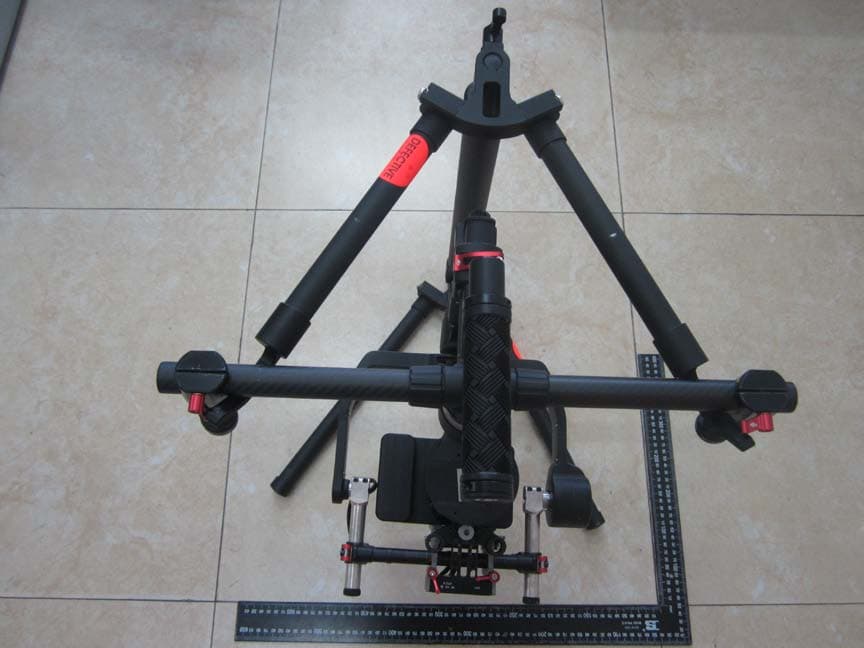
Click to zoom
Application Details
- Equipment Class
- DTS - Digital Transmission System
- Date of Grant
- Apr 09, 2015
- Application Purpose
- Original Equipment
- Date of Application
- Apr 09, 2015
- Equipment Note
- RONIN-M
- Frequency Range
- 2402.00000000 - 2480.00000000
- Company
- SZ DJI TECHNOLOGY CO., LTD
- Country
- China
Documents & Files
Document Text
Text extracted from the exhibit documents filed with the FCC. Open a document above to read the original.
Users Manual
Ronin-M 2015.1 V1.0 User Manual 2 © 2015 DJI. All Rights Reserved. Disclaimers and Warnings Congratulations on purchasing your new DJI product. Please read this manual and disclaimer carefully before using this product. By using this product, you hereby agree to this disclaimer and signify that you have read it fully. You agree that you are responsible for your own conduct and any content created while using this product, and for any consequence thereof. You agree to use this product only for purposes that are proper and in accordance with local regulations, terms and any applicable polices and guidelines. By reading this disclaimer, you also agree: 1. Any part of this disclaimer is subject to change without prior notice, refer to www.dij.com for the latest version. 2. DJI reserves the right of final interpretation of this disclaimer. Do not modify or adjust the Ronin-M. The Ronin-M has been calibrated before it leaves the factory. No adjusting or amending to the Ronin-M is allowed. Make sure to use the original battery, otherwise performance may be hindered, and internal malfunctions and damage to the gimbal may be caused. Please download the corresponding Assistant software. As DJI has no control over use, setup, final assembly, modification or misuse, no liability shall be assumed nor accepted for any resulting damage or injury. By the act of use, setup or assembly, the user accepts all resulting liability. DJI assumes no liability for damage(s) or injuries incurred directly or indirectly from the use of this product. DJI and Ronin-M are registered trademarks of DJI as names of product, brand, etc., appearing in this manual are trademarks or registered trademarks of their respective owner companies. This product and manual are copyrighted by DJI with all rights reserved. No part of this product or manual shall be reproduced in any form without the prior written consent or authorization of DJI. No patent liability is assumed with respect to the use of the product or information contained herein. Using Lithium Polymer (LiPo) Batteries LiPo intelligent batteries can be extremely hazardous and require special attention when handled. Always follow the following instructions when using LiPo batteries: 1. DJI intelligent batteries must be charged with a DJI charger. 2. DJI Intelligent batteries are designed to stop charging when full. However, it is good practice to monitor the charging progress and disconnect the battery from the charger once fully charged. 3. Do not charge an intelligent battery near flammable materials or on flammable surfaces such as carpet or wood. 4. Never charge a swollen, leaky or damaged battery. 5. Examine charger regularly for damage to the cord, plug, enclosure or other parts. Never use a damaged charger. 6. Disconnect the charger when not in use. 7. Do not clean the charger with denatured alcohol or other flammable solvents. Ronin-M User Manual © 2015 DJI. All Rights Reserved. 3 Usage and Storage 1. Keep batteries out of the reach of children and pets. 2. Never discharge batteries below 3V per cell. 3. Do not heat the battery. 4. Do not insert or remove batteries if the plastic cover has been torn or compromised in any way. 5. Do not drop or strike batteries. 6. Never use a swollen, leaky or damaged battery. 7. Clean battery terminals with a clean, dry cloth. 8. Do not expose batteries to extreme temperatures, including excessive heat. Do not leave the batteries inside vehicles on hot days. 9. Do not allow batteries to come into contact with any kind of liquid. Do not leave batteries out in the rain or near a source of moisture. 10. Do not leave batteries in a microwave oven or in a pressurized container. 11. Do not attempt to dismantle, pierce or cut a battery. Do not attempt to repair batteries yourself. 12. Do not place loose battery cells on any conductive surface, such as metal-toppled tables. 13. Do not put the loose cells in a pocket, bag or drawer where they may short-circuit against other items or where battery terminals could be pressed against each other. 14. Do not place or use batteries on strong electrostatic or electromagnetic surfaces or surrounding areas. This may result in battery damage. 15. Do not place heavy objects on the batteries or charger. Avoid dropping batteries. 16. Avoid direct contact with the electrolyte contained within the batteries. The electrolyte and electrolysis vapors are harmful to your health. 17. Do not mix battery brands inside the controller. 18. Do not attach the battery to wall or car charger sockets directly. Always use a DJI approved adapter. Battery Disposal 1. Discarding batteries in general household waste is bad for the environment. Please dispose of batteries properly. 2. Do not dispose of batteries in fire. 3. Damaged or unusable batteries must be disposed of in a container specially reserved for this purpose. When disposing of batteries, follow appropriate local guidelines and regulations. For further information, contact your local solid waste authority or a battery store. 4. Only use the DJI intelligent battery. 5. Always use the DJI intelligent battery charger. FCC Compliance Ronin-M complies with part 15 of the FCC rules. Operation is subject to the following two conditions: (1) This device may not cause harmful interference, and (2) This device accepts any interference received, including interference that may cause undesired operation. Ronin-M User Manual 4 © 2015 DJI. All Rights Reserved. Using this manual ImportantHints and TipsReferences or Definitions Download DJI Ronin-M Assistant App Download and install the DJI Ronin-M Assistant App. Search "DJI Assistant" on the App Store and then follow the instructions for iOS installation. Search "DJI Ronin" on the Google Play and then follow the instructions for Android installation. iOS6.1 or above Android4.3 or abovehttp://m.dji.net/dji-ronin © 2015 DJI. All Rights Reserved. 5 Contents Disclaimers and Warnings 2 Using Lithium Polymer (LiPo) Batteries 2 Us…
Text truncated - open the document above for the full version.
Users Manual
Ronin-M User Manual 14 © 2015 DJI. All Rights Reserved. Handle Bar Adjustment The customizable handle bar of the Ronin-M can be removed by following the steps below, if required. 1. Loosen the two screws as shown. 2. Remove the grip from the handle bar. 3. The resulting setup is shown below. Balancing To achieve the best performance from the Ronin-M, proper balancing is necessary and a must. Accurate balance is critical in shots where the Ronin-M will be subjected to extreme movements or accelerations (running, horseback riding, biking, car mounts, helicopters, etc.) Proper balance will also offer a longer battery runtime. There are 3 axes that need to be accurately balanced prior to powering the Ronin-M on and setting up the software. The camera needs to be fully setup with all accessories prior to installing and balancing the camera on the gimbal. If you are balancing the camera with a lens cap on, be sure to remove the lens cap prior to balancing. Be sure whenever balancing the camera that the Ronin-M’s power is turned off. Ronin-M User Manual © 2015 DJI. All Rights Reserved. 15 Step 1: Balancing the Vertical Tilt To adjust the vertical balance, you will need to change the camera’s vertical position. Adjust the height of the crossbar to achieve vertical tilt balance. 1. Rotate the Tilt Axis so that the camera lens is pointing skyward as much as your lens setup will allow and loosen the two vertical adjustment tabs. Gently slide the camera mount crossbar forward or backward until the camera remains pointing skyward when released. 2. Tighten the tabs and manually rotate the assembly simulating tilt to ensure there is no binding in the tilt motor. When proper balance is achieved, you can rotate the camera to any tilt angle, and it will stay in that position. Ensure the measurement marks match up on either side of the vertical bars. If they do not match up, the assembly could possibly be skewed higher or lower on one side, which would cause the tilt motor to bind. Step 2: Balancing the Roll Axis Balancing the camera left-to-right on the Roll Axis is also required. When the proper left/right roll balance is achieved, the camera will stay level. 1. Loosen the 2 lock-knobs to allow the camera and mounting plate to slide left and right. Slide the camera left or right until the Roll Axis remains level. 2. Tighten the 2 Lock-knobs to lock the camera mounting plate in position. Step 3: Balancing the Tilt Axis We also need to balance the camera fore and aft on the Tilt Axis. When the proper fore and aft tilt balance is achieved, the camera will stay level when you remove your hand (hold the roll axis at the same time). When adjusting the roll balancing position of the camera, only loosen the 2 lock-knobs a few turns to allow the camera base to slide. Do not loosen the lock-knobs excessively.
Users Manual
Ronin-M User Manual 16 © 2015 DJI. All Rights Reserved. Step 4: Balancing the Pan Axis The entire mass below the pan motor must be balanced on the central axis line of the pan motor. To achieve this balance, you must slide the pan axis slider. 1. Open the clamp [1] on the pan axis and turn the knob [2] to slide the assembly. Identify if the Ronin-M is front heavy or rear heavy. 2. While the Ronin-M is resting on the tuning stand, try rotating the Ronin-M along the pan axis by lifting one side of the handle bar. If the camera does not swing, the pan axis is properly balanced. Tighten the clamp after balancing is completed. Advanced Roll Adjustment If additional roll adjustment is needed in cases where the camera itself is too light in comparison to the tilt motor assembly, advanced roll adjustment can be achieved by loosening the indicated screws and pushing the assembly to the right or left. [1] [2] 1. Loosen the camera base's side clamp to allow the camera and mounting plate to slide forwards and backwards. Slide the camera forwards or backwards until the Tilt Axis remains level. It takes very small adjustments to get the balance right. 2. Tighten the side clamp to lock the camera and mounting plate in position. If properly balanced, the camera should be able to remain steady in any given tilt angle. © 2015 DJI. All Rights Reserved. 17 DJI Ronin-M Assistant App Tuning After finishing the balancing, you can adjust software parameters through the DJI Assistant App. Download and Install 1. Download the DJI Assistant App: Search “DJI Assistant” on the App Store then follow instructions for the iOS version. Search “DJI Ronin” on the Google Play then follow instructions for the Android version. 2. Be sure Bluetooth is switched to the on position on your mobile device. Position the camera in the standard operating position. Power on your Ronin-M and then open the app to connect to the Ronin-M via Bluetooth. 3. Register your e-mail address when you use the app for the first time. 4. Connect to your Ronin-M according to the tips in the app. After connecting to the main controller of the gimbal, you will see the Wizard menu. When the green light at the top in the app is steady and the blue light is blinking, the connection is complete. The green LED light on the Ronin-M will light up. After switching on Bluetooth on your mobile device, go back to the Assistant App to connect to the Ronin-M. The Ronin-M will not show up in the settings menu of your mobile device. It can only be connected to via the app. There are two device types, choose " Ronin" to enter the gimbal assistant page. Choosing "A2" will enter the DJI flight controller assistant page. The function of the iOS and Android app are the same, below is taking the iOS version for example. Basic Settings The functionality in the Wizard are the most basic functions you may want to adjust upon receiving your Ronin-M. These options are also the most used functions during standard operation of the Ronin-M. You can complete all these settings in the Wizard menu. N/A ? Gimbal Mode: Wizard Auto Tune Stability Briefcase Mode SmoothTrack Mode Live Data Calibrate Briefcase Mode SmoothTrack Mode SmoothTrack Adjustments 0 0 0 0 0 0 Power Pan Speed Tilt Deadband Roll Angle GimbalControlViewerMore Accel N/A ? Gimbal Mode: GimbalControlViewerMore Wizard Auto Tune Stability Briefcase Mode SmoothTrack Mode Live Data Calibrate Briefcase Mode SmoothTrack Mode Control Speed Adjustment 0 0 0 0 0 0 Power Pan Pan Tilt Tilt Roll Angle Select between customizable options Tap this after setting up camera balance Recognized by Bluetooth connection Ronin is providing feedback In App help ? Gimbal Wizard GimbalControlViewerMore Speed Pan Axis Pan Onboard Controller Remote Operator Tilt Axis Tilt Test Pan Speed DeadbandAccel SmoothTrack Adjustments SmoothTrack Test Control Speed Adjustment 50 1515 15 1515 40 0 0 0 Test Tilt Speed 1. Calibrate Auto Tune Stability provides an easy one-touch button for automatic configuration of each axis. Trajectory, speed, power and stiffness of motors are automatically tuned for the camera configuration that’s mounted. Ronin-M User Manual 18 © 2015 DJI. All Rights Reserved. Auto Tune Stability should be tapped whenever there is a new camera configuration mounted such as a lens change or accessories change. This will offer the best stability and the most optimal settings. 2. Live Data This monitors the feedback from each motor axis. If a particular motor axis indicates a power greater than 10, this often means the mechanical balancing of the camera hasn’t been properly adjusted. A properly balanced camera rig will have each axis indicating close to 0 power. Don’t worry if these settings are not always 0. The Angle indicates the current angle at which each axis is in relation to center. 3. Briefcase Mode When Briefcase Mode is switched on, the Ronin will be able to seamlessly transform into this operation mode. With Briefcase Mode turned off, the Ronin will allow the Roll axis to follow if the Ronin is tilted past the standard roll axis travel. 4. SmoothTrack Mode When SmoothTrack Mode is enabled, the Ronin will can be "steered" by the camera operator’s movements in the Pan and Tilt axis. This steering/translation speed can be adjusted for each axis independently. When the Ronin's top bar is rotated left or right, the camera will smoothly pan and slow down to a stop. Under the SmoothTrack options, the Pan Axis and the Tilt Axis can be independently adjusted. Pan Axis speed will determine how fast the camera will travel while translating a pan movement. Pan deadband will determine how much movement the gimbal will tolerate prior to translating the camera’s pan. Tilt Axis speed will determine how fast the camera will travel while translating a tilt movement. Tilt deadband will determine how much movement the gimbal will tolerate prior to translating the camera’s tilt. The Pan and Tilt SmoothTrack speed can be tested. Ensure there is no obstru…
Text truncated - open the document above for the full version.
Users Manual
Ronin-M User Manual 16 © 2015 DJI. All Rights Reserved. Step 4: Balancing the Pan Axis The entire mass below the pan motor must be balanced on the central axis line of the pan motor. To achieve this balance, you must slide the pan axis slider. 1. Open the clamp [1] on the pan axis and turn the knob [2] to slide the assembly. Identify if the Ronin-M is front heavy or rear heavy. 2. While the Ronin-M is resting on the tuning stand, try rotating the Ronin-M along the pan axis by lifting one side of the handle bar. If the camera does not swing, the pan axis is properly balanced. Tighten the clamp after balancing is completed. Advanced Roll Adjustment If additional roll adjustment is needed in cases where the camera itself is too light in comparison to the tilt motor assembly, advanced roll adjustment can be achieved by loosening the indicated screws and pushing the assembly to the right or left. [1] [2] 1. Loosen the camera base's side clamp to allow the camera and mounting plate to slide forwards and backwards. Slide the camera forwards or backwards until the Tilt Axis remains level. It takes very small adjustments to get the balance right. 2. Tighten the side clamp to lock the camera and mounting plate in position. If properly balanced, the camera should be able to remain steady in any given tilt angle. © 2015 DJI. All Rights Reserved. 17 DJI Ronin-M Assistant App Tuning After finishing the balancing, you can adjust software parameters through the DJI Assistant App. Download and Install 1. Download the DJI Assistant App: Search “DJI Assistant” on the App Store then follow instructions for the iOS version. Search “DJI Ronin” on the Google Play then follow instructions for the Android version. 2. Be sure Bluetooth is switched to the on position on your mobile device. Position the camera in the standard operating position. Power on your Ronin-M and then open the app to connect to the Ronin-M via Bluetooth. 3. Register your e-mail address when you use the app for the first time. 4. Connect to your Ronin-M according to the tips in the app. After connecting to the main controller of the gimbal, you will see the Wizard menu. When the green light at the top in the app is steady and the blue light is blinking, the connection is complete. The green LED light on the Ronin-M will light up. After switching on Bluetooth on your mobile device, go back to the Assistant App to connect to the Ronin-M. The Ronin-M will not show up in the settings menu of your mobile device. It can only be connected to via the app. There are two device types, choose " Ronin" to enter the gimbal assistant page. Choosing "A2" will enter the DJI flight controller assistant page. The function of the iOS and Android app are the same, below is taking the iOS version for example. Basic Settings The functionality in the Wizard are the most basic functions you may want to adjust upon receiving your Ronin-M. These options are also the most used functions during standard operation of the Ronin-M. You can complete all these settings in the Wizard menu. N/A ? Gimbal Mode: Wizard Auto Tune Stability Briefcase Mode SmoothTrack Mode Live Data Calibrate Briefcase Mode SmoothTrack Mode SmoothTrack Adjustments 0 0 0 0 0 0 Power Pan Speed Tilt Deadband Roll Angle GimbalControlViewerMore Accel N/A ? Gimbal Mode: GimbalControlViewerMore Wizard Auto Tune Stability Briefcase Mode SmoothTrack Mode Live Data Calibrate Briefcase Mode SmoothTrack Mode Control Speed Adjustment 0 0 0 0 0 0 Power Pan Pan Tilt Tilt Roll Angle Select between customizable options Tap this after setting up camera balance Recognized by Bluetooth connection Ronin is providing feedback In App help ? Gimbal Wizard GimbalControlViewerMore Speed Pan Axis Pan Onboard Controller Remote Operator Tilt Axis Tilt Test Pan Speed DeadbandAccel SmoothTrack Adjustments SmoothTrack Test Control Speed Adjustment 50 1515 15 1515 40 0 0 0 Test Tilt Speed 1. Calibrate Auto Tune Stability provides an easy one-touch button for automatic configuration of each axis. Trajectory, speed, power and stiffness of motors are automatically tuned for the camera configuration that’s mounted. Ronin-M User Manual 18 © 2015 DJI. All Rights Reserved. Auto Tune Stability should be tapped whenever there is a new camera configuration mounted such as a lens change or accessories change. This will offer the best stability and the most optimal settings. 2. Live Data This monitors the feedback from each motor axis. If a particular motor axis indicates a power greater than 10, this often means the mechanical balancing of the camera hasn’t been properly adjusted. A properly balanced camera rig will have each axis indicating close to 0 power. Don’t worry if these settings are not always 0. The Angle indicates the current angle at which each axis is in relation to center. 3. Briefcase Mode When Briefcase Mode is switched on, the Ronin will be able to seamlessly transform into this operation mode. With Briefcase Mode turned off, the Ronin will allow the Roll axis to follow if the Ronin is tilted past the standard roll axis travel. 4. SmoothTrack Mode When SmoothTrack Mode is enabled, the Ronin will can be "steered" by the camera operator’s movements in the Pan and Tilt axis. This steering/translation speed can be adjusted for each axis independently. When the Ronin's top bar is rotated left or right, the camera will smoothly pan and slow down to a stop. Under the SmoothTrack options, the Pan Axis and the Tilt Axis can be independently adjusted. Pan Axis speed will determine how fast the camera will travel while translating a pan movement. Pan deadband will determine how much movement the gimbal will tolerate prior to translating the camera’s pan. Tilt Axis speed will determine how fast the camera will travel while translating a tilt movement. Tilt deadband will determine how much movement the gimbal will tolerate prior to translating the camera’s tilt. The Pan and Tilt SmoothTrack speed can be tested. Ensure there is no obstru…
Text truncated - open the document above for the full version.
Users Manual
Ronin-M User Manual © 2015 DJI. All Rights Reserved. 31 Remote Control Features MODE: The MODE switch is used for toggling SmoothTrack. 1. In Position 1, Smooth Track is off. Remote control is freely position pan axis stops and holds the last input position of the pan axis control stick. 2. In Position 2, Smooth Track is on. Remote control is freely position pan axis stops and holds the last input position of the pan axis control stick. 3. In Position 3, Smooth Track is on. The gimbal will always point and reset pan to the forward facing direction once the pan axis control stick is let go. Position 1 -Free, SmoothTrack Off Position 2 -Free, SmoothTrack On Position 3 -Reset to Center, SmoothTrack On FUNCTION: 1. The FUNCTION switch is used to select the SmoothTrack speed. There are 3 possible selections: Fast, Normal and Slow. The value of each speed can be preset in the App or PC Assistant. Position 1 -Fast Position 2 -Normal Position 3 -Slow 2. Activating Motor Kill Switch Quickly flip the FUNCTION Switch between Position 1 and Position 3 consecutively for 3 times and you will activate the motor kill switch. Do the same again to turn off the motor kill switch. Prior to re- activating the gimbal motors, be sure to position the camera in the standard operating position. The motor kill switch is useful in case the gimbal operator runs into an issue or you need to make a quick mechanical adjustment to the gimbal or camera setup. Left Stick: Horizontal movements on the left stick control the Roll axis. Vertical movements have no definition. Right Stick: Horizontal movements on the right stick control the Pan axis. Right Stick:Vertical movements on the right stick control the Tilt axis. These stick settings can be customized in the DJI Ronin-M Assistant App or PC Assistant. Adding 3rd party transmitter/receiver Ronin-M supports 3rd party transmitters/receivers, such as D-Bus or PPM. Connect the transmitter through the port (refer to Page 8 for the location of D-Bus/PPM port). 32 © 2015 DJI. All Rights Reserved. Operation Modes There are three operation modes in the Ronin-M: underslung mode, upright mode and briefcase mode. Underslung Mode Underslung mode is the standard, default mode. It can be used without any user input. Upright Mode Flip the gimbal forward 180 degrees and it will automatically change to upright mode. Alternatively, you can set the gimbal into upright mode before turning it on. Upright mode is ideal for car mounts or other high camera positions, as it allows you to shoot higher and/or at eye level. Upright mode can be used without any user input. Do not flip the gimbal over sideways going left or right to convert to upright mode. Ronin-M User Manual © 2015 DJI. All Rights Reserved. 33 Briefcase Mode Briefcase mode allows you to hold the Ronin-M in a slim profile close to your body. To enter briefcase mode, tilt the gimbal on the roll axis 90 degrees to the left or right. You may turn briefcase mode off in the gimbal app, in which case the Ronin-M will never automatically transform into briefcase mode. In briefcase mode, the remote control does not have pan, tilt, or roll control of the Ronin-M. Maintenance The figure to the right shows the proper way to transport the Ronin-M with the stand. Using the hook- and-loop straps, lock the Ronin-M gimbal in place as shown. Be sure to undo the straps prior to turning the Ronin-M on! Ronin-M is a precise machine, and it is not waterproof. Keep it away from sand and dust during usage. After use, it is recommended to wipe the Ronin-M down with a soft dry cloth. Never spray any cleaning liquids onto the Ronin-M. 34 © 2015 DJI. All Rights Reserved. Troubleshooting NO.The ProblemWhat to Do 1Motors appear to be weakAfter camera balancing, launch the Assistant App or the PC/ MAC Assistant and start the Auto Tune Stability. Wait for the process to complete and the stiffness settings will be populated on the screen. 2If after tapping the Auto Tune Stability button and the gimbal is still vibrating (1) Check to make sure all knobs are very tight. Including the pan motor knob. (2) Check to make sure the camera securing screw is tight. Push on the camera plate to make sure it is not loose and sliding in the camera mount. (3) Try decreasing the stiffness of the each axis. You should be able to tell if there is one particular axis being affected by looking at the "power" of the axes. 3Pan axis seems off centerGo into the Assistant App or PC/MAC Assistant, tap/click the Calibrate Center and follow the on-screen instructions. 4Ronin seems to be driftingPlace the Ronin-M on the tuning stand and in the Assistant App or the PC/MAC Assistant, tap/click the Calibrate System button. Let the process complete before picking up the Ronin-M. 5SmoothTrack doesn’t work(1) Turn on the Remote control and be sure the MODE switch is not at Position 1 (the uppermost position). (2) SmoothTrack is turned off in the Assistant App or the PC/ MAC Assistant software. (3) The SmoothTrack Deadband is turned up too high. Reduce the Deadband size in the SmoothTrack Menu. 6Motors seem to shutoff automatically Check your camera balance. If the power indicated in the Gimbal Motors Menu indicates 10 or more on any of the 3 axes, please rebalance your camera. 7Gimbal shuts off and doesn’t come back on Power cycle the gimbal. This is a motor protection algorithm that’s built into the Ronin-M to save its own electronic components. If any particular motor goes into a self-protection mode (motor shuts off) 6 times within a 1 minute period, the Ronin-M will shut off power to the motors and will not come back to life unless power cycled. 8Forgot the Bluetooth password Connect Ronin-M to the PC/MAC Assistant and click the "Reset Password" button to reset your password. 9Footage appears to wobble side to side or up and down SmoothTrack speed is too high or SmoothTrack deadband is too low. Decrease the SmoothTrack speed or increase the deadband. © 2015 DJI. All Rights Reserved. 35 Specific…
Text truncated - open the document above for the full version.
Cover Letter(s)
Date:2015/04/09 To: Federal Communications Commission, Authorization & Evaluation Division, 7435 Oakland Mills Road, Columbia, MD 21046 Re: Request of Confidentiality for FCC ID: SS3-HG8001501 To Whom it may concern: Pursuant to sections 0.457 and 0.459 of Commission’s Rules(CFR 47), and Section 552(b)(4) of the Freedom of Information Act, SZ DJI TECHNOLOGY CO., LTD hereby requests confidentiality and treatment of certain information accompanying this application. The materials contain trade secrets and proprietary information not customarily released to the public. The public disclosure of these matters might be harmful to the Applicant and provide unjustified benefits to its competitors. We are also hereby request Short-Term Confidentiality for 180 days after the grant as outlined in Public Notice DA04-1705. This provision will give SZ DJI TECHNOLOGY CO., LTD. temporary confidentiality of commercially sensitive information prior to product release. The requested Permanent and Shor-Term Confidential exhibits are listed as follows: PERMANENT AND SHORT-TERM CONFIDENTIAL LIST Exhibit Description PERMANENT 1 Block Diagram 2 Operational Description 3 Schematics 4 BOM SHORT-TERM 5 External Photos 6 Internal Photos 7 Te s t-Setup Photos 8 User Manual The Applicant understands that pursuant to Rule 0.457, disclosure of this application and all accompanying documentations, where applicable, will not be made public before the date of the Grant for this application. Signatory Lisa Li SZ DJI TECHNOLOGY CO., LTD
External Photos
External Photos 1. EUT full view 2. EUT side view 3. EUT front side view 4. EUT rear side view
ID Label/Location Info
1. Label 2. Label location
Internal Photos
Internal Photos 1. EUT uncover view 2. Mainboard front view 3. Mainboard rear view 4. Sub board front view 5. Sub board rear view 6. Antenna view 2.4GHz Rx BT Tx
Internal Photos
Internal Photos 1. EUT uncover view 2. Mainboard front view 3. Mainboard rear view 4. Sub board front view 5. Sub board rear view 6. Antenna view 2.4GHz Rx BT Tx
Test Report
MORLAB GROUP FL1-3, Building A, FeiYang Science Park, No.8 LongChang Road, Tel: 86-755-36698555 Fax: 86-755-36698525 Block67, BaoAn District, ShenZhen , GuangDong Province, P. R. ChinaHttp://www.morlab.com E-mail: [email protected] Page 2 0f 36 REPORTNo.: SZ14110153W02 DIRECTORY TEST REPORT DECLARATION ∙∙∙∙∙∙∙∙∙∙∙∙∙∙∙∙∙∙∙∙∙∙∙∙∙∙∙∙∙∙∙∙∙∙∙∙∙∙∙∙∙∙∙∙∙∙∙∙∙∙∙∙∙∙∙∙∙∙∙∙∙∙∙∙∙∙∙∙∙∙∙∙∙∙∙∙∙∙∙∙∙∙∙∙∙∙∙∙∙∙∙∙∙∙∙∙∙∙∙∙∙∙∙∙∙∙∙∙∙∙∙∙∙∙∙∙∙∙∙∙∙ 4 1. TECHNICAL INFORMATION ∙∙∙∙∙∙∙∙∙∙∙∙∙∙∙∙∙∙∙∙∙∙∙∙∙∙∙∙∙∙∙∙∙∙∙∙∙∙∙∙∙∙∙∙∙∙∙∙∙∙∙∙∙∙∙∙∙∙∙∙∙∙∙∙∙∙∙∙∙∙∙∙∙∙∙∙∙∙∙∙∙∙∙∙∙∙∙∙∙∙∙∙∙∙∙∙∙∙∙∙∙∙∙∙∙∙∙∙∙∙∙∙∙∙∙∙ 5 1.1 APPLICANT INFORMATION ∙∙∙∙∙∙∙∙∙∙∙∙∙∙∙∙∙∙∙∙∙∙∙∙∙∙∙∙∙∙∙∙∙∙∙∙∙∙∙∙∙∙∙∙∙∙∙∙∙∙∙∙∙∙∙∙∙∙∙∙∙∙∙∙∙∙∙∙∙∙∙∙∙∙∙∙∙∙∙∙∙∙∙∙∙∙∙∙∙∙∙∙∙∙∙∙∙∙∙∙∙∙∙∙∙∙∙∙∙∙∙∙∙∙∙∙∙∙∙∙ 5 1.2 EQUIPMENT UNDER TEST (EUT) DESCRIPTION ∙∙∙∙∙∙∙∙∙∙∙∙∙∙∙∙∙∙∙∙∙∙∙∙∙∙∙∙∙∙∙∙∙∙∙∙∙∙∙∙∙∙∙∙∙∙∙∙∙∙∙∙∙∙∙∙∙∙∙∙∙∙∙∙∙∙∙∙∙∙∙∙∙∙∙∙∙∙∙∙∙∙∙∙∙∙∙∙∙∙∙∙∙∙ 5 1.2.1 IDENTIFICATION OF ALL USED EUTS ∙∙∙∙∙∙∙∙∙∙∙∙∙∙∙∙∙∙∙∙∙∙∙∙∙∙∙∙∙∙∙∙∙∙∙∙∙∙∙∙∙∙∙∙∙∙∙∙∙∙∙∙∙∙∙∙∙∙∙∙∙∙∙∙∙∙∙∙∙∙∙∙∙∙∙∙∙∙∙∙∙∙∙∙∙∙∙∙∙∙∙∙∙∙∙∙∙∙∙∙∙∙∙∙∙∙∙∙∙∙∙∙∙5 1.3 TEST STANDARDS AND RESULTS ∙∙∙∙∙∙∙∙∙∙∙∙∙∙∙∙∙∙∙∙∙∙∙∙∙∙∙∙∙∙∙∙∙∙∙∙∙∙∙∙∙∙∙∙∙∙∙∙∙∙∙∙∙∙∙∙∙∙∙∙∙∙∙∙∙∙∙∙∙∙∙∙∙∙∙∙∙∙∙∙∙∙∙∙∙∙∙∙∙∙∙∙∙∙∙∙∙∙∙∙∙∙∙∙∙∙∙∙∙∙∙∙∙ 6 1.3.1 TEST ENVIRONMENT CONDITIONS ∙∙∙∙…
Text truncated - open the document above for the full version.
Contact Information
Applicant
Gary Zeng(PM)
Test Firm
Shenzhen Morlab Communications Technology Co., LtdIvy zhu
Technical Specifications
| # | Rule Parts | Frequency Range | Power Output |
|---|---|---|---|
| 1 | 15C | 2.40 GHz - 2.48 GHz | 2.40 mW |
Other Applications from SZ DJI TECHNOLOGY CO., LTD
SS3-T55A2510
Dec 19, 2025DJI AGRAS T55
Equipment Class
NII - Unlicensed National Information Infrastructure TXSS3-T100A2510
Dec 19, 2025DJI AGRAS T100S, DJI AGRAS T70S
Equipment Class
NII - Unlicensed National Information Infrastructure TXSS3-TKMI2507
Dec 19, 2025DJI RC Mini
Equipment Class
DTS - Digital Transmission SystemSS3-RD60B2510
Dec 18, 2025Fixed Millimeter Wave Radar
Equipment Class
FDS - Part 15 Field Disturbance SensorSS3-RD60A2510
Dec 18, 2025Rotational Active Phased Array Radar
Equipment Class
FDS - Part 15 Field Disturbance Sensor