UBQTR101WIRELESS BASE STATION TRIMERSION
3001AD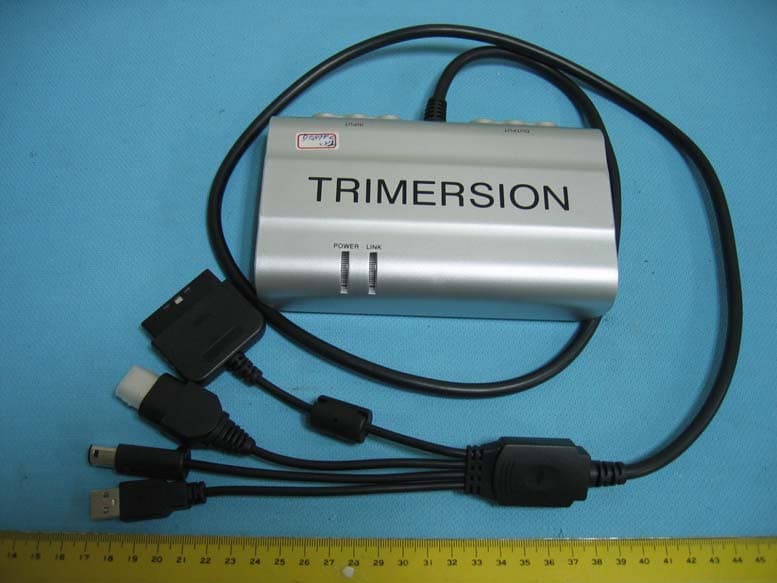
Click to zoom
Application Details
- Equipment Class
- DTS - Digital Transmission System
- Date of Grant
- Apr 26, 2007
- Application Purpose
- Original Equipment
- Date of Application
- Apr 26, 2007
- Equipment Note
- WIRELESS BASE STATION TRIMERSION
- Frequency Range
- 2414.00000000 - 2468.00000000
- Company
- 3001AD
- Country
- United States
Documents & Files
Document Text
Text extracted from the exhibit documents filed with the FCC. Open a document above to read the original.
Users Manual
3001AD TRIMERSION First Person Shooter Game Accessory PACKAGE CONTENTS: 1. 1 GUN CONTROLLER 2. 1 BASE STATION 3. 1 HEAD MOUNTED DISPLAY (HMD) 4. RCA cables to connect BASE STATION 5. Mini Stereo to RCA ADAPTER 6. Instruction Manual SYSTEM FEATURES: Wireless GUN CONTROLLER Wireless Audio and Video transmission from BASE STATION to HMD QVGA (640 x 480) Color LCD display in HMD 1Watt Audio Amp in HMD Gyro Head Motion Tracker in HMD All standard controls of a gamepad on GUN CONTROLLER Macro programming on GUN CONTROLLER BASE STATION works with a PC or Mac USB, Playstation, Xbox and Game Cube game controller connectors BASE STATION has video through (IN/OUT) for connecting a TV while TRIMERSION is in use GUN CONTROLLER and HMD run on (4) AA Batteries DIRECTIONS FOR PLAY: BASE STATION CONNECTION: To make it easier to setup the Trimersion when hooking it to a console game system, start the game as normal with the original controller then when the game is going, unplug the controller, plug in the Trimersion base station to the controller port then turn on the gun. Do not plug in the USB connector into anything but a computer USB port. Even though game consoles have USB connectors on them; the one on the base station is not intended to be used for that purpose, only the controller connectors. FOR PC/MAC with NTSC VIDEO OUT RCA JACK: Your computer must have a NTSC video out jack – hook up supplied RCA cable to VIDEO OUT and other end to VIDEO IN on Base Station. Plug in Mini Stereo to RCA adapter to AUDIO OUT on computer and the other end to the RCA jacks of Left and Right AUDIO IN. If your computer doesn’t have a NTSC VIDEO OUT RCA JACK, please purchase a VGA to NTSC converter. If you would like to see the same video that is displayed in the HMD, connect a TV to the VIDEO OUT on the BASE STATION. Plug USB connector from BASE STATION into USB jack on computer. Computer recognizes BASE STATION as a keyboard and mouse. Power to the BASE STATION comes from USB connector. Sit the HMD on a level surface and turn the POWER SWITCH on the GUN CONTROLLER to “ON”. The HMD must sit level and “TOP UP” without moving as it is turned ON. Pick up the HMD and rotate it, the cursor on the PC screen should move in the same direction. To verify correct operation of the GUN CONTROLLER, open a program like “Notepad” and push buttons on the gun, you will see characters typed across the screen. Start the First Person Shooter (FPS) game. The default GUN CONTROLLER macro is preset to a “QUAKE” configuration. If you need a different configuration you have two options: 1. Change the preset macros by following the MACRO ASSIGNMENT INSTRUCTIONS. 2. Open the keyboard binding menu in the software configuration menu of your FPS game and manually program each button. The Mouse Look function of the FPS game should function with the movement of the HMD the same way it does by using a mouse. The TRIMERSION will not interrupt the mouse or keyboard functionality but will work in combination with it. FOR XBOX, PLAYSTATION OR GAME CUBE GAME CONSOLE CONNECTION: Plug VIDEO and LEFT and RIGHT AUDIO OUT from the Game Console to the VIDEO and LEFT and RIGHT AUDIO IN on the back of the BASE STATION. If you would like to see the same video that is displayed in the HMD, connect a TV to the VIDEO OUT on the BASE STATION. Plug the appropriate GAME CONTROLLER connector from BASE STATION into the GAME CONTROLLER port on the game console system. Power to the BASE STATION comes from GAME CONTROLLER port on the game console system. The GUN CONTROLLER has all the same buttons as the game console gamepad controller. Sit the HMD on a level surface and turn the POWER SWITCH on the GUN CONTROLLER to “ON”. POWER LED has three indication modes: STEADY ON – Connected to BASE STATION SLOW FLASH – Low battery FAST FLASH – Connecting to BASE STATION The HMD must sit level and “TOP UP” WITHOUT MOVING as it is turned ON. Start the First Person Shooter (FPS) game. The default GUN CONTROLLER macro is preset to a “Quake” configuration. If you need a different configuration you have two options: 3. Change the preset macros by following the MACRO ASSIGNMENT INSTRUCTIONS. 4. Open the gamepad button binding menu in the software configuration menu of your FPS game and manually program each button. The Mouse Look function of the FPS game should function with the movement of the HMD the same way it does by using a joystick. To verify the HMD is communicating properly with the BASE STATION the LINK light on the BASE STATION will be a solid green. If the LINK light is flashing, it is not communicating with the GUN CONTROLLER. HOW TO PLAY: 1. To move player through game field use the front left D-Pad 2. To look around the game field move your head or use the right front D-Pad. 3. For game features such as “LEVEL VIEW” or “CENTER VIEW” use the buttons located along the barrel of the Control Gun. 4. Use the Triggers for Primary and Secondary Fire. 5. To Aim “Look at your target using the cross hairs to aim and shoot”. MACRO ASSIGNMENT INSTRUCTIONS: Only the two TRIGGERS are programmable. 1. To program either TRIGGER, push the MACRO button one time. The POWER LED will flash slowly. 2. Then press either the TOP TRIGGER or BOTTOM TRIGGER one time. The POWER LED will flash quickly. 3. Push the desired BUTTON you want to assign to the TRIGGER one time. The POWER LED will go back to solid. 4. This BUTTON is now assigned to the selected TRIGGER. 5. You can assign ANY of the BUTTONS on the GUN CONTROLLER to either of the TRIGGERS. TRIGGER ASSIGNMENT CLEAR: 1. Push the MACRO button one time. 2. Push the either the TOP TRIGGER or BOTTOM TRIGGER one time. 3. Push the M. CLEAR button one time. 4. The selected TRIGGER is now RESET to its DEFAULT configuration. ADJUSTMENT CONTROLS: ADJUSTMENT CONTROLS for the HMD are located on the bottom of the unit. Adjustments for VOLUME, CONTRAST and BRIGHTNESS are available. The TRACKER ON/OFF switch controls the functionality of the GYRO Motion Tracker …
Text truncated - open the document above for the full version.
Block Diagram
1 2 34 ABCD 4 3 2 1 D CBA WAV-503TX TransmitterAirwave Video&Audio Wireless Module ANTENNA MD7121 Receiver2.4G Wireless Module BOX ANT A-R Video Audio L Audio R A-L Video WT6561F4In1 Controller MCU(Receiver) 4In1 Cable I/O Power Power I/O Power ANTENNA Indicator SwitchChannle Select Link LEDPower LED Module 2-1 Module 1-1 WAV-503RX ReceiverAirwave Video&Audio Wireless Module Module 1-2 ANT ANTENNA SwitchChannle Select Video Audio L Audio R Power GVD410 BDMMicro Display Power Control Keys I/O Contrast AdjustBright Adjust UTC3544Amplifier I/O Power Sound OutputHeadphone I/O RheostatVolume Adjust Part No. Prepared By Date Approved By Qi Yong 2006-10-08 File No. WF-PIE-042/A FRONT ELECTRONIC CO., LTD. TITLE Rev: A02Model No. Block Diagram For Trimersion MD7121 Transmitter2.4G Wireless Module ANTENNA SN8P1707Q4In1 Controller MCU(Transmitter) Module 2-2 Power NTSC&PAL Power Indicator Link LEDTrack LEDPower LED MG1101Gyroscope I/O I/O I/O I/OI/O I/O I/O I/O I/O I/O Video Audio L Audio R Four Plug To Different Console Power I/O 4In1 Controller I/O I/O I/O XC6368BPower Manager Power Power BatterySize:AA 1.5V X 4 Power GUN HELMET I/OI/O SwitchTrack Switch I/O *The Product Includes a Cable That Convert PC Audio To BNC. Composite Video Input *External VGA To NTSC/PAL Converter 4In1 Platform Contain: PS2 、 XBOX 、 GC & PC *Platform: Auto Switch PS2(Gamepad)XBOX(Gamepad)GC(Gamepad)PC(Mouse+Keyboard) Replace Right Stick Or Mouse Move
External Photos
Spectrum Research & Testing Lab., Inc. No. 101-10, Ling 8, Shan-Tong Li, Chung-Li City, Taoyuan, Taiwan, R.O.C. Photo Page: 1 of 4 PHOTOS OF EUT
ID Label/Location Info
Spectrum Research & Testing Lab., Inc. No. 101-10, Ling 8, Shan-Tong Li, Chung-Li City, Taoyuan, Taiwan, R.O.C. Sample of FCC ID Label The device is large enough for it to be placed warning statement on the device as follow: FCC ID: UBQTR101 This device complies with Part 15 FCC Rules. Operation is subject to the following two conditions: (1) This device may not cause harmful interference, and (2) This device must accept any interference received, including interference that may cause undesired operation.
Internal Photos
Spectrum Research & Testing Lab., Inc. No. 101-10, Ling 8, Shan-Tong Li, Chung-Li City, Taoyuan, Taiwan, R.O.C. Photo Page: 2 of 5 PHOTOS OF EUT-Inside Spectrum Research & Testing Lab., Inc. No. 101-10, Ling 8, Shan-Tong Li, Chung-Li City, Taoyuan, Taiwan, R.O.C. Photo Page: 3 of 5 PHOTOS OF EUT-Main Board Spectrum Research & Testing Lab., Inc. No. 101-10, Ling 8, Shan-Tong Li, Chung-Li City, Taoyuan, Taiwan, R.O.C. Photo Page: 4 of 5 PHOTOS OF EUT-Main Board PHOTOS OF EUT-Main Board-1 TOP Spectrum Research & Testing Lab., Inc. No. 101-10, Ling 8, Shan-Tong Li, Chung-Li City, Taoyuan, Taiwan, R.O.C. Photo Page: 5 of 5 PHOTOS OF EUT-Main Board-1 BOTTON PHOTOS OF EUT-Main Board-2
Operational Description
FCC ID: UBQTR101 Operational Description of the equipment To make it easier to setup the Wireless Base StationTrimersion when hooking it to a console game system, start the game as normal with the original controller then when the game is going, unplug the controller, plug in the wireless base station Trimersion to the controller port then turn on the gun. Do not plug in the USB connector into anything but a computer USB port. Even though game consoles have USB connectors on them; the one on the wireless base station Trimersion is not intended to be used for that purpose, only the controller connectors. PRODUCT Wireless Base Station Trimersion MODEL NO. TR101 POWER REQUIREMENTS DC 5V, 160 mA FREQUENCY BAND 2400 ~ 2483MHz CARRIER FREQUENCY CH0: 2414~CH3:2468MHz CHANNEL SPACING 18MHz RF OUTPUT POWER 15dBm MODULATION TYPE FM DUTY CYCLE 8% NUMBER OF CHANNEL 4 BIT RATE OF TRANSMISSION Real Time MODE OF OPERATION Simplex ANTENNA TYPE Integral Antenna+PCB Antenna OPERATING TEMPERATURE -20~55 °C
Schematics
1 2 3 4 56 ABCD 6 5 4 3 2 1 D CBA C222P C122P R510M C7 104 C12 4.7UF C6 104 C9 10uF C1010P C1110P R284.7R C8 104 +5V VDD C3104 R3215K R3115K C131u VDD R73.6K R83.6K R93K TXD CLK DSR DATA/DTR RXD C18 3.3u/16V PD7 PD6 PA4 VDD DATA/DTR R2715K R2615K Y1 6MHz D+D- Q28050 R1330 FP_RDY R6 0 L115uH R2 22 R3 22 PD1 PD2 PD3 PD4 PD5 PA1 DATA/DTR PC1PC2 CD_TXEN TRXD F_CLK LED1 C17104 + C21 100u/16v R3020K VDD PD6 Lx 3 GND 1 Vout 2 U37805 +8V C20 47uF/16V D3IN5819 +5V 1234567 CN1 PS2 DSRCLKTXD VBI RXD +8V PE0 R4150K PA2PA3PA5 VDD V33 1 DP0 2 DM0 3 DP1 4 DM1 5 DP2 6 DM2 7 VDD 8 VSS 9 PB0 10 PB1 11 PB2 12 PB3 13 PB4 14 PB5 15 PB6 16 PB7 17 PD0 18 PD1 19 PD2 20 PD3 21 PD4 22 PD5 23 PD6 24 PD7 25 PA0 26 PA1 27 PA2 28 PA3 29 PA4 30 PA5 31 PA6 32 PA7 33 PC0 34 PC1 35 PC2 36 PC3 37 PC4 38 PC5 39 PC6 40 PC7 41 VDD 42 XTAL1 43 XTAL2 44 VSS 45 RESET 46 PE0 47 PE1 48 U1 WT6561TF QFP PC7 PE0 VBI PA6 R2920K PD7 SPI_CS SPI_CLK SPI_RXD SPI_TXD SPI_CSSPI_CLKSPI_TXDSPI_RXDCD_TXENTRXDF_CLKFP_RDY PD0 + C14 22u/10v C19 47uF/16V C16104 C15 104 12345 CN2 USB/XBOX RF_VDD R10 2K R11 2K R12 2K R13 2K R14 2K R15 2K R16 2K R17 2K R1812K R1912K R2012K R2112K R2212K R2312K R2412K R2512K S 1 C 2 D 3 Q 4 GND 5 67 VDD 8 93C46 PA4PA3 PA1 PA2 VDD R33 10K VDD 1234 8765 S1SW DIP-4 ANT1 ANTENNA A/LA/R C4 470uF/10V C5 470uF/16V VDD AV SPI_CS 1 SPI_CLK 2 SPI_RXD 3 SPI_TXD 4 CD_TXEN 5 TRXD 6 F_CLK 7 VIN 11 GND 9 FP_RDY 8 GND 10 CLK 12 CN3MD7121 Part No. Prepared By Date Approved By Qi Yong 2006-10-23 File No. WF-PIE- 042/A FRONT ELECTRONIC CO., LTD. TITLE Rev: A01Model No. Circuit Diagram For Box Of Trimersion D2 IN5819 D1IN5819 DATA/DTR DP0DM0 ANT Vin 2 GND 1 Vout 3 U4RC62FP-2502PR 1234 CN4NGC PROGRAM POINT 19 Q3 S9018 R35 10K R37 6.8K + C22 4.7uF/10V R39 1K VIDEO_OUT VIDEO_OUT C24 470P R3475 V-in VDD 1 2 3 4 5 6 J1AV-IN V-in A/R A/L 1 2 3 4 5 6 J2AV-OUT VIDEO_OUT A/R A/L Q4 S9018 R36 10K R38 6.8K + C23 4.7uF/10V R40 1K C25 470P V-in VDD Airwave Video&Audio Wireless Module Q18550 GND 1 V-IN 2 GND 3 L-IN 4 GND 5 R-IN 6 VDD 7 CS0 8 CS1 9 CS2 10 BX 11 GND 12 ANT 13 GND 14 U2WAV-503TX C26 104 AV 1 2 3 4 56 ABCD 6 5 4 3 2 1 D CBA VPP/VDD 1 P0.0/INT0 2 P0.1/INT1 3 P0.2/INT2 4 RST 5 P1.5 6 P1.4 7 P1.3 8 VDD 9 P1.2 10 P1.1 11 P1.0 12 P2.0 13 P2.1 14 P2.2 15 P2.3 16 VSS 17 AVSS 18 P4.7/AIN7 19 P4.6/AIN6 20 P4.5/AIN5 21 P4.4/AIN4 22 P4.3/AIN3 23 P4.2/AIN2 24 P4.1/AIN1 25 P4.0/AIN0 26 AVREFH 27 VDD 28 DAO 29 P5.7 30 P5.6 31 P5.5 32 P5.4/PWM0 33 P5.3/BZ1/PWM1 34 P5.2/SO 35 P5.1/SI 36 P5.0/SCK 37 P2.4 38 P2.5 39 P2.6 40 P2.7 41 VSS 42 XOUT 43 XIN 44 BZ0U1 SN8P1707Q C5104 C7104 C9104 C122pC282p Y116M R1520K C6 104 VDD VDD VDD R34.7K R24.7K VDD P4.5P4.4 P0.0P1.1P1.2 P1.0 P2.0 P2.1 P2.2 P2.3 P4.6 P4.5 P4.4 P4.3P4.2P4.1P4.0 PWM1 PWM0 C14 22uF/16V C11104 C13104 R204.7K Q28050 12 CN2M2 D2 4148 C12104 R194.7K Q18050 12 CN1M2 D1 4148 V-M PWM0PWM1 RY10K RX10K LX10K LY10K VDD VDD VDD VDD P4.3 P4.2 P4.1 P4.0 VDD R14.7K P4.6 VDD P1.5 Vin 2 GND 1 Vout 3 U2RC62FP-3302PR C3 22UF/16V C4104 P2.5 P2.4 P4.7 P1.3 XOUT D3 IN4148 D7 IN4148 D10 IN4148 D13 IN4148 Left MotorRight Motor K1 10K UP K2 10K DOWN K3 10K LEFT K4 10K RIGHT K5 10K ^ K6 10K X K7 10K O K8 10K [] K9 10K L1 K10 10K R1 K11 10K L2 K12 10K R2 D20IN4148C2210P C21 47uF/10V VDD P2.7 nRF-VDD C10104 P2.4P2.0P2.1P2.3P2.2P2.5P2.6 nRF-VDD SPI_CS 1 SPI_CLK 2 SPI_RXD 3 SPI_TXD 4 CD_TXEN 5 TRXD 6 F_CLK 7 VIN 11 GND 9 FP_RDY 8 GND 10 CLK 12 CN3MD7121 R25 1.5K R24 1.5K R23 1.5K R26 1.5K R22 1.5K R27 1.5K R54.7K R64.7K R44.7K R8 4.7K R7 4.7K P2.7 P2.6 P0.1P0.2 XOUT R16820 D4 IN4148 D5 IN4148 D6 IN4148 D8 IN4148 D9 IN4148 D11 IN4148 D12 IN4148 D14 IN4148 V-M C8104 R9 470R R104.7K VDD D15 IN4148 D16 IN4148 D17 IN4148 K13 10K L3 K14 10K R3 K15 10K RELOOD K18 SELECT K19 MACRO K20 CLEAR P0.0P0.1P0.2P1.4 Q38050 R1810K R284.7kR1712K VBAT P4.7 VDD D18 IN4148 K16 10K FIRE P5.5 P5.2 P1.3P1.2P1.1P1.0 P5.6 P1.4 P5.7P5.6P5.5 P5.2 P5.1 P5.0 LED1 MACRO 1234567 CN4TO Headpiece P5.0P5.1P1.5 Part No. Prepared By Date Approved By Qi Yong 2006-11-03 File No. WF-PIE- 042/A FRONT ELECTRONIC CO., LTD. TITLE Rev: A01Model No. Circuit Diagram For Gun Of Trimersion VCC GND D21 IN4148 K17 10K START S3 STICK-SWITCH LED LED 12345 CN5TO-C'F'Y'S 1234 CN6TO-R 3D 1234 CN7TO-L 3D P1.1P1.2P4.4P4.5P4.6 VDDP4.1P4.0GND GNDP4.3P4.2VDD 123456 CN9TO-R PCB P4.4 R1R2 P4.6P4.5 R3 R1R2R3 12345678 CN10TO-L PCB L1L2L3 P4.4P4.5P4.6P1.0P1.1 L1L2L3 123 CN8TO-MA.CL P1.4GNDP0.2 1234 CN11TO-ST.SE P0.1GNDP4.5 ST ST 12 CN13TO-FIRE 12 CN14TO-RELO0D P4.6 P4.6 FI RE REFI 123 CN12TO-SW GNDVBATV-M BATTERYAA 1.5*4 C15470uF/10V L1 22uH/0.5A S1POWER SWITCH R1310K/100k R1247K R11200K C1647pF D19IN5819 C17470uF/10V 5V VBAT VOUT 1 VDD 2 CE 3 GND 4 EXT 5 U3 XC6368B RL Q4 XP161A1355PR VBAT 5V VBAT R143K R213K A0 1 A1 2 A2 3 GND 4 SDA 5 SCL 6 WP 7 VCC 8 U424LC01 VDD P5.0P5.1 C18 104 VDD Total programming need: 19pins C?0.1UF 1 2 3 4 56 ABCD 6 5 4 3 2 1 D CBA S2 ENABEE SENSOR P1.5 VDD 123456 CN1 TO display V-O CNADJ C447uF/10V C5470uF/10V C7 104 K1 CON_UP K2 CON_DOWN K3 BRL_UP K4 BRL_DOWN R12KR21KR38KR43.9K C62.2uF/10V CNADJ C8475P C9475P C2220uF/16V ANT1 RX ANT C3103 5V C1470uF/10V CH1CH2CH3 R-O L-O V-O 1234 8765 S1SW DIP-4 GYROSCOPE SOUND CONTROL KEYS Part No. Prepared By Date Approved By Qi Yong 2006-10-08 File No. WF-PIE-042/A FRONT ELECTRONIC CO., LTD. TITLE Rev: A01Model No. Circuit Diagram For Helmet Of Trimersion C14 330UF/6.3V C16 330UF/6.3V R7100K C13104 C121UF C111UFC101UF A/LA/R LED2SENSOR ENABEE 12345 CN4CON5 L-IN L-INR-IN R-IN 1234 CN5 Earphone 1234567 CN2TO Headpiece P5.0P5.1P1.5LED VBAT 5V VDD VBAT VBAT ANT 11 GND 12 GND 1 V-O 2 L-O 3 R-O 4 +5V 5 GND 6 CS0 7 CS1 8 CS2 9 BX 10 U1WAV-503RX 12345 CN6SW-4 CH1CH2CH3CNADJ 1234 CN3SW-LED P1.5LED VDD OUT1 1 MUTE 2 IN1 3 GND 4 IN2 5 BIAS 6 OUT2 7 VDD 8 U2 UTC 3544 VBAT C17 47UF/6.3V R820KR920K R10 2.2K R11 2.2K L-OR-O A/LA/R SCL 2 SDA 3 VCC 1 GND 4 CAN 5 MG1101 U3 C15104 VDD TO MASTER P5.0P5.1 Vin 2 GND 1 Vout 3 U4RC62FP-3302PR C19475P C18475P
Test Report
Spectrum Research & Testing Lab., Inc. No. 101-10, Ling 8, Shan-Tong Li, Chung-Li City, Taoyuan, Taiwan, R.O.C. TEST REPORT Reference No.:A07032001 Report No.:FCCA07032001 FCC ID: UBQTR101 Page:2 of 41 Date: Apr. 12, 2007 Table of Contents 1. DOCUMENT POLICY AND TEST STATEMENT ................................................ 4 1.1 DOCUMENT POLICY ........................................................................................ 4 1.2 TEST STATEMENT ............................................................................................ 4 1.3 EUT MODIFICATION ......................................................................................... 4 2. DESCRIPTION OF EUT AND TEST MODE....................................................... 5 2.1 GENERAL DESCRIPTION OF EUT................................................................... 5 2.2 DESCRIPTION OF SUPPORT UNIT ................................................................. 5 2.3 DESCRIPTION OF TEST MODE ....................................................................... 5 3. DESCRIPTION OF APPLIED STANDARDS ...................................................... 6 4. CONDUCTED EMISSION TEST ........................................................................ 7 4.1 CONDUCTED EMISSION LIMIT........................................................................ 7 4.2 TEST EQUIPMENT............................................................................................ 7 4.3 TEST SETUP..................................................................................................... 8 4.4 TEST PROCEDURE .......................................................................................... 8 4.5 EUT OPERATING CONDITION ......................................................................... 8 4.6 TEST RESULT ................................................................................................... 9 5. RADIATED EMISSION TEST ........................................................................... 12 5.1 RADIATED EMISSION LIMIT............................................................................12 5.2 TEST EQUIPMENT...........................................................................................13 5.3 TEST SET-UP(30MHZ - 1GHZ) ........................................................................14 5.4 TEST PROCEDURE .........................................................................................16 5.5 EUT OPERATING CONDITION ........................................................................16 5.6 RADIATED EMISSION TEST RESULT .............................................................17 6. 6 DB BANDWIDTH............................................................................................21 6.1 LIMIT .................................................................................................................21 6.2 TEST EQUIPMENT...........................................................................................21 6.3 TEST SET-UP ...................................................................................................21 6.4 TEST PROCEDURE .........................................................................................21 6.5 EUT OPERATING CONDITION ........................................................................21 6.6 TEST RESULT ..................................................................................................22 7 PEAK POWER TEST.......................................................................................... 24 7.1 LIMIT ...................................................................................................................24 7.2 TEST EQUIPMENT...........................................................................................24 7.3 TEST SET-UP ...................................................................................................25 7.4 TEST PROCEDURE .........................................................................................25 7.5 EUT OPERATING CONDITION ........................................................................25 7.6 TEST RESULT ..................................................................................................25 8 BAND EDGE TEST ............................................................................................. 28 8.2 LIMIT ...................................................................................................................28 8.2 TEST EQUIPMENT...........................................................................................29 8.3 TEST SET-UP ...................................................................................................30 8.4 TEST PROCEDURE .........................................................................................31 8.5 EUT OPERATING CONDITION ........................................................................31 8.6 TEST RESULT ..................................................................................................31 Spectrum Research & Testing Lab., Inc. No. 101-10, Ling 8, Shan-Tong Li, Chung-Li City, Taoyuan, Taiwan, R.O.C. TEST REPORT Reference No.:A07032001 Report No.:FCCA07032001 FCC ID: UBQTR101 Page:3 of 41 Date: Apr. 12, 2007 9 POWER DENSITY TEST .................................................................................... 34 9.1 LIMIT ...................................................................................................................34 9.2 TEST EQUIPMENT .............................................................................................34 9.3 TEST SET-UP......................................................................................................34 9.4 TEST PROCEDURE............................................................................................34 9.5 EUT OPERATING CONDITION...........................................................................34 9.6 TEST RESULT.....…
Text truncated - open the document above for the full version.
Test Setup Photos
Spectrum Research & Testing Lab., Inc. No. 101-10, Ling 8, Shan-Tong Li, Chung-Li City, Taoyuan, Taiwan, R.O.C. TEST REPORT Reference No.:A07032001 Report No.:FCCA07032001 Page:36 of 39 Date: Apr. 12, 2007 11. PHOTOS OF TESTING - Radiated test(2G) Spectrum Research & Testing Lab., Inc. No. 101-10, Ling 8, Shan-Tong Li, Chung-Li City, Taoyuan, Taiwan, R.O.C. TEST REPORT Reference No.:A07032001 Report No.:FCCA07032001 Page:37 of 39 Date: Apr. 12, 2007 - RE(3M) Spectrum Research & Testing Lab., Inc. No. 101-10, Ling 8, Shan-Tong Li, Chung-Li City, Taoyuan, Taiwan, R.O.C. TEST REPORT Reference No.:A07032001 Report No.:FCCA07032001 Page:38 of 39 Date: Apr. 12, 2007 - CE
Contact Information
Applicant
Leighton Thomson
Test Firm
Spectrum Research & Testing Lab.Linda Chiang
Technical Specifications
| # | Rule Parts | Frequency Range | Power Output |
|---|---|---|---|
| 1 | 15C | 2.41 GHz - 2.47 GHz | 39.00 mW |
Other Applications from 3001AD
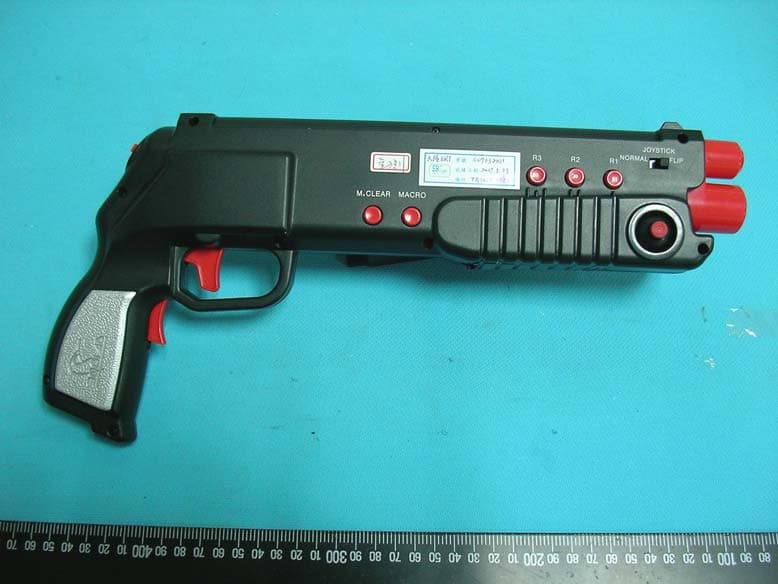
UBQTR101X
Apr 26, 2007WIRELESS GUN CONTROLLER TRIMERSION
Equipment Class
DTS - Digital Transmission System