UO4JY12UY-SREMOTE CONTROL
Jinhua Jinshun Tools Co., Ltd.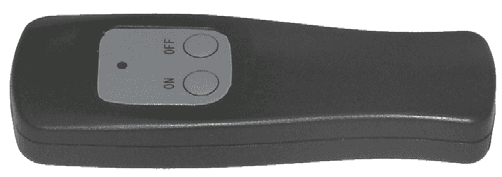
Click to zoom
Application Details
- Equipment Class
- DSC - Part 15 Security/Remote Control Transmitter
- Date of Grant
- Oct 17, 2006
- Application Purpose
- Original Equipment
- Date of Application
- Oct 17, 2006
- Equipment Note
- REMOTE CONTROL
- Frequency Range
- 433.86000000 - 433.86000000
- Country
- China
Documents & Files
Document Text
Text extracted from the exhibit documents filed with the FCC. Open a document above to read the original.
Users Manual
TELECONTROLLED CORDLESS WATER PUMP 1 Hose connector 2 Hose 3 Top cover with handle 4 Base 5 Adapter 6 Pump 7 Remote control For your own safety and for the safety of others, please read these instructions carefully before using this appliance. Keep in a safe place for future reference. INTRODUCTION This tool is applicable to many occasions, like pumping, sucking and draining water, and also filling-up water. TECHNICAL SPECIFICATIONS Application Clean water Voltage 12VDC Voltage battery charger 120V AC Frequency battery charger 60Hz Capacity battery 1200mAh Charging time 3-5Hrs Max Pumping Capacity 500l/h Max Pumping Height 1.5m Maximum water temp. 35°C remote control area < 3 m SPECIFIC SAFETY INSTRUCTIONS Dispose of plastic bags safely- they are a suffocation hazard for young children. Please read these instructions carefully and thoroughly before using this appliance and keep them for future reference. It is very important that you understand how to use this appliance safely so please take the time to familiarize yourself with the requirements as outlined in these instructions. If you are in any doubt what so ever about using this appliance, we strongly recommend that you employ the services of a suitably qualified person. Keep children and pets well away from the work area and never allow children to use this appliance or touch the extension cord at any time. When not in use, keep this appliance stored in a safe place out of reach of children. Never leave the appliance unattended when in use. Check that the power rating on your appliance correspond with the power rating at you mains supply. Never use this appliance in a pond or swimming pool while people are present- in the water. Always flush through with clean water after every use. IMPORTANT SAFETY ADVICE CONCERNING THE BATTERY PACK & BATTERY CHARGER If you should come into contact with any acid from the Battery pack, wash the affected parts with water immediately. If acid should come into contact with the eyes, rinse them immediately with water and seek medical advice as soon as possible. Before using both into contact with any acid from the battery charger, make sure you have read and understood the operating instructions and safety information. Only use the battery pack with the battery charger provided-using other chargers could be dangerous. Keep the battery pack, tool and battery charger away from damp and wet conditions. Before using the battery charger, check all wires are properly connected. If any wires on the charger are damaged, do not use it until these have been replaced. When the charger is not in use it should not be plugged in. When unplugging, do not pull the plug out by the cable. If the charger breaks down or suffers from other technical problems, take it to a recognized dealership to be checked before using it again. Any damaged parts must be replaced. Take care when handling the battery pack, do not drop it or knock it against other things. Never attempt to repair the battery charger or battery pack yourself; this can be extremely dangerous. Repairs should always be carried out by a recognized dealership. Always unplug the charger before cleaning or carrying out any other maintenance on it. Do not attempt to charge the battery pack in temperatures of below 10 degrees or above 40 degrees centigrade. The air vents on the battery charger must be kept unlocked. The battery pack must not be short-circuited. When an apparatus short-circuits, the strength of the electric current is increased. This can cause the apparatus to over heat, catch fire or even explode, causing damage and also endangering the operator. If the battery pack is broken or can no longer be recharged it must be properly disposed of. Never throw the battery pack into water or a fire – it may explode. OPERATION step1. Assemble remote control Put two cell batteries into the remote control housing (Fig 1). Cover the sheet. Pay attention to the polarity of the battery. The remote control will not work if the polarity goes wrong. Note: when not in use, take the battery out of the remote control housing. Fig 1 Cuation: This device complies with part 15 of the FCC reules. Operation is subject to the following two conditions: (1) This device may not cause harmful interference, and (2) this device must accept any interference received, including interference that many cause undesired operation. Changes of modifications not expressly approved by the party responsible for compliance could void the user’s authority to operate the equipment. Step2. Assemble extension hose Step3. Put the pump into water Before you put the pump into water, make sure the cover is fully closed. The inside of the pump should be wholly sealed. Step4. Switch ON/OFF Press the ON button on the remote control housing to start the pump, Press the OFF button on the remote control housing to stop the pump. (FIG 2) The area that the pump can receive signal is closer than 3 meters, so do not keep the remote control too far away from the pump or the remote control doesn’t work. FIG 2 Step5. Charging Open the top cover of the pump in a counter direction.(FIG 3) Remove the battery pack from the pump.(FIG 4) Position the battery pack in the battery charger as indicated in the illustration.(FIG 5) Plug the adapter into the outlet socket.(FIG 6) The charging processing starts; the red LED is now on. As soon as the green LED is on, charging has finished and the battery is ready for use. FIG 3 FIG 4 FIG 5 FIG 6 MAINTENANCE INSTRUCTIONS This unit needn’t special maintenance. If you suspect the pump has become blocked, remove the battery out of the pump: z Examine the hose and base plate. z Check if there is a kink in the hose. z Clean the hose and water inlet. STORAGE When storing the machine for longer than 6 weeks: z Fully discharge the battery (by running the unit ) and then recharge the battery for 3-5 hours. z Store in a dry and frost- free …
Text truncated - open the document above for the full version.
Block Diagram
1234 A B C D 4321 D C B A Title NumberRevisionSize A4 Date:13-Oct-2006Sheet of File:D:\CAR_MP3\MP3-J.ddbDrawn By: KT2KT1 LED R 3V DATAGND TX MODULE TX-2BS ANT PDF 文件使用 "pdfFactory Pro" 试用版本创建 www.fineprint.cn
Cover Letter(s)
S&E Technologies Laboratory Ltd. A 407 No. 407, Block A, Shennan Garden, High-Tech Industrial Park, Nanshen, Shenzhen, P.R. China Tel: +86 755 2663 6573 12 Fax: +86 755 2663 0557 DATE: October 16, 2006. Dear TCB Section of Timco Engineering, Inc., Thank you for cooperation. I would like to submit FCC application of Jinhua Jinshun Tools Co., Ltd / FCCID: UO4JY12UY-S by your TCB Approval today. Best Regards, S&E Technologies Laboratory Ltd. Adum Liu General Manager
External Photos
Jinhua Jinshun Tools Co., Ltd FCC ID:UO4JS12UY-S 9. Photographs – Constructional Details 9.1 EUT – Top View 9.2 EUT – Side View 9.3 EUT – Bottom View
ID Label/Location Info
Jinhua Jinshun Tools Co., Ltd FCC ID:UO4JS12UY-S 9.5 PCB – Inside View 9.6 PCB – Solder Side View 9.7 PCB – Component Side View
Internal Photos
Jinhua Jinshun Tools Co., Ltd FCC ID:UO4JS12UY-S 9.5 PCB – Inside View 9.6 PCB – Solder Side View 9.7 PCB – Component Side View
Operational Description
OPERATIONAL DESCRIPTION The JS12UY-S is a hand held battery powered transmitter designed to remote control a cordless water pump. The user activates it by means of push buttons. The JS12UY-S transmits a wideband FM modulated data stream with approximately ±75kHz deviation on a nominal 433.86MHz carrier with a baud rate of 1Kbit/sec. It uses an inbuilt printed loop antenna. Of PCB dimension 1mm track with, 30mm ╳50mm rectangle. The data sent is produced by a microprocessor. It commands the cordless water pump to on or off.
Schematics
11 22 33 44 D D C C B B A A Ti tl e Nu mb er Revi sio n Size A4 Date: 2006-10-11 Sheet of Fil e: C:\ Docu men ts and Set ti ngs \.. \DJ F.Sch Drawn By: TX-2BS 123456789 10111213141516 LE D TT 190 18 RT210 0KRT133 K KT 2 OFF KT 1 ON CT32P CT42P CT2 CT110 4 R43 3A ANT 3V SAW
Test Report
FCC Part 15 MEASUREMENT AND TEST REPORT For Jinhua Jinshun Tools Co., Ltd Jinshan Road, Xiaoshun Town, Jinhua, Zhejiang 321035, P.R.China October 16, 2006 Note: This test report is limited to the above client company and the product model only. It may not be duplicated without prior written consent of S&E Technologies Laboratory Ltd. FCC ID: UO4JS12UY-S This Report Concerns: Original Report Equipment Type: Remote Control Test Engineer: Rocky Ge Report Number: SE06J-395R Test Date: October 13-16, 2006 Reviewed By: Prepared By: S&E Technologies Laboratory Ltd Room 407, Block A Shennan Garden, Hi-Tech Industrial Park, Shenzhen 518057, P.R. China. Tel: 86-755-26636573, 26630631 Fax: 86-755-26630557 Jinhua Jinshun Tools Co., Ltd FCC ID:UO4JS12UY-S Report No.:SE06J-395R Page 2 of 2 FCC Part 15.231 Report Table of contents FCC PART 15............................................................................................................................ 1 1. TEST SUMMARY........................................................................................................................................ 4 2. GENERAL INFORMATION ...................................................................................................................... 5 2.1 C LIENT INFORMATION.................................................................................................................................. 5 2.2 G ENERAL DESCRIPTION OF E.U.T. ............................................................................................................... 5 2.3 D ETAILS OF E.U.T. ....................................................................................................................................... 5 2.4 D ESCRIPTION OF SUPPORT UNITS................................................................................................................. 5 2.5 S TANDARDS APPLICABLE FOR TESTING....................................................................................................... 5 2.6 T EST FACILITY............................................................................................................................................. 5 2.7 T EST LOCATION............................................................................................................................................ 6 3. EQUIPMENT USED DURING TEST........................................................................................................ 7 4. CONDUCTED EMISSION TEST ............................................................................................................. 8 4.1 T EST EQUIPMENT......................................................................................................................................... 8 4.2 T EST PROCEDURE......................................................................................................................................... 8 4.3 C ONDUCTED TEST SETUP............................................................................................................................. 8 4.4 EUT O PERATING CONDITION....................................................................................................................... 9 4.5 C ONDUCTED EMISSION LIMITS.................................................................................................................... 9 4.6 C ONDUCTED EMISSION TEST RESULT.......................................................................................................... 9 5. RADIATION EMISSION TEST .............................................................................................................. 10 5.1 TEST EQUIPMENT....................................................................................................................................... 10 5.2 M EASUREMENT UNCERTAINTY.................................................................................................................. 10 5.3 T EST PROCEDURE....................................................................................................................................... 10 5.4 R ADIATED TEST SETUP.............................................................................................................................. 11 5.5 S PECTRUM ANALYZER SETUP.................................................................................................................... 11 5.6 C ORRECTED AMPLITUDE & MARGIN CALCULATION................................................................................. 12 5.7 S UMMARY OF TEST RESULTS..................................................................................................................... 12 5.8 EUT O PERATING CONDITION..................................................................................................................... 12 5.9 R ADIATED EMISSIONS LIMIT...................................................................................................................... 13 5.10 R ADIATED EMISSIONS TEST RESULT........................................................................................................ 14 6. DWELL TIME............................................................................................................................................... 16 6.1 TEST STANDARDS....................................................................................................................................... 16 6.2 D IAGRAM OF TEST SETUP.......................................................................................................................... 16 6.3 T EST EQUIPMENTS USED............................................................................................................................ 16 6.4 T EST DESCRIPTION..................................................................................................................................... 16 6.5 T EST RESULTS TEST RESULTS : PASS .....................…
Text truncated - open the document above for the full version.
Test Setup Photos
Jinhua Jinshun Tools Co., Ltd FCC ID:UO4JS12UY-S 8. Photographs of Testing Radiated Emission Setup Photo
Contact Information
Applicant
Genzhang Ye(Manager)
Test Firm
Shenzhen Huatongwei International Insp. Co., LtdMoffy Yu
Technical Specifications
| # | Rule Parts | Frequency Range | Power Output |
|---|---|---|---|
| 1 | 15.231 | 433.86 MHz - 433.86 MHz | - |