AMWUC392Cordless Telephone System
Uniden America Corporation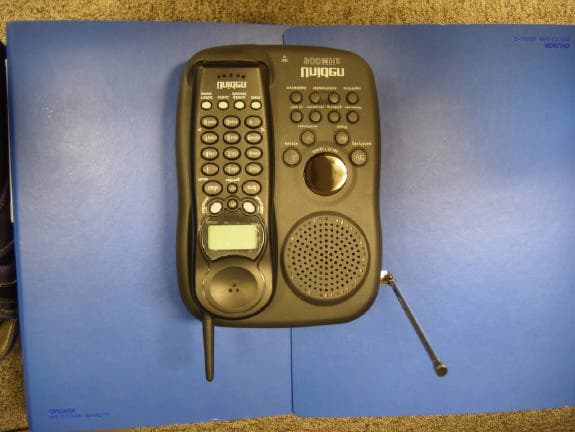
Click to zoom
Application Details
- Equipment Class
- DXX - Part 15 Low Power Communication Device Transmitter
- Date of Grant
- Jan 19, 2003
- Application Purpose
- Original Equipment
- Date of Application
- Jan 19, 2003
- Equipment Note
- Cordless Telephone System
- Frequency Range
- 925.45783500 - 927.52578700
- Company
- Uniden America Corporation
- Country
- United States
Documents & Files
Document Text
Text extracted from the exhibit documents filed with the FCC. Open a document above to read the original.
Users Manual
EXAI398 12/26/2 10:32 AM Page i EXAI398 12/26/2 10:32 AM Page ii www.uniden.com Step 2 Install and Charge the Handset Battery TO INSTALL THE HANDSET BATTERY When the handset battery pack is fully charged, after 15-20 hours of charging, plug the telephone cord into the base unit and then into a telephone wall jack. Your phone is set for tone dialing. If your local network requires pulse dialing, please see “Choosing the dial mode” on page 14. A Remove the cover. TO SET CALLER ID, LANGUAGE AND DIALING OPTIONS A Press and hold cid/menukey. B Press vol/ring/orvol/ring/keys to move the pointer to an option. C Press selectto change the option setting. D Press endto exit. D Plug the AC adapter cord into the base unit and then into a 120V AC outlet. E Place the handset on the base and charge continuously for 15 - 20 hours before using the phone. B Connect the battery pack connector with the correct polarity. C Replace the cover. redial pause selectmemdelete channel Note:Three Caller ID options are available: AutoTalk, Caller ID on Call Waiting (CIDCW), and Area Code. Step 3 Connect to Phone Line Step 4Setting Display Options Uniden Parts Department at (800) 554-3988 Hours: M-F 7:00 a.m. to 5:00 p.m. CST. We can also be reached on the web at www.uniden.com Make sure you have received the following items in the package. If any of these items are missing or damaged, contact the Uniden Parts Department. • Base unit • Handset • AC adapter • Rechargeable battery • Telephone cord • Beltclip • This Owner’s Manual • Other Printed Material Step 1 Checking the Package Contents QUICK REFERENCE GUIDE Step 5Set Answering System To turn answering system on, press answer on/off. A pre-recorded greeting will play and your system is ready to accept calls. To record a personal outgoing greeting to callers, please see page 36. [ 3 ]QUICK REFERENCE GUIDE EXAI398 12/26/2 10:32 AM Page 3 www.uniden.com [ 4 ] Contents Quick Reference Guide3 Welcome/Features5 Controls and Functions6 Getting Started Setting up the Phone8 Mounting the Base Unit on a Wall12 Setting Menu Options13 Basics Making and Receiving Calls15 Adjusting the Handset Ringer and Earpiece Volume16 Redial16 Tone Dialing Switch-over16 Traveling Out-of-Range17 Selecting a Different Channel17 Page17 Flash and Call Waiting 17 Memory Dialing Storing Phone Numbers and Names18 Steps for Entering Names and Special Characters20 Making Calls with Memory Dialing21 Chain Dialing 22 Editing a Stored Name and/or Phone Number23 Erasing a Stored Name and Phone Number24 RocketDial RocketDial24 Storing and Editing the RocketDial25 Making Calls with the RocketDial25 Deleting the RocketDial25 Caller ID Features Caller ID26 When the Telephone Rings26 Viewing the Caller ID Message List 27 Deleting Information from the Caller ID List27 Using the Caller ID List29 The Integrated Answering Device The Integrated Answering Device30 Features30 Turning the Answering System On/Off31 Setting Up Your Answering System31 Using Your Answering System38 Additional Information Changing the Digital Security Code 43 Installing the Beltclip43 Headset Installation44 Note on Power Sources44 Maintenance44 Troubleshooting45 General Information48 Precautions & Warranty49 I.C. Notice51 Index52 Remote Operation Card EXAI398 12/26/2 10:32 AM Page 4 www.uniden.com [ 5 ] Welcome Congratulations on your purchase of the Uniden EXAI398 series cordless telephone and answering system. This phone is designed and engineered to exacting standards for reliability, long life, and outstanding performance. Note: Some illustrations in this manual may differ from the actual unit for explanation purpose. The color of your cordless telephone may vary. Features •900 MHz Extended Range Technology •16 Digit, 3-line Backlit Display •Integrated Telephone Answering Device (ITAD) •Voice Prompted Guidance through ITAD Setup Menu •10 Number Memory Dialing • RocketDial •Caller ID and Call Waiting Caller ID •30 Number Caller ID Memory •32 Digit Redial •Flash and Pause •Pulse/Tone Dialing •Page/Find Handset •7 Hour Talk Time/14 Day Standby Time •Handset Earpiece and Ringer Volume Control •Hearing Aid Compatible •20 Channel Autoscan •English or French Display Option Be sure to visit our web site: www.uniden.com Uniden ® is a registered trademark of Uniden America Corporation. AutoTalk, AutoStandby, UltraClear Plus, Random Code, AutoSecure, and RocketDial are trademarks of Uniden America Corporation. As an E NERGYSTAR ® Partner, Uniden has determined that this product or product models meets the ENERGY STAR ® guidelines for energy efficiency. ENERGYSTAR ® is a U.S. registered mark. EXAI398 12/26/2 10:32 AM Page 5 www.uniden.com CONTROLS AND FUNCTIONS[ 6 ] Controls and Functions redial pause selectmemdelete channel 1 2 3 4 5 6 7 8 9 10 11 12 20 19 18 17 16 15 14 13 1. Handset antenna 2. Beltclip holes 3. Optional headset jack 4. Handset battery compartment 5. Handset earpiece 6. LCD display 7. Caller ID (cid)/menu key 8. Talk/flash key 9. * /tone/left cursor ( ) key 10. Redial/pause (p) key 11. Select key 12. Handset microphone and ringer speaker 13. Volume up ( ) key 14. RocketDial key 15. End key 16. Volume down ( ) key 17. #/right cursor ( ) key 18. Memory (mem) key 19. Delete/channel (ch) key 20. Handset charging contacts EXAI398 12/26/2 10:32 AM Page 6 www.uniden.com CONTROLS AND FUNCTIONS[ 7 ] mic 2122 30 31 32 24 23 25 26 27 28 29 33 34 35 36 37 38 21. Telephone line jack 22. DC IN 9V jack 23. Handset retainer clip 24. Set/ringer key 25. Delete key 26. Repeat/rewind (rew) key 27. Find hs key 28. Memo key 29. Base charging contacts 30. Base speaker 31. Speaker volume keys 32. Menu key 33. Charge/in use LED 34. Message counter display 35. Play/stop key 36. Skip/fast forward (ff) key 37. Answer on/off key 38. Greeting key 39. Microphone 40. Base antenna EXAI398 12/26/2 10:32 AM Page 7 www.uniden.com GETTING STARTED[ 8 ] Setting up the Phone Do the following steps: A. Choose the best locationC. Connect the base unit B. Install the bat…
Text truncated - open the document above for the full version.
Contact Information
Applicant
Paul Roby
Test Firm
Uniden CorporationKeizo Fujiwara
81-3-5543-2875
Technical Specifications
| # | Rule Parts | Frequency Range | Power Output |
|---|---|---|---|
| 2 | 15C | 925.457835 MHz - 927.525787 MHz | - |
Other Applications from Uniden America Corporation
AMWUA2405
Apr 15, 2026RADAR DETECTOR
Equipment Class
JBP - Part 15 Class B Computing Device PeripheralAMWUA2406
Apr 15, 2026RADAR DETECTOR
Equipment Class
JBP - Part 15 Class B Computing Device PeripheralAMWUA2402
Jul 23, 2024RADAR DETECTOR
Equipment Class
CRD - Part 15 Radar Detector
AMWUA2404
Feb 17, 2024Wi-Fi Bluetooth Combo Module
Equipment Class
DTS - Digital Transmission System
AMWUA2301
Feb 15, 2023RADAR DETECTOR
Equipment Class
CRD - Part 15 Radar Detector