APYHRO00039GSM-WCDMA Mobile-Phone / Bluetooth Enable
Sharp Corporation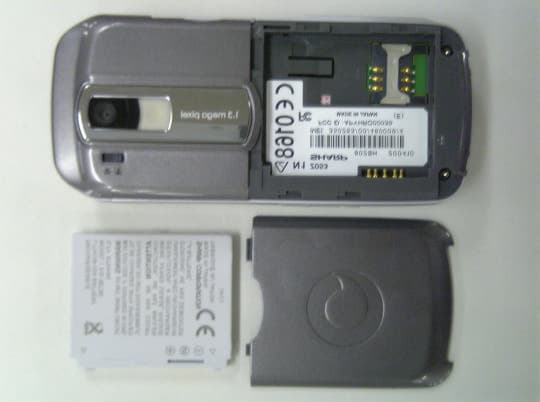
Click to zoom
Application Details
- Equipment Class
- DSS - Part 15 Spread Spectrum Transmitter
- Date of Grant
- Oct 25, 2004
- Application Purpose
- Original Equipment
- Date of Application
- Oct 25, 2004
- Equipment Note
- GSM-WCDMA Mobile-Phone / Bluetooth Enable
- Frequency Range
- 2402.00000000 - 2480.00000000
- Company
- Sharp Corporation
- Country
- Japan
Documents & Files
Document Text
Text extracted from the exhibit documents filed with the FCC. Open a document above to read the original.
Users Manual
Declaration of Conformity Hereby, Sharp Telecommunications of Europe Ltd, declares that this 802SH is in compliance with the essential requirements and other relevant provisions of Directive 1999/5/EC. A copy of the original declaration of conformity can be found at the following Internet address: http://www.sharp-mobile.com e_j350.book Page I Monday, October 25, 2004 6:33 PM 1 Introduction Congratulations on your new 3G/UMTS 802SH phone. Useful Functions and Services Your phone offers you the following features: •Video calls. You can talk while viewing each other on respective screens. •A built-in digital camera for taking pictures and video clips. •A message function for reading and creating SMS messages. •MMS (Multimedia Messaging Services) for personalising your phone in various ways. •A WAP browser for accessing information on the mobile Internet. •Java™ applications. You can also download various applications from Vodafone via the mobile Internet. •A voice recorder function for recording and playing back voice clips. •A Bluetooth ® wireless technology interface for establishing contact and transmitting data with certain devices. You can transmit pictures, sounds, and video clips to OBEX-enabled phones. •An infrared interface for data communication. You can transmit pictures, sounds, and video clips to OBEX-enabled phones. e_j350.book Page 1 Monday, October 25, 2004 6:33 PM 2 Introduction •A schedule alarm for creating and sending schedule entries with alarm settings. •Barcode scanner. With the built-in digital camera, you can read texts and barcodes, and create QR codes. •Playback of the downloaded sound and video clip files. •SD memory card slot that expands connectivity with a PC using the memory card. e_j350.book Page 2 Monday, October 25, 2004 6:33 PM 3 Introduction About This User Guide This user guide is carefully designed to help you learn about your phone’s features and operations quickly and effectively. NOTICE •We strongly recommend that you keep separate permanent written records of all important data. Data may be lost or altered in virtually any electronic memory product under certain circumstances. Therefore, we assume no responsibility for data lost or otherwise rendered unusable, whether as a result of improper use, repairs, defects, battery replacement, use after the specified battery life has expired or any other cause. •We assume no responsibility, directly or indirectly, for financial losses or claims from third parties resulting from the use of this product and any of its functions, such as stolen credit card numbers, the loss or alteration of stored data, etc. •All company and/or product names are trademarks and/or registered trademarks of their respective holders. •Screen layout may differ from that illustrated in this user guide. The information described in this user guide is subject to change without notice. e_j350.book Page 3 Monday, October 25, 2004 6:33 PM 4 Introduction •All the functions described in this user guide may not be supported by all networks. •We assume no responsibility for downloaded contents, information, etc. from the network. •Occasionally, a few black or bright pixels may appear on the screen. Please note that this will not have any impact on any of the features or on performance. Copyright According to copyright laws, the reproduction, alteration and use of material which is protected by copyright (music, pictures, etc.) is only permitted for personal or private use. If the user is not in possession of more extensive copyright or has not received the explicit permission from the copyright owner to reproduce, alter or use a copy which has been made or modified in this way, this is considered to be a violation of the copyright laws and gives the copyright owner the right to claim for damages. For this reason, avoid the illegal use of material which is protected by copyright. Windows is a registered trademark of Microsoft Corporation in the United States and/or other countries. e_j350.book Page 4 Monday, October 25, 2004 6:33 PM 5 Introduction Powered by JBlend™ Copyright 1997-2004 Aplix Corporation. All rights reserved. JBlend and all JBlend-based trademarks and logos are trademarks or registered trademarks of Aplix Corporation in Japan and other countries. Powered by Mascot Capsule ® /Micro3D Edition™ Mascot Capsule ® is a registered trademark of HI Corporation ©2002-2004 HI Corporation. All Rights Reserved. Licensed by Inter Digital Technology Corporation under one or more of the following United States Patents and/or their domestic or foreign counterparts and other patents pending, including U.S. Patents: 4,675,863: 4,779,262: 4,785,450: 4,811,420: 5,228,056: 5,420,896: 5,799,010: 5,166,951: 5,179,571 & 5,345,467 e_j350.book Page 5 Monday, October 25, 2004 6:33 PM 6 Introduction T9 Text Input is licensed under one or more of the following: U.S. Pat. Nos. 5,818,437, 5,953,541, 5,187,480, 5,945,928, and 6,011,554; Australian Pat. No. 727539; Canadian Pat. No. 1,331,057; United Kingdom Pat. No. 2238414B; Hong Kong Standard Pat. No. HK0940329; Republic of Singapore Pat. No. 51383; Euro. Pat. No. 0 842 463 (96927260.8) DE/DK, FI, FR, IT, NL,PT.ES,SE,GB; Republic of Korea Pat. Nos. KR201211B1 and KR226206B1; and additional patents are pending worldwide. SD logo is a trademark. Bluetooth is a trademark of the Bluetooth SIG, Inc. The Bluetooth word mark and logos are owned by the Bluetooth SIG, Inc. and any use of such marks by Sharp is under license. Other trademarks and trade names are those of their respective owners. e_j350.book Page 6 Monday, October 25, 2004 6:33 PM 7 Introduction Contains Macromedia ® Flash™ technology by Macromedia, Inc. Copyright © 1995-2004 Macromedia, Inc. All rights reserved. Macromedia, Flash, Macromedia Flash, and Macromedia Flash Lite are trademarks or registered trademarks of Macromedia, Inc. in the United States and other countries. Licensed by QUALCOMM Incorporated under one or more of the following United …
Text truncated - open the document above for the full version.
Users Manual
49 Using the Menu Top Menu 1.Press during stand-by. The Main menu is displayed. 2.Press a, b, c or d to highlight the desired menu, then press to access the function. The sub menu is displayed. For details on the menu options, see the table on pages 240 and 241. Using the Menu in the Viewer Position of the Display 1.Set the phone in the viewer position of the display. 2.Press the camera key to display the Main menu. 3.Press the side-up or side-down key to move the focus up or down, then press the camera key. Press the cancel key to return to the Main menu. The focus moves the same as in the normal position of the display by using the side-up and side-down keys illustrated by arrows. For details on the functions of these keys, see page 18. SelectExit Camera SelectExit Camera e_j350.book Page 49 Monday, October 25, 2004 6:33 PM 50 Using the Menu Shortcuts Your phone has a shortcut key (assigned to the shortcut key: S) with which you can access the desired menu quickly. The default shortcuts are as follows, which you can later customise: • Dialled Numbers • Received Calls •Calendar •Calculator • Voice Recorder To Use the Shortcuts 1.Press the shortcut key. 2.Select the desired item. To Customise the Shortcuts 1.Press the shortcut key. 2.Press [Options] and select “Assign”. The list of the available items is displayed. 3.Select the desired item. Note •To move the item in the list that appears in step 1, highlight the item, press [Options] and select “Move”. Then press a or b to the desired location and press . e_j350.book Page 50 Monday, October 25, 2004 6:33 PM 51 Entering Characters When entering characters to create Contacts List entries, text messages or multimedia messages, etc., press the corresponding keys. In multi-tap input method, press each key until the desired character is displayed. For example, press H once for the letter A or twice for the letter B. Table of Characters Pressing each key scrolls characters in the following order. The order varies depending on the language selected. English Mode Key Upper Case Characters Lower Case Characters Numeric G . (full-stop) , (comma) - (hyphen) ? ! ’ (apostrophe) @ :1 1 H ABC2abc22 I DEF3def33 J GHI4ghi44 K JKL5jkl55 L MNO6mno66 M PQRS7pqrs77 e_j350.book Page 51 Monday, October 25, 2004 6:33 PM 52 Entering Characters N TUV8tuv88 O WXYZ9wxyz99 Q (space) + = < > € £ $ ¥ % & 00 P Switches character case between four modes: Abc, ABC, 123 and abc. R .,?!:;-+#∗ @' " ( ) _&€£$ %/ ̃ <>§=\ | ¥ ¿¡^[ ]{ }¤ÅÄ ÆåäæàÇÉè é ì ÑñÖØöøòßÜü ù∆ΦΓΛΩΠΨΣΘ Ξ (space) ↵ G - O : Q Press and hold to enter 0 - 9 numbers. P :Press and hold to shift between multi-tap and T9 mode. R :Press and hold to display the Input Language screen. Key Upper Case Characters Lower Case Characters Numeric e_j350.book Page 52 Monday, October 25, 2004 6:33 PM 53 Entering Characters Changing the Input Languages You can change the input language on the text entry screen. 1.On the text entry screen, press [Options] and select “Input Language”. 2.Select the desired language. Changing the Input Mode T9 Text Input T9 text input method is a shortcut to enter text easily and quickly. 1.On the text entry screen, press and hold P to enter T9 mode. 2.Press [Options] and select “Input Mode”. 3.Select the input mode (Abc, ABC, abc, 123). 4.Press each key once for any letter you require on that key. To enter the word “How”, press J L O. 5.If the word shown isn’t the one you want, press a or b until you highlight the correct one. 6.Press to select the word. Note •If the correct word is not shown in step 5, enter the correct word again after switching to the multi-tap input method. e_j350.book Page 53 Monday, October 25, 2004 6:33 PM 54 Entering Characters Tip •If you press Q instead of step 6, a space is inserted next to the selected word. Symbols and Punctuation 1.On the text entry screen, press [Options] and select “Add Symbol”. 2.Select the desired symbol. My Dictionary You can create your own word list for T9 text input. 1.On the text entry screen in T9 mode, press [Options] and select “My Dictionary”. 2.Select “Add New Word” and enter a new word. To edit a word in the list 1.On the text entry screen in T9 mode, press [Options] and select “My Dictionary”. 2.Highlight the desired word. 3.Press [Options] and select “Edit”. 4.Modify the word. e_j350.book Page 54 Monday, October 25, 2004 6:33 PM 55 Entering Characters Using Templates You can use the sentences registered in Text Templates when entering characters. For details on creating the text template, see “Adding Phrases to Text Templates” on page 136. 1.On the text entry screen, move the cursor to the point you wish to insert the template. 2.Press [Options] and select “Advanced”. 3.Select “Insert Template”. 4.Select the desired text template. The selected text template is inserted. Copying, Cutting and Pasting Text By using these options, you can carry out editing smoothly. To Copy and Cut Text 1.On the text entry screen, press [Options] and select “Advanced”. 2.Select “Copy” or “Cut”. 3.Move the cursor to the first letter to be copied or to be cut, then press . 4.Move the cursor to the last letter to highlight the area, then press . e_j350.book Page 55 Monday, October 25, 2004 6:33 PM 56 Entering Characters To Paste Text 1.On the text entry screen, move the cursor to the point you wish to paste the letters. 2.Press [Options] and select “Advanced”. 3.Select “Paste”. The saved text is pasted. e_j350.book Page 56 Monday, October 25, 2004 6:33 PM 57 Contacts List (M 8-1) You can store the phone numbers and email addresses of your friends, family and colleagues in the Contacts List. Your phone can store up to 500 entries. In a Contacts List, you can save the following items: Items Saved in the Handset Memory First Name:up to 16 characters Last Name:up to 16 characters Tel 1:up to 32 digits Tel 2 (displayed if “Tel 1” is entered):up to 32 digits Tel 3 (displayed if “Tel 2” is entered):up to 32 digits Email1:up to 128 characters Email2 (displayed if …
Text truncated - open the document above for the full version.
Users Manual
99 Messages • “Roam. Download” (“Always download”, “Always defer”): Controls message download timing when roaming outside of your network. “Always download”: Downloads messages immediately from the server. “Always defer”: Defers message download. • “Delivery Report”: Enables or disables Delivery Report request. • “Read Report”: Enables or disables Read Report request. • “Expiry Time”: This indicates the number of days and hours for which a message you send may remain undelivered to the message recipient. During this period, the message service centre will continually try to deliver the message to the recipient. Select the validity period. • “Delivery Rep. Allow”: Enables or disables Delivery Report when receiving a message, which applies to the Delivery Report function. • “Auto Delete” (“None”, “Inbox”, “Sent”, “Both”): Deletes the oldest message automatically, when the Inbox, Sent or both (Inbox and Sent) is full. • “Edit Signature”: Opens the screen to enter the signature. • “Reply History” (“Yes”, “No”): Disables or enables whether the message will be added to your reply message or not. e_j350.book Page 99 Monday, October 25, 2004 6:33 PM 100 Messages SMS Settings “Messages” → “Settings” → “SMS Settings” 1.Select the item you wish to set up. • “Message Centre”: Enter the centre phone number. If you wish to enter a country code for a message to an international number, press and hold Q until a + sign is displayed. • “Reply Path”: Accepts or rejects the same reply path with the send path when receiving the reply message for your message. • “Message Format”: Select the message format to be used when creating a new message. • “Optimisation”: When set “On” (default), double-byte characters such as European characters with an accent are converted into single-byte characters and sent. When “Off”, double-byte characters are sent as displayed. Please note that you may be charged double for double-byte characters sent in an SMS when Optimisation is set “Off”. Select “On” or “Off”. e_j350.book Page 100 Monday, October 25, 2004 6:33 PM 101 Messages MMS Settings “Messages” → “Settings” → “MMS Settings” 1.Select the item you wish to set up. • “Slide Duration”: Sets the duration of the slide. • “Max Message Size”: Defines the maximum size of messages that are downloaded. • “Creation Mode” (“Free”, “Restricted”): When set to “Free”, you can attach files of any format to the mail. When set to “Restricted”, only certain formats can be attached. Email Settings “Messages” → “Settings” → “Email Settings” 1.Select the item you wish to set up. • “Download Interval”: Sets the download interval. • “Max Message Size”: Defines the maximum size of messages that are downloaded. e_j350.book Page 101 Monday, October 25, 2004 6:33 PM 102 Vodafone live! (M 2) Your phone is already configured to access Vodafone live! and the mobile internet*. Vodafone live! is a new mobile internet portal which is your gateway to a new world of information, games, music and services. Because your phone uses 3G (UMTS), it has a system that is much faster than previous ways of getting mobile information. Also, the connection is ‘always on’ which means there is no need to wait for dialling up. You only have to pay for the data you send or receive, not how long you’re connected. * If you have problems getting connected, please phone Vodafone Customer Support. Your phone contains a WAP browser used for surfing on the Mobile Internet, where you can get a lot of useful information. Normally, pages are designed for a mobile phone. Your phone is already setup to Vodafone site for WAP/MMS Settings. e_j350.book Page 102 Monday, October 25, 2004 6:33 PM 103 Vodafone live! Starting the WAP Browser 1.Press C during stand-by. To Exit the WAP Browser 1.Press F to exit the browser. Navigating a WAP Page •a b c d: Move the highlights around in the screen. •:Executes the option displayed in the lower centre of the screen. •A:Launches the browser option menu. •C:Selects an action displayed in the lower right of the screen. Used to access “Vodafone live!” by opening the browser. •F(short press): Exits the browser. (press and hold): Turns off the phone. e_j350.book Page 103 Monday, October 25, 2004 6:33 PM 104 Vodafone live! Browser Menu To Edit Favourites C → [Options] → “Bookmarks” 1.Select the desired URL, and press [Options]. You can edit the list of Bookmarks by the following options: “Select”:Selects a bookmark. “Details”:Displays detailed information of the WAP page. “Send page”:Sends the URL address to recipients. “New”:Creates new folders or bookmarks. “Rename”:Renames bookmarks. “Edit URL”:Edits URL address of the bookmarks. “Move”:Moves Bookmarks to another location. “Delete”:Deletes bookmarks. “Delete All”:Deletes all bookmarks. e_j350.book Page 104 Monday, October 25, 2004 6:33 PM 105 Vodafone live! The Browser Options You can use various options of the WAP browser. C → [Options] “Select”:Selects a WAP page. “Home”:Goes to the homepage. “Bookmarks”:(See page 104.) “Mark Page”:Marks the selected WAP page. “Save items”:Saves items from WAP pages. “Go to URL”:Goes to the WAP page that you enter the URL address. “Access History”:Shows the history where you have browsed. “Forward”:Goes to the next page of the pages displayed. “Reload Page”:Reloads the WAP page again to get new information. “Advanced”:Displays the advanced menus. “Exit”:Exits the browser. The Advanced Options C → [Options] → “Advanced” “My Saved Page”:Displays the bookmarked pages. “Save this page”:Saves the WAP page as the local file. “Send page”:Sends the WAP page data. “Details”:Shows detailed information of the WAP page. “Browser Data”:Edits the browser data. You can clear the cache/cookies/ history. “Search This Page”:Searches specific words in the WAP page. e_j350.book Page 105 Monday, October 25, 2004 6:33 PM 106 Vodafone live! “Alert Inbox”:Displays WAP Push alerts. “Copy Text”:Copies the text on the web page. “Settings”:Displays the Settings menus. “Restart browser”:Restart…
Text truncated - open the document above for the full version.
Users Manual
174 Settings External Light Colour You can select from 7 colours and 1 pattern for each profile and change it during an incoming call. “Settings” → “Profiles” 1.Highlight the profile you wish to customise. 2.Press [Options] and select “Personalise”. 3.Select “External Light”. 4.Select “For Voice Call”, “For Video Call” or “For New Message”. 5.Select the desired colour or “Off”. Tip •If you select “Disco” in step 5, all 7 colours flash in order during an incoming call. Any Key Answer You can answer a call by pressing any key except F, , U and [Busy]. For details, see page 37. “Settings” → “Profiles” 1.Highlight the profile you wish to customise. 2.Press [Options] and select “Personalise”. 3.Select “Any Key Answer”. 4.Select “On” or “Off”. e_j350.book Page 174 Monday, October 25, 2004 6:33 PM 175 Settings Setting the Display You can change the settings of the display. Wallpaper For the stand-by screen, 5 pictures are provided. Pictures taken with the digital camera or images downloaded from a WAP site can be used for wallpapers. Setting My Pictures “Settings” → “Display Settings” → “Wallpaper” 1.Select “My Pictures”. 2.Select the desired picture. 3.After displaying the picture, press . Note •Some pictures cannot be used because of their picture and data types. •If the picture in My Pictures is already set, it is displayed in step 1. Press [Change] and select the desired picture. (M 12-2) e_j350.book Page 175 Monday, October 25, 2004 6:33 PM 176 Settings Assigning the Pictures Pictures can be displayed when turning the power on or off, when receiving an incoming call, or when operating the alarm. Pictures taken with the digital camera or images downloaded from a WAP site can be used. To Set Built-in Pictures “Settings” → “Display Settings” → “System Graphics” 1.Select the desired scene to set the picture to. 2.Select “Preset Animation” when you select “Power On” or “Power Off” in step 1. Select “Pattern 1”, “Pattern 2” or “Pattern 3” when you select “Incoming Call” or “Alarm” in step 1. To Set My Pictures “Settings” → “Display Settings” → “System Graphics” 1.Select the desired scene to set the picture to. 2.Select “My Pictures”. 3.Select the desired picture. 4.After displaying the picture, press . 5.Specify the area you wish to display using the navigation keys. Note •Some pictures cannot be used because of their picture and data types. •If the picture in My Pictures is already set, it is displayed in step 2. Press [Change] and select the desired picture. e_j350.book Page 176 Monday, October 25, 2004 6:33 PM 177 Settings Setting the Font Weight You can change the font weight displayed on the screen. “Settings” → “Display Settings” → “Font Settings” 1.Select “Thin”, “Normal”, “Bold” or “Bolder”. The preview image is displayed in the selected weight. Setting the Greeting Message You can set the message which is displayed when the phone is turned on. “Settings” → “Display Settings” → “Greeting Message” → “Switch On/Off” 1.Select “On” or “Off”. 2.Select “Edit Message” and enter the message when you select “On” in step 1. Up to 10 characters can be saved as a message. Showing the Clock You can display the calendar or the current date and/or time during stand-by. To Set the Clock Display “Settings” → “Display Settings” → “Clock & Calendar” → “Show Clock” 1.Select the desired clock type or “Off” to set clock display off. Tip •When you select “Calendar”, you can display one or two consecutive calendars by selecting “1 month” or “2 months”. e_j350.book Page 177 Monday, October 25, 2004 6:33 PM 178 Settings Backlight The backlight will shut off if you do not press the keypad for a certain length of time. You can specify a desired time to elapse before the backlight shuts off, which will help conserve battery life. Tip •When you purchase this phone, Backlight is set to 15 seconds. To Select the Backlight Time Out “Settings” → “Display Settings” → “Backlight” 1.Select the desired time. Select “Off” to shut it off. Adjusting the Brightness of the Backlight You can adjust the brightness of the backlight of the screen between 4 levels. “Settings” → “Display Settings” → “Brightness” 1.Press a (Light) and b (Dark) for maximum clarity. 2.Press . e_j350.book Page 178 Monday, October 25, 2004 6:33 PM 179 Settings Setting the Display Saving The screen of this phone will automatically turn off after a given amount of time. You can change the length of time before the Display Saving goes into effect, which will help conserve battery life. Tip •When you purchase this phone, Display Saving is set to 2 minutes. “Settings” → “Display Settings” → “Display Saving” 1.Select the desired time. Note •Display Saving does not work while you are making a call, using WAP, or using an application. •To cancel the Display Saving: The display saving continues until either a key is pressed or there is an incoming alert. The first key press only cancels this function. You must press another key in order to enter any numerical or text value. Sound Settings You can use this menu to check or edit the current Profiles settings (except “Any Key Answer”). (M 12-3) e_j350.book Page 179 Monday, October 25, 2004 6:33 PM 180 Settings Time & Date You need to set the correct time and date in order for your phone’s various time-based functions to work correctly. “Settings” → “Time & Date” → “Set Date/Time” 1.Enter the day, month and year using the digit keys. 2.Enter the time using the digit keys. Tip •When you enter the time in the 12-hour format, press a or b to switch between am and pm. The order in which the date and time is displayed is based on the format setting. Selecting the Time Format “Settings” → “Time & Date” → “Time Format” 1.Select “24 Hour” or “12 Hour”. Selecting the Date Format “Settings” → “Time & Date” → “Date Format” 1.Select from “D.M.Y”, “M-D-Y” or “Y/M/D”. Setting the Daylight Saving “Settings” → “Time & Date” → “Daylight Saving” 1.Select “On” or “Off”. (M 12-4) e_j350.book Page 180 Monday, October 25, 2004 6:33 PM 181 Se…
Text truncated - open the document above for the full version.
External Photos
802SH Photo(External) 802SH Photo(External)
Internal Photos
802SH Photo(Internal) 802SH Photo(Internal)
Test Report
Test report No. : 25AE0006-HO-2 Page : 2 of 39 Issued date : September 27, 2004 FCC ID : APYHRO00039 Revised date : September 30, 2004 UL Apex Co., Ltd. Head Office EMC Lab. 4383-326 Asama-cho, Ise-shi, Mie-ken 516-0021 JAPAN Telephone : +81 596 24 8116 Facsimile : +81 596 24 8124 MF060b(10.04.03) CONTENTS PAGE SECTION 1: Client information .................................................................................................................... 3 SECTION 2: Equipment under test (E.U.T.)................................................................................................ 3 SECTION 3: Test specification, procedures & results ................................................................................ 4 SECTION 4: Operation of E.U.T. during testing ......................................................................................... 6 SECTION 5: Conducted Emission, Section 15.207 ...................................................................................... 7 SECTION 6: Carrier Frequency Separation, Section15.247(a)(1) ............................................................. 7 SECTION 7: 20 dB Bandwidth, Section 15.247(a)(1) .................................................................................. 7 SECTION 8: Number of Hopping Frequency, Section 15.247(a)(1)(iii)..................................................... 8 SECTION 9: Dwell time, Section 15.247(a)(1)(iii)........................................................................................ 8 SECTION 10: Maximum Peak Output Power, Section 15.247(b)(1) ......................................................... 8 SECTION 11: Spurious Emission / Band Edge Compliance 15.247(c) ...................................................... 9 APPENDIX 1: Photographs of test setup .................................................................................................... 10 Conducted Emission ............................................................................................................................................................................10 Spurious Emission (Radiated) ............................................................................................................................................................11 Worst Case Position (Y-axis:Horizontal / Z-axis:Vertical) ...............................................................................................................12 APPENDIX 2: Test instruments .................................................................................................................. 13 APPENDIX 3: Data of EMI test................................................................................................................... 14 Conducted Emission ............................................................................................................................................................................14 Carrier Frequency Separation............................................................................................................................................................19 20dB Bandwidth ..................................................................................................................................................................................21 Number of Hopping Frequency ..........................................................................................................................................................23 Dwell time.............................................................................................................................................................................................25 Maximum Peak Output Power ...........................................................................................................................................................28 Radiated Spurious Emission(30-1000MHz).......................................................................................................................................30 Radiated Spurious Emission (1-25GHz) / Band Edge compliance...................................................................................................33 Conducted Spurious Emission(30MHz-25GHz)................................................................................................................................36 Conducted Spurious Emission / Band Edge compliance ..................................................................................................................39 Test report No. : 25AE0006-HO-2 Page : 3 of 39 Issued date : September 27, 2004 FCC ID : APYHRO00039 Revised date : September 30, 2004 UL Apex Co., Ltd. Head Office EMC Lab. 4383-326 Asama-cho, Ise-shi, Mie-ken 516-0021 JAPAN Telephone : +81 596 24 8116 Facsimile : +81 596 24 8124 MF060b(10.04.03) SECTION 1: Client information Company Name : Sharp Corporation Brand or Trade name : SHARP Address : 2-13-1 Iida Hachihonmatsu HigashiHiroshima-City, Hiroshima-ken, 739-0192 Japan Telephone Number : +81-82-420-1592 Facsimile Number : +81-82-420-1852 Contact Person : Seiichi Ichikawa SECTION 2: Equipment under test (E.U.T.) 2.1 Identification of E.U.T. Type of Equipment : GSM & WCDMA Cellular Phone Model No. : 802SH Serial No. : 350263/00/004031/1 and 350263/00/004039/4 (For the Radiated Spurious Emission) 350263/00/004079/0 (For Conducted tests) Country of Manufacture : Japan Receipt Date of Sample : August 27, 2004 Condition of EUT : Production prototype (Not for Sale: This sample is equivalent to mass-produced items.) 2.2 Product Description Clock frequency CPU:13MHz/ RTC:32.768kHz Feature of EUT 802SH(referred to as the EUT in this report)is Tri-Band GSM &WCDMA Mobile Cellular Phone with AC CHARGER(XN-1QC93), DATA CABLE (XN-1DC30) <Transmitter> Equipment Type Transceiver Frequency of Operation 2402MHz to 2480MHz Ba…
Text truncated - open the document above for the full version.
Contact Information
Applicant
Taihei Ohtsuka(Division Manager, ESG & Q promotion div.)
Test Firm
UL Apex Co., Ltd.Tetsuo Maeno
Technical Specifications
| # | Rule Parts | Frequency Range | Power Output |
|---|---|---|---|
| 1 | 15C | 2.40 GHz - 2.48 GHz | 700.00 µW |
Other Applications from Sharp Corporation
APYHRO00343
Aug 17, 2026Smartphone
Equipment Class
DTS - Digital Transmission SystemAPYHRO00342
Jul 29, 2026Smart phone
Equipment Class
DXX - Part 15 Low Power Communication Device TransmitterAPYHRO00341
May 28, 2026Smart phone
Equipment Class
DTS - Digital Transmission SystemAPYHRO00340
Dec 01, 2025BT remote control
Equipment Class
DTS - Digital Transmission SystemAPYHRO00339
Sep 17, 2025Smart phone
Equipment Class
NII - Unlicensed National Information Infrastructure TX