BEJ50PK750UAPLASMA TV/MONITOR
LG Electronics USA, Inc.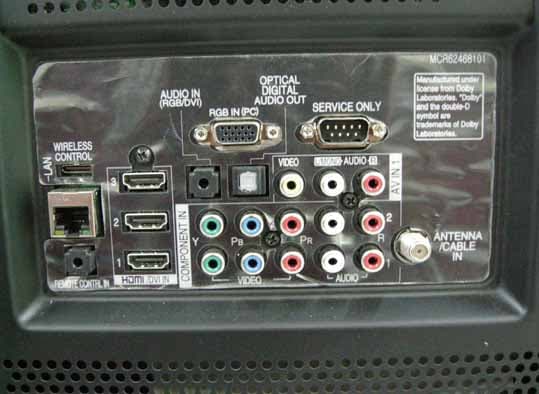
Click to zoom
Application Details
- Equipment Class
- JBP - Part 15 Class B Computing Device Peripheral
- Date of Grant
- Jan 18, 2010
- Application Purpose
- Original Equipment
- Date of Application
- Jan 17, 2010
- Equipment Note
- PLASMA TV/MONITOR
- Company
- LG Electronics USA, Inc.
- Country
- United States
Documents & Files
Document Text
Text extracted from the exhibit documents filed with the FCC. Open a document above to read the original.
Users Manual
Please read this manual carefully before operating your set and retain it for future reference. The model and serial number of the TV is located on the back and one side of the TV. Record it below should you ever need service. P/NO : SAC34134201 (0911-REV00) www.lge.com This product qualifies for ENERGY STAR in the “fac- tory default (Home Use)” setting. Changing the factory default settings or enabling other features may increase power consumption that could exceed the limits necessary to quality for ENERGY S TAR. Model: Serial: 1-800-243-0000 USA, Consumer User 1-888-865-3026 USA, Commercial User 1-888-542-2623 CANADA LG Customer Information Center Yahoo Support http://connectedtv. yahoo. com/help Netflix Support http://www.netflix.com/tvhelp YouTube Support http://www.y outube.com/t/contact_us Vudu Support http://www.vudu.com/support LCD TV LED LCD TV pLasma TV ownEr’s manuaL ownEr’s manuaL LCD TV moDELs 32LD550 42LD550 46LD550 52LD550 60LD550 LED LCD TV moDELs 42LE5400 47LE5400 55LE5400 42LE5500 47LE5500 55LE5500 60LE5500 47LD650 55LD650 47LE8500 55LE8500 pLasma TV moDELs 50pK750 60pK750 42LE7500 47LE7500 55LE7500 2 warnInG / CauTIon The lightning flash with arrowhead symbol, within an equilateral trian- gle, is intended to alert the user to the presence of uninsulated “dan- gerous voltage” within the product’s enclo- sure that may be of sufficient magnitude to constitute a risk of electric shock to persons. The exclamation point within an equi- lateral triangle is intended to alert the user to the presence of important oper- ating and maintenance (servicing) instruc- tions in the literature accompanying the appliance. TO REDUCE THE RISK OF ELECTRIC SHOCK DO NOT REMOVE COVER (OR BACK). NO USER SERVICEABLE PARTS INSIDE. REFER TO QUALIFIED SERVICE PERSONNEL. warnInG/CauTIon TO REDUCE THE RISK OF FIRE AND ELECTRIC SHOCK, DO NOT EXPOSE THIS PRODUCT TO RAIN OR MOISTURE. noTE To CaBLE/TV InsTaLLEr This reminder is provided to call the CATV system installer’s attention to Article 820-40 of the National Electric Code (U.S.A.). The code provides guide- lines for proper grounding and, in particular, speci- fies that the cable ground shall be connected to the grounding system of the building, as close to the point of the cable entry as practical. warnInG / CauTIon To prevent fire or shock hazards, do not expose this product to rain or moisture. FCC notice Class B digital device This equipment has been tested and found to comply with the limits for a Class B digital device, pursuant to Part 15 of the FCC Rules. These limits are designed to provide reasonable pro- tection against harmful interference in a residen- tial installation. This equipment generates, uses and can radiate radio frequency energy and, if not installed and used in accordance with the instructions, may cause harmful interference to radio communications. However, there is no guarantee that interference will not occur in a particular installation. If this equipment does cause harmful interference to radio or television reception, which can be determined by turning the equipment off and on, the user is encour- aged to try to correct the interference by one or more of the following measures: - Reorient or relocate the receiving antenna. - Increase the separation between the equip- ment and receiver. - Connect the equipment to an outlet on a circuit different from that to which the receiver is con- nected. - Consult the dealer or an experienced radio/TV technician for help. This device complies with part 15 of the FCC Rules. Operation is subject to the following two condi- tions: (1) This device may not cause (harmful) interference, and (2) this device must accept any interference received, including interference that may cause undesired operation (of the device). Any changes or modifications in construction of this device which are not expressly approved by the party responsible for compliance could void the user’s authority to operate the equipment. CauTIon Do not attempt to modify this product in any way without written authorization from LG Electronics. Unauthorized modification could void the user’s authority to operate this product. 3 IMPORTANT SAFETY INSTRUCTIONS saFETY InsTruCTIons Read these instructions. Keep these instructions. Heed all warnings. Follow all instructions. 1 Do not use this apparatus near water. 2 Clean only with dry cloth. 3 Do not block any ventilation openings. Install in accordance with the ma nufacturer’s instruc- tions. 4 Do not install near any heat sources such as radiators, heat registers, stoves, or other appa- ratus (including amplifiers) that produce heat. 5 Do not defeat the safety purpose of the polarized or grounding-type plug. A polarized plug has two blades with one wider than the other. A grounding type plug has two blades and a third grounding prong, The wide blade or the third prong are provided for your safety. If the provided plug does not fit into your outlet, consult an elec- trician for replacement of the obsolete outlet. 6 Protect the power cord from being walked on or pinched particularly at plugs, conve- nience receptacles, and the point where they exit from the apparatus. 7 Only use attachments/accessories speci- fied by the manufacturer. 8 Use only with the cart, stand, tripod, bracket, or table specified by the manufacturer, or sold with the apparatus. When a cart is used, use caution when moving the cart/ apparatus combination to avoid injury from tip-over. 9 Unplug this apparatus during lighting storms or when unused for long periods of time. 10 Refer all servicing to qualified service per- sonnel. Servicing is required when the apparatus has been damaged in any way, such as power-supply cord or plug is dam- aged, liquid has been spilled or objects have fallen into the apparatus, the appara- tus has been exposed to rain or moisture, does not operate normally, or has been dropped. 4 SAFETY INSTRUCTIONS 11 Never touch this apparatus or antenna during a thunder or lighting sto…
Text truncated - open the document above for the full version.
Users Manual
9 ImporTanT InFormaTIon To prEVEnT “ImaGE Burn / Burn-In” on Your TV sCrEEn ABOUT DIVX VIDEO: DivX® is a digital video format created by DivX,Inc. This is an official DivX Certified device that plays DivX video. Visit www.divx.com for more information and software tools to convert your files into DivX video. ABOUT DIVX VIDEO-ON- DEMAND: This DivX Certified® device must be registered in order to play DivX Video-on-Demand (VOD) content. To generate the registration code, locate the DivX VOD section in the device setup menu. Go to vod.divx.com with this code to complete the registration process and learn more about DivX VOD. “DivX Certified to play DivX video up to HD 1080p, including premi- um content” “Pat. 7,295,673; 7,460,688;7,519,274” ꔛ When a fixed image (e.g. logos, screen menus, video game, and computer display) is displayed on the TV for an extended period, it can become permanently imprinted on the screen. This phenomenon is known as “image burn” or “burn-in.” Image burn is not covered under the man- ufacturer’s warranty. ꔛ In order to prevent image burn, avoid displaying a fixed image on your TV screen for a prolonged period (2 or more hours for LCD, 1 or more hours for Plasma). ꔛ Image burn can also occur on the letter- boxed areas of your TV if you use the 4:3 aspect ratio setting for an extended period. Unlimited instant access to movies and TV shows with Netflix subscrip- tion. Yahoo! TV Widgets give you the best of the Internet in perfect har- mony with the simplicity and reli- ability of your TV. TV Widgets deliv- er a Cinematic Internet TM experi- ence by converting your favorite web services for viewing on the TV. Stream movies, TV shows and video, and get up to the minute news, stock information and weath- er updates directly to your TV using Yahoo!, Netflix, YouTube and Vudu. on DIsposaL (only hg lamp used LCD TV) The fluorescent lamp used in this product contains a small amount of mercury. Do not dispose of this product with general household waste. Disposal of this product must be carried out in accordance to the regulations of your local authority. PREPARATION PREPARATION 10 ACCESSORIES prEparaTIon Ensure that the following accessories are included with your TV. If an accessory is missing, please con- tact the dealer where you purchased the TV. The accessories included may differ from the images below. option Extras * Wipe spots on the exterior only with the polishing cloth. * Do not wipe roughly when remov- ing stain. Excessive pressure may cause scratch or discoloration. Polishing Cloth not included with all models 1.5V1.5V 1,5Vcc1,5Vcc D-sub 15 pin Cable When using the VGA (D-sub 15 pin cable) PC connection, the user must use shielded signal interface cables with ferrite cores to maintain standards compli- ance. LCD TV (32/42/46/52/60LD550, 47/55LD650) Protection Cover (Refer to P.17) Power Cord 1.5V1.5V 1,5Vcc1,5Vcc 1.5V1.5V 1,5Vcc1,5Vcc 1.5V1.5V 1,5Vcc1,5Vcc ENERGY CH VOL 1 2 ABC 3 DEF 4 GH I 5 JKL 6 MN O 7 PQRS 8 TU V 0 9 WXYZ P A G E SA VING TV AV MODE INPUT FA V RA TIO MUTE BACK EXIT WIDGETS ENTER MARK DELETE CHAR/NU M LIST FLASHBK MENU FREEZE Q.MENU INFO Owner’s ManualCD Manual, Program CD Remote Control, Batteries (AAA) plasma TV (M4 x 20) Screws for stand assembly (Refer to P.16) Screw for stand fixing (Refer to P.22) x 8 (For 50PK750) (For 32/42LD550) Protection Cover (Refer to p.15) Cable Holder (Refer to p.19) x 2 x 3x 4 Screws for stand assembly (Refer to P.14) (M5 x 14)(M4 x 28) 19 PREPARATION 1 Lan Network connection for Netflix, Yahoo! TV Widgets, etc. Also used for photo and music files on local network. 2 hDmI/DVI In, hDmI In Digital Connection. Supports HD video and Digital audio. Doesn’t support 480i. Accepts DVI video using an adapter or HDMI to DVI cable (not included). 3 rGB In (pC) Analog PC Connection. Uses a D-sub 15 pin cable (VGA cable). AUDIO IN (RGB/DVI) 1/8” (0.32 cm) headphone jack for analog PC audio input. 4 rs-232C In (ConTroL & sErVICE) porT Used by third party devices. This port is used for service or Hotel mode. 5 opTICaL DIGITaL auDIo ouT Digital optical audio output for use with amps and home theater systems. Note: In standby mode, this port doesn’t work. 6 aV (audio/Video) In Analog composite connection. Supports stan- dard definition video only (480i). 7 anTEnna/CaBLE In Connect over-the air signals to this jack. Connect cable signals to this jack. 8 ComponEnT In Analog Connection. Supports HD. Uses a red, green, and blue cable for video & red and white for audio. 9 wIrELEss ConTroL Connect the Wireless Dongle to the TV to control the external input devices connected to Media Box wirelessly. 10 usB InpuT Used for viewing photos and listening to MP3s. 11 hEaDphonE InpuT Plug the headphone into the headphone socket. 12 power Cord socket For operation with AC power. Caution: Never attempt to operate the TV on DC power. 13 rEmoTE ConTroL In porT For a wired remote control. 35 ExTERNAL EqUIPMENT SETUP HD RECEIVER SETUP ꔛ To prevent the equipment damage, never plug in any power cords until you have finished connecting all equipment. ꔛ Image shown may differ from your TV. Supported ResolutionsY, CB/PB, CR/PR 1. how to connect 1 Connect the video outputs ( Y, PB, PR ) of the digital set-top box to the ComponEnT In VIDEo 1 or 2 jacks on the TV. Match the jack colors (Y = green, P B = blue, and PR = red). 2 Connect the audio output of the digital set-top box to the ComponEnT In auDIo 1 or 2 jacks on the TV. 2. how to use ꔛ Turn on the digital set-top box. ( Refer to the owner’s manual for the digital set-top box operation. ) ꔛ Select the Component1 or Component2 input source on the TV using the InpuT button on the remote control. Component Connection This TV can receive digital over-the-air/digital cable signals without an external digital set-top box. However, if you do receive digital signals from a digital set-top box or other digital external device. SignalComponentHDMI 480iYesNo 480pYesYes 720pYesYes 1080iYesYes 1080pYesYes Res…
Text truncated - open the document above for the full version.
Users Manual
ExTERNAL EqUIPMENT SETUP ExTERNAL EqUIPMENT SETUP 56 Setting up the AP (Access Point) or the wireless router is required before connecting the TV to the network. NETWORK ꔂ Move ꔉ Enter • Network Type : Wireless • Network Setting • Network Status • Legal Notice • ESN □ Wired ꔑ Wireless Network Setting Cancel Access Point Searching ■ ■ ■ ■ ■ ■ ꔅ Ad-hocꔅ PBC ꔅ PIN Network Setting � Access Point Search ꔅ Ad-hocꔅ PBC ꔅ PIN Direct Input Network1 � Network2 � Ad-hoc Network4 Wireless Network Setup ꔛ setting: Return to the IP setting menu. ꔛ Test: Test the current network status after setting the network. ꔛ Close: Return to the previous menu. NETWORK ꔂ Move ꔉ Enter • Network Type : Wired • Network Setting • Network Status • Legal Notice • ESN ꔀ ꔉ 1 MENU Select nETworK. 2 ENTER Select network Type. 3 ENTER Select wireless. 4 ENTER Select network setting. 5 ENTER Scan the all available AP (Access Point) or wireless routers within range and display them as a list. 6 ENTER Select an AP (Access Point) or wireless router on the list. 57 ExTERNAL EqUIPMENT SETUP Network Setting Enter the access point name (SSID) DELETE SYMB CHAR/NUM ENTERCANCEL Network Setting Enter the password. DELETE SYMB CHAR/NUM ENTERCANCEL Network Setting □ None ꔑ WEP □ WPA-PSK (AES) □ WPA-PSK (TKIP) □ WPA1 □ WPA2 Cancel Select the wireless network security. 7 ENTER 12 ABC3 DEF 4 GHI5 JKL6 MNO 7PQRS8 TUV 0 9 WXYZ When selecting Direct Input, Input the SSID (Service Set Identifier). 8 ENTER Select the wireless network security. 9 ENTER 12 ABC3 DEF 4 GHI5 JKL6 MNO 7PQRS8 TUV 0 9 WXYZ Input the password. Reteat steo 5-7 on P.? ꔛ If you have security on your AP (Access Point) or wireless router, ver- ify that the WEP (Wired Equivalent Privacy) or WPA (Wi-Fi Protected Access) key that was entered into the TV matches the router’s information exactly. You need to input the secu- rity code as necessary. ꔛ WEP security mode generally have 4 keys available on an access point or wireless router’s setting. If your access point or wireless router use WEP security, enter the security code of the key “No.1” to connect on your home network. ꔛ An Access Point is a device that allows you to connect to your home network wirelessly. Direct Input Connection: When a security code is not set Network Setting � Access Point Search ꔅ Ad-hocꔅ PBC ꔅ PIN Direct Input Network1 � Network2 � Ad-hoc Network4 Network Setting IP Mode◀ IP Auto Setting ▶ IP Address255 . 255 . 0 . 0 Subnet Mask255 . 255 . 0 . 0 Gateway255 . 255 . 0 . 0 DNS Server255 . 255 . 0 . 0 Enter ExTERNAL EqUIPMENT SETUP ExTERNAL EqUIPMENT SETUP 58 If your access point or wireless router that supports WPS, it’s available to use your access point or wireless router within 120 counts. You do not need to know the access point name (SSID: Service Set Identifier) and security code of your access point or wireless router. Network Setting � Access Point Search ꔅ Ad-hocꔅ PBC ꔅ PIN Direct Input Network1 � Network2 � Ad-hoc Network4 Network Setting � Access Point Search ꔅ Ad-hocꔅ PBC ꔅ PIN Direct Input Network1 � Network2 � Ad-hoc Network4 WPS (Wi-Fi Protected Setup) Connection: When a security code is already set) PIN (Personal Identification Number) PBC (Push Button Configuration) 7 Connect the acccess point as pIn. Reteat steo 5-7 on P.? 7 Connect the acccess point as pBC. GREEN BLUE ꔛ PIN Number 는 Dongle 이 가지고 있는 고유의 8자리 숫자임 Network Setting The PIN to the wireless router settings page, enter your PIN number. PIN Number : 87539274 Cancel Network Setting Push the button on the access point until it is detected within 120 counts. Remain : 80 count(s) Cancel
Users Manual
59 ExTERNAL EqUIPMENT SETUP AP 없이, 통신하고자 하는 기계와 직접(direct) 연결하여 통신하는 방법 마치 크로스케이블로 2 대의 PC 를 연결하는 것과 동일함 Network Setting � Access Point Search ꔅ Ad-hocꔅ PBC ꔅ PIN Direct Input Network1 � Network2 � Ad-hoc Network4 AD-hoc Mode Network Setting Ad-hoc network to connect to Server Information Network ID (SSID) : adhoc 12 Security Key : 1230983738 ꔅ Create a new server EnterCancel ꔛ If a network may not operate, cre- ate a new server, using the YELLOW button. 7 Enter the ad-hoc mode. 8 ENTER Select EnTEr. YELLOW WATCHINg TV / CHANNEL CONTROL WATCHIN g TV / CHANNEL CONTROL 60 ENERGY CHVOL 12 ABC3 DEF 4 GHI5 JKL6 MNO 7PQRS8 TUV 0 9 WXYZ P A G E SAVING TV AV MODEINPUT FAV RATIO MUTE BACK EXIT WIDGETS ENTER MARK DELETE CHAR/NUM LIST FLASHBK MENU FREEZE Q.MENU INFO REMOTE CONTROL FUNCTIONS When using the remote control, aim it at the remote control sensor on the TV. waTChInG TV / ChannEL ConTroL POWERTurns the TV on from standby or off to standby. ENERgY SAVINgAdjusts the Energy Saving setting. ►p.138 AV MODEToggles through preset Video and Audio modes. ►p.64 INPUTRotates through inputs. Also switches the TV on from standby. ►p.62 TVReturns to the last TV channel. NUMBER button — (DASH) Used to enter a program number for multiple program channels such as 2-1, 2-2, etc. LISTDisplays the channel table. ►p. FLASHBKTunes to the last channel viewed. MENUDisplays the main menu or clears all on-screen displays and return to TV viewing. NETCAST Select the desired NETCAST menu source. (Yahoo! TV Widgets, Netflix, Vudu, YouTube, My Media etc.) q.MENUOpens the list of Quick Menu options. ►p. THUMBSTICK (Up/Down/Left Right/ENTER) Navigates the on-screen menus and adjusts the system settings to your preference. BACKAllows the user to move return one step in an interactive application or other user interaction function. WIDgETSWIDGETS for showing or hiding the Yahoo! Dock and accessing the Yahoo! TV Widgets user expe- rience. ►p.70-77 ExITClears all on-screen displays and return to TV viewing. MY Media MY Media 92 Viewing Files on the network You can view the photos or listen to music files from folders shared on the network. RGB IN (PC) WIRELESS CONTROL (RGB/DVI) RS-232C IN ( CONTROL&SERVICE) OPTICAL DIGITAL /DVI IN 2 3 1 VIDEOAUDIO L(MONO) R VIDEO AUDIO COMPONENT IN AV IN 1 YPBPR LR AUDIO INAUDIO OUT 2 1 LAN ► Connect the PC and TV using a shar- ing device so that you can see the PC’s shared files on the TV. ► How to set a share folder may differ depending on the Windows version. ► The speed may be slow or it may cause an error if you try to access a folder from two TVs at the same time. ► Because files could be deleted from a shared PC, set the user access level to Read Only. ► Do not share any important personal documents as it may be accessed by a different PC. ► If you rename or disable a shared folder on the PC after mounting, you cannot mount it again. ► If the status of the network or a share folder on the PC is changed, search is run again when entering the highest folder in the menu. ► A maximum of 20 of shared folders on 4 computers are supported. ► When using file sharing from a com- puter, it is recommended you use a wired port of the hub. ► When using the wireless port of the hub to share the file on the PC, some functions can be limited. ► Because the TV does not support the wireless function using the USB don- gle, My Media function only supports the wired environment. i.e) LCD TV Broadband modem Broadband modem Router Broadband Service Broadband Service Movie List MY MEDIA Press ENTER (�) to see photos from the USB.ꔅ DivX Option� Exit Photo ListMusic List 3 MENU Select MY MEDIA. 4 ENTER Select Movie List, Photo List or Music List. 1 Set a share folder (CIFS: Common Internet File System) on the PC (Refer to P.?). 2 Connect the LAN port of the Modem or Router to the LAN port on the TV. 93 MY Media dLna about dLna this tV is a dLna Certified digital media product that can display and play movie, photo and music content from your dLna Certified network device and dLna server. the digital Living network alliance (dLna) is a cross-industry organization of consumer electronics, computing industry and mobile device companies. digital Living provides consumers with easy sharing of digital media through a wired or wireless net- work in the home. the dLna certification logo makes it easy to find products that comply with the dLna interoperability Guidelines. this unit complies with dLna interoperability Guidelines v1.5. When a PC running dLna server software or other dLna compatible device is connected to this player, some setting changes of software or other devices may be required. Please refer to the operating instruc- tions for the software or device for more information. ! ? ! ? NOTE ►The supplied Nero MediaHome 4 Essentials CD-ROM is a customized software edition only for sharing files and folders to this player. ►The supplied Nero MediaHome 4 Essentials software does not support following functions: Transcoding, Remote UI, TV control, Internet services and Apple iTunes ►This manual explains operations with the English version of Nero MediaHome 4 Essentials as examples. Follow the explanation referring to the actual operations of your language version. MY Media MY Media 94 installing nero Mediahome 4 essentials nero Mediahome 4 essentials is a software for sharing movie, music and photo files stored on your computer to this tV. Requirement PC system before you install Nero MediaHome 4 Essentials ꔛ Windows® XP (Service Pack 2 or higher), Windows Vista® (no Service Pack required), Windows® XP Media Center Edition 2005 (Service Pack 2 or higher), Windows Server® 2003 ꔛ Windows Vista® 64-bit edition (application runs in 32-bit mode) ꔛ Hard drive space: 200 MB hard drive space for a typical installation of Nero MediaHome stand- alone ꔛ 1.2 GHz Intel® Pentium® III or AMD Sempron™ 2200+ processors ꔛ Memory: 256 MB RAM ꔛ Graphics card with at least 32 MB video memory, minimum resolution of 800 x 600 pixels…
Text truncated - open the document above for the full version.
Users Manual
NetcaSt Netcast 124 using yahoo! tV widgets The sidebar’s bottom toolbar includes four color- coded buttons. RED Close the sidebar and return to watching TV. YELLOW Add or delete a snippet. GREEN Change the widget’s settings. BLUE Resize video to fit onscreen, or to make it fullscreen. WIDGETS Activate Yahoo! TV Widgets. ꔛ The horizontal list at the bottom of your TV screen is called “the dock”. ꔛ The items in this list are called “snippets”. ꔛ A snippet is a shortcut which opens a TV Widget. Move between snippets. ꔛ Focus is located in the leftmost region (high- lighted in dark red). ꔛ The dock scrolls snippets under this focal point. ENTER Open the Sidebar when the TV Widget snippet is in focus. ꔛ The Home button including the main logo is at the top of the sidebar. Navigate a menu item. ꔛ The currently focused button is the one high- lighted in dark red. ENTER Select the focused button. 125 Netcast using the Profile widget ꔛ The Profile widget configures your user profile. ꔛ You can set up multiple profiles for multiple users. ꔛ Each profile maintains its own list of TV Widgets. ꔛ The Switch Profile menu allows you to switch to a different user profile. ꔛ The Profile Settings menu allows you to customize your profile, create a profile PIN, or limit the installation of widgets. ꔛ The System Settings menu allows you to change your Location, repeat the tutorial, and restore Factory Settings. ꔛ restore Factory Settings will erase all profiles and widgets installed by users, and restore the original configuration. (See also NetCast options reset Yahoo! Factory Settings) ꔛ The Administrative Controls menu allows you to set the Screen Saver timeout, create the owner PIN, and to Create a Profile. ꔛ The Sign in to Yahoo! menu allows you to personalize your experience using your Yahoo! ID. ꔛ If you don’t have a Yahoo! ID yet, please visit http://www.yahoo.com to create one. using the widget gallery ꔛ The widget Gallery allows you to browse and discover new TV Widgets. ꔛ The featured TV Widgets are highlighted in the display case at the top of the sidebar. ꔛ You can also browse available TV Widgets by category. ꔛ To install a widget, select Add widget to My Profile and press the ENTER button. ꔛ The owner PIN is needed to install widgets for profiles that have been protected through the Limit Profile indicator under Profile widget Profile Settings. ꔛ Go to the Profile widget Administrative Controls menu to set or change the owner PIN. NetcaSt Netcast 126 using the yahoo! News widget ꔛ The Yahoo! News widget provides the latest headline news for business, entertainment, politics, sports, top stories, and many other categories. ꔛ Select a category, press eNter. ꔛ Select a headline within the category, press eNter. ꔛ View the dynamically updated news summary for the selected headline. using the yahoo! weather widget ꔛ The Yahoo! weather widget provides updates on your local and favorite weather locations with content that dynamically changes with weather conditions. ꔛ Press the GreeN button to display the Settings menu. ꔛ From the Settings menu you can add or remove a city for which you want to view weather information. - Add a New City by entering the name of the city. Once the search results are displayed, select the city you want and press eNter button. - Delete a City by selecting the city you want to delete from the city list. Press eNter button and confirm the deletion. - Select the Display Units As button to change the temperature indication mode to Imperial or Metric. Imperial will show tem- peratures in Fahrenheit and Metric will use Celsius. ꔛ To create a snippet for a favorite city: - Select the city from the home page and view the detailed weather information. - Press the YeLLow button. - Select the Add Snippet button and press eNter to add the city as a snippet. ꔛ To delete a snippet for a city: - Navigate to the snippet and press ENTER button to start the widget. The detailed page for the snippet’s city will be dis- played. - Press the YeLLow button. - Select the Delete Snippet button and press ENTER button to remove the snippet. 127 Netcast using the yahoo! finance widget ꔛ View stock information and the latest stock news with the Yahoo! Finance Widget. ꔛ Press the GreeN button to set up your stocks. - Use the Add New Symbol menu to enter the name of a new stock. - Select the stock you want to add from the search results and select the Add Symbol button and press eNter button. - The selected stock is added to the My Stocks list. - The Import Symbols From Yahoo! menu retrieves the stocks from your Yahoo! Finance portfolio. - The Merge Symbols button merges the symbols in the Yahoo! Finance Widget with the symbols from your portfolio. - The replace Symbols button deletes the symbols in the Yahoo! Finance Widget and replaces them with the symbols from your portfolio. - The Display Format button changes the stock-price fluctua- tion transition to Value or Percentage. ꔛ To create a snippet for a favorite stock: - Select the stock symbol from the home page and view the detailed finance information. - Press the YeLLow button. - Select the Add Snippet button and press eNter button to add the stock as a snippet. ꔛ To delete a snippet: - Navigate to the snippet and press eNter button to start wid- get. The detailed page for the snippet’s stock will be displayed. - Press the YeLLow button. - Select the Delete Snippet button and press eNter button to remove the snippet. NetcaSt Netcast 128 using the flickr widget ꔛ The flickr widget provides a television-viewing experience while watching slideshows of family and friends’ photos. ꔛ Personalize the flickr widget by logging in with your Yahoo! ID. Refer to Using the Profile widget for instruc- tions. ꔛ The Your Photos menu shows photos you have registered with the flickr website. ꔛ The Your Sets menu allows you to view photos you have classified in flickr. ꔛ The explore menu allows you to explore photos featured by the flickr website. ꔛ The Mark as …
Text truncated - open the document above for the full version.
Cover Letter(s)
LG Electronics USA Date: Jan 14, 2010 Federal Communications Commission 7435 Oakland Mills Road Columbia MD 21046 c.c. Compliance Certification Services Certification Division 47173 Benicia Street Fremont, CA 94538, USA To whom it may concern: I, the undersigned, hereby authorize Jin-Mo Yang,Engineering Manager of ESTECH Co., Ltd. and hereafter referred to as ESTECH, to act on our behalf in all manners relating to application for equipment authorization, including signing of all documents relating to these matters. Any and all acts carried out by Jin-Mo Yang,Engineering Manager of ESTECH Co., Ltd. on our behalf shall have the same effect as acts of our own. I, the undersigned, hereby certify that we are not subject to a denial of federal benefits, that includes FCC benefits, pursuant to Section 5301 of the Anti-Drug Abuse Act of 1988, 21 U.S.C. 853(a). In authorizing ESTECH as our agent, we still recognize that we are responsible to: a) comply with the relevant provisions of the certification program; b) make all necessary arrangements for the conduct of the evaluation, including provision for examining documentation and access to all areas, records (including internal audit reports) and personnel for the purposes of evaluation (e.g. testing, inspection, assessment, surveillance, reassessment) and resolution of complaints; c) make claims regarding certification only in respect of the scope for which certification has been granted; d) do not use our product certification in such a manner as to bring the Certification Division into disrepute and not make any statement regarding our product certification which the Certification Division may consider misleading or unauthorized; e) upon suspension or cancellation of certification, discontinue use of all advertising matter that contains any reference thereto and return any certification documents as required by the Certification Division; f) use certification only to indicate the products are certified as being in conformity with specified standards; g) endeavor to ensure that no certificate or report nor any part thereof is used in a misleading manner; h) ensure that any reference to our product certification in communication media such as documents, brochures or advertising, complies with the requirements of the Certification Division; i) keep a record of all complaints made known to the us relating to th…
Text truncated - open the document above for the full version.
Contact Information
Applicant
David Kim(Team leader, LGEUS NA Policy & Regulatory Affairs)
Test Firm
ESTECH Co., Ltd.Yang Jinmo
Technical Specifications
| # | Rule Parts | Frequency Range | Power Output |
|---|---|---|---|
| 1 | 15B | - | - |
Other Applications from LG Electronics USA, Inc.
BEJTFHOBINI1F1
Jan 08, 2025Telematics
Equipment Class
DTS - Digital Transmission SystemBEJNT-16Z90TS
Oct 02, 2024Notebook Computer
Equipment Class
DSS - Part 15 Spread Spectrum TransmitterBEJSP-PEW8
Sep 26, 2024Stylus Pen
Equipment Class
DCD - Part 15 Low Power Transmitter Below 1705 kHzBEJ-RSMV2
Sep 24, 2024RF Module
Equipment Class
FDS - Part 15 Field Disturbance SensorBEJTFBMEIBN3EU
Sep 24, 2024Telematics
Equipment Class
NII - Unlicensed National Information Infrastructure TX