BEJ55LV555HUALCD TV/Monitor
LG Electronics USA, Inc.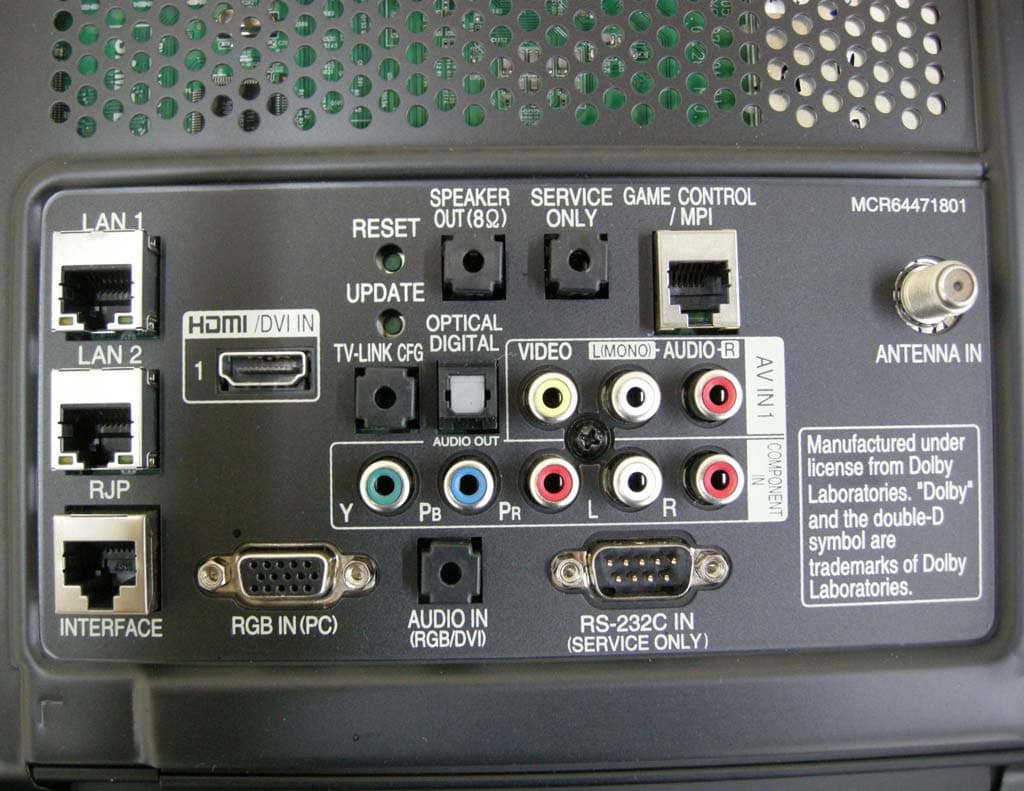
Click to zoom
Application Details
- Equipment Class
- JBP - Part 15 Class B Computing Device Peripheral
- Date of Grant
- Aug 31, 2011
- Application Purpose
- Original Equipment
- Date of Application
- Aug 31, 2011
- Equipment Note
- LCD TV/Monitor
- Company
- LG Electronics USA, Inc.
- Country
- United States
Documents & Files
Document Text
Text extracted from the exhibit documents filed with the FCC. Open a document above to read the original.
Users Manual
OWNER’S MANUAL LED LCD TV / LCD TV Please read this manual carefully before operating your set and retain it for future reference. P/NO : SAC34134301 (1107-REV05) www.lg.com 32LG710H 37LG710H 42LG710H 32LD650H 37LD650H 42LD650H 47LD650H 55LD650H 32LD655H 37LD655H 42LD655H 32LD660H 37LD660H 42LD660H 32LD665H 37LD665H 42LD665H 32LV555H 37LV555H 42LV555H 47LV555H 55LV555H 2 WARNING / CAUTION WARNING / CAUTION To prevent fire or shock hazards, do not expose this product to rain or moisture. FCC NOTICE Class B digital device This equipment has been tested and found to comply with the limits for a Class B digital device, pursuant to Part 15 of the FCC Rules. These limits are designed to provide reasonable protection against harmful interference in a residential installation. This equipment generates, uses and can radiate radio frequency energy and, if not installed and used in accordance with the instructions, may cause harmful interference to radio communications. However, there is no guarantee that interference will not occur in a particular installation. If this equipment does cause harmful interference to radio or television reception, which can be determined by turning the equipment off and on, the user is encouraged to try to correct the interference by one or more of the following measures: - Reorient or relocate the receiving antenna. - Increase the separation between the equipment and receiver. - Connect the equipment to an outlet on a circuit different from that to which the receiver is connected. - Consult the dealer or an experienced radio/TV technician for help. This device complies with part 15 of the FCC Rules. Operation is subject to the following two condi- tions: (1) This device may not cause (harmful) interference, and (2) this device must accept any interference received, including interference that may cause undesired operation (of the device). Any changes or modifications in construction of this device which are not expressly approved by the party responsible for compliance could void the user’s authority to operate the equipment. CAUTION Do not attempt to modify this product in any way without written authorization from LG Electronics. Unauthorized modification could void the user’s authority to operate this product WARNING RISK OF ELECTRIC SHOCK DO NOT OPEN The lightning flash with arrowhead symbol, within an equilateral triangle, is intended to alert the user to the presence of uninsulated “dangerous voltage” within the product’s enclosure that may be of sufficient magnitude to constitute a risk of electric shock to persons. The exclamation point within an equilateral triangle is intended to alert the user to the presence of important operating and maintenance (servicing) instructions in the literature accompanying the appliance. TO REDUCE THE RISK OF ELECTRIC SHOCK DO NOT REMOVE COVER (OR BACK). NO USER SERVICEABLE PARTS INSIDE. REFER TO QUALIFIED SERVICE PERSONNEL. WARNING/CAUTION TO REDUCE THE RISK OF FIRE AND ELECTRIC SHOCK, DO NOT EXPOSE THIS PRODUCT TO RAIN OR MOISTURE. NOTE TO CABLE/TV INSTALLER This reminder is provided to call the CATV system installer’s attention to Article 820-40 of the National Electric Code (U.S.A.). The code provides guidelines for proper grounding and, in particular, specifies that the cable ground shall be connected to the grounding system of the building, as close to the point of the cable entry as practical. 3 SAFETY INSTRUCTIONS Read these instructions. Keep these instructions. Heed all warnings. Follow all instructions. Do not use this apparatus near water. Clean only with a dry cloth. Do not block any ventilation openings. Install in accordance with the manufacturer’s instructions. Do not install near any heat sources such as radia- tors, heat registers, stoves, or other apparatus (including amplifiers)that produce heat. Do not defeat the safety purpose of the polarized or grounding-type plug. A polarized plug has two blades with one wider than the other. A grounding type plug has two blades and a third grounding prong, The wide blade or the third prong are provided for your safety. If the provided plug does not fit into your out- let, consult an electrician for replacement of the obsolete outlet. Protect the power cord from being walked on or pinched particularly at plugs, convenience recepta- cles, and the point where they exit from the appara- tus. Only use attachments/accessories specified by the manufacturer. Use only with the cart, stand, tripod, bracket, or table specified by the manufacturer, or sold with the appa- ratus. When a cart is used, use caution when moving the cart/apparatus combination to avoid injury from tip-over. Unplug this apparatus during lighting storms or when unused for long periods of time. Refer all servicing to qualified service personnel. Servicing is required when the apparatus has been damaged in any way, such as power-supply cord or plug is damaged, liquid has been spilled or objects have fallen into the apparatus, the apparatus has been exposed to rain or moisture, does not operate normally, or has been dropped. Never touch this apparatus or antenna during a thunder or lighting storm. When mounting a TV on the wall, make sure not to install the TV by the hanging power and signal cables on the back of the TV. Do not allow an impact shock or any objects to fall into the product, and do not drop onto the screen with something. IMPORTANT SAFETY INSTRUCTIONS 1 2 3 4 5 7 8 9 10 11 12 13 6 4 CAUTION concerning the Power Cord : It is recommend that appliances be placed upon a dedicated circuit; that is, a single outlet circuit which powers only that appliance and has no additional outlets or branch circuits. Check the specification page of this owner's manual to be certain. Do not connect too many appliances to the same AC power outlet as this could result in fire or elec- tric shock. Do not overload wall outlets. Overloaded wall out- lets, loose or damaged wall outlets, extension cords, frayed power cor…
Text truncated - open the document above for the full version.
Users Manual
PREPARATION 32 ANTENNA IN PREPARATION ANTENNA OR CABLE CONNECTION 1. Antenna (Analog or Digital) This image refers to using a Wall Antenna Socket or Outdoor Antenna without a Cable Box Connection. 2. Cable Wall Antenna Socket Outdoor Antenna (VHF, UHF) Cable TV Wall Jack Multi-family Dwellings/Apartments (Connect to wall antenna socket) RF Coaxial Wire (75 Ω) RF Coaxial Wire (75 Ω) Single-family Dwellings /Houses (Connect to wall jack for outdoor antenna) Be careful not to bend the copper wire when connecting the antenna. Copper Wire - For optimum picture quality, adjust the antenna direction if needed. ■ To improve the picture quality in a poor signal area, please purchase a signal amplifier and install properly. ■ If the antenna needs to be split for two TV’s, install a 2-Way Signal Splitter. ■ If the antenna is not installed properly, contact your dealer for assistance. ■ To prevent damage, do not connect to the power outlet until all connections are made between the devices. ANTENNA IN This image refers to using a cable connection without a cable box. - If you experience a poor signal when using cable, make sure the RF cable is screwed in completely. Contact your cable company is a poor signal persists. PREPARATION 33 MPI CARD SLOT / PPV CARD INSTALLATION (Except 47/55LD650H, 32/37/42/47/55LV555H) 1. Remove the two MPI card retainer screws. 2. Pull out current MPI card far enough so that the RF cable can be detached from the old card. 3. Detach RF cable. 4. Place new PPV card into slot and slide it in far enough to reconnect RF cable. 5. Insert card all the way into the slot making sure it is fully seated into back plane connector. 6. Replace the two card retainer screws. The MPI card is equipped with an RF jack for antenna/cable signal source connection. This card can be removed and replaced with a third-party PPV (Pay-Per-View) card. MPI Card Removal / PPV Card Installation RF CABLE ANTENNA IN M.P.I. M.P. I. Card Slot G There is an RF cable connected to the back of the card. Remove the card slowly. WARNING EXTERNAL EQUIPMENT SETUP 34 HD RECEIVER SETUP EXTERNAL EQUIPMENT SETUP This TV can receive Digital Over-the-air or Digital Cable signals without an external digital set-top box. However, if you do receive digital signals from a digital set-top box or other digital external device, refer to the figure as shown below. Component Connection 1. How to connect Connect the video outputs ( Y, PB, PR ) of the digital set- top box to the COMPONENT IN VIDEO jacks on the TV. Match the jack colors (Y = green, P B= blue, and P R= red). Connect the audio output of the digital set-top box to the COMPONENT IN AUDIO jacks on the TV. 2 1 2. How to use ■ Turn on the digital set-top box. ( Refer to the owner’s manual for the digital set-top box. ) ■ Select Component input source using the INPUT button on the remote control. ■ To prevent the equipment damage, never plug in any power cords until you have finished connecting all equipment. ■ Image shown may differ from your TV. U RESET LAN (SERVICE ONLY) COMPONENT IN VIDEO AUDIO R (S VIDEO AUDIO COMPONENT IN RGB(PC) AUDIO (RGB/DVI) RGB IN TV-LINK CFG YLRPBPR 1 2 Y, CB/PB, CR/PR Supported Resolutions Horizontal Vertical Frequency ( kHz ) Frequency ( Hz ) 15.7359.94 15.7360.00 31.4759.94 31.4760.00 44.9659.94 45.0060.00 33.7259.94 33.7560.00 67.5060.00 Resolution 720x480i 720x480p 1280x720p 1920x1080i Signal 480i 480p 720 p 10 8 0 i 10 8 0 p Component Ye s Ye s Ye s Ye s Ye s HDMI No Ye s Ye s Ye s Ye s 1920x1080p For 37/42/47/55LD650H, 37/42LD655H, 37/42LD660H, 37/42LD665H, 37/42/47/55LV555H For 37/42/47/55LD650H, 37/42LD655H, 37/42LD660H, 37/42LD665H, 37/42/47/55LV555H EXTERNAL EQUIPMENT SETUP 35 HDMI Connection Connect the digital set-top box to HDMI/DVI IN 1 (DVI) or 2* jack on the TV. No separate audio connection is necessary. HDMI supports both audio and video. 1. How to connect 2. How to use ■ Turn on the digital set-top box. ( Refer to the owner’s manual for the digital set-top box. ) ■ Select HDMI1 or HDMI2 input source with using the INPUT button on the remote control. 2 1 HDMI-DTV HDMI/DVI IN 2 1(DVI) RJP INTERFACE VID RGB HDMI/DVI IN 2 1(DVI) HDMI-DTV OUTPUT 1 Horizontal Vertical Frequency ( kHz ) Frequency ( Hz ) 31.4759.94 31.4760.00 44.9659.94 45.0060.00 33.7259.94 33.7560.00 26.9723.94 27.0024.00 33.7129.97 33.7530.00 67.43259.939 67.5060.00 Resolution 720x480p 1280x720p 1920x1080i G If the HDMI cables don’t support High Speed HDMI, it can cause flickers or no screen display. In this case use the latest cables that support High Speed HDMI. G HDMI mode supports PCM, Dolby Digital audio format. NOTE ! 1920x1080p For 37/42/47/55LD650H, 37/42LD655H, 37/42LD660H, 37/42LD665H, 37/42/47/55LV555H *HDMI2: Except 32/37/42/47/55LV555H EXTERNAL EQUIPMENT SETUP 36 EXTERNAL EQUIPMENT SETUP DVI to HDMI Connection RGB(PC) AUDIO (RGB/DVI) RGB IN UPDA RESET LAN (SERVICE ONLY) RJP INTERFACE COMPONENT IN VIDEO AUDIO R (S HDMI/DVI IN 2 1(DVI) LR DVI-DTV OUTPUT L R TV-LINK CFG CO 1 2 GG A DVI to HDMI cable or adapter is required for this connection. DVI doesn't support audio, so a separate audio connection is necessary. NOTE ! Connect the DVI output of the digital set-top box to the HDMI/DVI IN 1 (DVI) jack on the TV. Connect the audio output of the digital set-top box to the AUDIO (RGB/DVI) jack on the TV. 1. How to connect 2. How to use ■ Turn on the digital set-top box. ( Refer to the owner’s man- ual for the digital set-top box. ) ■ Select the HDMI1 input source on the TV using the INPUT button on the remote control. 2 1 EXTERNAL EQUIPMENT SETUP 37 DVD SETUP Component Connection Component Input ports To get better picture quality, connect a DVD player to the component input ports as shown below. Component ports on the TV YPBPR Video output ports on DVD player Y Y Y Y P B B-Y Cb Pb P R R-Y Cr Pr Connect the video outputs ( Y, PB, PR ) of the DVD to the COMPONENT IN VIDEO jacks on the TV. Match the jack colors ( Y = green, PB = blue, and PR = red ) . Connect …
Text truncated - open the document above for the full version.
Users Manual
PICTURE CONTROL 65 AV1, AV2, HDMI1, HDMI2 TV TV, AV1or AV2, HDMI1, HDMI2 AV1or AV2 Main Picture Source Available Sub Picture Sources HDMI1or HDMI2 Component, RGB-PC TV, AV1, AV2, HDMI1or HDMI2 TV, AV1, AV2, HDMI1, HDMI2 PICTURE CONTROL 66 PICTURE CONTROL PICTURE SIZE (ASPECT RATIO) CONTROL This feature lets you choose the way an analog picture with a 4:3 aspect ratio is displayed on your TV. ■ RGB-PC input source can only use 4:3 or 16:9 aspect ratio. Press the RATIO button repeatedly to select the picture options : Set By Program, 4:3, 16:9, Zoom, Just Scan . 1 RATIO 2 RETURN Return to TV viewing. 16:9 ■ You can also adjust Aspect Ratio in the PICTURE menu. PICTURE CONTROL 67 Set by program Selects the proper picture proportion to match the source’s image. 4:3 Choose 4:3 when you want to view a picture with an original 4:3 aspect ratio. 16:9 Adjust the picture horizontally, in a linear pro- portion to fill the entire screen. (4:34:3) (16:916:9) Set By Program Set By Program PICTURE CONTROL 68 PICTURE CONTROL Zoom Choose Zoom when you want to view the picture without any alteration. However, the top and bottom portions of the picture will be cropped. Just Scan Normally the edges of video signals are cropped 1-2%. Just Scan turns off this cropping and shows the complete video. Notes: If there is noise on the edges of the original signal, it will be visible when Just Scan is activated. Just Scan operates only with DTV/CADTV/HDMI-DTV/DVI-DTV (720p/1080i), Component(720p/1080i) input sources. PICTURE CONTROL 69 Enter Move PICTURE E Aspect Ratio : 16:9 Picture Mode : Standard • Backlight70 • Contrast90 • Brightness50 • Sharpness70 • Color60 • Tint0 PRESET PICTURE SETTINGS (PICTURE MODE) There are factory presets for picture settings available in the user menus. You can use a preset, change each setting manually, , or use the Intelligent Sensor. Select PICTURE . Select Intelligent Sensor , Vivid , Standard , Natural , Cinema , Sport or Game . 1 MENU 3 ENTER Select Picture Mode . 2 ENTER 4 RETURN Return to the previous menu. Enter Move PICTURE E Aspect Ratio : 16:9 Picture Mode : Standard • Backlight70 • Contrast90 • Brightness50 • Sharpness70 • Color60 • Tint0 ■ When selecting Intelligent Sensor is changed to Auto automatically. ■ When selecting Intelligent Sensor , it is changed contrast, brightness, sharp- ness, color and tint automatically. ■ Vivid , Standard , Natural , Cinema , Sport , and Game Settings are preset for the optimum picture quality at the factory. ■ Intelligent Sensor : The most suitable picture is automatically adjusted accord- ing to the surrounding conditions. ■ Vivid : This is the mode to maximize the effect of the video in the retail store. Strengthen the contrast, brightness, color and sharpness for vivid picture. ■ Standard : This is the mode to realize optimum viewing condition for the gen- eral user. ■ Natural : This is the mode to display the most natural screen status. ■ Cinema : This mode optimizes video for watching movies. ■ Sport : This is the video mode to emphasize dynamic video and primary color (e.g, white, uniform, grass, sky blue etc.) by realizing the optimal screen for sports. ■ Game : This is the mode to realize fast response speed in a fast gaming screen. RG RG Intelligent Sensor Vivid Standard Natural Cinema Sport Game Home or MENU Return to TV viewing. Home or PICTURE CONTROL 70 PICTURE CONTROL MANUAL PICTURE ADJUSTMENT - USER MODE Adjust the picture appearance to suit your preference and viewing situations. This feature is disable in “ Picture Mode-Intelligent Sensor ”. Make appropriate adjustments. Select Backlight, Contrast, Brightness, Sharpness, Color, or Tint. Select Picture Mode . 2 ENTER Select Vivid , Standard , Natural , Cinema , Sport or Game . 3 ENTER 4 ENTER 5 ENTER 6 RETURN Return to the previous menu. • Back Light70 E E E E Enter Enter Move PICTURE E Aspect Ratio : 16:9 Picture Mode : Standard • Backlight70 • Contrast90 • Brightness50 • Sharpness70 • Color60 • Tint0 ■ Backlight : This function adjusts the brightness of LCD panel, to control the brightness of the screen. Adjusting the backlight is recommended when setting the brightness of the set. When decreas- ing the backlight, the brightness of the black becomes darker without any loss in video signal and the power consumption is reduced. ■ Contrast : Increase or decrease the gra- dient of the video signal. You may use Contrast when the bright part of picture is saturated. ■ Brightness : Adjusts the base level of the signal in the picture. You may use Brightness when the dark part of the pic- ture is saturated. ■ Sharpness : Adjusts the level of crisp- ness in the edges between the light and dark areas of the picture. The lower the level, the softer the image. ■ Color : Adjusts intensity of all colors. ■ Tint : Adjusts the balance between red and green levels. RG MENU Return to TV viewing. Home or Select PICTURE . 1 MENU Home or PICTURE CONTROL 71 PICTURE IMPROVEMENT TECHNOLOGY You can calibrate the screen for each Picture Mode or set the video value according to the special video screen. You can set the video seeing differently for each input. To reset to the factory default after making adjustments to each input source, execute the Picture Reset function for each Picture Mode. Select Advanced Control . Select your desired options. 3 2 ENTER ENTER 5 RETURN Return to the previous menu. Make appropriate adjustments. 4 Enter Move PICTURE E Enter Move PICTURE E Picture Mode : Standard • Backlight70 • Contrast90 • Brightness50 • Sharpness70 • Color60 • Tint0 • Advanced Control RG Color Temperature Medium Dynamic Contrast F Medium G Dynamic Color Low Noise Reduction Medium Gamma Medium Black Level Low Eye Care Off Close Real Cinema Off E RG Picture Mode : Standard • Backlight70 • Contrast90 • Brightness50 • Sharpness70 • Color60 • Tint0 • Advanced Control MENU Return to TV viewing. Home or Select PICTURE . 1 MENU Home or PICTURE CONTROL 72 PICTURE CONTROL ■ Set to warm to enhance hotte…
Text truncated - open the document above for the full version.
Users Manual
SOUND & LANGUAGE CONTROL 79 CLEAR VOICE II By differentiating the human sound range from others, it improves the sound quality of voices. Enter Move AUDIO E LR Enter Move AUDIO E LR Auto Volume: Off Clear Voice II: On • Level3 Balance0 Sound Mode: Standard • SRS TruSurround XT:Off • Treble50 • Bass50 Auto Volume: Off Clear Voice II: On • Level3 Balance0 Sound Mode: Standard • SRS TruSurround XT:Off • Treble50 • Bass50 -+-+ Off On Select Clear Voice II . Select On or Off . 3 2 ENTER ENTER 6 RETURN Return to the previous menu. Select Level . 4 ENTER Make appropriate adjustments. 5 ENTER Adjustment for Clear Voice ll Level With selecting On Select AUDIO . 1 MENU Home or MENU Return to TV viewing. Home or SOUND & LANGUAGE CONTROL 80 SOUND &LANGUAGE CONTROL BALANCE Select Balance . Make appropriate adjustments. 3 2 ENTER ENTER Adjust the left/right sound of speaker to suit your taste and room situations. 4 RETURN Return to the previous menu. Enter Move AUDIO Enter Move AUDIO LR E Auto Volume: Off Clear Voice II: Off • Level3 Balance0 Sound Mode: Standard • SRS TruSurround XT:Off • Treble50 • Bass50 LR E Auto Volume: Off Clear Voice II: Off • Level3 Balance0 Sound Mode: Standard • SRS TruSurround XT:Off • Treble50 • Bass50 Close E E Balance 0 LR -+ -+ Select AUDIO . 1 MENU Home or MENU Return to TV viewing. Home or SOUND & LANGUAGE CONTROL 81 TV SPEAKERS ON/OFF SETUP If you wish to use an external Hi-Fi system or a SRS System, turn off the TV’s internal speakers. In AV , Component , RGB and HDMI with HDMI to DVI cable, the TV speaker can be operational even when there is no video signal. Turn the TV speakers off if using external audio equipment. Select TV Speaker . Select On or Off . 3 2 ENTER ENTER Enter Move AUDIO E • Level3 Balance0 Sound Mode: Standard • SRS TruSurround XT:Off • Treble50 • Bass50 • Reset TV Speaker: On LR Enter Move AUDIO E • Level3 Balance0 Sound Mode: Standard • SRS TruSurround XT:Off • Treble50 • Bass50 • Reset TV Speaker: On LR Off On -+-+ Select AUDIO . 1 MENU Home or 4 RETURN Return to the previous menu. MENU Return to TV viewing. Home or SOUND & LANGUAGE CONTROL 82 SOUND &LANGUAGE CONTROL E AUDIO RESET Settings of the selected Sound Mode return to the default factory settings. Select Reset . 2 ENTER Initialize the adjusted value. 3 ENTER 4 Enter Move AUDIO E • Level3 Balance0 Sound Mode: Standard • SRS TruSurround XT:Off • Treble50 • Bass50 • Reset LR Enter Move AUDIO E • Level3 Balance0 Sound Mode: Standard • SRS TruSurround XT:Off • Treble50 • Bass50 • Reset LR Resetting audio configuration... i -+ -+ E Select AUDIO . 1 MENU Home or MENU Return to TV viewing. Home or SOUND & LANGUAGE CONTROL 83 Each time you press the SAP button, Mono , Stereo , or SAP appear in turn. Return to TV viewing. 1 SAP 2 STEREO/SAP BROADCAST SETUP For Analog only: This TV can receive MTS stereo programs and any SAP (Secondary Audio Program) that accom- panies the stereo program if the station transmits an additional sound signal. Mono sound is automatically used if the broadcast is only in Mono. If other languages are available on the digital signal,select them with the SAP button. RETURN MONOSAPSTEREO SOUND & LANGUAGE CONTROL 84 SOUND &LANGUAGE CONTROL AUDIO LANGUAGE Other languages may be available if a digital signal is provided by the broadcasting station. This feature operates only in DTV mode. Enter Move OPTION Enter Move OPTION Menu Language: English Audio Language: English Caption: Off Set ID: 1 Demo Mode: Off Data Broadcasting Zone Menu Language: English Audio Language: English Caption: Off Set ID: 1 Demo Mode: Off Data Broadcasting Zone English Spanish French Select OPTION . Select Audio Language . Select your desired language. 1 MENU 3 2 ENTER ENTER 4 RETURN Return to the previous menu. Home or MENU Return to TV viewing. Home or NOTE ! G Data Broadcasting: For 32/37/42LG710H, 32/37/42/47/55LD650H, 32/37/42LD655H G Zone: For 32/37/42LD660H, 32/37/42LD665H, 32/37/42/47/55LV555H SOUND & LANGUAGE CONTROL 85 ON-SCREEN MENUS LANGUAGE SELECTION The menus can be shown on the screen in the selected language. Enter Move OPTION Enter Move OPTION Menu Language: English Audio Language: English Caption: Off Set ID: 1 Demo Mode: Off Data Broadcasting Zone Menu Language: English Audio Language: English Caption: Off Set ID: 1 Demo Mode: Off Data Broadcasting Zone English Español Français Select Menu Language . Select your desired language. From this point on, the on-screen menus will be shown in the selected language. 3 2 ENTER ENTER 4 RETURN Return to the previous menu. Select OPTION . 1 MENU Home or MENU Return to TV viewing. Home or NOTE ! G Data Broadcasting: For 32/37/42LG710H, 32/37/42/47/55LD650H, 32/37/42LD655H G Zone: For 32/37/42LD660H, 32/37/42LD665H, 32/37/42/47/55LV555H SOUND & LANGUAGE CONTROL 86 SOUND &LANGUAGE CONTROL CAPTION MODE Captions are provided to help the hearing impaired watch TV. Select a caption mode for displaying captioning information if provided on a program. Analog caption displays information at any position on the screen and is usually the program's dialog. Caption/Text, if provided by the broadcaster, would be available for both digital and analog channels on the Antenna/Cable. This TV is programmed to memorize the caption/text mode which was last set when you turned the power off. This function is only available when Caption Mode is set On . Select Caption . Select On . 3 2 ENTER ENTER Select CC1 - 4 or Text1 - 4 . 4 Analog Broadcasting System Captions ■ When selecting Off , Sub-menus for Analog, DTV, and Digital Option become disabled. ■ CAPTION The term for the words that scroll across the bottom of the TV screen; usually the audio portion of the pro- gram provided for the hearing impaired. ■ TEXT The term for the words that appear in a large black frame and almost cover the entire screen; usually messages provid- ed by the broadcaster. 5 RETURN Return to the previous menu. Enter Move OPTION Enter Move OPTION Menu Language: English Audio Language: Englis…
Text truncated - open the document above for the full version.
Users Manual
TIME SETTING 90 TIME SETTING Manual Clock Setup If the current time setting is wrong, reset the clock manually. Enter Move TIME Enter Move TIME Clock Off Time: Off On Time: Off Sleep Timer: Off Auto Off: On Clock Off Time: Off On Time: Off Sleep Timer: Off Auto Off: On Select Clock . Select Manual . 3 2 ENTER ENTER Select the Year, Month, Date, Hour, or Minutes option. 4 Set the Year, Month, Date, Hour, or Minutes option. 5 6 RETURN Return to the previous menu. Month Date 21 Year 2009 Hour 10 AM 02 Minute 10 Time Zone Eastern Daylight Saving Auto Close F Manual G Select TIME . 1 MENU Home or MENU Return to TV viewing. Home or TIME SETTING 91 AUTO ON/OFF TIME SETTING This function operates only if the current time has been set. The Off Time function overrides the On Time function if they are both set to the same time. The TV must be in standby mode for the On Time to work. Enter Move TIME Enter Move TIME Clock Off Time: Off On Time: Off Sleep Timer: Off Auto Off: On Clock Off Time: Off On Time: 6:30 AM (Once) Sleep Timer : Off Auto Off: On Select Off Time or On Time . Select Repeat . 3 2 ENTER ENTER Select Off , Once , Daily , Mon. ~ Fri. , Mon. ~ Sat. , Sat. ~ Sun. , or Sun. . 4 Select and set Hour or Minute . 5 6 RETURN Return to the previous menu. Repeat F Once G Hour 6 AM Minute 30 Close Feb. 21, 2009 10:10 AM Select TIME . 1 MENU Home or MENU Return to TV viewing. Home or TIME SETTING 92 TIME SETTING SLEEP TIMER SETTING The Sleep Timer turns the TV off at the preset time. Note that this setting is cleared when the TV is turned off. ■ To cancel the Sleep Timer , select Off . ■ Press the SLEEP button repeatedly to select the number of minutes. Enter Move TIME Enter Move TIME Clock Off Time: Off On Time: Off Sleep Timer: Off Auto Off: On Clock Off Time: Off On Time: Off Sleep Timer: Off Auto Off: On Select Sleep Timer . Make appropriate adjustments. 3 2 ENTER ENTER 4 RETURN Return to the previous menu. Off 10 min. 20 min. 30 min. 60 min. 90 min. 120 min. 180 min. 240 min. AUTO SHUT-OFF SETTING If set to on and there is no input signal, the TV turns off automatically after 15 minutes. Enter Move TIME Enter Move TIME Clock Off Time: Off On Time: Off Sleep Timer: Off Auto Off: On Clock Off Time: Off On Time: Off Sleep Timer: Off Auto Off: On Select Auto Off . Select On or Off . 3 2 ENTER ENTER 4 RETURN Return to the previous menu. Off On Select TIME . 1 MENU Home or Select TIME . 1 MENU Home or MENU Return to TV viewing. Home or MENU Return to TV viewing. Home or PARENTAL CONTROL / RATINGS PARENTAL CONTROL / RATING 93 Parental Control can be used to block specific channels, ratings and other viewing sources. The Parental Control Function (V-Chip) is used to block program viewing based on the ratings sent by the broad- casting station. The default setting is to allow all programs to be viewed. Viewing can be blocked by choosing the type of the program and the categories. It is also possible to block all program viewing for a time period. To use this function, the following must be done : 1. Set ratings and categories to be blocked. 2. Specify a password 3. Enable the lock V-Chip rating and categories Rating guidelines are provided by broadcasting stations. Most television programs and television movies can be blocked by TV Rating and/or Individual Categories. Movies that have been shown at the theaters or direct-to- video movies use the Movie Rating System ( MPAA ) only. Ratings for Television programs including made-for-TV movies : ■ TV-G ( General audience ) ■ TV-PG ( Parental guidance suggested ) ■ TV-14 ( Parents strongly cautioned ) ■ TV-MA ( Mature audience only ) ■ TV-Y ( All children ) ■ TV-Y7 ( Children 7 years older ) SET PASSWORD & LOCK SYSTEM Set up blocking schemes to block specific channels, ratings, and external viewing sources. A password is required to gain access to this menu. Setting up Your Password Close Enter Password **** Select LOCK . 1 MENU ENTER Input the password. 2 123 456 78 0 9 ABC DEF GHI WXYZ TUV PQRS MNO JKL &@ .:/, ■ When you select On , the Lock System is enable. ■ The TV is set up with the initial pass- word “0-0-0-0”. Enter Move LOCK Lock System : On Set Password Block Channel Movie Rating TV Rating-Children TV Rating-General Downloadable Rating Input Block ENTER Home or PARENTAL CONTROL / RATING 94 PARENTAL CONTROL /RATINGS Enables or disables the blocking scheme you set up previously. Lock System Enter Move LOCK Lock System : Off Set Password Block Channel Movie Rating TV Rating-Children TV Rating-General Downloadable Rating Input Block Select Lock System . Select On or Off . 3 2 ENTER Enter Move LOCK Lock System : On Set Password Block Channel Movie Rating TV Rating-Children TV Rating-General Downloadable Rating Input Block Off On ■ When you select On , the Lock System is enable. 4 RETURN Return to the previous menu. Select LOCK . 1 MENU ENTER ENTER Home or MENU Return to TV viewing. Home or PARENTAL CONTROL / RATING 95 Set up blocking schemes to block specific channels, ratings, and external viewing sources. A password is required to gain access to this menu. Set Password Enter Move LOCK Lock System : Off Set Password Block Channel Movie Rating TV Rating-Children TV Rating-General Downloadable Rating Input Block Select Set Password . Choose any 4 digits for your new password. As soon as the 4 digits are entered, re-enter the same 4 digits on the Confirm . 4 3 ENTER 123 456 78 0 9 ABC DEF GHI WXYZ TUV PQRS MNO JKL &@ .:/, Enter Move LOCK Lock System : Off Set Password Block Channel Movie Rating TV Rating-Children TV Rating-General Downloadable Rating Input Block Close New **** Confirm **** Input the password. 2 123 456 78 0 9 ABC DEF GHI WXYZ TUV PQRS MNO JKL &@ .:/, 5 RETURN Return to the previous menu. Select LOCK . 1 MENU ENTER ENTER Home or MENU Return to TV viewing. Home or PARENTAL CONTROL / RATING 96 PARENTAL CONTROL /RATINGS CHANNEL BLOCKING Enter Move LOCK Lock System : Off Set Password Block Channel Movie Rating TV Rating-Children TV Rating-…
Text truncated - open the document above for the full version.
Contact Information
Applicant
David Kim(Team leader, LGEUS NA Policy & Regulatory Affairs)
Test Firm
ESTECH Co., Ltd.Yang Jinmo
Technical Specifications
| # | Rule Parts | Frequency Range | Power Output |
|---|---|---|---|
| 1 | 15B | - | - |
Other Applications from LG Electronics USA, Inc.
BEJTFHOBINI1F1
Jan 08, 2025Telematics
Equipment Class
DTS - Digital Transmission SystemBEJNT-16Z90TS
Oct 02, 2024Notebook Computer
Equipment Class
DSS - Part 15 Spread Spectrum TransmitterBEJSP-PEW8
Sep 26, 2024Stylus Pen
Equipment Class
DCD - Part 15 Low Power Transmitter Below 1705 kHzBEJ-RSMV2
Sep 24, 2024RF Module
Equipment Class
FDS - Part 15 Field Disturbance SensorBEJTFBMEIBN3EU
Sep 24, 2024Telematics
Equipment Class
NII - Unlicensed National Information Infrastructure TX