DI2RCBBasic On/Off Remote Control (Transmitter)
Computime Limited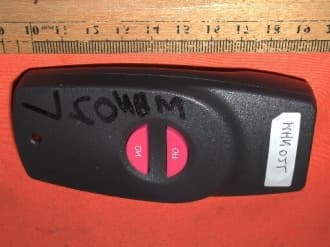
Click to zoom
Application Details
- Equipment Class
- DSC - Part 15 Security/Remote Control Transmitter
- Date of Grant
- Aug 08, 2002
- Application Purpose
- Original Equipment
- Date of Application
- Aug 08, 2002
- Equipment Note
- Basic On/Off Remote Control (Transmitter)
- Frequency Range
- 350.00000000 - 350.00000000
- Company
- Computime Limited
- Country
- Hong Kong
Documents & Files
Document Text
Text extracted from the exhibit documents filed with the FCC. Open a document above to read the original.
Users Manual
RCB Basic On/Off Remote Control INSTALLATION AND OPERATING INSTRUCTIONS This basic on/off remote control system provides a safe, reliable, and user-friendly remote control for millivolt valve gas appliances. The system can be manually turned on and off with the transmit- ter. Always check with the home owner’s manual of the appliance for additional information, warnings regarding accessory installa- tion before connecting this remote control system. Carefully inspect the contents for shipping damage. If any parts are missing or damaged, immediately contact the dealer from whom you purchased the kit. Do not attempt to install any part of the kit unless all parts are in good condition. Please keep this manual for future reference. CONTENTS OF KIT DescriptionQty Transmitter1 Battery Alkaline AAA ( for Transmitter)3 Receiver (Assembly) consists of :1 Receiver Box Slide Button-Black (On/RS/Off) Battery Alkaline AA (for Receiver)4 Wall Cover Plate-Black1 Wall Cover Plate-White1 Slide Button-White (On/RS/Off)1 Screws (for Wall Cover Plate)2 Plug-In Wiring Assembly – 18" Inches1 Installation Instructions1 Velcro (Loop and Hook)1 Screws (for fireplace system control covers) 2 FEATURES/SPECIFICATIONS • Battery Powered Transmitter and Receiver • Easy Access Front Battery Door • Pre-Programmed for Quick Installation • 16 Security Codes • Quick Disconnect Wiring Assembly WARNING Important Safety Information • Read this manual thoroughly prior to installing, programming or operating any remote control. • This remote control system is designed for use with a milli volt gas valve system. Do not use this remote control system on applications with voltages above 30 Volts AC. • This remote control system requires three (3) "AAA" and four (4) "AA" alkaline batteries to power the transmitter and receiver. Wiring must conform to appliance requirement and building codes/ordinances as required by local and national code authorities having jurisdiction. • Do not short (or jumper) across the gas valve terminals to test the remote control installation. This could damage the unit and void the warranty. • This remote control system should only be used as described in this manual. Any other use is not recommended and will void the warranty. Turn appliance OFF and allow to cool before installing or servicing. DO NOT connect 110-120 VAC wiring to the milli-volt gas control valve. The remote operator must be installed exactly as outlined in these instructions. Read all instructions completely before attempting installation. Follow instructions carefully during installation. Any modification of components will void the warranty and may cause a fire hazard. INSTALLATIONS Remote Receiver: The remote receiver may be wall mounted or installed in the appliance per the appliance homeowner’s manual. Refer to the Homeowner’s Manual for special installation instructions. If wall mounted, the remote receiver must be installed in a junction box with cover plate provided. Failure to follow the installation instructions found in the appropriate Homeowner’s Manual will void the warranty and may cause a fire hazard. Installing Batteries: The remote receiver uses four (4) "AA"- size batteries. To install batteries, 1. Open the battery door by pressing the two tabs located on the door. 2. Install the batteries as indicated in the receiver cover. 3. Close the battery door until the door tab snaps in place. 4. To install the receiver into a wall junction box, install the receiver with the screws provided . 5. Gently, install the slide switch back to the receiver stem. 6. The batteries should be replaced at least once every 6 months or when the battery indicator flashes. Installing Wire: This system comes with an 18 inch pre-assembled wire assembly. Insert the white terminal to the back of the receiver. The terminal wire block can only be installed one way. Do not force the termi- nal plug onto the receiver. Follow the homeowner’s manual for connecting the two (2) 1/4" female spade terminals to the millivolt valve. For applications longer than 18 inches, use 18 gauge wire, 105ºC rated, with no splices. Connect to the two (2) 1/4" female spade wiring terminals. Wire can be no longer than 20 feet. Make sure that the wires do not contact the appliances any place other than at the terminals. Exposure to temperatures higher than 105C (250ºF) may cause the receiver to malfunction or fire hazard. Remote Transmitter: Installing Batteries: The remote transmitter uses three (3) "AAA"- size batteries. To install batteries, 1. Press down the battery door tab and lift up and remove the battery door. 2. Install the batteries as indicated on the receiver cover. 3. Close the battery door by snap- ping in place. 4. The batteries should be replaced at least once every 6 months or when the battery indicator flashes. Setting Privacy (DIP) Switch on Receiver and Transmitter: The remote receiver and transmitter privacy (DIP) switches are preset at the factory. The receiver and transmitter privacy (DIP) switches are preset at the factory. In the event of activation or interference from other nearby transmissions, reset the code using the following procedure: 1. Slide the code switches on the transmitter or receiver to your choice of ON or OFF position. Switches #1, #3 and #4 are pre- set to "ON", and #2 is preset to "OFF" for both the transmitter and receiver. 2. The switches on the transmitter and receiver must match in order for the system to work. 3. The system is now ready to operate. Do not use two (2) or more remote control systems in the same area with the same dip switch settings, as they will communicate with each other. This may cause the appliances to malfunction. WARNING Battery Door WARNING WARNING Back of the Transmitter Battery Door Tab Dip Switch (Default) Receiver Transmitter OPERATIONS: Transmitter: General: The RCB is an On/Off remote control. The transmitter will operate the remote receiver from 1foot to a maximum of 30 feet. The operational r…
Text truncated - open the document above for the full version.
Block Diagram
3XAA BATTERY LOW BATTERY CIRCUIT LED display ENCODER (HT12E) RF control signal (RF transistor,SAW350MH z) key input 350MHz sine wave oscillation CIRCUIT DIP switch (4)
External Photos
Test SetupFCCID : DI2RCB External Photo -front External Photo - rear
ID Label/Location Info
FCC ID : DI2RCB IC : 1700A-RCB This device complies with Part 15 of the FCC Rules. Operation is subject to the following two conditions: 1) This device may not cause harmful interference, and 2) This device must accept any interference received, including interference that may cause undersired operation. Model : RCB MADE IN CHINA
Internal Photos
Test SetupFCCID : DI2RCB Internal Photo - 1 Internal Photo - 2 Test SetupFCCID : DI2RCB Internal Photo – 3 Internal Photo - 4
Operational Description
Critical Component of MHN02L(TX) ComponentPart Number Description ENCODER HT12E U1 Encode the RF signal , drive LED CD40106BC U2Low battery detect, Generate about 1.5Hz wave for low battery LED display LED LED1 Light on when transmit signal, flash when low battery Rubber keyOn/offInput command DIP switch (4) DIP1 Generate different address code RF transistor MMBTH10Q1Generate oscillation of RF frequency 350MHz and as modulator SAW RESONATOR 350MHz SAW1Generate oscillation of RF frequency 350MHz
Test Report
• The test results reported in this test report shall refer only to the sample actually tested and shall not refer or be deemed to refer to bulk from which such a sample may be said to have been obtained. • This report shall not be reproduced except in full without prior authorization from Intertek Testing Services Hong Kong Limited. • For Terms And Conditions of the services, it can be provided upon request. • The evaluation data of the report will be kept for 3 years from the date of issuance. Intertek Testing Services Hong Kong Ltd. 2/F., Garment Centre, 576 Castle Peak Road, Kowloon, Hong Kong. Tel: (852) 2173 8888 Fax: (852) 2785 5487 Computime Limited Application For Certification (FCC ID: DI2RCB) Transmitter WO# 0210026 DL/Sandy August 3, 2002 INTERTEK TESTING SERVICES FCC ID: DI2RCB i LIST OF EXHIBITS INTRODUCTION EXHIBIT 1:General Description EXHIBIT 2:System Test Configuration EXHIBIT 3:Emission Results EXHIBIT 4:Equipment Photographs EXHIBIT 5:Product Labelling EXHIBIT 6:Technical Specifications EXHIBIT 7:Instruction Manual EXHIBIT 8:Miscellaneous Information INTERTEK TESTING SERVICES FCC ID: DI2RCB ii MEASUREMENT/TECHNICAL REPORT Computime Limited - MODEL: Ambient RCB FCC ID: DI2RCB August 3, 2002 This report concerns (check one:)Original Grant X Class II Change Equipment Type: Low Power Transmitter (example: computer, printer, modem, etc.) Deferred grant requested per 47 CFR 0.457(d)(1)(ii)?Yes No X If yes, defer until: date Company Name agrees to notify the Commission by: date of the intended date of announcement of the product so that the grant can be issued on that date. Transition Rules Request per 15.37?Yes No X If no, assumed Part 15, Subpart C for intentional radiator - the new 47 CFR [12-18-01 Edition] provision. Report prepared by:Derek Leung Intertek Testing Services 2/F., Garment Center, 576, Castle Peak Road, HONG KONG. Phone:852-2173-8504 Fax:852-2371-0521 INTERTEK TESTING SERVICES FCC ID: DI2RCB iii Table of Contents 1.0 General Description..................................................................................................................2 1.1 Product Description..............................................................................................................2 1.2 Related Submittal(s) Grants....................................................................................................2 1.3 Test Methodology.................................................................................................................3 1.4 Test Facility.........................................................................................................................3 2.0 System Test Configuration..........................................................................................................5 2.1 Justification..........................................................................................................................5 2.2 EUT Exercising Software.......................................................................................................5 2.3 Special Accessories...............................................................................................................5 2.4 Equipment Modification.........................................................................................................6 2.5 Measurement Uncertainty......................................................................................................6 2.6 Support Equipment List and Description..................................................................................6 3.0 Emission Results.......................................................................................................................8 3.1 Field Strength Calculation.......................................................................................................9 3.2 Radiated Emission Configuration Photograph..........................................................................11 3.3 Radiated Emission Data........................................................................................................12 4.0 Equipment Photographs............................................................................................................15 5.0 Product Labelling....................................................................................................................17 6.0 Technical Specifications...........................................................................................................19 7.0 Instruction Manual..................................................................................................................21 8.0 Miscellaneous Information........................................................................................................23 8.1 Measured Bandwidth...........................................................................................................24 8.2 Discussion of Pulse Desensitization.......................................................................................25 8.3 Calculation of Average Factor...............................................................................................26 8.4 Emissions Test Procedures..................................................................................................27 INTERTEK TESTING SERVICES FCC ID: DI2RCB iv List of attached file Exhibit typeFile Descriptionfilename Test ReportTest Reportreport.pdf Operation DescriptionTechnical Descriptiondescri.pdf Test Setup PhotoRadiated Emissionradiated photos.doc Test ReportBandwidth Plotbw.pdf External PhotoExternal Photoexternal photos.doc Internal PhotoInternal Photointernal photos.doc Block DiagramBlock Diagramblock.pdf SchematicsCircuit Diagramcircuit.pdf ID Label/LocationLabel Artwork and Locationlabel.pdf User ManualUser Manualmanual.pdf Timing DiagramTiming Diagramtiming.pdf INTERTEK TESTING SERVICES FCC ID: DI2RCB 1 EXHIBIT 1 GENERAL DESCRIPTION INTERTEK TESTING SER…
Text truncated - open the document above for the full version.
Test Setup Photos
Test SetupFCCID : DI2RCB Radiated -front Radiated - rear
Contact Information
Applicant
Philip Chung(Reliability Manager)
Technical Contact
Intertek Testing Services Hong Kong Ltd.Derek Leung
[email protected]852 2173 8504
2/F, Garment Centre · Kowloon · Hong Kong
Non-Technical Contact
Intertek Testing Services Hong Kong Ltd.Derek Leung
[email protected]852 2173 8504
Test Firm
Intertek Testing Services Hong KongBilly Chow
Technical Specifications
| # | Rule Parts | Frequency Range | Power Output |
|---|---|---|---|
| 1 | 15.231 | 350 MHz - 350 MHz | - |
Other Applications from Computime Limited

DI2RCSTA-TX
Dec 04, 2014Transmitter
Equipment Class
DSC - Part 15 Security/Remote Control Transmitter
DI2RCST-RX
Dec 04, 2014Receiver
Equipment Class
CYY - Communications Receiver used w/Pt 15 Transmitter
DI2AAHZT3A
May 29, 2013Wireless Thermostat Controller
Equipment Class
DXX - Part 15 Low Power Communication Device Transmitter
DI2AAHZT21
May 27, 2013Wireless Thermostat
Equipment Class
DXX - Part 15 Low Power Communication Device Transmitter
DI2-TDL6192
Oct 07, 2012US SMART PLUG
Equipment Class
DTS - Digital Transmission System