LDKRTBIZ0352Cisco Unified IP Endpoint 9951 with BT Module
Cisco Systems Inc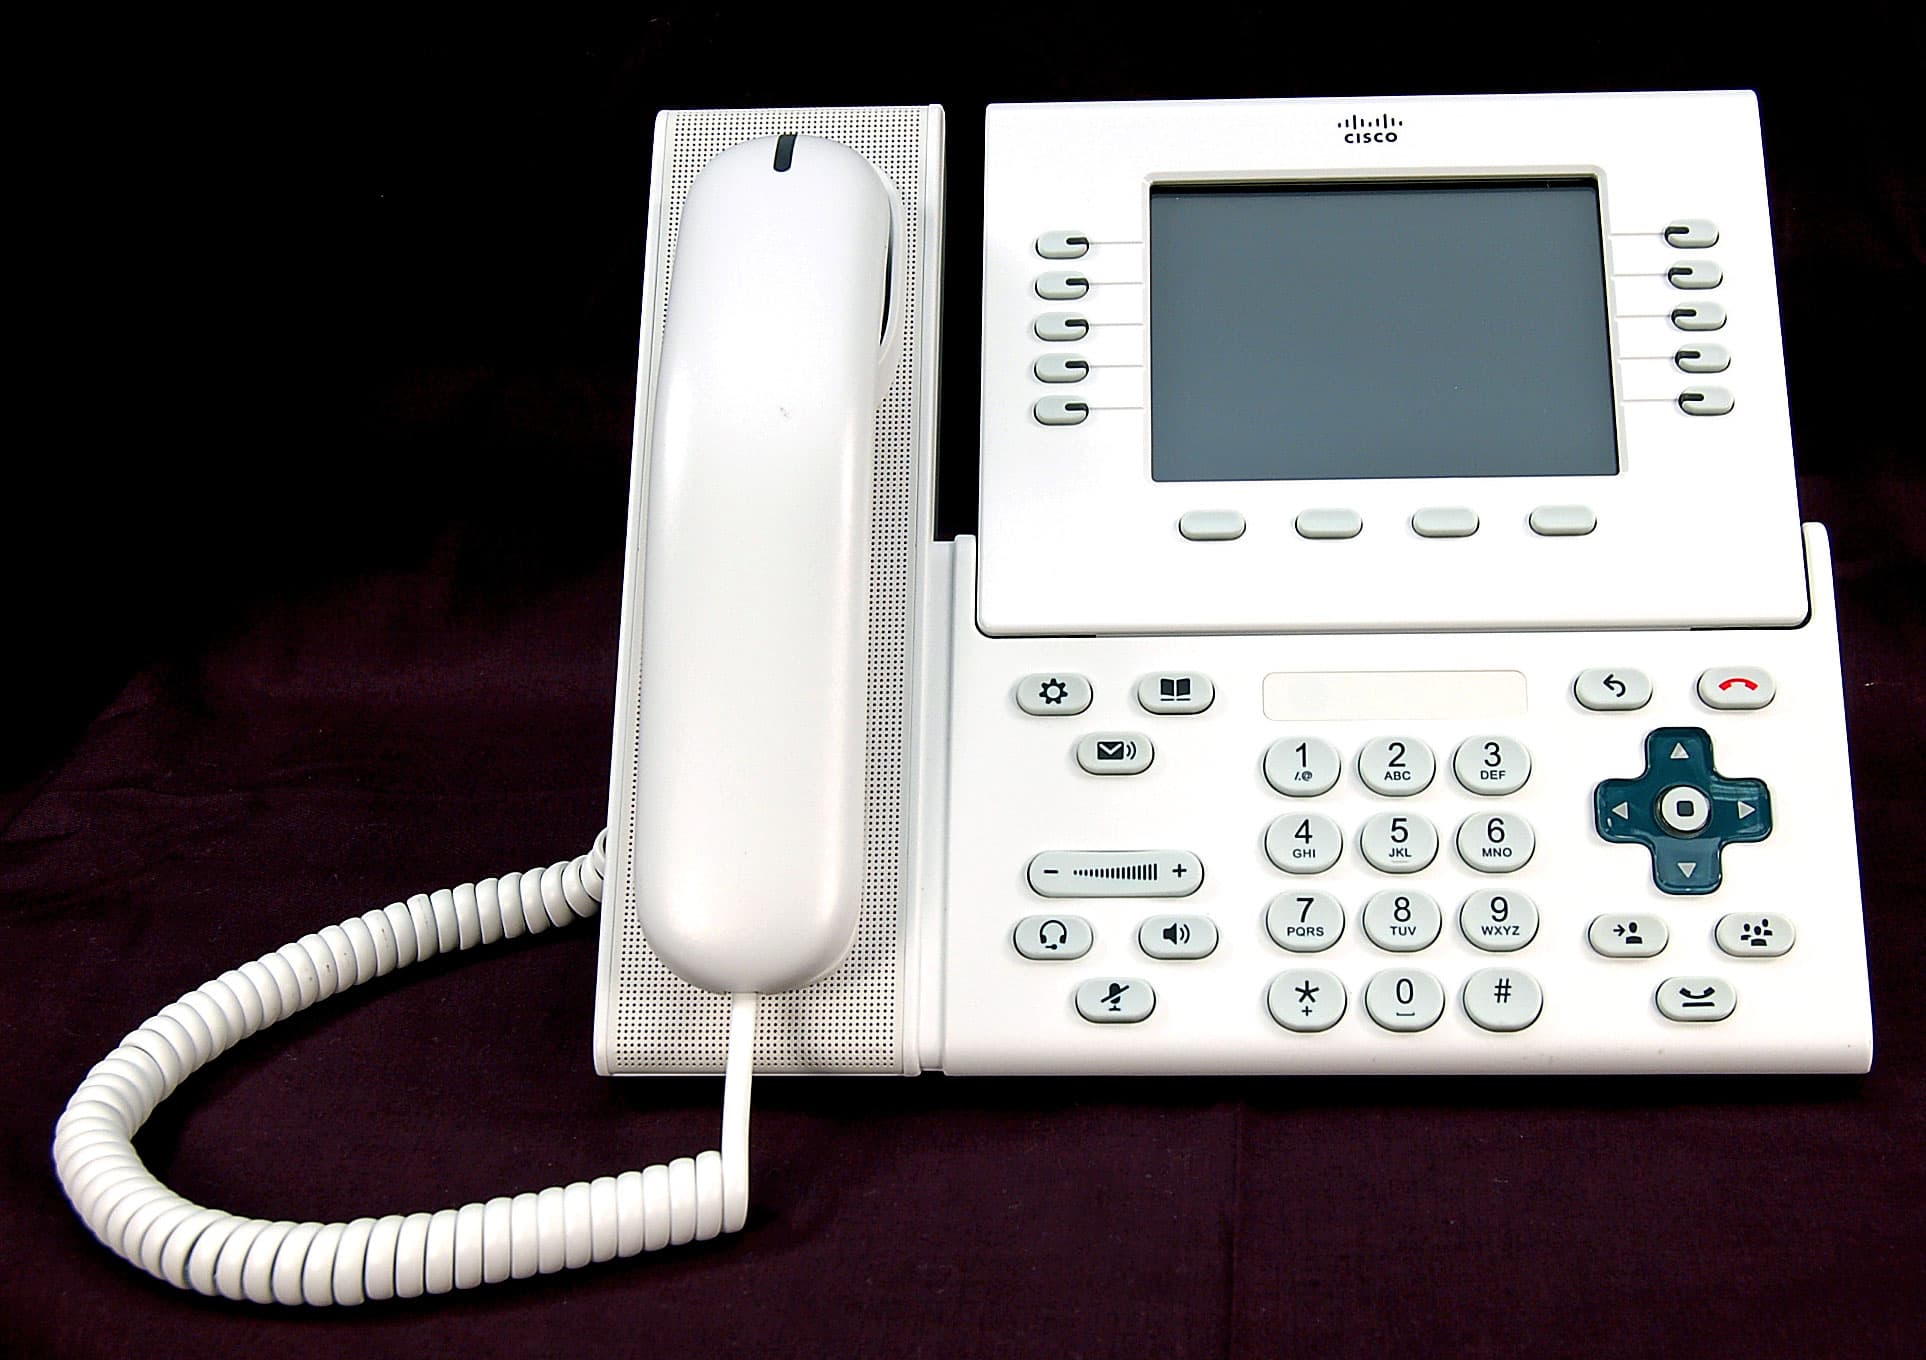
Click to zoom
Application Details
- Equipment Class
- DSS - Part 15 Spread Spectrum Transmitter
- Date of Grant
- Jan 05, 2010
- Application Purpose
- Original Equipment
- Date of Application
- Jan 04, 2010
- Equipment Note
- Cisco Unified IP Endpoint 9951 with BT Module
- Frequency Range
- 2402.00000000 - 2480.00000000
- Company
- Cisco Systems Inc
- Country
- United States
Documents & Files
Document Text
Text extracted from the exhibit documents filed with the FCC. Open a document above to read the original.
Users Manual
Americas Headquarters Cisco Systems, Inc. 170 West Tasman Drive San Jose, CA 95134-1706 USA http://www.cisco.com Tel: 408 526-4000 800 553-NETS (6387) Fax: 408 527-0883 Cisco Unified IP Phone 8961, 9951, and 9971 User Guide for Cisco Unified Communications Manager 7.1(3) (SIP) Cisco, Cisco Systems, the Cisco logo, and the Cisco Systems logo are registered trademarks or trademarks of Cisco Systems, Inc. and/or its affiliates in the United States and certain other countries. All other trademarks mentioned in this document or Website are the property of their respective owners. The use of the word partner does not imply a partnership relationship between Cisco and any other company. (0705R)© 2009 Cisco Systems, Inc. All rights reserved. OL-19474-01 Q UICK R EFERENCE Cisco Unified IP Phone 8961, 9951, and 9971 for Cisco Unified Communications Manager 7.1(3) (SIP)SoftkeysPhone Screen IconsButtonsCommon Phone Tasks Softkeys All Calls Lists all calls. Answer Answers a call. Apply Confirms the edited and nonedited settings in that screen. Call Initiates a call. Call Back Receives notification when a busy extension becomes available. Cancel Cancels an action or exit a screen without applying changes. Clear List Removes all entries in a list or category. Conference Use when Conference feature is activated. Delete Deletes an entry in a category, such as from Call History. Details In Call History or Accessories, selects a call-history record or an accessory to view selection details. Dial Dials a selected number. Divert Sends or redirects a call to voicemail or to a predetermined phone number. Edit Modifies an item, such as a name. EditDial Edits a number before calling. End Call Disconnects the current call or the current intercom call. Exit Returns to the previous screen. Forward All/ Forward Off Sets up or cancels call forwarding. Log Out Signs out of Personal Directory. Missed Calls Lists all missed calls. More Displays additional softkeys. Common Phone Tasks Place a call Lift handset or press Headset or Speakerphone. Redial a number Press the Redial softkey. Switch to handset during a call Pick up the handset. Switch to speaker or headset during a call Press or , then hang up the handset. Mute and un-mute your phone Press . View your call history Press > Call History . Hold and resume a highlighted call Press to hold. Press the R esume softkey to resume the held call. Transfer a call to new number Press , enter the number, and then press the button again. Place an intercom call Press the Intercom button, if available, and enter a number, if needed. Speak after you hear the tone. From a connected call, start a conference call Press , dial the participant, and then press the button again. Silence the ring of an incoming call Press the Vo l u m e button down once. New Call Makes a new call. Park Stores a call. Phones Displays the phone information for a personal contact. Play Plays ringtone. Redial Redials the most recently dialed number. Remove Removes a conference participant or an entry. Resume Resumes a highlighted call on hold. Revert Reverts back to the last applied settings (for that screen). Save Saves the chosen settings. Search Searches for a directory listing. Select Selects the highlighted option. Set Sets an option, such as a ringtone. Setup Configures an accessory. Show Details Shows details about the current call. Speed Dial Dials a number using a speed-dial code. Swap For a Transfer or Conference, toggles between two existing calls. Tr a n s f e r Use when Transfer feature is activated. Update Updates an entry in Personal Directory. Backspace to delete characters.Back. Phone Screen Icons Off-hook / connected callOn-hook Incoming call Missed callPlaced call Received call Call forwarding enabledCall on hold Message waiting Feature Icons(If available on your phone) Common task, such as for Answer, CallBack, and Speed Dial.All Calls enabledDo Not Disturb (DND) in useIntercom call–one-way (whisper)Intercom call–two-way (connected)Line Status–monitored line in useLine Status–monitored line ringing (Call Pickup only) Line Status–monitored line in the DND state Buttons For the Cisco Unified IP Phone 8961, 9951, and 9971 Quick Start Guides, go to this URL: http://cisco.com/en/US/products/ps10453/products_user_guide_list.html MobilitySecure call ApplicationsContactsMessagesHeadset SpeakerphoneMuteBackReleaseNavigation pad and Select buttonTransfer ConferenceHoldVo l u m eFeature buttons (left side of screen)Session buttons (right side of screen) Cisco Unified IP Phone 8961, 9951, and 9971 User Guide for Cisco Unified Communications Manager 7.1(3) (SIP)v Contents Your Phone 1 Cisco Unified IP Phone 8961 1 Phone Connections 1 Footstand 4 Phone Display Viewing Angle 5 Change Display Viewing Angle 5 Buttons and Hardware 5 Phone Screen 10 Phone with Single Line 10 Phone with Multiple Lines 11 Phone Screen Navigation and Item Selection 14 Power-Save Mode 15 Handset Rest 15 Cisco Unified IP Phone 9951 16 Phone Connections 16 Bluetooth 19 Footstand 20 Phone Display Viewing Angle 21 Change Display Viewing Angle 21 Buttons and Hardware 21 Phone Screen 26 Phone with Single Line 26 Phone with Multiple Lines 27 Phone Screen Navigation and Item Selection 30 Power-Save Mode 31 Handset Rest 31 Cisco Unified IP Phone 9971 32 Phone Connections 32 Wireless Connection and Bluetooth 35 viOL-19963-01 Footstand 36 Phone Display Viewing Angle 37 Change Display Viewing Angle 37 Buttons and Hardware 37 Phone Screen 42 Phone with Single Line 42 Phone with Multiple Lines 43 Phone Screen Navigation and Item Selection 45 Power-Save Mode 47 Phone Display Cleaning 47 Handset Rest 48 Applications 49 Phone Applications 49 Call History 49 View Call History 49 View Call Record Details 50 Filter Call History 50 Dial From Call History 50 Edit Number From Call History 50 Clear Call History 51 Delete Call Record From Call History 51 Preferences 51 Ringtones 52 Wallpaper 52 Brightness 52 Bluetooth 53 Accessories 53 View Accessories…
Text truncated - open the document above for the full version.
Users Manual
8OL-19963-01 6 Navigation pad and Select button The four-way Navigation pad allows you to scroll through menus, highlight items, and move within a text input field. The Select button (center of the Navigation pad) allows you to select a highl ighted item. The Select button is lit (white) when the phone is in power-save mode. 7 Conference buttonCreates a conference call. 8 Hold buttonPlaces a connected call on hold. 9 Transfer buttonTransfers a call. 10 KeypadAllows you to dial phone numbers, enter letters, and choose menu items (by entering the item number). 11 Speakerphone buttonSelects the speakerphone as the default audio path and initiates a new call, picks up an incoming call, or ends a call. During a call, the button is lit green. The speakerphone audio path does not change until a new default audio path is selected (for example, by picking up the handset). If external speakers are connected , the Speakerphone button selects them as the default audio path. 12 Mute buttonToggles the microphone on or off during a call. When the microphone is muted, the button is lit red. 13 Headset buttonSelects the headset as the default audio path and initiates a new call, picks up an incoming call, or ends a call. During a call, the button is lit green. A headset icon in the phone screen header line indicates the headset is the default audio path. This audio path does not change until a new default audio path is selected (for example, by picking up the handset). 14 Volume buttonControls the handset, headset, and speakerphone volume (off-hook) and the ringer volume (on-hook). Silences the ringer on the phone if an incoming call is ringing. 15 Messages buttonAuto-dials your voicemail system (varies by system). Your Phone Cisco Unified IP Phone 8961, 9951, and 9971 User Guide for Cisco Unified Communications Manager 7.1(3) (SIP)9 16 Applications buttonOpens/closes the Applications menu. Depending on how your system administrator sets up the phone, use it to access applications such as call history, preferences, and phone information. 17 Contacts buttonOpens/closes the Contacts menu. Depending on how your system administrator sets up the phone, use it to access personal directory, corporate directory, or call history. 18 Phone displayCan be positioned to your preferred viewing angle. 19 Programmable feature buttons Each corresponds to a phone line, speed dial, and calling feature. Pressing a button for a phone line displays the active calls for that line. If you have multiple lines, you may have an All Calls button that display s a consolidated list of all calls from all lines (oldest at the top). Then, it is recommended that you keep your phone in the All Calls view. Color LEDs indicate the line state: •Amber —Ringing call on this line •Green —Active or held call on this line •Re d —Shared line in-use remotely (The position of the programmable feature bu ttons can be reversed with the position of the session buttons on phones that use a locale with a right-to-left reading orientation, such as Hebrew and Arabic.) 20 Handset with light stripThe handset light strip lights up to indicate a ringing call (flashing red) or a new voice message (steady red). 10OL-19963-01 Phone Screen The way that your system administrator set up your phone determines what is displayed on your phone screen. Phone with Single Line 1 Line labelDisplays the line phone information. 2 HeaderDisplays the date and time, and information (such as phone number) about the selected line. (If you are on a call and highlight the header instead of a call, the softkeys that disp lay are the same as those that display when the phone is idle. This is useful, for example, if you want to access the Forward All or New Call softkeys while you are on a call.) Your Phone Cisco Unified IP Phone 8961, 9951, and 9971 User Guide for Cisco Unified Communications Manager 7.1(3) (SIP)11 Phone with Multiple Lines If you have multiple lines, it is recommended that you use the All Calls button to view all calls on all lines. If you handle many calls at one time, it is recommended that you use the Ans wer button to answer the oldest incoming call without having to scroll down the call list and select the call. For more information, see your system administrator. 3 Session button label (for connected call) Displays information (such as phone number and duration) about a connected call on the line. 4 Session button label (for held call) Displays information (such as phone number and duration) about a held call on the line. Pressing the corresponding session button resumes the held call. 5 New Call iconIndicates you can press the corresponding session button to make a new call. 6 SoftkeysSoftkey options for the selected (highlighted) call only. If you select a different call (by pressing a feature button or the Navigation pad, or by answering a ringing call), the softkey options may change. 12OL-19963-01 1 Primary line labelDisplays information about the primary phone line. Look for the blue icon on the line label to see which line is selected. In th is case, the primary line is selected, and the information displayed is for the primary line only. 2 HeaderDisplays the date and time, and information (such as phone number) about the selected line. (If you are on a call and highlight the header instead of a call, the softke ys that display are the same as those that display when the phone is idle. This is useful, for example, if you want to access the Forward All or New Call softkeys while you are on a call.) 3 Session label (with Connected Call icon) Displays information (such as call status and duration) about a connected call associated with the selected line. Your Phone Cisco Unified IP Phone 8961, 9951, and 9971 User Guide for Cisco Unified Communications Manager 7.1(3) (SIP)13 4 Session labels (with Held Call icons) Display information (such as call status and duration) about held calls associated with the selected line. Calls are displayed on the right side o…
Text truncated - open the document above for the full version.
Users Manual
32OL-19963-01 Cisco Unified IP Phone 9971 The Cisco Unified IP Phone 9971 provides these features: •Phone connections •Wireless connection and bluetooth •Footstand •Phone-display viewing angle •Buttons and hardware •Phone screen •Power-save mode •Phone-display cleaning •Handset rest Phone Connections Your system administrator can help you connect your phone to the corporate IP telephony network. Your Phone Cisco Unified IP Phone 8961, 9951, and 9971 User Guide for Cisco Unified Communications Manager 7.1(3) (SIP)33 1 DC adapter port (DC48V) 6 Handset port 2 AC-to-DC power supply (optional for the network port connection but required for a wifi connection) 7 Analog headset port (headset optional) 3 AC power wall plug (optional) 8 USB port 4 Network port (10/100/1000 SW) with IEEE 802.3af and 802.3at power enabled 9 Anti-theft security connector (lock optional) 5 Computer port (10/100/1000 PC) 193117 8 9 2 3 4 5 6 7 1 ComputerNetwork ComputerNetwork 34OL-19963-01 NoteEach USB port supports a maximum of five supported and nonsupported devices that are connected to the phone. Each device connected to the phone is included in the maximum device count. For example, your phone can support five USB devices (such as three Cisco Unified IP Color Key Expansion modules, one hub, and one other standard USB device) on the side port and five additional standard USB devices on the back port. (Many third-party USB products count as several USB devices.) For more information, see your system administrator. 1 USB port 3 Speaker port for output to optional external speakers 2 Cisco Unified IP Phone Expansion Module 7917 connector 4 Microphone port for input from optional external microphone Your Phone Cisco Unified IP Phone 8961, 9951, and 9971 User Guide for Cisco Unified Communications Manager 7.1(3) (SIP)35 Wireless Connection and Bluetooth Your phone can be connected to a wireless network using 802.11a or 802.11b/g, but your system administrator sets up the connection. For more information, see your system administrator. Your phone supports Bluetooth Class 2 technology when the headsets support Bluetooth. You can add and connect up to five Bluetooth headsets to your phone, but the last Bluetooth headset connected becomes the default for use with the phone. Related Topic Bluetooth Headsets, page 111 36OL-19963-01 Footstand If your phone is placed on a table or desk, connect the footstand to the back of the phone. 1 Insert the curved connectors into the lower slots. 2 Lift the footstand until the connectors snap into the upper slots. 1 1 2 2 2 2 1 1 193118 Your Phone Cisco Unified IP Phone 8961, 9951, and 9971 User Guide for Cisco Unified Communications Manager 7.1(3) (SIP)37 Phone Display Viewing Angle The viewing angle of the phone display can be adjusted according to your preference. Change Display Viewing Angle Hold the handset and cradle with your left hand, hold the right side of the bezel (to the right of the display) with your right hand, and then move your hands back and forth in opposite directions to adjust the angle. Buttons and Hardware Your phone provides quick access to your phone lines, features, and call sessions: •Use the feature buttons (on the left) to view calls on a line or access features such as speed dial or All Calls. •Use the call session buttons (on the right) to perform tasks such as making a call, answering a call, or resuming a held call. Each call on your phone is associated with a session button. 193119 38OL-19963-01 1 711101298 13 17 19 18 14 15 16 4 5 6 3 2 194675 Your Phone Cisco Unified IP Phone 8961, 9951, and 9971 User Guide for Cisco Unified Communications Manager 7.1(3) (SIP)39 1 Phone screenShows information about your phone, including directory number, call information (for example caller ID, icons for an active call or call on hold) and available softkeys. Phone screen items, such as menu options and softkeys, are touch-sensitive. 2 Session buttonsEach represents a call session and takes the default action for that session. For example, pressing the session button for a ringing call answers the call, while pressing the session button for a held call resumes the call. Color LEDs reflect the call state. LEDs can flash (blink on and off rapidly), pulse (alternately dim and brighten), or appear solid (glow without interruption). •Flashing amber —Ringing call. Pressing this button answers the call. •Solid green —May be a connected call or an outgoing call that is not yet connected. If the call is connected, pressing this button displays the call details or the participants of a conference call. If the call is not yet connected, pressing this button ends the call. •Pulsing green —Held call. Pressing this button resumes the held call. •Solid red —Shared line in-use remotely. Pressing this button allows you to barge in on the call (if Barge is enabled). •Pulsing red —Shared line call put on hold remotely. Pressing this button resumes the held call. Icons next to the session buttons indicate an action for that session. For example, pressing the session button with a Missed Calls icon displays your missed calls, and pressing the session button with a Voicemail icon accesses your voice messaging system. (The position of the session buttons can be reversed with the position of the programmable feature buttons on phones that use a locale with a right-to-left reading orientation, such as Hebrew and Arabic.) 3 Back buttonReturns to the previous screen or menu. 4 Release buttonEnds a connected call or session. 40OL-19963-01 5 Navigation pad and Select button The four-way Navigation pad allows you to scroll through menus, highlight items, and move within a text input field. The Select button (center of the Navigation pad) allows you to select a highlighted item, disable the phone screen for cleaning, or enable the phone screen if it is in power-save mode. The Select button is lit (white) when the phone is in power-save mode. 6 Conference buttonCreates a conference call. 7 Hold b…
Text truncated - open the document above for the full version.
Users Manual
46OL-19963-01 Select an item using the Select button. Press the Select button (at the center of the Navigation pad). Highlight the Preferences application and press the Select button. Navigate to a submenu. (A right arrow (>) next to the menu item indicates that a submenu exists.) Highlight the menu item and press the item number on the keypad. Or press the down arrow on the Navigation pad and then press the Select button. Highlight the Network Setup menu, then press 1 to open the submenu. Select a line to use a calling feature (when line is idle). Press the line label. Indicators of your line selection include: •The selected line is displayed on the phone screen header. •Color of the icon (on the line label) changes to blue. Press the line label, then press the Forward All softkey to forward calls on that line. Select a line to use a calling feature (when line has one or more active calls). Double-tap the line label. Indicators of your line selection include: •The selected line is displayed on the phone screen header. •Color of the icon (on the line label) changes to blue. Double-tap the line label, then press the Forward All softkey to forward calls on that line. Change the line view (while on a call). Select a different line by double-tapping the label for the other line. If you are on a call, changing the line view does not end the call, but it may disappear from view. To see your current call session again, select the line the call is on. While on a call, double-tap the label for the line. Call session information for the newly selected line is displayed. Call session information previously displayed may disappear from view. Go back to the previous screen or menu. Press the Back button or the softkey. From the Preferences menu, press or the softkey. TaskActionExample Your Phone Cisco Unified IP Phone 8961, 9951, and 9971 User Guide for Cisco Unified Communications Manager 7.1(3) (SIP)47 Power-Save Mode Depending on how your system administrator set up your phone, the phone display may go into a power-save mode (the phone screen appears blank and the Select button is lit white). To turn on the phone display, press any button, touch the blank phone screen, or pick up the handset. Phone Display Cleaning Before cleaning the phone display, disable the phone screen by pressing the Select button until you see the message “Touchscreen Disabled.” The phone screen will re-enable automatically after 60 seconds. To re-enable the phone screen manually after cleaning, press the Select button until you see the message “Touchscreen Enabled.” CautionUse only a soft, dry cloth to wipe the phone display. Do not use any liquids or powders on the phone because they can contaminate phone components and cause failures. 48OL-19963-01 Handset Rest Your system administrator may have mounted your phone on a wall. With a wall-mounted phone, you may need to adjust the handset rest to ensure that the receiver does not slip out of the cradle. 1 Remove the handset from the cradle and pull the plastic tab from the handset rest. 2 Rotate the tab 180 degrees. 3 Hold the tab between two fingers, with the corner notches facing you. 4 Line up the tab with the slot in the cradle and press the tab evenly into the slot. An extension protrudes from the top of the rotated tab. Return the handset to the handset rest. 213 275943 4 Applications Cisco Unified IP Phone 8961, 9951, and 9971 User Guide for Cisco Unified Communications Manager 7.1(3) (SIP)49 Applications Phone Applications Phone applications allow you to access the following: •Call History •Preferences •Accessories •WLAN Sign in •Running Applications •Phone Information •Administrator Settings (For system administrators only). Call History Call History allows you to view information on the last 150 calls on your phone. An icon displays indicating the type of call: •Received— •Placed— •Missed— The caller ID is displayed with the call icon. If the caller ID is unavailable, then the phone number is displayed. If the phone number is unavailable, then “Unknown” is displayed. All Call History items are integrated into one list and are ordered by time (latest to oldest). There is a 150 call limit per phone and not per line. For example, if a phone has multiple lines, the 150 call limit applies to all lines combined. You can sort the Call History list by all lines, each line, or by missed calls. You can sort the call history for each line by selecting the individual line for which you want to see the call history, or select the All Calls softkey to see the merged history for all lines. You can also dial a number directly from the Call History list. A (plus) + symbol on entries in call history, redial, or call directory indicates that your phone is set up to list international calls. For more information, see your system administrator. View Call History 1.Press the Applications button . 2.Select Call History. (Use the Navigation pad and Select button to scroll and select.) 50OL-19963-01 The phone screen displays the call history with an icon associated for each type of call. 3.Press the Exit softkey to return to the Applications screen. View Call Record Details 1.Press the Applications button . 2.Select Call History. (Use the Navigation pad and Select button to scroll and select.) The phone screen displays the call history with an icon associated for each type of call. 3.Select a call record and press the Details softkey (you may need to press More softkey first). The phone screen displays the time stamp, duration of the call, caller’s name, caller’s directory number and any alternate number. 4.Press the softkey to return to the Call History screen. 5.Press the Exit softkey to return to the Applications screen. Filter Call History 1.Press the Applications button . 2.Select Call History. (Use the Navigation pad and Select button to scroll and select.) 3.Press the Missed Calls softkey. The Call History screen displays only the missed calls on the selected line. 4.To view all ca…
Text truncated - open the document above for the full version.
Users Manual
94OL-19963-01 The Cisco Unified CM User Options main web page displays. From this page you can select User Options to select a device, access User Settings, Directory features, your Personal Address Book, and Fast Dials. 7.To sign out of user options, select Logout. Device You can make changes to your device settings on your phone from the User Options web pages. You can make changes to these device settings on your phone: •Lines •Speed-dial settings •Phone services Related Topics Speed Dial, page 89 Select a Device From the User Options Web Pages 1.After you have signed in to your User Options web pages, select User Options > Device. The Device Configuration page displays. Toolbar buttons located at the top of the Device Configuration page are specific to the selected device type. 2.If you have multiple devices assigned to you, select the appropriate device (phone model, Extension Mobility profile, or Remote Destination profile) from the Name drop-down menu. Customize Do Not Disturb Options 1.Sign in to your User Options web pages. Your system administrator sets up the Do Not Disturb (DND) feature for your phone. 2.From the drop-down menu, select User Options > Device. 3.Set the following options: –Do Not Disturb—Check the check box to enable or disable DND. –DND Option—Select None, Ringer Off (to turn off only the ringer), Call Reject, or Use Common Phone Profile Setting. –DND Incoming Call Alert (applies to either DND option set)—Set the alert to Beep Only, Flash Only, Disable, or select “None” (to use the “Alert” setting set up by your system administrator). User Options Cisco Unified IP Phone 8961, 9951, and 9971 User Guide for Cisco Unified Communications Manager 7.1(3) (SIP)95 Related Topics Do Not Disturb, page 78 Line Settings Line settings affect a specific phone line (directory number) on your phone. Line settings can include call forwarding, visual and audio message-waiting indicators, voice-message indicators, ring patterns, and other line-specific settings. You can set up other line settings directly on your phone: •Set up call forwarding for your primary phone line •Change rings, display, and other phone-model specific settings Related Topics •Call Forward All, page 70 •Call History, page 49 Set Up Call Forwarding Per Line 1.Sign in to your User Options web page. 2.Select User Options > Device. 3.Select a phone from the Name drop-down menu. 4.Select Line Settings. 5.If you have more than one directory number (line) assigned to your phone, select a line from the Line drop-down menu. 6.In the Incoming Call Forwarding area, select call forwarding settings for various conditions. 7.Select Save. Related Topics Call Forward All, page 70 Change the Voice Message Indicator Setting Per Line 1.Sign in to your User Options web page. 2.Select User Options > Device. 3.Select a phone from the Name drop-down menu. 4.Select Line Settings. 5.If you have more than one directory number (line) assigned to your phone, select a line from the Line drop-down menu. 96OL-19963-01 6.In the Message Waiting Lamp area, choose from various settings. Typically, the default message waiting setting prompts your phone to display a steady red light from the handset light strip to indicate a new voice message. 7.Select Save. Change the Audible Voice Message Indicator Setting Per Line 1.Sign in to your User Options web page. 2.Select User Options > Device. 3.Select a phone from the Name drop-down menu. 4.Select Line Settings. 5.If you have more than one directory number (line) assigned to your phone, select a line from the Line drop-down menu. 6.In the Audible Message Waiting Lamp area, choose from various settings. 7.Select Save. Change the Ring Settings Per Line 1.Sign in to your User Options web page. 2.Select User Options > Device. 3.Select a phone from the Name drop-down menu. 4.Select Line Settings. 5.If you have more than one directory number (line) assigned to your phone, select a line from the Line drop-down menu. 6.In the Ring Settings area, set the option for Ring Setting (Phone Idle) and Ring Setting (Phone Active) from the drop-down menus. The options are: –Use System Default –Disable –Flash Only –Ring Once –Ring –Beep Only [this option is only available for Ring Setting (Phone Active)] 7.Select Save. Change or Create a Line Text Label for Your Phone Display 1.Sign in to your User Options web page. 2.Select User Options > Device. User Options Cisco Unified IP Phone 8961, 9951, and 9971 User Guide for Cisco Unified Communications Manager 7.1(3) (SIP)97 3.Select a phone from the Name drop-down menu. 4.Select Line Settings. 5.If you have more than one directory number (line) assigned to your phone, select a line from the Line drop-down menu. 6.In the Line Text Label area, enter a text label. Your phone uses the ASCII Label field if the phone does not support double-byte character sets. 7.Select Save. Speed Dial on the Web Depending on how your phone has been set up, you can use speed-dial line buttons and speed-dial codes, which you can set up on your User Options Web pages. Set Up Speed-Dial Buttons 1.Sign in to your User Options Web pages. 2.Select User Options > Device. 3.Select a phone from the Name drop-down menu. 4.Select Speed Dials. 5.In the Speed Dial Settings area, enter a number and label for a speed-dial button on your phone. 6.Select Save. Set Up Speed-Dial Codes 1.Sign in to your User Options Web pages. 2.Select User Options > Device. 3.Select a phone from the Name drop-down menu. 4.Select Speed Dials. 5.In the Abbreviated Dial Settings area, enter a number and label for a speed-dial code. 6.Select Save. Phone Services Phone services can include special phone features, network data, and web-based information (such as stock quotes and movie listings). You must first subscribe to a phone service before accessing it on your phone. You can assign a service to a speed-dial button from the User Options web page. 98OL-19963-01 The services available for your phone depend on how the system admi…
Text truncated - open the document above for the full version.
Contact Information
Applicant
Samuel Kim(Manager, Engineering)
Technical Contact
CISCOCraig N. Mullis
[email protected]1 408 853 9501
170 West Tasman Drive · San Jose, California · United States
Test Firm
Cisco Systems, Inc.Dave Wilson
Technical Specifications
| # | Rule Parts | Frequency Range | Power Output |
|---|---|---|---|
| 1 | 15C | 2.40 GHz - 2.48 GHz | 3.00 mW |
Other Applications from Cisco Systems Inc
LDKJ98213058
May 25, 2026Wireless Phone
Equipment Class
DSS - Part 15 Spread Spectrum TransmitterLDKIW9165E
Aug 20, 2024Wi-Fi 6E Outdoor Access Point
Equipment Class
6SD - 15E 6 GHz Standard Power Access PointLDKIW9165DH
Aug 05, 2024Wi-Fi 6E Outdoor Access Point
Equipment Class
6SD - 15E 6 GHz Standard Power Access PointLDKUSBC2857
Jul 22, 2024Cisco Headset USB-C Adapter
Equipment Class
DSS - Part 15 Spread Spectrum TransmitterLDKESPRD2922
May 09, 2024UC Phone
Equipment Class
NII - Unlicensed National Information Infrastructure TX