QDMIFP999MP3 PLAYER
DREAMUS COMPANY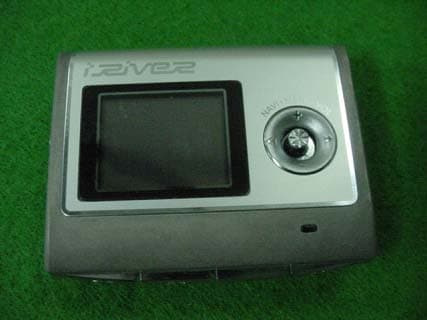
Click to zoom
Application Details
- Equipment Class
- JBP - Part 15 Class B Computing Device Peripheral
- Date of Grant
- Jun 14, 2004
- Application Purpose
- Original Equipment
- Date of Application
- Jun 14, 2004
- Equipment Note
- MP3 PLAYER
- Company
- DREAMUS COMPANY
- Country
- South Korea
Documents & Files
Document Text
Text extracted from the exhibit documents filed with the FCC. Open a document above to read the original.
Users Manual
iFP-900 Instruction Manual Thank you for your purchase. Please read this manual carefully before using your new player. http://www.iriver.com MP3 PLAYER /FM TUNER Model iFP-900 http://www.iriver.com Getting Started Copyrights / Certification / Trademarks / Limited Liability Copyrights 1- Welcome Getting Started 1- Thank your for your iRiver purchase. The iFP-900 comes complete with a long list of advanced features. It is important that you read the manual to ensure that you get the most out of your new player. URL : www.iRiver.com Find information on our company, products, and customer and technical support. Update your player with firmware downloads. Firmware upgrades offer Consult the product FAQ. Register your iRiver product online so that our Customer Service is able to provide support as efficiently as possible. All contents contained in this manual subject to change without notice to improve ability of this player or according to changing of specification. http://www.iRiver.com iRiver Limited has all the rights of the patent, trademark, literary property and intellectual property related to this manual. You may not reproduce any part of this manual unless authorized by iRiver Limited. You can be punished by using any part of this manual illegally. The software, audio and video which have an intellectual property are protected by copyright and international laws. It is user s responsibilities when he/she reproduce or distribute the contents created by this product. The companies, institutions, products, people and events used in examples are not real data. We don t have any intension to be related with any companies, institutions, products, people and events through this manual and should not draw inferences. Users are responsible for observing the copyrights and intellectual properties. 1999~2004 iRiver Limited, All right reserved Windows, Windows 98 SE, Windows ME, Windows 2000, Windows XP and Windows Media Player are the registered trademarks of Microsoft Corp. CE, FCC, MIC Certification Trademarks Neither the Manufacturer, importers nor dealers is responsible for any accidental damage including bodily injury or any damage resulting from misuse or unsuitable operation by you. The information on this manual is prepared with the current product specifications. The manufacturer, iRiver Limited, is adding new features to the product and may persistently apply new technologies hereafter. All standards may be changed at any time without notice. Limited Liability Welcome to iRiver Website Getting started Locating the controls PC software installation Basic operation Convenient Functions Additional information 1 2 3 4 5 6 Contents This manual covers the installation and use of the player hardware. For details regarding the software operation including transferring music to the player, please see the Software Instruction Manual. Getting started Getting started Contents 1 Handling Notices for Safety Features About power supply 1-1 1-3 1-4 1-5 Getting started Handling Notices for Safety 1-2 Handling Notices for Safety Getting started 1-1 Keep out of direct sunlight. Damage to your player may result from improper use. Do not use water or chemicals to clean the player. Clean the surface with a soft cloth. Damage to your player may result from improper use. Do not disassemble or modify. Damage to your player may result from improper use. Keep out of extreme heat and cold. Damage to your player may result from improper use. Do not place objects inside the device. Damage to your player may result from improper use. Do not use excessive force on the buttons or attempt to disassemble the device. Damage to your player may result from improper use. Keep away from harsh environments including humid, dusty, and smoky areas. Damage to your player may result from improper use. Avoid falling over a stone or other material with putting the player in your pocket Damage to your player may result or injury from improper use. Keep headphones / earphones cords under control at all times. Cords may get caught on a variety of objects and cause damage or injury. Avoid contacting the player with water or chemicals. Damage to the internal parts of the player may occur. If your player gets wet, dry the outside with a soft cloth as soon as possible. Avoid running with hanging the player in your neck. Damage to your player may result or injury from improper use. Keep the player away from strong magnets or excessive violation or dropping any material. Damage to your player may result from improper use. Getting started Features of iFP-900 1-4 Getting started 1-3 Multi-Codec Player: Supports MP3, WMA, OGG and ASF formats. Firmware Upgrade Provides the latest updated features via firmware upgrade. 260,000 color graphic LTPS LCD supporting Multiple Languages(40 languages) iFP-900 Series comes with 260,000 color graphic LTPS (Low Temperature Poly Silicon) LCD which can support multiple languages. FM Function You can easily listen to FM stations and set your favorite stations by using Auto Preset and Frequency Memory functions. 6 Preset EQ: Normal, Rock, Jazz, Classic, U Bass, Metal Xtreme EQ and Xtreme 3D Customize your own EQ with Xtreme EQ and enhance bass and surround sound with Xtreme 3D. GUI (Graphic User Interface) Menu System Easy Navigation The simple navigation makes it easy to find any song. Supports 8 levels of subfolders, 500 folders total and up to 1500 files at one time. Create your own playlists. Direct MP3 Encoding 11.025KHz ~44.1KHz, 8Kbps ~ 320Kbps Record FM Radio, Voice, or line-in from another device Voice record level is automatically controlled by AGC function. Convenient neck strap. Built-in Rechargeable battery that charges directly from the USB port as well as AC Adapter. Supports USB 2.0(Maximum transferring speed : 480MBit/Sec.) About Power Supply Charging from the PC Connect the player to the PC with USB cable. The player will charge automatically when the player is connected to the PC. Use only …
Text truncated - open the document above for the full version.
Users Manual
Basic operation Basic operation 4-6 Menu Seup 1 2 3 Click Push You can adjust various function of the player. After pushing and holding the NAVI/MENU button, adjust as following method. 1. Scroll between Menus: Push the NAVI/MENU button toward I orI direction. 2. Function Selection: Press the NAVI/MENU button. 3. Exit: Press and hold the NAVI/MENU button or click the PLAY/STOP button. Long Click Click Long Click Basic operation Basic operation Tuning FM stations 4-5 Selecting the FM stereo/mono Press the STEREO/PLAY/STOP button to select Stereo/Mono. Click Push the NAVI/MENU button to theordirection to select desired station. Push Basic operation Listening to the FM radio FM radio listening 4-8 Listening to music Basic operation Playing music file 4-7 Press and hold the MODE/REC button. The current function appears on the LCD screen. Push the NAVI/MENU button to theordirection to select FM radio. Press the NAVI/MENU button to confirm. Push the NAVI/MENU button to theordirection to select FM station. 1 1 2 2 3 3 1 2 Click Push Push Push To increase To decrease Push Previous Next To select music file Adjusting the volume Click Power on/play/stop A-B repeat Click Function Long Click To play the folder Previous folder Next folder Long Push Push To fast forward/reverse Fast reverse Fast forward Long Push Power off playback mode Click Long Click Long Click Basic operation Listening to the FM radio Programming station preset manually 4-10 Listening to the FM radio Basic operation 4-9 3 3 Press the MEMORY/EQ(A-B) button. Automatically appears memory icon and a reserved number of the preset stations. 4 4 Push the NAVI/MENU button to theordirection to select number of the preset. 5 5 Press the MEMORY/EQ(A-B) button to store. Press the PLAY/STOP button to cancel. Up to 20 station can be stored. to store 1 1 Automatically select stations and save them in sequential order. (It only activates while the player is not in PRESET mode) Auto store Long Click 2 2 Press the NAVI/MENU button to cancel preset mode. Press and hold the MEMORY(A-B) button. Automatically select stations and save them in sequential order. Click Programming station preset automatically Programming station preset manually 1 1 2 2 Press the NAVI/MENU button to cancel preset mode. Push or long push the NAVI/MENU to the ordirection to select FM station. Click Long Push to cancel PRESET Click to cancel To select number of the preset stations. Reserved number of the preset stations. Click Push Auto memory may not work within weak transmission areas. Note Basic operation Listening to the FM radio Tuning stations automatically 4-12 Listening to the FM radio Basic operation Deleting preset station 4-11 Press the NAVI/MENU button to cancel preset mode. Push and hold the NAVI/MENU button to ordirection. The frequencies are scanned automatically. When a broadcast is received, scanning stops. Click Long Push Select the station to be deleted at preset mode. 1 1 2 2 The next station will appear when station delete is completed. Push and hold the memory button again if you also want to delete the next station. Press and hold the MEMORY/EQ(A-B) button. To select stereo/mono Press the STEREO/PLAY/STOP button to select Stereo/Mono. Stereo/Mono Click FM Tuner reception may vary in different areas. While in Preset mode, auto scan and auto memory functions are not available. When the player doesn’t have any preset stations, EMPTY will be displayed at preset mode then faded out. Note Auto scanning To cancel PRESET Basic operation Recording the FM stations To stop FM recording 4-14 Recording the FM stations Basic operation Recording the FM stations 4-13 Press the MODE/REC button during FM reception. The station will be recorded, the remaining recording time will be displayed on the LCD screen. Press the MODE/REC button to stop recording. The recorded file is saved as TUNER000.REC. It is saved in the RECORD folder. To play a recorded files After changing to MP3 mode, select a Tuner file in the RECORD folder, press the PLAY/STOP button. To pause FM recording Click Click Press the PLAY/STOP button to pause the recording process. Press the PLAY/STOP button again to restart recording. Click Volume can not be controlled while recording. Recorded REC files can be converted to MP3 files using iRiver Manager. (Refer to iRiver Music Manager Instruction Manual) Note Click Basic operation Recording voice To play a recorded file 4-16 Recording voice Basic operation Recording voice 4-15 Press and hold the MODE/REC button to appears current function on the LCD screen. Press the NAVI/MENU button to the ordirection to select Voice mode. Press the NAVI/MENU button (or PLAY/STOP) to go to Voice recording mode. (The recorder will be in standby mode.) 1 1 2 2 Press the MODE/REC button to stop recording. Note: After stopping a recording, starting again will create a new voice file. Press the PLAY/STOP button while stop mode. Press the PLAY/STOP button to pause the recording process. Press the PLAY/STOP button again to restart recording. To stop recording voice To pause recording voice Long Click Click Push Press the MODE/REC button and to begin recording. 3 3 Click Click Click Pause Restart Click Click The recorded file is saved as VOICE000.REC in the VOICE folder. If “00:00:00” is displayed on the LCD, the player’s memory is full. To record, delete files and/or folders on the player to make some space available.(Refer to page 5-3, Software Instruction Manual) Keep the player far away enough from the source to avoid distortion in the recording. The player can not record when the memory is full or the battery is low. Recorded REC files can be converted to MP3 files using iRiver Manager. (Refer to Software Instruction Manual) Note Basic operation Recording from an external audio source Recording from an external audio source 4-18 Recording from an external audio source Basic operation Preparing Recording from an external audio source 4-17 Press and hold the MODE/REC button. The c…
Text truncated - open the document above for the full version.
Users Manual
Convenient functions Menu-Basic operation Enter Sub Menu 5-14 Menu-Basic operation Convenient functions Basic operation 5-13 Main menuSub menusub menu settings l Press and hold the NAVI/MENU button to display the menu system. l The MENU system is composed of 6 main menus with sub-menus. Push the NAVI/MENU button to the ordirection to select menu. Click the NAVI/MENU button. Long Click Previous Next Push Click You can set, cancel or change sub menu by pushing the NAVI/MENU button towardor or VOL +, VOL -. Push the MENU/NAVI button to the or(VOL + or VOL -) direction to select sub menu. Push the MENU/NAVI button to confirm. Click the PLAY/STOP button to return Main MENU at the sub-menu setting. Exit sub menu Exit main menu Click the PLAY/STOP button to exit Main Menu. To select Main Menu 1 1 2 2 Exit Sub MenuExit Main Menu Previous Next Push Up Down Click Previous Next Push Up Click Click Click Convenient functions Menu-General 5-16 Menu-General Convenient functions General 5-15 ON: Playback resumes from the previous location in a song when the player is stopped or powered off. OFF: Playback begins from the first track after the player is stopped or powered off. Initialize menus to the original factory settings. The button’s operation order is as below. Click NAVI/MENU (select default menu) or VOL+ (select YES) Press NAVI/MENU (select YES : Initialization) Support 40 languages Song title and ID3 tag information is dependent on the version of the PC operating system that was used to create it. (For example, if an MP3 file is created in a English version of Windows, the language setting should be English for the proper title display) Resume Language Load Default Convenient functions Menu-Display Scroll Speed 5-18 Menu-Display Convenient functions Display 5-17 You can adjust the time that the Backlight stays on. SEC: Backlight stays on from 3 to 30 seconds. MINUTE: Backlight stays on from 1 to 30 minutes. Press the NAVI/MENU button to set SEC/MINUTE. Back Light During playback, you can display visualizations, the elapsed time of the track, or the free memory on your player. Normal: display elapsed time. Remain: display remaining time. On: Display track with ID3 tag information Off: Display track with file name Adjust scroll speed by 1x / 2 x / 4x / Vertical / Horizontal. Vertical: The scroll goes up and down Horizontal: The scroll goes from the left to the right. Visualization Waveform Level Meter Progressive Free Space Tag Information Time " File name will be displayed by default for songs with no ID3 information Note Time display may not be accurate for files encoded in Variable Bit Rate formats. Note Convenient functions Menu-Timer Set Time 5-20 Menu-Timer Convenient functions Timer 5-19 Automatically turns the power off at the stop mode. (Time range can be set from 1 to 60 minutes by a minute) Use the orswitch to adjust time. Automatically turns the power off after a fixed time. (Time range can be set from 0 to 180 minutes by one minute increments.) You can listen to the beep sound at 1 minute before powering off by setting BEEP to ON. Use the orswitch to adjust time. Set BEEP ON/ OFF by pressing the NAVI/MENU button. ON: A beep sound will play one minute before the player shuts off. OFF: No beep sound is played. Once powered off, the sleep timer will reset to 0. Sleep Power Off Stop Power Off Alarm/Record Select Set Alarm Set the current time. Push the NAVI/MENU switch toward orto select the item and toward VOL + or VOL - to set the clock. Use the orswitch to adjust time. A day of the week is automatically set. OFF: The Alarm and Tuner Record functions are disabled and the player will not power on at either indicated time. ALARM: At the time indicated in the "Set Alarm" setting (see below) the player will power on and begin music playback." TUNER RECORD: At the time indicated in the "Tuner Rec. Reservation" setting (see page 5-21) the player will power on and begin recording from the selected radio station. Push the NAVI/MENU switch toward or(VOL+or VOL - ) to select the item. Set the working time of alarm. Push the NAVI/MENU switch toward orto select the item and toward VOL + or VOL - to set the alarm. DAY: Alarm rings at the set time of the set day repeatedly. ALL: Alarm rings at the set time everyday. Menu-Timer Convenient functions Tuner Rec. Reservation 5-21 Convenient functions MENU-Control Control 5-22 The fast scan speed can range from 1x/ 2x/ 4x/ 6x. This defines the operating method of short or long click ofor lever. OFF: Skip doesn’t activate. 10: Skip 10 tracks at time. DIRECTORY: Skip to previous or next folder. Fast Skip FF/RW Scan Speed Set the time and station to be recorded. Push the NAVI/MENU switch toward orto select the item and toward VOL + or VOL - to set the recording time. DAY: Tuner recording is started at the same time of the set day repeatedly. ALL: Tuner recording is started at the set time every day. End Time:Cansettherangeofrecordingtimefrom10Min.to 240 Min. Convenient functions MENU-Control Line-in Recording Mode 5-24 MENU-Control Convenient functions Voice Recording Mode 5-23 You can adjust recording quality when recording voice. ON: When recording voice, the recording level is automatically controlled and recordings from long distances are enhanced. OFF: AGC(Automatic Gain Control) not activated. Bit Rate: 8Kbps~160Kbps Sampling Frequency: 11.025KHz ~44.1KHz The voice recording mode will automatically pause during silence. This is useful for recording over a long period of time to save memory. OFF: Voice Auto Detection is disabled. Voice Auto Detection: Set the relative level of sound needed to activate the recorder. (Level 1- Level 10). Recordpausetimesetting: Set the number of seconds of silence to record before pausing.(1-10 sec) Voice Auto Detection You can adjust recording quality when recording from the FM Tuner. Mono: Recorded to Mono sound. Stereo: Recorded to Stereo sound. Bit Rate: 8Kbps~320Kbps Sampling Frequency: 11.025KHz ~44.1KHz Tuner Recor…
Text truncated - open the document above for the full version.
ID Label/Location Info
MP3 Player MODEL : iFP-999 FCC ID : QDMIFP999 Manufactured by iRiver
Test Report
EMI TEST REPORT Emission of electromagnetic disturbance Test Report No. : ERI-FCC04-0042 Equipment : MP3 Player Name of basic model : iFP-999 Family model : iFP-995, iFP-990 Family ID : QDMIFP999 Manufacturer : AV CHASEWAY MFG.FTY. Applicant : ReignCom Limited. Tested date : 2004. 6. 12 – 6. 14 Issued date : 2004. 6. 14 Test results : PASS Test Standards : FCC Part 15 Subpart B (Class B) /Digital devices & peripherals Test Procedure and Items: - AC Power line Conducted emissions measurement : ANSI C63.4-1992 - Radiated emissions measurement : ANSI C63.4-1992 Tested by: YOUNG-SIK, KIM Approved by: SANG-KYU, LEE The results in this report apply only to the sample tested. This test report shall not be reproduced except in full, without the written approval of ERI Laboratory. EMC RESEARCH INSTITUTE EMC Research Institute CONTENTS 1. CLIENT INFORMATION 2. LABORATORY INFORMATION 3. EQUIPMENT UNDER TEST INFORMATION(EUT) 3.1 Identification of the EUT 3.2 Additional information about the EUT 3.3 Peripheral equipment 4. CONTINUOUS DISTURBANCE VOLTAGE, MAIN TERMINAL 4.1 Operating environment 4.2 Test set-up and test procedures 4.3 Operation Conditions 4.4 Test instrument 4.5 Test results (Test mode: Up & Download mode) 4.6 Test results (Test mode: Play mode) 5. RADIATED DISTURBANCE : 30MHz – 1000MHz 5.1 Operating environment 5.2 Test set-up 5.3 Test conditions 5.4 Test instrument 5.5 Test results (Test mode: Up & Download mode) 5.6 Test results (Test mode: Play mode) 5.7 Test results (Test mode : FM Tuner mode) APPENDIX (None) EMC Research Institute 1. CLIENT INFORMATION The EUT has been tested by request of : Company : ReignCom Limited. Address : 8F Posgen VentureTower, 1586-7 Seocho-dong, Seocho-gu, Seoul, Korea Name of contact : H.J. Mun Telephone : +82-2-3019-1723 Facsimile : +82-2-3019-1746 2. LABORATORY INFORMATION The 10m full-anechoic chamber and/or EMC facilities are used for these testing. These facilities were accredited by KOLAS, EK, MIC of Korea and FCC of USA. Address ELECTROMAGNETIC RESEARCH INSTITUTE. 66-6, JEIL-RI, YANGJI-MYUN, YOUNGIN-CITY, KYUNGGI-DO, KOREA Telephone No. : +82-31-336-1186~7 Facsimile No. : +82-31-336-1184 Registered No. KOLAS : 111 EK : J MIC : KR0030 FCC Filing No. : 302567 3. EQUIPMENT UNDER TEST INFORMATION(EUT) 3.1 Identification of the EUT Type of equipment : MP3 Player Model name : iFP-999 Brand name : - Manufacturer : AV CHASEWAY MFG.FTY. Address : Langang Village, Chongguang Town, Baoan District, Shenzhen City, Guangdong, China Telephone : +86-755-708-4671 Facsimile : +86-755-708-5490 Country of origin : CHINA Rating : 120V, 60Hz EMC Research Institute 3.2 Additional information about the EUT Class B, Family Models List: Basic Model Variant Model Differential point Memory size iFP-995 HDD size 512M iFP-999 (1G) iFP-990 HDD size 256M 3.3 Peripheral equipment Defined as equipment needed for correct operation of the EUT. Description Model No. Serial No. Manufacture Notebook Life Book P Series 464307 211 682 FUJITSU LIMITED. AC/DC adaptor CA01007-0750 03502395C PT SANKEN INDONESIA AC/DC adaptor SA41-521k - Dongguan Qiaozi Santai Electrical Appliances Co., Ltd. Printer C6247A CN13V1B1RY HP EMC Research Institute 4. CONTINUOUS DISTURBANCE VOLTAGE, MAIN TERMINAL : Frequency range 0.15 MHz to 30 MHz 4.1 Operating environment Temperature : 22.0 Relative Humidity : 46.0 % 4.2 Test set-up and test procedures The mains terminal disturbance voltage was measured with the equipment under test(EUT) in a shield room. The EUT was connected to an artificial mains network(LISN) placed on the floor. The EUT was placed on non-metallic table 0.4m above the metallic, grounded floor. The distance to other metallic surface was at least 0.8m. Amplitude measurements were performed with a quasi-peak detector and an average detector. 4.3 Operation Conditions Upload mode, play mode 4.4 Test instrument Instrument Model No Serial No. Makers Next cal.date Used Test receiver ESCS30 100022 R&S 2004. 06. 16 ESH3-Z5 100029 R&S 2004. 11. 11 L.I.S.N. ESH3-Z5 100031 R&S 2005. 01. 06 Shield room 8 6 3.3m/H - - - AC Main Printer Notebook AC/DC adaptor EUT Earphone LISN LISN AC/DC adaptor EMC Research Institute 4.5 Test results (Upload mode) Date of test: Jun 12, 2004. An overview sweep performed with peak detector & average detector are included in the report as test reports. Frequency Tested LISN Meter Range Freq. Reading Limits Margin QP AV QP AV QP AV [MHz] [MHz] [dBuV] [dBuV] [dBuV] 0.189 N 53.8 43.4 64.1 54.1 10.3 10.7 0.201 H 52.5 33.1 63.5 53.5 11.0 20.4 0.15-30 0.210 H 38.4 19.0 63.2 53.2 24.8 34.2 0.255 N 46.0 41.2 61.5 51.5 15.5 10.3 0.315 N 40.1 30.9 59.7 49.7 19.6 18.8 0.333 H 37.5 29.3 59.4 49.4 21.9 20.1 0.507 N 40.6 40.0 56.0 46.0 15.4 6.0 0.603 N 36.2 34.2 56.0 46.0 19.8 11.8 0.867 N 34.8 28.4 56.0 46.0 21.2 17.6 1.449 N 33.3 33.1 56.0 46.0 22.7 12.9 * <5 : mean less than 5dB * Other frequency keep over 20dB margin. EMC Research Institute [Live line] [Neutral line] EMC Research Institute 4.6 Test results (Play mode) Date of test: Jun 12, 2004. An overview sweep performed with peak detector & average detector are included in the report as test reports. Frequency Tested LISN Meter Range Freq. Reading Limits Margin QP AV QP AV QP AV [MHz] [MHz] [dBuV] [dBuV] [dBuV] 0.150 N 26.7 <5 66.0 56.0 39.3 - 0.210 N 22.3 <5 63.1 53.1 40.8 - 0.15-30 0.315 N 24.8 <5 59.7 49.7 34.9 - 0.414 N 17.8 <5 57.5 47.5 39.7 - 0.567 N 11.1 <5 56.0 46.0 44.9 - 0.786 N 9.0 <5 56.0 46.0 47.0 - 1.098 N 5.3 <5 56.0 46.0 50.7 - 14.140 N 11.3 10.7 60.0 50.0 48.7 39.3 16.740 N 7.5 5.7 60.0 50.0 52.5 44.3 * <5 : mean less than 5dB * Other frequency keep over 20dB margin. EMC Research Institute [Live line] [Neutral line] EMC Research Institute 5. RADIATED DISTURBANCE : 30MHz – 1000MHz 5.1 Operating environment Temperature : 23.0 Relative Humidity : 48.0 % 5.2 Test set-up The frequency range investigated was 30 MHz to 1000 MHz. All readings are quasi-peak unless stated otherwise. The half-wave dipole antenna was tuned t…
Text truncated - open the document above for the full version.
Contact Information
Applicant
HONGGYU LEE(Manager)
Test Firm
EMC Research InstituteKyu-Hong Jung
Technical Specifications
| # | Rule Parts | Frequency Range | Power Output |
|---|---|---|---|
| 1 | 15B | - | - |
Other Applications from DREAMUS COMPANY
QDMPPF43
Aug 28, 2024SP3000M
Equipment Class
NII - Unlicensed National Information Infrastructure TXQDMPPM45
Oct 17, 2023KANN ULTRA
Equipment Class
NII - Unlicensed National Information Infrastructure TX
QDMPPR51
May 07, 2023SE300
Equipment Class
NII - Unlicensed National Information Infrastructure TX
QDMPSP22
May 04, 2023UW100 MK II
Equipment Class
DSS - Part 15 Spread Spectrum Transmitter
QDM-HERO-OLS01
Jan 16, 2023LIM YOUNG WOONG OFFICIAL LIGHT STICK
Equipment Class
DTS - Digital Transmission System