QDMN10PORTABLE DIGITAL AUDIO PLAYER
DREAMUS COMPANY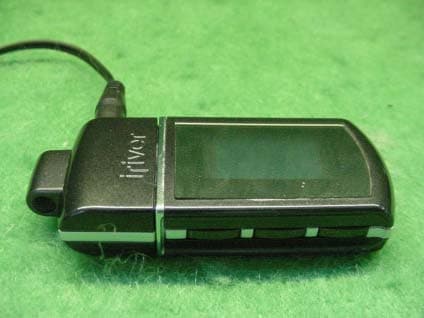
Click to zoom
Application Details
- Equipment Class
- JBP - Part 15 Class B Computing Device Peripheral
- Date of Grant
- Jun 17, 2004
- Application Purpose
- Original Equipment
- Date of Application
- Jun 17, 2004
- Equipment Note
- PORTABLE DIGITAL AUDIO PLAYER
- Company
- DREAMUS COMPANY
- Country
- South Korea
Documents & Files
Document Text
Text extracted from the exhibit documents filed with the FCC. Open a document above to read the original.
Users Manual
I Quick Start Guide IPower ON / OFF 2 Listening to music 2 Recording 3 Charging 4 Chapter 1 Quick Start GuidePower ON / OFF Quick Start GuideListening to music Power ONPress the <PLAY/STOP> button toturn on the player. Press and Hold When stopped or in recording standby mode,the player automatically turns off according to thesetting of STOP POWER OFF on the MENU. 1 Selecting an Audio Track : Plays previous track: Plays next track 3 Volume control : To increase : To decrease 4 Listening to musicPress the <PLAY/STOP> buttonto turn on the player. 2 Connecting productConnect the earphones as shownillustrations. 1 Power OFFPress and Hold the <PLAY/STOP>button. 2 Press the <PLAY/STOP> buttonagain to play. 1 Quick Start Guide Quick Start GuideVoice Recording Press the <MENU> button. - The recording is started. 4 Press the <MENU> button again to play. - The recording is completed. 5 Check the Recording VoicePress the <PLAY/STOP> button. 6 Quick Start GuideVoice Recording MenuPress and Hold the <MENU> button. Press and Hold 1 Recording VoicePress and Hold the <PLAY/STOP> button. - The recorder will be in standby mode. 3 Selecting a Voice RecordingPress the or < , > to selectVoice mode. 2 Quick Start GuideCharging with USB cable Connecting USB cableConnect the USB cable (provided) to the USB port of your computer. 1 l The player can be recharged even during power off. l Charge time: 3 hours (At full discharge) I Getting started IWelcome 6 Copyrights and Trademarks 6 Features of iFP-N10 7 Components 8 Locating the controls 8 LCD screen display 10 Chapter 2 Getting startedWelcome Getting startedCopyrights and Trademarks Thank you for purchasing this product.The iFP-N10 comes complete with a long list of advanced features.Please read this manual carefully to get the most out of your new player.http://www.iRiver.comYou can obtain information about your product, look for updates and find Q/A s at our website. CopyrightsiRiver Limited has all the rights of the patent, trademark, literary property and intellectual property related to thismanual. You may not reproduce any part of this manual unless authorized by iRiver Limited.You can be punished by using any part of this manual illegally.The software, audio and video which have an intellectual property are protected by copyright and internationallaws. It is user s responsibilities when he/she reproduce or distribute the contents created by this product.The companies, institutions, products, people and events used in examples are not real data. We don t have anyintension to be related with any companies, institutions, products, people and events through this manual andshould not draw inferences. Users are responsible for observing the copyrights and intellectual properties. '1999~2004 iRiver Limited. All rights reserved. TrademarksWindows, Windows 98 SE, Windows ME, Windows 2000, Windows XP and Windows Media Player are theregistered trademarks of Microsoft Corp. 2 Getting started Getting startedFeatures of iFP-N10 Multi-Codec PlayerSupports MP3,WMA and ASF formats.Firmware UpgradeProvides the latest updated features via firmware upgrade.Graphic LCD supporting Multiple LanguagesGraphic LCD which can support multiple languages (40 languages).6 Preset EQNormal, Rock, Jazz, Classic, U Bass, MetalXtreme EQ and Xtreme 3DCustomize your own EQ with Xtreme EQ and enhance bass and surround sound with Xtreme 3D. GUI (Graphic User Interface)Menu SystemConvenient neck strapSupports USB 1.1Simple NavigationSimple navigation makes it easy to find any song.Supports 8 levels of subfolders, 100 folders total and up to 500 files at one timeVoice RecordingCreate your own playlists iFP-N10 Earphones andCovers Mini USB Getting startedComponents Accessories are subject to change without notice. Movie Clip CD Manual/Warranty form(Quick Start Guide) Getting startedLocating the controls Your player may differ slightly from that shown in the illustrations. Product View - top 1 Product View - bottom 2 LCD Display Push openbutton 2 Getting started Getting startedLocating the controls Your player may differ slightly from that shown in the illustrations. Product View - top 1 Product View - bottom 2 LCD DisplayEarphones’Jack Push openbutton Getting startedLocating the controls Your player may differ slightly from that shown in the illustrations. Product View - Left side 1 Product View - Right side 2 Play / Stop ButtonPower ON / OFFButton Long : MENU ButtonShort : MODE ButtonVolume - ButtonDown ButtonVolume + ButtonUp Button Next Button /Left ButtonPrevious Button /Right Button Getting startedLCD screen display Music mode 1 1 Time2 Progress Bar3 Play Mode4 Folder Name5 Song Title6 Battery Indicator7 Play time8 Volume9 EQ / File Format / Bit Rate / Sampling Rate Getting startedLCD screen display IRM (iRiver Rights Management) iRiver Rights Management is a digital music format.Please visit our web site for details about this music format. File Format 2 Getting started Getting startedLCD screen display Recod mode [Before Recoding][After Recoding] 1 1 Condition of Recoding2 Icon of Recoding3 Progress Bar4 File Number5 Elapsed Time6 Indicator Time7 Progress Bar for Recode8 Folder Name for Recode9 File Name for Recode I Using Basic Functions ISoftware installation 14 Connecting to the PC 17 Installation of New Hardware 18 Detach the player 20 Basic Functions 21 Navigation 21 MP3 22 Recording-Voice 22 Menu Setup 24 Delect-File 24 Delect-Folder 26 Chapter 3 Using Basic FunctionsSoftware installation Please complete the steps in this section BEFORE ATTACHING YOUR PLAYER TO YOUR PC . Insert the Installation CD into the CD-ROM drive.The following screen appears after inserting the CD. - If the installation doesn’t automatically begin, execute the "setup.exe"file in the installation CD.The installation programwill begin. - The installation CD contains the following contents : Device DriverManager ProgramManager Program for Mac 1 System Requirements (Windows) Pentium133MHz or faster CD-ROM drive USB …
Text truncated - open the document above for the full version.
Contact Information
Applicant
HONGGYU LEE(Manager)
Test Firm
EMC Research InstituteKyu-Hong Jung
Technical Specifications
| # | Rule Parts | Frequency Range | Power Output |
|---|---|---|---|
| 1 | 15B | - | - |
Other Applications from DREAMUS COMPANY
QDMPPF43
Aug 28, 2024SP3000M
Equipment Class
NII - Unlicensed National Information Infrastructure TXQDMPPM45
Oct 17, 2023KANN ULTRA
Equipment Class
NII - Unlicensed National Information Infrastructure TX
QDMPPR51
May 07, 2023SE300
Equipment Class
NII - Unlicensed National Information Infrastructure TX
QDMPSP22
May 04, 2023UW100 MK II
Equipment Class
DSS - Part 15 Spread Spectrum Transmitter
QDM-HERO-OLS01
Jan 16, 2023LIM YOUNG WOONG OFFICIAL LIGHT STICK
Equipment Class
DTS - Digital Transmission System