R74TC2108UTwo Way Radio
Shenzhen HYT Science &Technology Co Ltd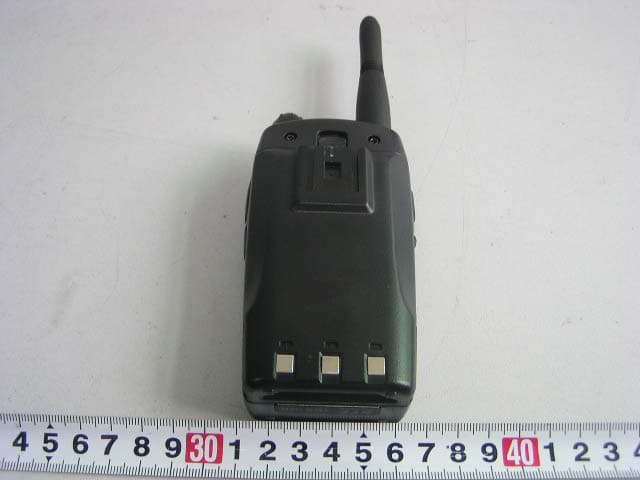
Click to zoom
Application Details
- Equipment Class
- TNF - Licensed Non-Broadcast Transmitter Held to Face
- Date of Grant
- Jul 11, 2006
- Application Purpose
- Original Equipment
- Date of Application
- Jul 11, 2006
- Equipment Note
- Two Way Radio
- Frequency Range
- 450.00000000 - 470.00000000
- Country
- China
Documents & Files
Document Text
Text extracted from the exhibit documents filed with the FCC. Open a document above to read the original.
Users Manual
1 THANK YOU! We are grateful for your purchase of HYT product. We believe this easy–to-use radio will provide you with dependable and reliable communications. This HYT portable two-way radio is a precision device. Treat it with care, and you will enjoy years of reliable operation. MODELS COVERED IN THIS MANUAL TC2108U: UHF Two-way Radio 2 User Safety Information PLEASE READ THIS IMPORTANT INFORMATION BEFORE USING YOUR HYT PORTABLE TWO-WAY RADIO. ◇ Only qualified technicians are allowed to maintain this product. ◇ To avoid electromagnetic interference, turn off your radio in places where posted notices instruct you to do so. Hospitals or health care facilities may be using equipment that is sensitive to external RF energy. When travelling on aircraft, turn off your radio when the airline crew instructs you to do so. ◇ When in vehicles equipped with an air bag, do not place a portable radio in the airbag deployment area. ◇ Turn off your radio prior to entering any area with a potentially explosive atmosphere. Do not remove, install, or charge batteries in such areas. ◇ To avoid possible interference with blasting operations, turn off your radio when you are near electrical blasting caps. ◇ Do not use any portable radio that has a damaged antenna. If a damaged antenna comes into contact with your skin, a minor burn may result. ◇ Do not expose the radio to direct sunlight for long periods of time. Do not place the radio in direct contact with any heating source. 3 CONTENTS Product Inspection Battery Charging Information Accessory Information Battery Antenna Belt Clip Getting Started LCD Display Basic Operations Features Monitor Channel Scan Priority Channel Scan Scan Revert Channel Selectable CTCSS/CDCSS Selectable Squelch Level High/Low power Key lock Time Out Timer (TOT) Battery Save Low Battery Alert Busy Channel Lockout Backlight Troubleshooting Guide Optional Accessories Care and Cleaning CTCSS/CDCSS table Frequency Chart 4 Product Inspection Thank you for your purchase of HYT portable two-way radio model: TC2108. Before use, please inspect the product as follows. First check the shipping carton for any signs of damage. If any damage has occurred, please contact your dealer immediately. Confirm the supplied product against the packing slip to assure accuracy. Available Accessories Part number Item Qty.(pcs) Antenna* 1 Adapter 1 Li-ion Battery 1 Belt Clip 1 Owner’s Manual 1 Charger cup 1 *Notes: Antenna mark: TC2108-U (1), TC2108H-U (1): Green; TC2108-U (2), TC2108H-U (2): White; TC2108-V (2), TC2108H-V (2): Dark Red. 5 Battery Charging Information Standard Charger 1. Insert the radio and battery or battery alone into the charging cup. Charging begins and the red LED will light continuously. When the charging cycle is complete, the red LED will change to green. Charging time is less than 2.5 hours. 2. After the battery is fully charged, the charger will shut off automatically. 3. A flashing red LED indicates an abnormal charging condition, which can be caused by an old battery or a defective battery. Contact your dealer for instructions. Notes: Batteries should be charged in a dry environment at room temperature. If the battery cannot reach normal capacity after charging, you need to replace the battery. Do not short out the battery terminals or dispose of the battery by fire. Accessory Information Battery Attaching the Battery (See figure○ 1 ) 1, Insert the tabs, at the bottom of the battery, into the slots at the bottom of the radio chassis.. 2, Press the top of the battery towards the radio until a click is heard. Removing the Battery (See figure○ 2 ) 1, Turn off the radio. 2, Push the battery latch on the back panel, towards the top of the radio. 3, Pull the top of the battery away from the radio chassis, and lift the battery from the radio. 6 Antenna Attaching the Antenna (See figure○ 3 ) 1, Align the threaded end of the antenna with the radio’s antenna connector. 2, Turn the antenna clockwise to tighten. Removing the Antenna (See figure○ 4 ) 1.Turn the antenna counter-clockwise until you can remove it. Belt Clip Attaching the Belt Clip (See figure○ 5 ) 1, Align the grooves of the belt clip with those of the battery. 2, Press the belt clip down until a click is heard. Removing the Belt Clip (See figure○6) 1, Pry the belt clip tab away from the battery. 2, Slide the belt clip upwards to remove it. . 7 Getting Started 1. Antenna Used to receive or transmit signals. 2. LCD Displays operation status of the radio. 3. LED indicator In transmit mode, the red LED will turn on. In receive mode, the green LED will turn on. A flashing red LED indicates that the battery is low. 4. POWER/VOL Knob Rotate the volume control clockwise to turn the unit on, fully counter clockwise to turn the unit off. Increase or decrease volume by adjusting the volume control accordingly. 5. Down key Adjust the channel downwards. 6. SCAN key Press the scan key to activate the scan mode. When the radio detects properly coded activity on a channel, it will stop scanning and listen to that channel. 7. Up key Adjust the channel upwards. 8 8. PTT button To transmit, press and hold PTT button. To receive, release PTT button. 9. MONI button In receive mode, press the MONI key to monitor other activity on your selected channel . 10. Microphone When transmitting, speak into the microphone holding the radio 2-4 inches from your mouth. 11. jack Used to connect external earphone/microphone accessories. 12. Speaker Listen to received audio. 13. DC Jack Used for factory adjustment only. 14. Battery latch Used to fasten and remove the battery. 15. Belt clip Used to clip radio on your belt. 16. Battery pack 9 LCD Display 1. Appears when the transmit power of the current channel is set for low power. 2. Appears when the dealer disables the radio’s speaker. (Must use audio accessory to operate.) 3. Appears when the keys are locked. 4. Display the current channel number. 10 Basic Operations To Turn On the Radio Turn the…
Text truncated - open the document above for the full version.
External Photos
EXHIBIT B - EUT PHOTOGRAPHS EUT – Front View EUT – Rear View
ID Label/Location Info
EXHIBIT A - FCC ID LABELING AND LOCATION Proposed FCC ID Labeling Proposed FCC ID Location FCC ID Label Location ATTENTION! Restricted to occupational use to satisfy FCC RF exposure limits. See users manual for operating requirements. FCC ID: R74TC2108U Model: TC2108U
Internal Photos
EXHIBIT C - EUT INTERNAL PHOTOGRAPHS EUT – Inside View (1) EUT –Inside View (2) Battery View EUT – Main PCB Front View EUT – Main PCB Rear View
Operational Description
Circuit Description 1. Frequency Configuration The receiver utilizes double conversion super heterodyne. The first IF is 45.05MHz and the second is 455KHz. The first local oscillator signal is supplied from PLL circuit. Frequency needed in the transmitter is supplied from PLL circuit. Figure 1 shows the frequency configuration. Frequency range:TC2108U: 450MHz—470MHz ANTSW ANT MCF CF 455KHz IF SYSTEM 45.05MHz 44.595MHz TCXO SP 12.8MHz MIC MIC AMP PLL VCO AMP RX TX RF AMP TX AMP AF AMP Figure 1. frequency configuration 2. Receiver The receiver utilizes double conversion super heterodyne. 1) Front-end RF Amplifier The input signal from antenna is amplified in RF amplifier (Q27) after passing through the receive/transmit circuit and a 3-stage LC band pass filter. The amplified signal is filtered by a band pass filter (a 3-stage LC BPF) to eliminate unwanted signal before passing to the first frequency mixer. 44.595 MHz SP AF AMP IC8 ANT D11 RF AMP Q27 MCF MIXER Q23 1st Local OSC (PLL) IFAMP Q22 XF1 IF.MIX IC1 AF AMP LPF .HPF BPF BPF Figure 2. receiver section configuration 2) The First Mixer The signal from RF amplifier is mixed with the first local oscillator signal from PLL frequency synthesizer in the first mixer (Q23) to generate a 45.05MHz first IF signal. The first IF signal is then fed through two monolithic crystal filters (XF1) to remove spurious signals from adjacent channels. 3) IF Amplifier The first IF signal is amplified in Q22 and then enters the IF process chip IC1. The signal is mixed with the second local oscillator signal in IC1 to create a 455KHz second IF signal. The second IF signal is then fed to a 455KHz ceramics filter (CF1) to eliminate unwanted signals before it is amplified and FM detected in IC1. 4) AF Amplifier The demodulated AF signal obtained from IC1 is amplified in IC7 (1/4), and then filtered by low pass filter Q19 and high pass filter Q20, and then de-emphasized by R130 and C156. The resulting AF signal passes through a volume control circuit and then is amplified to a sufficient level to drive the speaker by AF power amplifier (IC8). 5) Squelch Part of the AF signal from IC1 enters IC1 again, and the noise component is amplified and rectified by a filter and an amplifier to produce a DC voltage corresponding to the noise level. The DC signal from IC1 goes to the analog port of the microprocessor (IC11). IC11 determines whether to output sounds from the speaker by detecting whether the input voltage is higher or lower than preset value. To output sounds from the speaker, IC11 sends a high level signal to the MUTE and AFCO lines and turns IC8 on through Q12. DET FM IF IC1 IF AMP HPF AMP IC7 AF LPF HPF DET 2 39 40 1 SW Q12 SW AF/PF AMP IC7 LPF IC11 MCU B U S Y M U T E A F C O T I IC8 SP Figure 3. AF amplifier and squelch circuit 6) Receive signaling CTCSS Audio frequencies over 300Hz of the output signal from IC1 are cut off by a low-pass filter. The resulting signal enters the microprocessor IC11. IC11 determines whether the CTCSS matches the preset value and controls the MUTE and AFCO and the speaker sound output according to the squelch results. 3. PLL Frequency Synthesizer PLL circuit generates the first local oscillator signal for reception and the RF signal for transmission. 1) PLL Circuit The frequency step of PLL circuit is 5KHz or 6.25KHz. A12.8MHz reference oscillator signal is divided at IC1 by a fixed counter to produce a 5KHz or 6.25KHz reference frequency. Output signal from voltage control oscillator (VCO) passes through buffer amplifier Q14 and is divided at IC2 by the dual-module programmable counter. The divided signal is compared in the phase comparator IC2 with the 5KHz or 6.25KHz reference signal. The output signal from phase comparator is filtered through a low-pass filter and passed to the VCO to control the oscillator frequency. (See figure 4) REF OSC PLL DATA 5KHz/6.25KHz 12.8MHz I/M 5KHz/6.25KHz PLL IC IC2 PHASE COMPARATOR I/N CHARGE PUMP RF AMP RX VCO D7,8 T/R SW D5,6 Q8 TX VCO LPF D2,3 Q14 Q16 Q13 BUFF AMP Figure 4. PLL circuit 2) VCO The operating frequency is generated by Q16 in transmit mode and by Q8 in receive mode. The operation frequency generates a voltage through the phase comparator to control the varactor diodes, so as to keep the oscillator frequency consistent with the preset frequency in CPU (D2 and D3 in transmit mode and D7 and D8 in receive mode). T/R pin is set high in receive mode causing Q6 to turn off Q16 and turn Q7 on. The T/R pin is set low in transmit mode. The output from Q8 and Q16 is amplified by Q14 and sent to the buffer amplifier. 3) Unlock Detector If low level appears at LD pin of IC2, unlock condition will occur, and DC voltage is obtained from D13 and R63, and the voltage supplied to the UL pin of microprocessor by IC2 goes low. When the microprocessor detects this condition, the transmitter is disabled, ignoring the push-to-talk switch input signal. (See figure 5) MPU PLL IC C180 IC2 LD D13 R63 UL IC11 Figure 5. unlocked detect circuit 4. Transmitter 1) Transmit audio The audio signal from microphone is amplified through IC3(1/2) ,and then pre-emphasized, and then filtered by another low-pass filter(separate filter)(Q25 and Q24) to eliminate the frequencies over 3KHz. The resulting signal enters the VCO for direct FM modulation. (See figure 6) 2) CTCSS Encoder The necessary frequency for CTCSS encoder is generated by IC11 and FM-modulated to the PLL reference signal. Since the reference OSC does not modulate the loop characteristic frequency or higher, modulation is performed at the VCO side by adjusting the balance. (See figure 6) IC11 MUTE TO CTCSS MIC Q26 SW IC3(1/2) MIC AMP IC3(1/2) IDT (SPLATTER FILTER) Q24,25 LPF VR2 MAX DEV REFERENCE OSC X1 IC2 VCO D2,3 VR4 PREEMPHASIS Figure 6. transmit CTCSS 3) VCO and RF amplifier The transmit signal obtained from VCO buffer amplifier Q14 is amplified by Q15. This amplified signal is passed to power amplifier Q32 and Q31, which includes a 2-stage FET …
Text truncated - open the document above for the full version.
Parts List/Tune Up Info
TC2108U Adjustment Description The radio can be programmed with PC program software or by manual programming. Manual programming procedure of TC2108 is as follow. (Please refer to the test and alignment mode in the section Radio Mode.) I. Instruments: 1. Communication analyzer 2955B 1 set 2. Scanner 1 set 3. 3A/10V Power Supply 1 set 4. Digital Voltmeter 1 set 5. 3A Ammeter 1 set 6. RF Cable II. Alignment: 1. Initializing: It’s necessary to set the model and initialize the radio before alignment because there is no needed information in EEPROM when the radio is manufactured. Short out two SELF points on PCB (i.e, pin 26 and grounding pin), and turn on the power, after a “beep” sounds, LCD displays “BAND 1-22”. The radio enters model set and reset mode. Press [UP]/[DOWN] to select model number 1-22. [For example, the model number of radio 450MHz-470MHz is “7”]. Press [PTT] to save the model and to initialize the radio. Refer to the table in page 11 for data of initialization. 2. Alignment: Some items can be aligned in conventional communication mode and the others in manual alignment mode. Turn on the power, the radio enters conventional communication mode. While pressing [PTT] and [MONI] simultaneously, turn on the power, and in 3 seconds the radio enters model select menu. Select “ tune”, and press PTT to enter manual alignment mode. Only the model number is set, the alignment can be done. VCO: Measurement Alignment Item Condition Test Instrument Terminal Part Method Specifications /Remarks 1. Power supply power voltage DC 7.5V 1.CH: TX HIGH 3.0V±0.1V 2.Transmit VCO Lock voltage 2.CH: TX LOW TC1 Check >1V 1.CH: RX HIGH 3.0V±0.1V 3. Receive VCO Lock voltage 2.CH: RX LOW Digital Voltmeter CV TC2 Check >1V
RF Exposure Info
Note: This test report is specially limited to the above client company and this particular sample only. It may not be duplicated without prior written consent of Bay Area Compliance Laboratory Corporation. This report must not be used by the client to claim product certification, approval, or endorsement by NVLAP, NIST or any agency of the U.S. Government. SAR EVALUATION REPORT For Shenzhen HYT Science & Technology Co., Ltd. HYT Tower,Shenzhen Hi-Tech Industrial Park North, Beihuan Rd., Nanshan District, Shenzhen,Guangdong,P.R.C. FCC ID: R74TC2108U This Report Concerns: Original Report Equipment Type: Two-way Radio Test Engineer: Eric Hong Report No.: R06050915S Report Date: 2006-07-12 Reviewed By: Daniel Deng Prepared By: Bay Area Compliance Laboratory Corporation 1274 Anvilwood Ave. Sunnyvale, CA 94089 Tel: (408) 732-9162 Fax: (408) 732 9164 Shenzhen HYT Science & Technology Co., Ltd FCC ID:R74TC2108U Report #R06050915 SAR Evaluation Report Page 2 of 54 DECLARATION OF COMPLIANCE SAR EVALUATION Rule Part(s): FCC §2.1093 & IEEE 1528 Test Procedure(s): FCC OET Bulletin 65 Supplement C & IEEE 1528 Device Type: Two-way Radio Model Number: TC2108U Modulation: FM TX Frequency Range: 450MHz – 470MHz Max. Conducted Power Tested: 2.34 Watts Antenna Type(s): External Antenna Body-Worn Accessories: Earphone and Belt clip Face-Head Accessories: None 1.525 mw/g (1g, 450MHz, Body-Worn), 0.975 mw/g (1g, 450 MHz, Face hold) BACL Corp. declares under its sole responsibility that this wireless portable device has been determined to be in compliance for localized specific absorption rate (SAR) for uncontrolled exposure and general population exposure limits specified in FCC OET Bulletin 65 Supplement C and has been tested in accordance with the measurement procedures specified in ANSI IEEE C95.3:2002 & IEEE 1528. All measurements reported herein were performed under my supervision and believed to be accurate to the best of my knowledge. I further attest for the completeness of these measurements and vouch for the qualifications any and all personnel performing such measurements. The results and statements contained in this report pertain only to the device(s) evaluated. /signature/ Eric Hong Bay Area Compliance Laboratory Corp. Shenzhen HYT Science & Technology Co., Ltd FCC ID:R74TC2108U Report #R06050915 SAR Evaluation Report Page 3 of 54 TABLE OF CONTENTS REFERENCE, STANDARDS, AND GUILDELINES .............................................................................................. 4 SAR LIMITS................................................................................................................................................................ 5 EUT DESCRIPTION.................................................................................................................................................... 6 DESCRIPTION OF TEST SYSTEM.......................................................................................................................... 7 MEASUREMENT SYSTEM DIAGRAM............................................................................................................................. 9 SYSTEM COMPONENTS.............................................................................................................................................. 11 TESTING EQUIPMENT ........................................................................................................................................... 20 EQUIPMENTS LIST & CALIBRATION INFO.................................................................................................................. 20 SAR MEASUREMENT SYSTEM VERIFICATION.............................................................................................. 21 SYSTEM ACCURACY VERIFICATION.......................................................................................................................... 21 EUT TEST STRATEGY AND METHODOLOGY................................................................................................. 22 SAR EVALUATION PROCEDURE................................................................................................................................22 CONCLUSION ........................................................................................................................................................... 23 SAR BODY WORST-CASE TEST DATA...................................................................................................................... 23 APPENDIX A – MEASUREMENT UNCERTAINTY............................................................................................24 APPENDIX B – PROBE CALIBRATION CERTIFICATES ................................................................................ 26 APPENDIX C – DIPOLE CALIBRATION CERTIFICATES............................................................................... 37 APPENDIX D - TEST SYSTEM VERIFICATIONS SCANS ................................................................................ 43 LIQUID MEASUREMENT RESULT................................................................................................................................43 APPENDIX E - EUT SCANS..................................................................................................................................... 46 APPENDIX F – CONDUCTED OUTPUT POWER MEASUREMENT............................................................... 48 PROVISION APPLICABLE............................................................................................................................................ 48 TEST PROCEDURE...................................................................................................................................................... 48 TEST EQUIPMENT....................................................................................................................................................... 48 TEST RESULTS........…
Text truncated - open the document above for the full version.
Test Report
Note: The test report is specially limited to the above company and this particular sample only. It may not be duplicated without prior written consent of Bay Area Compliance Lab Corp. (ShenZhen). This report must not be used by the client to claim product certification, approval, or endorsement by NVLAP, NIST or any agency of the US Government. FCC PART 90 TYPE APPROVAL EMI MEASUREMENT AND TEST REPORT For Shenzhen HYT Science & Technology Co., Ltd HYT Tower, Shenzhen Hi-Tech Industrial Park North, Beihuan Rd., Nanshan District, Shenzhen, P.R.C. FCC ID: R74TC2108U June 23, 2006 This Report Concerns: Original Report Equipment Type: Two-way radio Test Engineer: Charmi Peng Deny Xiong Report No.: RSZ06043002 Test Date: May 23, 2006-June 20, 2006 Reviewed By: Boni Baniqued Prepared By: Bay Area Compliance Lab Corp. (ShenZhen) 6/F, the 3rd Phase of WanLi Industrial Building, ShiHua Road, FuTian Free Trade Zone, ShenZhen, Guangdong 518038, P.R.China Tel: +86-755-33320018 Fax: +86-755-33320008 Shenzhen HYT Science & Technology Co., Ltd FCC ID: R74TC2108U Report # RSZ06043002 Page 2 of 42 FCC PART 90 TYPE APPROVAL Report TABLE OF CONTENTS GENERAL INFORMATION.......................................................................................................................................4 PRODUCT DESCRIPTION FOR EQUIPMENT UNDER TEST (EUT) ....................................................................................4 OBJECTIVE...................................................................................................................................................................4 RELATED SUBMITTAL(S)/GRANT(S).............................................................................................................................4 TEST METHODOLOGY..................................................................................................................................................4 TEST FACILITY.............................................................................................................................................................4 LOCAL SUPPORT EQUIPMENT LIST AND DETAILS........................................................................................................5 SYSTEM TEST CONFIGURATION ..........................................................................................................................6 DESCRIPTION OF TEST CONFIGURATION......................................................................................................................6 EQUIPMENT MODIFICATIONS.......................................................................................................................................6 CONFIGURATION OF TEST SETUP.................................................................................................................................7 BLOCK DIAGRAM OF TEST SETUP................................................................................................................................7 SUMMARY OF TEST RESULTS...............................................................................................................................8 §2.1046 - CONDUCTED OUTPUT POWER..............................................................................................................9 APPLICABLE STANDARD..............................................................................................................................................9 TEST EQUIPMENT LIST AND DETAILS...........................................................................................................................9 TEST PROCEDURE........................................................................................................................................................9 TEST DATA................................................................................................................................................................10 §2.1046, and §90.205 – RADIATED OUTPUT POWER .........................................................................................14 APPLICABLE STANDARD............................................................................................................................................14 TEST EQUIPMENT LIST AND DETAILS.........................................................................................................................14 TEST PROCEDURE......................................................................................................................................................14 TEST DATA................................................................................................................................................................15 §2.1047, and §90.207 - MODULATION CHARACTERISTIC ...............................................................................16 A PPLICABLE S TANDARD ............................................................................................................................................16 T EST E QUIPMENT L IST AND D ETAILS .........................................................................................................................16 T EST P ROCEDURE ......................................................................................................................................................16 TEST DATA................................................................................................................................................................16 §2.1049, and § 90.209 – OCCUPIED BANDWIDTH ...............................................................................................20 APPLICABLE STANDARD............................................................................................................................................20 TEST EQUIPMENT LIST AND DETAILS........................................................................................…
Text truncated - open the document above for the full version.
Test Setup Photos
EXHIBIT D - TEST SETUP PHOTOGRAPHS Radiated Emission - Front View (Below 1000 MHz) Radiated Emission - Rear View (Below 1000 MHz) Radiated Emission - Front View (Above 1000 MHz) Radiated Emission - Rear View (Above 1000 MHz) Frequency Stability View
Contact Information
Applicant
Xiong Lei
Test Firm
Bay Area Compliance Laboratory Corp. (Shenzhen)John Chan
Technical Specifications
| # | Rule Parts | Frequency Range | Power Output | Emission | Tolerance |
|---|---|---|---|---|---|
| 2 | 9 | 450 MHz - 470 MHz | 2.32 W | 16K0F3E | 2.5 ppm |
Other Applications from Shenzhen HYT Science &Technology Co Ltd

R74TR-800U1
Feb 26, 2008REPEATER (BASE STATION)
Equipment Class
TNB - Licensed Non-Broadcast Station Transmitter
R74TR-800U2
Feb 24, 2008REPEATER BASE STATION
Equipment Class
TNF - Licensed Non-Broadcast Transmitter Held to Face
R74TR-800V
Feb 20, 2008REPEATER (BASE STATION)
Equipment Class
TNB - Licensed Non-Broadcast Station Transmitter
R74TC-620V2
Feb 18, 2008Two-Way Radio
Equipment Class
TNF - Licensed Non-Broadcast Transmitter Held to Face
R74TC-980U1
Jan 14, 2008TWO-WAY RADIO
Equipment Class
TNF - Licensed Non-Broadcast Transmitter Held to Face