A3LHLK506W61-inch LCD Projection TV Monitor
Samsung Electronics Co Ltd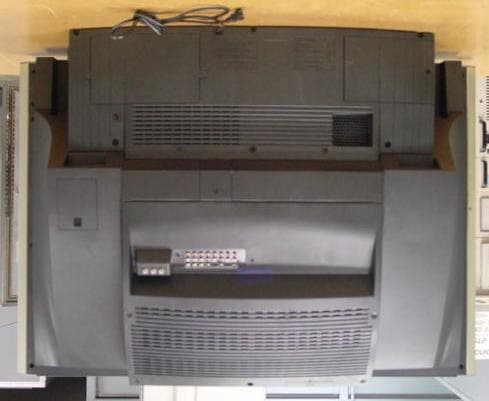
Click to zoom
Application Details
- Equipment Class
- JBP - Part 15 Class B Computing Device Peripheral
- Date of Grant
- Jul 05, 2001
- Application Purpose
- Original Equipment
- Date of Application
- Jul 04, 2001
- Equipment Note
- 61-inch LCD Projection TV Monitor
- Company
- Samsung Electronics Co Ltd
- Country
- United States
Documents & Files
Document Text
Text extracted from the exhibit documents filed with the FCC. Open a document above to read the original.
Users Manual
INSTRUCTION MANUAL Projection Color Television HLK436W/HLK506W SAMSUNG ELECTRONICS AMERICA INC. 105 CHALLENGER ROAD, RIDGEFIELD PARK, NJ 07660 U.S.A. FOR YOUR NEAREST SAMSUNG SERVICE CENTER DIAL 1-800-SAMSUNG www.samsungusa.com AA68-01242A(ENG) Safety Instructions Table of Contents 2 3 Warning! Important Safety Instructions CAUTION: TO REDUCE THE RISK OF ELECTRIC SHOCK, DO NOT REMOVE COVER (ORBACK). THERE ARE NO USER SERVICEABLE PARTS INSIDE. REFER ALL SERVICING TO QUALI-FIED SERVICE PERSONNEL. This symbol indicates high voltage is present. It is dangerous to make anykind of contact with any part inside this product.This symbol alerts you that important literature concerning operation andmaintenance has been included with this product. CAUTION: FCC/CSA regulations state that any unauthorized changes or modifications to thisequipment may void the user’s authority to operate it.CAUTION: To prevent electric shock, match the wide blade of plug to the wide slot, and fullyinsert the plug.ATTENTION: Pour eviter les chocs electriques, introduire la lame le plus large de la fiche dansla borne correspondante de la prise et pousser jusqu’au fond.Note to CATV system installer: This reminder is provided to call CATV system installer’s attentionto Article 820-40 of the National Electrical Code (Section 54 of Canadian Electrical Code, Part I), that provides guidelines for proper grounding and, in particular, speci-fies that the cable ground shall be connected to the grounding system of the building as close tothe point of cable entry as possible.Important: One Federal Court has held that unauthorized recording of copyrighted TV programsis an infringement of U.S. copyright laws. Certain Canadian programs may also be copyright-ed and any unauthorized recording in whole or in part may be in violation of these laws. To prevent damage which may result in fire or electric shock, do not expose this appliance to rain or moisture. Introduction ................................................................................................6Your New Wide TV ..................................................................................10 List of Features ........................................................................................................10Checking Parts ........................................................................................................10Side Panel Buttons ..................................................................................................11Side Panel Jacks ......................................................................................................11Side Panel LED Indicators ........................................................................................12Rear Panel Jacks ......................................................................................................13Remote Control ........................................................................................................14 Connections ............................................................................................18 Connecting VHF and UHF Antennas ..........................................................................18 Antennas with 300-ohm Flat Twin Leads ............................................................18Antennas with 75-ohm Round Leads ................................................................18Separate VHF and UHF Antennas ....................................................................19 Connecting Cable TV and VCR ................................................................................20 Cable without a Cable box..............................................................................20Cable with a Cable Box that Descrambles All Channels......................................20Connecting a Cable Converter Box ..................................................................21Connecting a Cable Converter Box and a VCR..................................................21 Connecting a Camcorder..........................................................................................22Connecting a DVD Player ........................................................................................23Connecting a Set Top Box ........................................................................................24Connecting Surround Speakers..................................................................................25 Operation .............................................................................................. 28 Turning the TV On and Off ......................................................................................28Adjusting Basic Convergence ....................................................................................28Viewing the Menus and Displays ..............................................................................30 Displaying the Menus......................................................................................30Displaying Status Information ..........................................................................30 Selecting the Menu Language ..................................................................................31Selecting the Antenna Input ......................................................................................31Channel Memory ....................................................................................................32 Selecting the Broadcast Source ........................................................................32Storing Channels in Memory Automatically ......................................................33Adding and Erasing Channels ........................................................................33 Changing Channels ................................................................................................34 Using the Channel Buttons .......................................................................…
Text truncated - open the document above for the full version.
Users Manual
Using Automatic (“Standard”) Picture Settings 1 Press the P.Mode button on the remote control to change the picture settings. 2 Press P.Mode repeatedly to select the “Standard,” “Mild,” or “Custom” picturesetting. Guide to Automatic Picture Settings• Choose Standard to set the TV to operate at top performance according to your TV’s specifications. • Choose Mild when viewing the TV in low light, or when playing video games.• Choose Custom if you want to adjust the settings yourself. Picture ControlUsing the remote, you can change the contrast, brightness, tint, color, and sharpness settings ofthe TV. Customizing the Picture 1 Press the Menu button. Press the joystick to enter.Move joystick left or right toselect “Custom”. You will see the items“Brightness,” “Contrast,”“Color,” “Tint,” and“Sharpness.” 2 Move the joystick down to select the item you want to change. 3 Move the joystick right or left to raise or lower the value ofthe item. When you are finished adjusting an item, wait a moment. Thelevel indicator will disappear and the Video menu will return.You can continue to make adjustments, or press the Menu buttonto exit. 39 Operation 38 Operation Setting the TimersThis TV can be set to turn on or off automatically at specific times that you choose. Before usingthe timers, you must set the TV’s clock, as described previously.Setting the On/Off Timer 1 Press the Menu button. Move the joystick down to select SETUP, then press the joystick to enter. 2 Move the joystick down to select Time, then press the joystick to enter. 3 Move the joystick down to select the “On time”. Move the joystick right toselect the hour, then Move the joystickup or down to adjust the hour for the TVto turn on. 4 Move the joystick right to select the minute. Move the joystick up or down toadjust the minute. Move the joystickright to select AM, then move the joy-stick up or down to select AM or PM. Continued... 41 Operation 40 Operation Setting the ClockThis TV has a built-in clock that will appear on screen when you press the Display button on theremote control. Setting this clock also allows you to use it to automatically turn the TV on or off. 1 Press the Menu button. Move the joystick down to select SETUP, then press the joystick to enter. 2 Move the joystick down to select Time, then press the joystick to enter. 3 Move the joystick right to select the hour. Move the joystick upor down to select the correcthour. 4 Move the joystick right to select the minute. Move thejoystick up or down to selectthe correct minute. Move thejoystick to the right to selectAM, then move the joystick upor down to select AM or PM. 5 Press Menu to exit the menus. Setting Up Your Remote ControlThis TV’s remote control can operate almost any VCR, cable box, or DVD. After it has been set upproperly, your remote control can operate in four different modes: TV, VCR, Cable, or DVD.Pressing the corresponding button on the remote control allows you to switch between thesemodes, and control whichever piece of equipment you choose. Setting Up the Remote to Operate Your VCR 1 Turn off your VCR. 2 Press the MODE button and make sure that the VCR LED is illuminated. 3 Press the Set button on your TV’s remote control. 4 Using the number buttons on your remote control, enter both digits of theVCR code listed on page 46 of thismanual for your brand of VCR. Makesure you enter both digits of the code,even if the first digit is a “0.”(If morethan one code is listed, try the firstone.) 5 Press the Power button on the remote control. Your VCR should turn on if yourremote is set up correctly.If your VCR does not turn on after setup, repeat steps 2, 3, and 4, but tryone of the other codes listed for yourbrand of VCR. If no other codes are list-ed, try each VCR code, 00 through 72. Notes on Using Remote Control Modes: VCR, Cable, DVD and TV• When your remote control is in “VCR” mode, the volume buttons still control your TV’s volume. • When your remote is in “TV” mode, the VCR control buttons (PLAY, PAUSE, etc.) still operate your VCR. • When your remote control is in “CABLE” or “DVD” mode, the volume buttons still control your TV’s volume, and the VCR control buttons (PLAY, PAUSE, etc.) still operate your VCR. 43 Operation 42 Operation 5 Move the joystick right to select Off, then move the joystick up or down toselect “On”. 6 When you are finished, move the joy- stick right. 7 If you want to set the Off time, move the joystick down to select the “Off time”.Set the “Off time” just as you set the“On time”. 8 If you want to set the volume level when the TV turns on, move the joystick downto select “On time volume”. Move thejoystick right to set the volume level youwant when the TV turns on. Press theMenu button to return to normal viewing. Setting the Sleep TimerYou can set your TV to automatically turn off after a preset interval. 1 Press the Sleep button on the remote con- trol. 2 You’ll see “Off” at the bottom of the screen. Press the Sleep button to selectthe time interval for the TV to stay on.The interval ranges from 10 to 360 min-utes. Setting Up the Remote to Operate Your DVD 1 Turn off your DVD. 2 Press the MODE button and make sure that the DVD LED is illuminated. 3 Press the SET button on your TV’s remote control. 4 Using the number buttons on your remote control, enter both digits of theDVD code listed on page 46 of thismanual for your brand of DVD. Makesure you enter three - digits of the code,even if the first digit is a “0.” If there ismore than one code listed, try the firstone. 5 Press the Power button on the remote control. Your DVD should turn on if yourremote is set up correctly.If your DVD does not turn on after setup, repeat steps 2, 3, and 4, but tryone of the other codes listed for yourbrand of DVD. If no other codes are list-ed, try each code, 078 through 087. Notes on Using Remote Control Modes: VCR, Cable, DVD and TV• When your remote control is in “VCR” mode, the volume buttons still control your TV’s volume. • When your remote is …
Text truncated - open the document above for the full version.
External Photos
Front view of EUT Rear view of EUT
ID Label/Location Info
Label and Lable Location - Label - Label Location This report shall not be reproduced except in full, without the written approval of SEC EMC Testing laboratory.
Internal Photos
Front view of EUT Rear view of EUT Rear view of EUT (Setup of main Drive B'd) Front view of Main PCB Rear view of Main PCB Front view of Power PCB Rear view of Power PCB Front view of DC/DC Module PCB Rear view of DC/DC Module PCB
Internal Photos
Top view of Drive B'd & Balast engine part Front view of Drive PCB Rear view of Drive PCB Top view of Balast engine part Rear view of Balast engine PCB Rear view of Digital PCB Rear view of Digital PCB
Test Report
Page 1 of 15 JOB NO. : SEMC1161 Product :LCD Projection TV Receiver Model No. :HLK506W FCC ID : A3LHLK506W 1. This test reports shall not be reproduced except in full, without the written approval of SEC EMC Testing laboratory. 2. This test reports does not constitute an endorsement by NIST/NVLAP or U.S Government. 3. This test report is to certify that the tested device properly complies with the requirements of FCC Rules and Regulations Part 15 Subpart B Unintentional Radiators. All tests necessary to show compliance to the requirements were and these results met the specifications requirement. Date of test :May 31, 2001 Issued Date :June 12, 2000 Tested by: Chun Kyu, PARK / Test Engineer Reviewed by: Seung Kyu, CHA / Manager of EMC Lab Authorised by: Taek Jeong, Shin / Chief of EMC Lab This laboratory is registered by the NIST/NVLAP, U.S.A. The test reported herein have been performed in accordance with its terms of registration. EMI TEST REPORT According to FCC Part 15 Subpart B/Class B NVLAP Code: 200447 Page 2 of 15 JOB NO. : SEMC1161 Table of Contents 1. General Information 1.1 Product Description 1.2 Configuration of EUT and peripherals 1.3 Used Cable Description 1.4 System Block Diagram of Test Configuration 2. System Test Configuration 2.1 Configuration of Radiated and Conducted Interference Measurement 2.2 Operation Enviroment 2.3 Test Procedure 3. Measurement Uncertainty 4. Conducted Emission Test Data 5. Radiated Emission Test Data 6. Label Configuration and Location 7. Test Equipment Used Distribution This test report has been made available as follows: CS Management Center, EMC Laboratory1 original CTV Division1 copy This report shall not be reproduced except in full, without the written approval of SEC EMC Testing laboratory. Page 3 of 15 JOB NO. : SEMC1161 1. General Information Applicant :Samsung Electronics Co., Ltd. CS Management Center EMC Test Laboratory Tel.: +81-(0)31-200-2135 Fax.: +81-(0)31-200-2189 Full Address :416 Maetan 3 Dong, Paldal-Ku, Suwon City, Kyungki Do, Korea, 442-742 Kind of Product :LCD Projection TV Receiver CONTACT PERSON :Chun Kyu, PARK TEL. +82-31-200-2135 REGULATION(S) :FCC Part 15 Subpart B, Class B Model Name :HLK506W(Brand Name: SAMSUNG) Customer Ref. :Color TV Div. (Contact Person : Seung Cheol, Lee Tel.: +82-(0)31-200-5419) TEST SITE :RF Anechoic Chamber & Shield Room TEST SITE ADDRESS :416, Maetan-3 Dong, Paldal-Gu Suwon City, Kyungki-Do, Korea, 442-742 This report shall not be reproduced except in full, without the written approval of SEC EMC Testing laboratory. Page 4 of 15 JOB NO. : SEMC1161 1.1 Product Description 1) Operating Frequency : 13.5MHz Main Video Decoder(VPC3230), 27MHz Main Video Decoder(VPC3230) / Interlace to Progressive(SDA9400), 65MHz LVDS Receiver(90CF386) / LVDS Trans-mitter(90C385), 35MHz Red FLCD Driver(SDP-0001) / Green FLCD Driver(SDP-0001) / Blue FLCD Driver(SDP-0001) 2) Justification The system was configured for testing in typical fashion use. Cable were attached to each of the available I/O Ports. Where applicable, peripherals were attached to the I/O cables. The mode of operation utilized for testing was selected to best simulate typical EUT use. 3) Description of Testing operating mode 4) Tested Resolution : This report shall not be reproduced except in full, without the written approval of SEC EMC Testing laboratory. Audio Output 1024 X 768 Audio out to TV Audio IN Operating Mode Operating section of EUT "H" Pattern display Resolutions On Screen Refresh ratesColors Display Tested Video mode 60Hz16bits Page 5 of 15 JOB NO. : SEMC1161 5) Product Specification ItemSpecificationRemark Inch50"Wide Display DeviceFLCD 0.76" 3 ResolutionHD (3million pixels)Picture Scan SystemProgressive (720P) Screen Format16:09 PCMulti Sync (XGA) CaptionYesFunctions Universal RMCYes Multi languageEnglish / Spanish / French V-chipYes GUI (On Screen Graphic)Yes Favorate CHYes DTV ReadyIn : 1080i/720p/480p/480i , Out : 720p Picture Mode4:3, 16:9, Panorama, Zoom1, Zoom2, Stretch Connection & TerminalAV-InFront S-VHS RF-InRear AV-In S-VHS Component PC-Input1EA (D_sub 15Pin) This report shall not be reproduced except in full, without the written approval of SEC EMC Testing laboratory. Page 6 of 15 JOB NO. : SEMC1161 1.2 Configuration of EUT and peripherals MarkItemModel No.Serial No.ManufacturerRemark A LCD Projection TV HLK506W-SAMSUNGEUT BNote PCS830626591AR200504SAMSUNG CDummy Load---Rated Impedance 1.3 Used Cable Description No.ItemLength[m]Shielded(Y/N) 1Monitor Cable1.5Y 2 Power Cable1.5N 3 Power Cable 1.5N 4External Cables1.5Y This report shall not be reproduced except in full, without the written approval of SEC EMC Testing laboratory. Remark Connected PC to TV(D-Sub 15pin) RCI & S-VHS Cables Power supply for EUT & Note pc Power supply for Note pc Page 7 of 15 JOB NO. : SEMC1161 1.4 System Block Diagram of Test Configuration This report shall not be reproduced except in full, without the written approval of SEC EMC Testing laboratory. A Power Supply B 1 Power Supply Termination for all cables Termination 4 C C 3 2 4 Page 8 of 15 JOB NO. : SEMC1161 2. System Test Configuration 2.1 Configuration of Radiated and Conducted Interference Measurement * Cabling was taken into consideration and test data was taken under worse case conditions. 1)Conduction(Front View) 2)Conduction(Rear View) This report shall not be reproduced except in full, without the written approval of SEC EMC Testing laboratory. Page 9 of 15 JOB NO. : SEMC1161 3) Radiation(Front View) 4) Radiation(Rear View) This report shall not be reproduced except in full, without the written approval of SEC EMC Testing laboratory. Page 10 of 15 JOB NO. : SEMC1161 2.2 Operation Enviroment ConductionRadiation Temperature [ C ] :2220 Humidity [ % ] :4345 Power supply :AC120V/60HzAC120V/60Hz 2.3 Test Procedure 2.3.1 Conducted Emissions Eut was placed on a platform of nominal size, 1m by 1.5m, raised 80cm above the conducting ground plane. The rear of tabletop was located 40cm to …
Text truncated - open the document above for the full version.
Test Setup Photos
Conducted Emission (Rear view) Conducted Emission (Front view) Radiated Emission (Front view) Radiated Emission (Rear view)
Contact Information
Applicant
Jenni Chun(General Manager)
Technical Contact
PCTEST Engineering Lab. Inc.Randy Ortanez
[email protected]410-290-6652
6660-B Dobbin Road · Columbia, Maryland · United States
Test Firm
Samsung Electronics Co., Ltd.T. Shin
Technical Specifications
| # | Rule Parts | Frequency Range | Power Output |
|---|---|---|---|
| 1 | 15B | - | - |
Other Applications from Samsung Electronics Co Ltd
A3LSMS741B
Aug 05, 2026Portable Handset
Equipment Class
6VL - 15E 6 GHZ Very Low Power DeviceA3LSMX940
Jul 31, 2026BT,BLE Tablet DTS,UNII a,b,g,n,ac,ax,be and digitizer
Equipment Class
DTS - Digital Transmission SystemA3LSMS741U
Jul 30, 2026Portable Handset
Equipment Class
6CD - 15E 6 GHz Low Power Dual ClientA3LSMX840
Jul 27, 2026BT,BLE Tablet DTS,UNII a,b,g,n,ac,ax and Digitizer
Equipment Class
DSS - Part 15 Spread Spectrum TransmitterA3LSMX848U
Jul 27, 2026WCDMA, LTE, 5G NR Tablet BT,BLE, DTS,UNII a b g n ac ax and Digitizer
Equipment Class
JBP - Part 15 Class B Computing Device Peripheral