BEJMU60PZ12V60" Plasma Monitor
LG Electronics USA, Inc.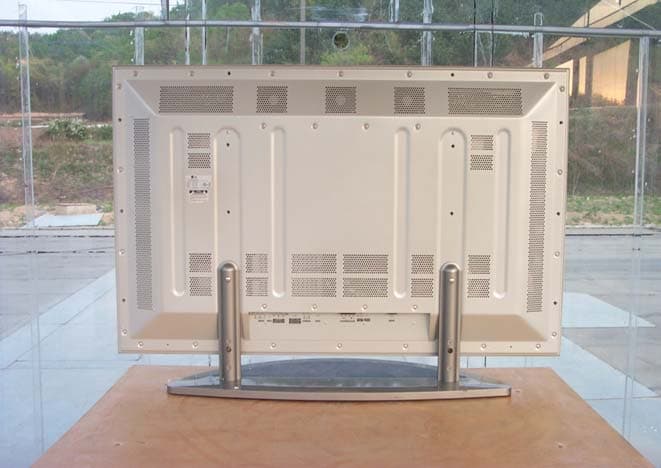
Click to zoom
Application Details
- Equipment Class
- JBP - Part 15 Class B Computing Device Peripheral
- Date of Grant
- Apr 28, 2002
- Application Purpose
- Original Equipment
- Date of Application
- Apr 28, 2002
- Equipment Note
- 60" Plasma Monitor
- Company
- LG Electronics USA, Inc.
- Country
- United States
Documents & Files
Document Text
Text extracted from the exhibit documents filed with the FCC. Open a document above to read the original.
Users Manual
PLASMA MONITOR ON/OFF INPUT SELECT VOLUME P/NO : 3828VA0277W(NP00KB) PLASMA MONITOR Please read this owner’s manual carefully beforeoperating the Monitor.Retain it for future reference.Record model number and serial number of theMonitor.See the label attached on the back of the Monitorand quote this information to your dealer when yourequire service.Model number : Serial number : MU-60PZ12VMU-60PZ12VAMU-60PZ12VBMU-60PZ12VKMU-60PZ12VS OWNER’S MANUAL ON/OFF INPUT SELECT VOLUME WARNING TO REDUCE THE RISK OF FIRE AND ELECTRIC SHOCK, DO NOTEXPOSE THIS PROD- UCTTO RAIN OR MOISTURE. The explanation about colored dots may be present on PDPscreen The PDPwhich is the display device of this product is composed of 0.9 to 2.2 million cells and a few cell defects can occur in the manufacture of the PDP. Several colored dots visible on the screen would be acceptable, in line with other PDPmanufacturers and would not mean that the PDPis faulty. We hope you will understand that the product which corresponds to this standard is regarded as acceptable. It means that it could not be changed or refunded. We promise that we'll do our best to develop our technology to minimize the cell defects. The explanation about noise of 60" PDP In the same way that a fan is used in a PC to keep the CPU cool, the PDPis equipped with cooling fans to improve the reliability of this product. Therefore, a certain level of noise could occur when the fan is oper- ated. This noise doesn't have any negative effect on its efficiency and liability and it's also determined to have no difficulty while using this product. The noise from the fans is normal in the operation of this prod- uct. We hope you will understand that a certain level of noise is acceptable. It means that it is not change- able nor refundable. FCC NOTICE •MU-60PZ12V/VA/VB/VK/VS : AClass B digital device This equipment has been tested and found to comply with the limits for a Class B digital device, pursuant to Part 15 of the FCC Rules. These limits are designed to provide reasonable protection against harmful interference in a residential installation. This equipment generates, uses and can radiate radio frequency energy and, if not installed and used in accordance with the instructions, may cause harmful interference to radio communications. However, there is no guarantee that interference will not occur in a particular installation. If this equipment does cause harmful interference to radio or television reception, which can be determined by turning the equipment off and on, the user is encouraged to try to correct the interfer- ence by one or more of the following measures: - Reorient or relocate the receiving antenna. - Increase the separation between the equipment and receiver. - Connect the equipment into an outlet on a circuit different from that to which the receiver is connected. - Consult the dealer or an experienced radio/TV technician for help. Earth wire should be connected. -If the earth wire is not connected, there is possible a danger of electric shock caused by the current leakage. -If grounding methods are not possible, a separate circuit breaker should be employed and installed by a qualified electrician. -Do not connect ground to telephone wires, lightning rods or gas pipe. Keep this manual with Monitor for future easy refer- ence) Table of Contents First step WARNINGS..............................................................4 SAFETYINSTRUCTIONS........................................5 Monitor Overview Front Panel Controls................................................8 Connection Panel Overview.....................................9 Remote Control Key Functions/Accessories..........10 Monitor Installation.................................................12 Equipment Connections and Setup VCR Setup..............................................................14 Cable TV Setup......................................................16 External AV Source Setup......................................17 DVD Setup..............................................................18 DTV Setup..............................................................19 PC Setup................................................................20 PC Mode Feature Check(Overview)......................22 PC Mode Adjustments............................................23 Picture In Picture (PIP) function.............................26 Twin picture function...............................................29 Using the remote control........................................31 Basic Features Setup and Operation Turning on the Monitor...........................................32 OSD Display Rotation............................................33 Checking features...................................................34 Sleep Timer Setting Sleep Timer (Monitor turn-off time)............35 Picture & Sound Auto picture control................................................36 Adjusting picture appearance.................................37 DRP(Digital Reality Picture)..................................38 Adjusting Sound: Bass, Treble, Balance................39 Auto Sound Control................................................40 AVL(Auto volume leveler)......................................41 Special Features Using Still function..................................................42 Using the screen options........................................43 Adjusting OSD Transparency.................................44 Adjusting color temperature...................................45 Setting picture format.............................................46 External control device setup.................................47 IR Code (NEC format)............................................55 Others Maintenance...........................................................56 Troubleshooting check list......................................57 Product specifications.............................................59 4 WARNINGS WARNIN…
Text truncated - open the document above for the full version.
Users Manual
31 Safety instructions Monitor Overview Basic operation Sleep timer Picture & Sound Special features Others Connections Using the remote control Installing batteries •Open the battery compartment cover on the back of the remote control and insert the batteries with correct polarity, match “+” with “+”, and match “-” with “-”. •Install two 1.5V “AAA” alkaline batteries. Don’t mix used batteries with new batteries. Notes for using the remote control Make sure these are no objects between the remote control and its sensor. Don’t place the remote control near a heater or damp place. Strong impact on the remote con- trol may cause operation failure. Signal from the remote control may be disturbed by sun light or other strong light. In this case, turn the set to other direction. 32 Turning on the Monitor 3 2 1 2 1 - When using the remote control, aim it at its sensor on the Monitor. Turning on the Monitor just after installation Turning on the Monitor (power cord is still connected) Connect power cord correctly. Press the main ON/OFFbutton on the Monitor. At this moment, the Monitor is switched to standby mode. Press the or INPUT SELECTbutton on the Monitor or press the POWERor INPUT SELECTbutton on the remote control and then the Monitor will be turned on. Press the or INPUT SELECTbutton on the Monitor or press the POWER or INPUT SELECTbutton on the remote control and then the Monitor will be turned on. If the Monitor is turned off with the button on the Monitor • Press the main ON/OFFbutton on the Monitor to turn on the Monitor. If the Monitor is turned off with the ON/OFF button on the Monitor • Press the main ON/OFFbutton on the Monitor and then press the or INPUT SELECTbutton on the Monitor or press the POWERor INPUT SELECTbutton on the remote control and then the Monitor will be turned on. If the Monitor is turned off with the remote control and also the ON/OFF button on the Monitor Tips •Adjusting volume level The volume(GG) button increases the sound and the volume(FF) button reduces the level of sound. 33 Safety instructions Monitor Overview Connections Basic operation Sleep timer Picture & Sound Special features Others OSD Display Rotation 3 2 1 READY Press the D / Ebutton to select OSD ROTATE and then press the Gbutton. Press the D / Ebutton to select NORMALor ROTATE. •Select NORMALwhen mounting the monitor horizontally. •Select ROTATEwhen mounting the monitor vertically. Press the OKbutton to exit. OSD ROTATEG ARCG SCREENG TRANSPARENCYG PIP/DWG SET IDG COLOR TEMP.G NORMAL ROTATE OSD ROTATE OSD ROTATEG ARCG SCREENG TRANSPARENCYG PIP/DWG SET IDG COLOR TEMP.G NORMAL ROTATE NORMAL OK MENU VOL VOL Press the MENUbutton and then press the D / Ebutton to select menu. Press the Gbutton. 34 1 3 2 Press the MENUbutton. Press the D / Ebutton. •Each press will cycle through the menus shown below. Checking features Press the Gbutton to select a feature to adjust, and then press the D / Eor F / Gbuttons to adjust the selected item. •Press the OKbutton to exit. APCG DRPG CONTRAST100 G BRIGHTNESS50 G COLOR50 G TINT0 G SHARPNESS50 G MOVE GNEXTAEXIT D E DASPG AVLG TREBLE50 G BASS50 G BALANCE0 G MOVE GNEXTAEXIT D E OSD ROTATEG ARCG SCREENG TRANSPARENCYG PIP/DWG SET IDG COLOR TEMP.G MOVE GNEXTAEXIT D E <Picture menu> <Sound menu> <Special menu> -Use the remote control to make adjustments. -Select VIDEOinput source MENU VOLVOL 35 Safety instructions Monitor Overview Connections Basic operation Sleep timer Picture & Sound Special features Others Setting Sleep Timer Sleep Timer turns the Monitor off after a preset time Press the SLEEPbutton to set sleep time. Each time you press SLEEPbutton, the next pre- set setting time is changed as follows: •To release sleep time setting, press the SLEEPor F /Gbutton repeatedly to select F--- G. •‘ SLEEP 1’will be displayed one minute before the Monitor is due to switch off. F--- GF10 G F20 GF30 G F120 GF180 G F240 G F90 GF60 G Tips •When the sleep time you want is displayed on the screen, don’t press the SLEEPbutton. After 20 seconds, the screen display disappears and sleep time is set. •To check remaining sleep time after setting, press the SLEEPor OKbutton just once. •If you turn the Monitor off after setting the sleep timer, the setting is erased. The sleep timer will then have to be set again. F 30 G SLEEP SLEEP 36 2 1 APC (Auto Picture Control) Press the APCbutton. Press the APCor F / Gbuttons to select your desired picture condition. •Each press of F /Gbuttons changes the screen display as shown below. •You can also select CLEAR, SOFTor USERin the PIC- TURE menu. User refers to adjustments you made to the picture menu items. See next page. CLEARSOFTUSER F CLEAR G APC Auto picture control Use APC to set the Monitor for the best picture appearance -APC is not available in RGB or PIP/TWIN PICTURE modes. APC 37 Safety instructions Monitor Overview Connections Basic operation Sleep timer Picture & Sound Special features Others 2 1 READY Example : Changing the contrast. Press the D / Ebutton to select CON- TRAST and then press the Gbutton. •Adjust BRIGHTNESS, COLOR, TINTand SHARPNESSin the same way. Use the F / Gbuttons to make appro- priate adjustments and then press the OKbutton. •Press the D /Ebuttons to select other items. Adjusting picture appearance APCG DRPG CONTRAST100 G BRIGHTNESS50 G COLOR50 G TINT0 G SHARPNESS50 G CONTRAST100 APCG DRPG CONTRAST70 G BRIGHTNESS50 G COLOR0 G TINT0 G SHARPNESS50 G -PIPand Twin picture inset settings are not adjustable. OK VOLVOL MENU VOL VOL Press the MENUbutton and then press the D / Ebutton to select menu. Press the Gbutton. 38 DRP(Digital Reality Picture) DRPimproves image outlines in dark screens. 3 1 READY Press the D / Ebutton to select DRP and then press the Gbutton. Press the OKbutton to exit. APCG DRPG CONTRAST100 G BRIGHTNESS50 G COLOR50 G TINT0 G SHARPNESS50 G CLEAR SOFT DRP 2 Press the D / Ebutton to select CLEARor SOFT. APCG DRPG CONTRAST100 G BRIGHTNESS50 G COLOR50 G TINT0 G SHARPNESS50 G CLEAR SOFT CLEAR -This f…
Text truncated - open the document above for the full version.
Block Diagram
POWER board Block Diagram EM I FI LTER RECTI FI ER RECTI FI ER RUSH CONTROL POW ER CONTROL PFC I NDUCTOR Power Swi t chi ng FET PFC 380V TI NY 255P Auxi l l ar y Tr ans TI NY 255P ST-BY Tr ans PFC Pack UC 3854 HI GH POW ER FACTOR PREREGULATOR St -by 5V Aux. 16V STR- F6668B + MULTI TRANS Fl y Wheel DI ODE FLY BACK MODE Panel Ct l 5V Panel Dr i ve 5V Sound 30V VSC 16V VSC 12V VSC 6V St ep down Regul at or SI -8120S St ep down Regul at or SI -8050S PANEL VI DEO SCAN CONVERTER Zer o Cur r ent Resonant Mode Power FET 2sk2837 UC 3863 Resonant power suppl y mode I R 2113S Hi gh speed power FET dr i ver UC 3863 Resonant power suppl y mode I R 2113S Hi gh speed power FET dr i ver Power FET 2sk2837 VS 170-185 VA 72-80 SOUND FAN VSC ADRESS SUSTAI N DRI VE LOGI C P F C DC-DC VS Pack VA Pack EPROM CTL Pack 5V m oni VS on VS on RL on Rush CTL VSC board Block Diagram AC INPUTCOMPONENT RGB-PC/ RGB-DTV AUDIO INPUT RGB INPUT/ CONTROL VPC3230D (C o l or decoder ) 4H com b f i l t er Y/C separ at or MSP3401 (A u d i o si gna pocess, S/W ) M 52758FP (V i deo sw i t ch) sw i t chi ng si gnal s i nput f r om t wo t ypes of i mage and out put t i ng t hem JAG ASM (S c al er ) Hi ghl y I nt egr at ed, Mi xed Si gnal Fl at Panel Di spl ay Pr ocessor SI I 150 (T M D S TX) 21P FLI 2200 (D e i nt er l ace) FLI 2220 (Enhancer ) CXA2101Q (C o l or cont r ol & Vi deo SW . ) base band si gnal & RGB si gnal pr ocessi ng / vi deo sw i t chi ng EPM 7064 (G en. Cl am p) SPK OUT MEMORY (4 M - B Y T E ) S-VI DEO MEMORY (8 M - B Y T E ) PC DTV ADV7123 DTV_R,G,B,V,H PC_V,H R, G, B, H, V PC_R, G, B STB_R,G,B,H,V Audi o_R, L LA4282 (A u d i o AMP) Audi o_R, L Audi o_R, L CVBS DTV_Y, Pb, Pr STB_Y,Pb,Pr Y, U, V Y0~7/C0~7 R,G,B R, G, B, H, V PIP_Y,U,V H,V H/V H,V DTV_Y, Pb, Pr Y, Cb, Cr S_Y/C DTV_Y,Pb,Pr R,G,B H, V
External Photos
8. Photographs of EUT [ Front ] [ Rear ] Report Number : ESTF150204-002 , Web : www. estech. co. kr Page 14 of 14
ID Label/Location Info
FCC ID : BEJMU60PZ12V MU-60PZ12V
Test Report
Compliance Test Report for FCC Company name Address Telephone Product name Model No. Serial No. Test date 4/22/2002 ~ Testing location Standard □Class A■Class B Test resultOK □Class A■Class B Test resultOK Tested by Reviewed b y Abbreviatio * Note - This test report is not permitted to copy partly without our permission - This test result is dependent on only equipment to be used - This test result based on a single evaluation of one sample of the above m OK, Pass = Passed, Fail = Failed, N/A = not applicable LG Electronics USA 6133 N River Rd Suite 1100 Rosemont, IL60018US 847-692-4630 urement facility registration nu m Senior Engineer J.M. Yang Director T.K. Lee 94696 (Signature) (Signature) Date of issue4/22/2002 ESTECH. Co., Ltd. 97-1 Hoiuk-Ri Majang-Myon, Icheon-city, KyungKi-Do, Korea Test item ■ Conducted Emission ■ Radiated Emissio n FCC PART 15 2001 , ANSI C 63.4 2001 MU-60PZ12V 204KT00001 LG Electronics Inc. KOREA Report Number : ESTF150204-002 , Web : www. estech. co. kr Page 1 of 14 Report Number ESTF150204-002 Manufacturer untry of orig Applicant Product 4/25/2002 60" Plasma Monitor 3 4 5 6 8 8 8 9 10 10 10 11 12 14 Appendix 1. Spectral diagram Appendix 2. Phorographs of EUT in side PCB Appendix 3. Block diagram of EUT Appendix 4. Circuit Diagram 7. Photographs of test setup ....................................................................................... 8. Photographs of EUT ................................................................................................ 6. Measurement of conducted emission ..................................................................... 6.1 Measurement equipment .................................................................................... 6.2 Environmental conditions .................................................................................... 6.3 Test data ......................................................................................................... Report Number : ESTF150204-002 , Web : www. estech. co. kr Page 2 of 14 5. Measurement of radiated emission ........................................................................ 5.1 Measurement equipment .................................................................................... Contents 1. Laboratory Information ................................................................................................... 2. Description of EUT ................................................................................................ 3. Test Standards ...................................................................................................... 4. Measurement condition .......................................................................................... 5.2 Environmental conditions ................................................................................. 5.3 Test data ......................................................................................................... 1. Laboratory Information 1.1 General 1.2 Test Lab. Corporation Name : ESTECH Co. Ltd Head Office : 3 rd Fl., Chungdam Bldg., 119-1 Chungdam-dong Kangnam-gu , S (Safety & Telecom. Test Lab) EMC Test Lab : 58-1 Osan-Ri, GaNam-Myon, YeoJoo-Gun, KyungKi-Do, Korea 97-1 Hoiuk-Ri Majang-Myon, Icheon-city, KyungKi-Do, Korea Branch Office : USA-ESTECH INC. 21801 Stevens Creek Blvd. Suite 2A Cupertino, CA95014 1.3 Official Qualification(s) MIC : Granted Accreditation from Ministry of Information & Communication f and Telecommunication KOLAS : Accredited Lab By Korea Laboratory Accreditation Schema base on C E requirements FCC : Filed Laboratory at Federal Communications Commission VCCI : Granted Accreditation from Voluntary Control Council for Interfere n This EUT (Equipment Under Test) has been shown to be capable of compliance with the applicable technical standards and is tested in accordance with the measurement procedures as indicated in this report. ESTECH Lab attests to accuracy of test data. All measurement reported herein were performed by ESTECH Co., Ltd. ESTECH Lab assume full responsibility for the completeness of these measurements and vouch for the qualifications of all persons taking them. Report Number : ESTF150204-002 , Web : www. estech. co. kr Page 3 of 14 2. Description of EUT 2.1 Summary of Equipment Under Test Product : Model Number : Serial Number : Manufacturer : Country of or i: Rating : Receipt Date : 2.2 General descriptions of EUT * Specification of this product is ths following - Width : 1455mm, Hight : 883 mm - Depth 99mm, Weight : 70 Kg - Resolution : 1280 *720 (Dot) - Color : 16,770,000 (256 steps of each R, G and B) * This equipment has been tested and found to comply with the limits fo r Report Number : ESTF150204-002 , Web : www. estech. co. kr Page 4 of 14 * This Product is used Monitor, VCR, Cable TV , DVD , DTV, PC 60" Plasma Monitor MU-60PZ12V 204KT00001 LG Electronics Inc. KOREA 120V, 60Hz 22-Apr-02 3. Test Standards Test Standard : FCC PART 15 (2001) Test Method : ANSI C 63.4 (2001) This standard sets forth uniform methods of measurement of radio- frequency (RF) signals and noise emitted from both unintentional and intentional emitters of RF energy in the frequency range 9 kHz to 40 GHz. Methods for the measurement of radiated and AC power-line conducted radio noise are covered and may be applied to any such equipment unless otherwise specified by individual equipment requirements. These methods cover measurement of certain decides that deliberately radiate energy, such as intentional emitters, but does not cover licensed transmitters. This standard is not intended for certification/approval of avionic equipment or for industrial, scientific, and medical (ISM) equipment These method apply to the measurement of individual units or systems comprised of multiple units This Standard sets out the regulations under which an intentional, unintentional, or incidental radiator may be operated without an individual license. It also contains t…
Text truncated - open the document above for the full version.
Test Setup Photos
7. Photographs of test setup 7.1 Setup for Radiated Test : 30 ~ 1000 MHz [ Front ] [ Rear ] Report Number : ESTF150204-002 , Web : www. estech. co. kr Page 12 of 14 7.2 Setup for Conducted Test : 0.45 ~ 30 MHz [ Front ] [ Rear ] Report Number : ESTF150204-002 , Web : www. estech. co. kr Page 13 of 14
Contact Information
Applicant
David Kim(Team leader, LGEUS NA Policy & Regulatory Affairs)
Test Firm
Bay Area Compliance LaboratoryJohn Chan
Technical Specifications
| # | Rule Parts | Frequency Range | Power Output |
|---|---|---|---|
| 3 | 15B | - | - |
Other Applications from LG Electronics USA, Inc.
BEJTFHOBINI1F1
Jan 08, 2025Telematics
Equipment Class
DTS - Digital Transmission SystemBEJNT-16Z90TS
Oct 02, 2024Notebook Computer
Equipment Class
DSS - Part 15 Spread Spectrum TransmitterBEJSP-PEW8
Sep 26, 2024Stylus Pen
Equipment Class
DCD - Part 15 Low Power Transmitter Below 1705 kHzBEJ-RSMV2
Sep 24, 2024RF Module
Equipment Class
FDS - Part 15 Field Disturbance SensorBEJTFBMEIBN3EU
Sep 24, 2024Telematics
Equipment Class
NII - Unlicensed National Information Infrastructure TX