EMJMMORFCGUODynex Wireless Optical NB Mouse
Primax Electronics Ltd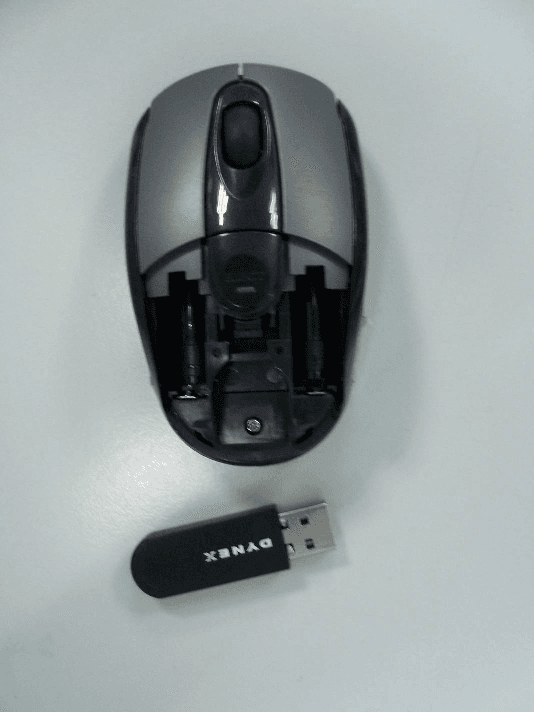
Click to zoom
Application Details
- Equipment Class
- DXX - Part 15 Low Power Communication Device Transmitter
- Date of Grant
- Jul 13, 2010
- Application Purpose
- Original Equipment
- Date of Application
- Jun 28, 2010
- Equipment Note
- Dynex Wireless Optical NB Mouse
- Frequency Range
- 27.04500000 - 27.04500000
- Company
- Primax Electronics Ltd
- Country
- Taiwan
Documents & Files
Document Text
Text extracted from the exhibit documents filed with the FCC. Open a document above to read the original.
Users Manual
• Windows® XP Windows Vista® Windows® 7 Mac OS X 10.4 DX-BWLMSE/DX-PWLMSE/DX-PKWLMSE Wireless Laptop Mouse I Souris sans l pour ordinateur portatif - DX-BWLMSE/DX-PWLMSE/DX-PKWLMSE Ratón inalámbrico para laptop - DX-BWLMSE/DX-PWLMSE/DX-PKWLMSE I DX-BWLMSE/DX-PWLMSE/DX-PKWLMSE Mouse features Scroll wheel Left button Using your mouse 1 Press the left and right mouse buttons to perform standard left and right button functions. 2 Use the scroll wheel to scroll up and down the screen. 3 Press and hold the scroll wheel down, then move the mouse up and down to scroll up and down the screen. NOTE: this feature may not be available in all programs. Troubleshooting • Make sure that your laptop meets the system requirements. • Only use the mouse on a clean, flat, non-slippery surface to ensure smooth and accurate cursor action. • If your laptop BIOS setup has mouse options, make sure that they are set to default settings. • If your mouse fails to work, check the USB mouse function in your laptop’s BIOS. The function should be enabled for normal use. Right button Eject button with power LED Battery/USB receiver compartment Optical sensor Power button Caractéristiques de la sourisCaracterísticas del ratón Mollette de dé lement Bouton gauche Utilisation de la souris 1 Appuyer sur les boutons gauche et droit de la souris pour obtenir les fonctions classiques de ces boutons. 2 Utiliser la molette de défilement pour faire défiler l’écran vers le haut ou vers le bas. 3 Maintenir la molette de défilement appuyée, puis déplacer la souris vers le haut ou vers le bas pour faire défiler l’écran dans les deux sens. REMARQUE : cette caractéristique peut ne pas être disponible dans toutes les applications. Problèmes et solutions • Vérifier que l’ordinateur portatif est conforme aux spécifications requises du système. • Utiliser la souris uniquement sur une surface propre, plane et non-glissante pour assurer un mouvement régulier et précis du curseur. • Si la configuration du BIOS de l’ordinateur portatif comporte des options pour la souris, vérifier que celles-ci sont configurées sur les paramètres par défaut. • Si la souris ne fonctionne pas, vérifier que la fonctionnalité USB de la souris est activée dans le BIOS de l’ordinateur portatif. Cette fonctionnalité doit être activée pour une utilisation normale. Bouton droit Bouton d’ouverture avec DEL d’alimentation Compartiment des piles/du récepteur USB Capteur optique Bouton marche/arrêt Rueda de desplazamiento Botón primario Uso de su ratón 1 1 Presione los botones izquierdo y derecho de su ratón para obtener las funciones normales de estos botones. 2 Use la rueda de desplazamiento para desplazar la pantalla hacia arriba y hacia abajo. 3 Mantenga presionado la rueda de desplazamiento, y luego mueve el ratón hacia arriba y hacia abajo para desplazar la ventana hacia arriba y hacia abajo. NOTA: esta característica puede no estar disponible en todas las aplicaciones. Localización y corrección de fallas • Asegúrese de que su laptop cumple con los requisitos de sistema. • Utilice el ratón únicamente sobre una superficie limpia, plana y antideslizante para garantizar la acción uniforme y exacta del cursor. • Si la configuración del BIOS de su laptop tiene opciones para el ratón, asegúrese de que éstas estén configuradas con los valores predefinidos. • Si el ratón no funciona, compruebe la función del ratón USB en el BIOS de su laptop. La función deberá estar habilitada para uso normal. Botón secundario Botón de abertura con indicador LED de alimentación Compartimiento de las pilas/del receptor USB Sensor óptico Botón de Encendido Quick Setup Guide I Guide d’installation rapide I Guía de instalación rápida I System requirements • Windows® XP, Windows Vista®, Windows® 7 or Mac OS X 10.4 or higher • One available USB port Setting up your mouse 1 Push the EJECT button with power LED for battery to open the compartment cover. 2 Insert two AAA batteries, making sure that the + and - on the batteries match the + and - in the compartment. 3 Remove the USB receiver, then close the battery/USB receiver compartment. 4 Plug the USB receiver into an open USB port on your laptop. 5 Slide the power switch on the bottom of your mouse to the ON position. The laptop automatically detects the mouse. Cleaning your mouse Wipe the mouse with a damp, lint-free cloth. ____________________________ Con guration système requise • Windows MD XP, Windows Vista MD , Windows MD 7 ou Mac OS X 10.4 ou supérieur • Un port USB disponible Con guration de la souris 1 Ouvrir le compartiment des piles en appuyant sur le bouton d’ouverture (EJECT) avec DEL de piles chargées. 2 Insérer deux piles de type AAA, en vérifiant que le + et le – des piles sont alignés avec le + et le – à l’intérieur du compartiment. 3 Retirer le récepteur USB puis refermer le compartiment des piles/du récepteur USB. 4 Connecter le récepteur USB à un port USB de l’ordinateur portatif. 5 Mettre le bouton marche/arrêt situé sur la partie inférieure de la souris sur ON (Marche). L’ordinateur portatif détecte automatiquement la souris. Nettoyage de la souris Essuyer la souris avec un chiffon humide non-pelucheux. ____________________________ Requisitos de sistema • Windows® XP, Windows Vista®, Windows® 7 o Mac OS X 10.4 o más reciente • Un puerto USB disponible Instalación del ratón 1 Presione el botón de abertura (EJECT) con el indicador LED de pila cargada para abrir la cubierta del compartimiento. 2 Inserte dos pilas AAA, asegurándose de que los signos + y – de las pilas coincidan con los signos + y – en el interior del compartimiento de las pilas. 3 Remueva el receptor USB, y cierre el compartimiento de las pilas/receptor. 4 Conecte el receptor en un puerto USB disponible en su laptop. 5 Deslice el interruptor de encendido en la parte inferior del ratón a la posición ON (Encendido). Su laptop detectará automáticamente el ratón. Limpieza del ratón Limpie el ratón con un paño húmedo, sin pelusas. 10-0360 One-year limited warranty For…
Text truncated - open the document above for the full version.
External Photos
External photos Test Report No.: 17016144 001 Page 1 of 3 Figure 1 Figure 2 External photos Test Report No.: 17016144 001 Page 2 of 3 Figure 3 Figure 4 External photos Test Report No.: 17016144 001 Page 3 of 3 Figure 5
ID Label/Location Info
* 2 4 . 5 m m *34.5 mm Dynex Wired Optical Mouse Model No:DX-PMSE Rating:5V 100mA S/N:YYMDDAXXXXXX Made in China 10 DX-PMSE Mouse label SCALE: 1:1 DX-PWLMSE Mouse label SCALE: 1:1 DX-PWLMSEA Dongle label SCALE: 1:1 *26mm * 1 0 m m Model No:DX-PWLMSEA Made in China S/N:YYMDDAXXXXXX Rating:5V 80mA Dynex Wireless NB Mouse Receiver 10 * 2 4 . 5 m m *34.5 mm Dynex Wireless Optical NB Mouse Model No:DX-PWLMSE Rating:3V 40mA Power:2 AAA batteries FCC ID:EMJMMORFCGUO S/N:YYMDDAXXXXXX Made in China 10
Internal Photos
Internal photos Test Report No.: 17016144 001 Page 1 of 5 Figure 1 Internal photos Test Report No.: 17016144 001 Page 2 of 5 Figure 2 Internal photos Test Report No.: 17016144 001 Page 3 of 5 Figure 3 Internal photos Test Report No.: 17016144 001 Page 4 of 5 Figure 4 Internal photos Test Report No.: 17016144 001 Page 5 of 5 Figure 5
Test Report
Produkte Products Prüfbericht - Nr.: Test Report No. 17016143 001 Seite 2 von 21 Page 2 of 21 TEST SUMMARY 5.1.1 ANTENNA REQUIREMENT RESULT: Passed 5.1.2 FIELD STRENGTH WITHIN BAND RESULT: Passed 5.1.3 OUT-OF-BAND EMISSION RESULT: Passed 6.1.1 ELECTROMAGNETIC FIELDS RESULT: Passed Produkte Products Prüfbericht - Nr.: Test Report No. 17016143 001 Seite 3 von 21 Page 3 of 21 Contents 1. GENERAL REMARKS.........................................................................................................4 1.1 COMPLEMENTARY MATERIALS...........................................................................................4 2. TEST SITES.......................................................................................................................4 2.1 TEST FACILITIES...............................................................................................................4 2.2 LIST OF TEST AND MEASUREMENT INSTRUMENTS...............................................................5 2.3 TRACEABILITY..................................................................................................................6 2.4 CALIBRATION....................................................................................................................6 2.5 MEASUREMENT UNCERTAINTY...........................................................................................6 2.6 LOCATION OF ORIGINAL DATA...........................................................................................6 2.7 STATUS OF FACILITY USED FOR TESTING...........................................................................6 3. GENERAL PRODUCT INFORMATION....................................................................................7 3.1 PRODUCT FUNCTION AND INTENDED USE...........................................................................7 3.2 RATINGS AND SYSTEM DETAILS.........................................................................................7 3.3 INDEPENDENT OPERATION MODES.....................................................................................8 3.4 NOISE GENERATING AND NOISE SUPPRESSING PARTS........................................................8 3.5 SUBMITTED DOCUMENTS...................................................................................................8 4. TEST SET-UP AND OPERATION MODES...............................................................................9 4.1 PRINCIPLE OF CONFIGURATION SELECTION........................................................................9 4.2 TEST OPERATION AND TEST SOFTWARE............................................................................9 4.3 SPECIAL ACCESSORIES AND AUXILIARY EQUIPMENT..........................................................9 4.4 COUNTERMEASURES TO ACHIEVE EMC COMPLIANCE.........................................................9 4.5 TEST SETUP DIAGRAM....................................................................................................10 5. TEST RESULTS...............................................................................................................12 5.1 TRANSMITTER REQUIREMENT & TEST SUITES...................................................................12 5.1.1 Antenna Requirement................................................................................................................ 12 5.1.2 Field strength within band ......................................................................................................... 13 5.1.3 Out-of-band emission ................................................................................................................ 15 6. SAFETY HUMAN EXPOSURE.............................................................................................19 6.1 RADIO FREQUENCY EXPOSURE COMPLIANCE...................................................................19 6.1.1 Electromagnetic Fields .............................................................................................................. 19 7. PHOTOGRAPHS OF THE TEST SET-UP..............................................................................20 8. LIST OF TABLES..............................................................................................................21 9. LIST OF PHOTOGRAPHS...................................................................................................21 Produkte Products Prüfbericht - Nr.: Test Report No. 17016143 001 Seite 4 von 21 Page 4 of 21 1. General Remarks 1.1 Complementary Materials None. 2. Test Sites 2.1 Test Facilities TÜV Rheinland (Guangdong) Ltd. EMC Laboratory Guangzhou Auto Market, Yuan Gang Section of Guangshan Road, Guangzhou, P.R. China FCC Registration No.: 833845 Test site Industry Canada No.: 2932C-1 Produkte Products Prüfbericht - Nr.: Test Report No. 17016143 001 Seite 5 von 21 Page 5 of 21 2.2 List of Test and Measurement Instruments Table 1: List of Test and Measurement Equipment Kind of Equipment Manufacturer Type S/N Calibrated until Spurious emission and Radiated emission EMI Test Receiver Rohde & Schwarz ESCI-3 100216 2010-11-26 Spectrum Analyzer Rohde & Schwarz FSP30 100286 2010-08-24 Trilog-Broadband Antenna SCHWARZBECK MESS-ELEKTRONIK VULB9168 209 2010-11-07 Double-Ridged Waveguide Horn Antenna Rohde & Schwarz HF906 100385 2010-08-18 Pre-amplifier MITEQ AFS42- 00101800-25- S-42 1101599 2010-07-31 Standard Gain Horn Antenna EMCO 3160-09 21642 N/A Pre-amplifier MITEQ AFS33- 18002650-30- 8P-44 1108282 2010-07-31 3m Anechoic Chamber Albatross Project GmbH N/A N/A 2011-04-16 Loop Antenna Rohde & Schwarz HFH2-Z2 100111 2010-12-11 Produkte Products Prüfbericht - Nr.: Test Report No. 17016143 001 Seite 6 von 21 Page 6 of 21 2.3 Traceability All measurement equipment calibrations are traceable to NIST or where calibration is performed outside the United States, to equivalent nationally recognized standards organizations. 2.4 Calibration Equipment requiring calibration is calibrated peri…
Text truncated - open the document above for the full version.
Test Setup Photos
Produkte Products Prüfbericht - Nr.: Test Report No. 17016143 001 Seite 20 von 21 Page 20 of 21 7. Photographs of the Test Set-Up Photograph 1: Set-up for Emissions (9kHz - 30MHz) Photograph 2: Set-up for Emissions (30MHz-1GHz)
Contact Information
Applicant
Nelson Chou(Manager)
Test Firm
TUV Rheinland (GuangDong) Ltd.Yuxin Huang
Technical Specifications
| # | Rule Parts | Frequency Range | Power Output |
|---|---|---|---|
| 1 | 15C | 27.045 MHz - 27.045 MHz | - |
Other Applications from Primax Electronics Ltd
EMJ-BHS2705
Aug 28, 2026Wireless Headset
Equipment Class
DTS - Digital Transmission SystemEMJMMOBTN5O
Aug 22, 2024wegear MW1 Creator Mouse
Equipment Class
DTS - Digital Transmission SystemEMJDDGRFN5
Aug 22, 2024wegear MW1 2.4G Dongle
Equipment Class
DXX - Part 15 Low Power Communication Device Transmitter
EMJDTPA-P002D
Jan 14, 2024Dongle
Equipment Class
DXX - Part 15 Low Power Communication Device Transmitter
EMJOH1
Oct 29, 2023Level Bridge
Equipment Class
DTS - Digital Transmission System