MSQDSLN10Wireless Home Gateway
ASUSTeK Computer Inc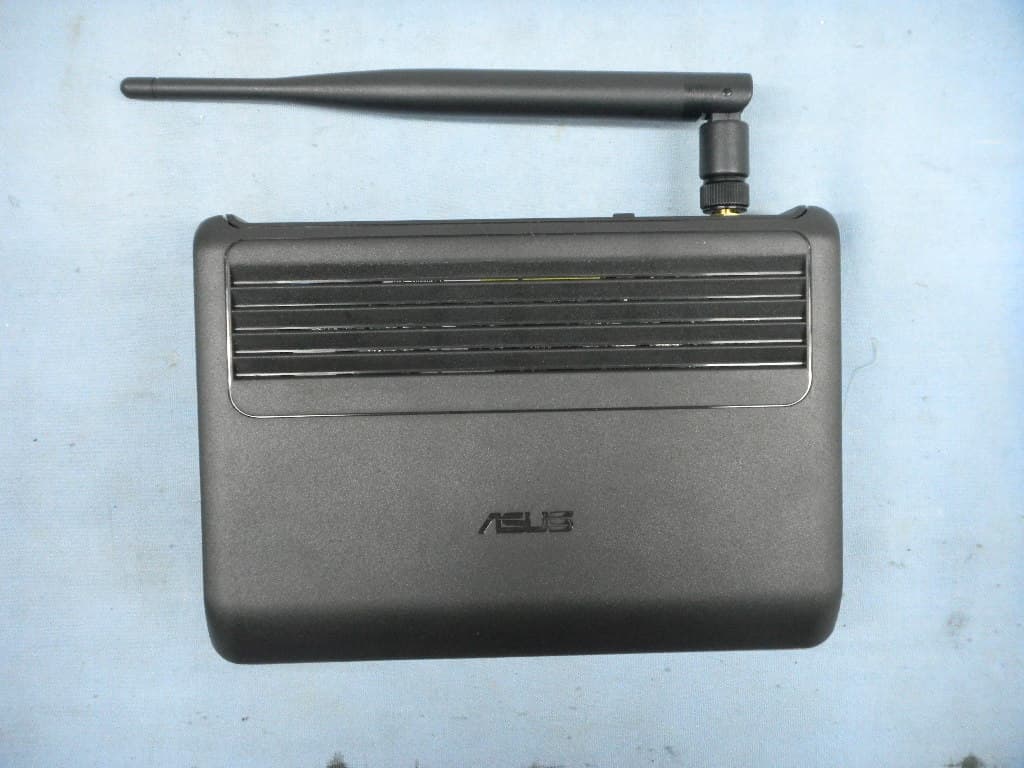
Click to zoom
Application Details
- Equipment Class
- DTS - Digital Transmission System
- Date of Grant
- Jun 07, 2011
- Application Purpose
- Original Equipment
- Date of Application
- Jun 05, 2011
- Equipment Note
- Wireless Home Gateway
- Frequency Range
- 2422.00000000 - 2452.00000000
- Company
- ASUSTeK Computer Inc
- Country
- Taiwan
Documents & Files
Document Text
Text extracted from the exhibit documents filed with the FCC. Open a document above to read the original.
Users Manual
DSL-N10 11N Wireless ADSL Modem Router PowerADSLInternetWireless 123 LAN 4 DSL-N10 11N Wireless ADSL Modem Router PowerADSLInternetWireless 123 LAN 4 ASUS Wireless ADSL Router ANT Reset Power PowerLAN4LAN3LAN2LAN1 WPS Wireless On/Off ADSL (A) (B) (C) EC Declaration of Conformity We, the undersigned, Manufacturer: ASUSTek COMPUTER INC. Address, City: No. 150, LI-TE RD., PEITOU, TAIPEI 112, TAIWAN R.O.C. Country: TAIWAN Authorized representative in Europe: ASUS COMPUTER GmbH Address, City:HARKORT STR. 21-23, 40880 RATINGEN Country: GERMANY declare the following apparatus: Product name : Wireless ADSL Gateway Model name : DSL-N10 conform with the essential requirements of the following directives: 2004/108/EC-EMC Directive EN 55022:2006+A1:2007 EN 61000-3-2:2006+A2:2009 EN 61000-3-3:2008 EN 55024:1998+A1:2001+A2:2003 EN 55020:2007 EN 55013:2001+A1:2003+A2:2006 1999/5/EC-R &TTE Directive EN 300 328 V1.7.1(2006-10) EN 300 440-1 V1.4.1(2008-05) EN 300 440-2 V1.2.1(2008-03) EN 301 511 V9.0.2(2003-03) EN 301 908-1 V3.2.1(2007-05) EN 301 908-2 V3.2.1(2007-05) EN 301 893 V1.4.1(2005-03) EN 301 489-1 V1.8.1(2008) EN 301 489-3 V1.4.1(2002-08) EN 301 489-4 V1.3.1(2002-08) EN 301 489-7 V1.3.1(2005-11) EN 301 489-9 V1.4.1(2007-11) EN 301 489-17 V2.1.1(2009) 2006/95/EC-LVD Directive EN 60950-1:2001+A11:2004 EN 60950-1:2006 EN60065:2002+A1:2006 EN 60950-1:2006+A11:2009 2009/125/EC-ErP Directive Regulation (EC) No. 1275/2008 EN 62301:2005 EN 62018:2003 Regulation (EC) No. 642/2009 EN 62301:2005 Regulation (EC) No. 278/2009 EN 62301:2005 CE marking Declaration Date: Jan. 03, 2011 Year to begin affixing CE marking:2011 Position : CEO Name : Jerry Shen Signature :__________ (EC conformity marking) DSL-N10 Wireless ADSL Gateway NOTE: For more details and advanced configuration instructions, refer to the user manual included in the Utility CD. Q6504 / Second Edition / March 2011 4. Setup is completed. 3. Launch the web browser and follow the Quick Internet Setup (QIS) steps. NOTE: If the QIS web page does not appear after you launched the web browser, disable the proxy settings on the web browser. ® ! Setting up a Home Network 1. Connect your devices. 2. Before starting ADSL setting procedure, ensure that the ADSL indicator on DSL-N10 front panel become solid. English 1. Connect your devices. 2. Before starting ADSL setting procedure, ensure that the ADSL indicator on DSL-N10 front panel become solid. 3. Launch the web browser and follow the Quick Internet Setup (QIS) steps. * If the QIS web page does not appear after you launched the web browser, disable the proxy settings on the web browser. 4. Setup is completed. Russian 1. Подключите Ваши устройства. 2. Перед настройкой ADSL, убедитесь, что индикатор ADSL, расположенный на передней панели DSL-N10, горит. 3. Запустите браузер и следуйте инструкциям быстрой настройки интернета (QIS). * Если QIS страница не появилась при запуске браузера, отключите использование прокси-сервера в браузере. 4. Настройка завершена. Русским пользователям мы рекомендуем настроить ADSL с помощью утилиты ADSL Setting Wizard с компакт-диска. German • Schließen Sie Ihre Geräte an. • Vergewissern Sie sich bitte, dass die DSL-Anzeige am DSL-N10 dauerhaft leuchtet, bevor Sie die DSL-Einrichtung starten. • Starten sie einen Web-Browser und folgen sie den Internet-Schnelleinstellungsschritten (QIS). * wenn die QIS-Seite nicht erscheint, nachdem Sie den Webbrowser gestartet haben, deaktivieren Sie bitte die Proxy-Einstellungen Ihres Webbrowsers. • Die Einrichtung ist fertig. Italian • Collegare le periferiche. • Prima di avviare la procedura di configurazione ADSL, assicurarsi che la spia dell’indicatore ADSL sul pannello frontale sia accesa in modo continuo. • Avviare il browser web e seguire la procedura QIS (Quick Internet Setup). * Se,dopo aver avviato il browser web,non si riesce a visualizzare la pagina web QIS, disattivare le impostazioni proxy del browser. • La configurazione è stata completata. Lithuanian • Prijunkite prietaisus. • Prieš pradėdami ADSL nustatymo procedūrą, palaukite, kol ADSL indikatorius ant prietaiso DSL-N10 skydelio nebemirgės ir švies vientisa šviesa. • Paleiskite interneto naršyklę ir vadovaukitės greitos internetinės sąrankos (QIS) nuorodomis. * Jei paleidus interneto naršyklę neatsiveria QIS puslapis, dezaktyvuokite interneto naršyklės „Proxy“ nustatymus. • Sąranka baigta. Latvian • Savienojiet savas ierīces. • Pirms ADSL iestatīšanas procesa, lūdzu, pārliecinieties, ka ADSL indikators uz DSL-N10 paneļa pārstāj mirgot. • Palaidiet tīmekļa pārlūku un izpildiet Quick Internet Setup (Ātrās interneta palaišanas) (QIS) soļus. * Ja pēc tīmekļa pārlūka palaišanas QIS tīmekļa lapa neparādās, atspējojiet proxy iestatījumus tīmekļa pārlūkā. • Iestatīšana ir pabeigta. Portuguese • Ligue os dispositivos. • Antes de iniciar o procedimento de configuração ADSL, certifique-se de que o indicador de ADSL no painel frontal do DSL-N10 fica fixo. • Abra o browser da web e siga as instruções para configuração rápida da Internet. * Se a página Web da função QIS não for exibida ao iniciar o navegador Web, desactive as definições de proxy do navegador Web. • A configuração fica assim concluída. Romanian • Conectaţi dispozitivele dvs. • Înainte de a începe procedura de setare pentru ADSL verificaţi ca indicatorul ADSL de pe panoul DSL-N10 să fie aprins constant. • Lansaţi browser-ul web şi urmaţi paşii de Conectare Rapidă la Internet (QIS). * Dacă pagina web QIS nu apare după ce aţi lansat browserul web, dezactivaţi setările proxy ale browserului web. • Conectarea este finalizată. Polish • Podłącz swoje urządzenia. • Przed uruchomieniem procedury ustawień ADSL należy upewnić się, że świeci stałym światłem wskaźnik ADSL na panelu przednim DSL-N10. • Uruchom przeglądarkę internetową i postępuj zgodnie z poleceniami Szybkiej konfiguracji Internetu (QIS). * Jeżeli strona sieciowa QIS nie jest wyświetlana po uruchomieniu przeglądarki sieciowej, należy wyłączyć ustawienia proxy przeglądar…
Text truncated - open the document above for the full version.
External Photos
FCC ID.: MSQDSLN10 Page 1 of 3 Audix Technology (Wujiang) Co., Ltd. EMC Dept. Report No.: ACWE-F1102006 FIGURE 1 General Appearance (Front View) FIGURE 2 General Appearance (Back View) FCC ID.: MSQDSLN10 Page 2 of 3 Audix Technology (Wujiang) Co., Ltd. EMC Dept. Report No.: ACWE-F1102006 FIGURE 3 General Appearance (I/O Ports) FIGURE 4 General Appearance (I/O Ports) FCC ID.: MSQDSLN10 Page 3 of 3 Audix Technology (Wujiang) Co., Ltd. EMC Dept. Report No.: ACWE-F1102006 FIGURE 5 General Appearance (I/O Ports)
RF Exposure Info
FCC ID: MSQDSLN10 Page 1 of 1 MPE CALCULATIONS Systems operating under the provision of 47 CFR 1.1307(b)(1) shall be operated in a manner that ensures that the public is not exposed to radio frequency energy levels in excess of the FCC guidelines. The EUT will only be used with a separation of 20 centimeters or greater between the antenna and the body of the user or nearby persons and can therefore be considered a mobile transmitter per 47 CFR 2.1091(b). The MPE calculation for this exposure is shown below. Using the Antennas with highest output power: The peak radiated output power (EIRP) is calculated as follows: Frequency (GHz) Peak Output Power (dBm) Antenna Gain (dBi) EIRP (P+G) (dBm) EIRP (mw) 2.4 24.90 5.0 29.9 977.23 EIRP = P + G Where P = Power input to the antenna (mW). G = Power gain of the antenna (dBi) The numeric gain (G) of the antenna with a gain specified in dB is determined by: Frequency (GHz) Antenna Gain (dBi) Numeric Antenna Gain 2.4 5.0 3.16 G = Log-1 (dB antenna gain/10) Power density at the specific separation: Frequency (GHz) Numeric Power Gain of the Antenna (G) Power input to the antenna (P) (mW) Maximum Power Spectral Density S=PG/(4πR 2 ) (mW/cm 2 ) Maximum Power Spectral Density Limit (mW/cm 2 ) 2.4 3.16 309.03 0.19 1.00 S = PG/(4R 2 π) S = Maximum power density (mW/cm 2 ) P = Power input to the antenna (mW). G = Numeric power gain of the antenna R = Distance to the center of the radiation of the antenna (20cm = limit for MPE) The maximum permissible exposure (MPE) for the general population is 1mW/cm 2 . The power density at 20cm does not exceed the 1mW/cm 2 limit. Therefore, the exposure condition is compliant with FCC rules.
Test Setup Photos
FCC ID: MSQDSLN10 Page 1 of 4 Audix Technology (Wujiang) Co., Ltd. EMC Dept. Report No.: ACWE-F1102006 1. PHOTOGRAPHS 1.1. Conducted Emission measurement Front View of Conducted Measurement Side View of Conducted Measurement FCC ID: MSQDSLN10 Page 2 of 4 Audix Technology (Wujiang) Co., Ltd. EMC Dept. Report No.: ACWE-F1102006 1.2. Radiated Emission measurement 1.2.1. Frequency Range 30MHz~1GHz at 3m Semi-Anechoic Chamber Front View of Radiated Measurement Back View of Radiated Measurement FCC ID: MSQDSLN10 Page 3 of 4 Audix Technology (Wujiang) Co., Ltd. EMC Dept. Report No.: ACWE-F1102006 1.2.2. Frequency Range Above 1GHz at 3m Semi-Anechoic Chamber 1.3. Photo of Restricted Brand & Band Edge Emission FCC ID: MSQDSLN10 Page 4 of 4 Audix Technology (Wujiang) Co., Ltd. EMC Dept. Report No.: ACWE-F1102006 1.4. Photo of Section 5 ~ 9 1.5. Photo of Ping test
Contact Information
Applicant
Jackson Yen(Associate Vice President)
Technical Contact
Test Firm
Audix Technology(WuJiang)Co.,LtdAllen Wang
Technical Specifications
| # | Rule Parts | Frequency Range | Power Output |
|---|---|---|---|
| 2 | 15C | 2.42 GHz - 2.45 GHz | 192.00 mW |
Other Applications from ASUSTeK Computer Inc
MSQ-GC701
Aug 21, 2026Wireless Gaming Controller
Equipment Class
DSS - Part 15 Spread Spectrum TransmitterMSQMPDONGLE3
Aug 18, 2026WIRELESS DONGLE
Equipment Class
DTS - Digital Transmission System
MSQ-GC701D
Aug 13, 2026USB Wireless Dongle
Equipment Class
DSS - Part 15 Spread Spectrum TransmitterMSQ-CM3206DM4A
May 27, 2026Chromebook/Notebook PC
Equipment Class
DCD - Part 15 Low Power Transmitter Below 1705 kHz
MSQ-GST868003
Apr 03, 2026MODULE-WIRELESS CHRG
Equipment Class
DCD - Part 15 Low Power Transmitter Below 1705 kHz