2A64B-DEX95Floor Cleaning Robot
Ecovacs Home Service Robotics Co., Ltd.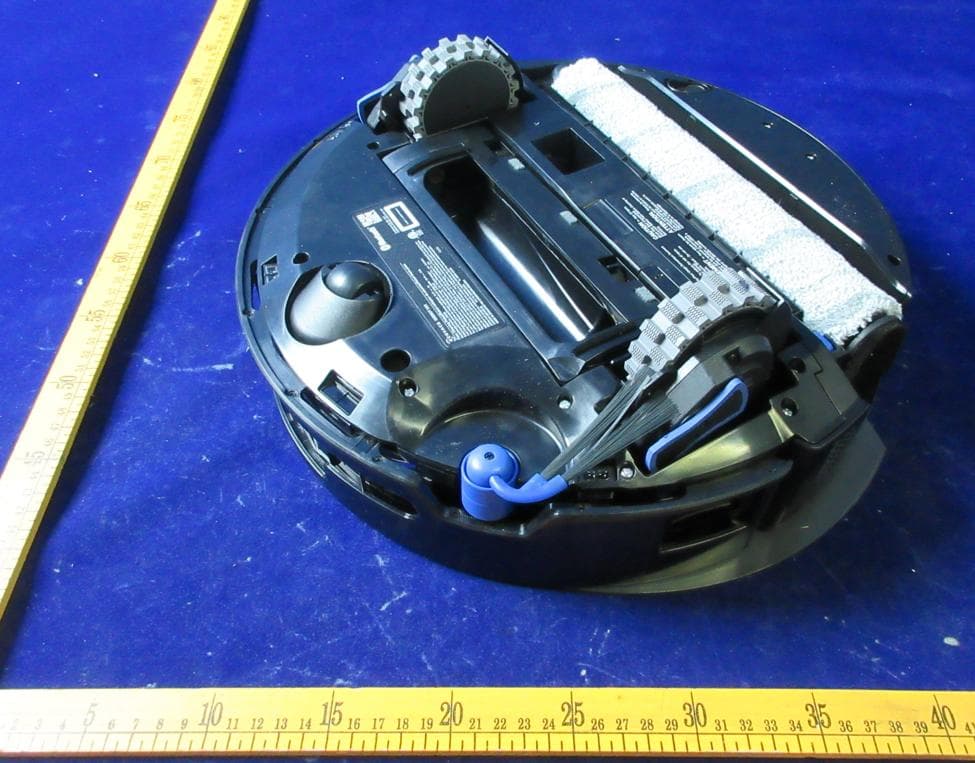
Click to zoom
Application Details
- Equipment Class
- DTS - Digital Transmission System
- Date of Grant
- Jan 05, 2026
- Application Purpose
- Original Equipment
- Equipment Note
- Floor Cleaning Robot
- Frequency Range
- 2402.00000000 - 2480.00000000
- Country
- China
Documents & Files
Document Text
Text extracted from the exhibit documents filed with the FCC. Open a document above to read the original.
Users Manual
74ES-LA Toque en DEEBOT para pausarlo mientras está trabajando� También puede utilizar la aplicación ECOVACS HOME o el control por voz para pausar el DEEBOT� 3. Pausa Después de una pausa, todas las luces indicadoras del DEEBOT se apagarán� Para activar a DEEBOT, presione � Alternativamente, utilice la aplicación ECOVACS HOME o el control por voz para reanudar la operación del DEEBOT� 4. Despertar 2. Iniciar la limpieza 1. Inicio de la cartografía Antes del primer mapeo, por favor ayude a eliminar algunos problemas potenciales� Por ejemplo, DEEBOT puede quedarse atascado debajo de muebles� Consulte las siguientes soluciones: ① Levante los muebles bajos si es posible; ② Cubra la parte inferior de los muebles� 8 Usar DEEBOT para limpiar Asegúrese de que DEEBOT esté en la estación y completamente cargado antes de limpiarlo por primera vez� Toque en DEEBOT para empezar� También puede utilizar la aplicación ECOVACS HOME o el control por voz para empezar� Para el primer uso, por favor, comience aspirando 2 o 3 veces antes de comenzar a fregar para obtener un mejor rendimiento de limpieza� El depósito de agua del DEEBOT se rellena automáticamente por medio de la estación� No es necesario rellenar manualmente� Al fregar, DEEBOT reconoce los tipos de suelo y es capaz de levantar las mopas automáticamente cuando encuentra alfombras� No utilice DEEBOT en alfombras de pelo largo o alfombras con fibras de más de 10 mm de largo� Se recomienda plegar las alfombras de pelo largo con fibras de más de 10 mm durante el proceso de limpieza, o definir las zonas con alfombras de pelo largo como de entrada prohibida fijando un límite virtual en la aplicación ECOVACS HOME� Pulsación breve 3� Vuelva a colocar la tapa del cajón para recoger el polvo y presione firmemente la tapa para fijarla en su posición� 75ES-LA Utilice la aplicación ECOVACS HOME o el control por voz para llamar a DEEBOT, u oprima sin soltar el botón de DEEBOT durante 3 s para permitir que DEEBOT se acople para cargarse� Cuando PowerBoost Charging está activado, DEEBOT se cargará rápidamente durante unos 5 minutos después de volver a la estación� A continuación, pasará a la carga estándar y se detendrá automáticamente una vez cargado por completo� 5. Volver a la estación DEEBOT entrará en modo de sueño profundo si permanece fuera de la estación durante unas 10 h para proteger la batería� Apague y encienda para despertar a DEEBOT� Si no hay respuesta, vuelve a colocar el DEEBOT en la estación para que se cargue� 6. Modo de sueño profundo 3 S MANTENIMIENTO PERIÓDICO Para mantener a DEEBOT funcionando al máximo rendimiento, realice mantenimiento y sustituya piezas con las siguientes frecuencias: Pieza Frecuencia de mantenimiento Sustitución Mopa de rodillo lavable/Cada 1-2 meses Cubeta de goteoCada semana/ Bolsa para polvo/ Cuando la aplicación lo indique Cepillo lateralCada 2 semanas Cada 3-6 meses Cepillo principalCada semana Cada 6-12 meses FiltroCada semanaCada 3-6 meses Rueda universal Sensores anticaída Sensor de bordes Parachoques Contactos de carga de DEEBOT Contactos de carga de la estación OMNI Módulo de navegación Módulo de evitar obstáculos Cámara AIVI Aprox� cada mes / Depósito de agua limpiaCada 3 meses / Depósito de agua suciaCada mes/ Cuerpo y fondo de la estación Cada mes/ Cubeta para lavado de la mopaCada 5 meses/ Unidad de solución de limpiezaCada mes/ Nota: Explore más accesorios en la aplicación ECOVACS HOME o en https://www�ecovacs�com� 1 Frecuencia de mantenimiento 76ES-LA Nota: • Lave el filtro con agua como se muestra� • No utilice los dedos ni cepillos para limpiar el filtro� Nota: Seque completamente los componentes antes del uso� 4� Seque al aire el depósito de polvo y el filtro� 3� Lave el depósito de polvo y el filtro con agua y sacúdalos para eliminar las gotas de agua� 2� Abra la red del filtro y retire el filtro� 1� Retire el depósito de polvo y vacíelo� 1 Mantener el depósito de polvo MANTENIMIENTO DEL DEEBOT Limpiar el depósito de polvo 77ES-LA Nota: Explore más accesorios en la aplicación ECOVACS HOME o en https://www�ecovacs�com� Limpiar el cepillo principal 1� Retire la tapa del cepillo principal� 2� Retire y limpie el cepillo principal� 2 Mantenimiento del cepillo principal y del cepillo lateral 3� Instale el cepillo principal y la tapa� Limpiar el cepillo lateral Retire el cepillo lateral con un destornillador y límpielo� 78ES-LA 4� Levante el eje del rodillo y limpie tanto el eje del rodillo como la cámara del rodillo� 5� Introduzca la mopa de rodillo en la tapa del extremo del rodillo y toque dos veces rápidamente el botón para retraerla� Nota: No lave el DEEBOT con agua� Tocar dos veces rápidamente 1� Toque dos veces rápidamente el botón para liberar el componente de mopa de rodillo� 2� Presione el botón de desbloqueo lateral para retirar el rodillo y, a continuación, retire la tapa del extremo del rodillo� 3� Limpie la tapa del extremo del rodillo y la mopa de rodillo� 3 Mantenimiento de la mopa de rodillo Nota: No jale con fuerza el rodillo mientras esté retraído, ya que podría dañar el componente de mopa de rodillo� Tocar dos veces rápidamente Limpie la mopa de rodillo 79ES-LA 1� Retire la cubeta de goteo� 2� Limpie la cubeta de goteo� 3� Instale los componentes del filtro de la cubeta de goteo como se muestra en la ilustración� Nota: Es posible que salga una pequeña cantidad de agua residual al voltear el DEEBOT si no está en modo de secado� 4 Mantener limpia la cubeta de goteo Limpie la cubeta de goteo Limpie el Módulo de evitar obstáculos 5 Mantener otros componentes Limpiar el parachoques 80ES-LA Limpiar los sensores anticaída Limpiar el sensor de bordes Nota: Los contactos de carga contienen componentes electrónicos sensibles� Límpielos con un paño seco� No utilice un paño húmedo para evitar daños causados por el agua� Limpiar los contactos de carga Limpiar el módulo de navegación 81ES-LA Limpiar las ruedas motrices Limpiar la rueda universal Nota: Sujete el asa para levantar y sacar la bolsa par…
Text truncated - open the document above for the full version.
Users Manual
49FR-CA 4� Soulevez l'arbre du rouleau et nettoyez à la fois l'essieu du rouleau et la chambre du rouleau� 5� Poussez la serpillière à rouleau dans le couvercle d'extrémité du rouleau et appuyez deux fois sur le bouton pour qu'il se rétracte� Remarque : Ne lavez pas le DEEBOT à l'eau� Double tapotement 1� Appuyez deux fois sur le bouton pour libérer le composant de la serpillière à rouleau� 2� Appuyez sur le bouton de déverrouillage latéral pour retirer le rouleau, puis détachez le couvercle d'extrémité du rouleau� 3� Nettoyez le couvercle d'extrémité du rouleau et la serpillière à rouleau� 3 Entretenir la vadrouille à rouleau Remarque : Ne tirez pas le rouleau en forçant lorsqu'il est rétracté, car cela pourrait endomma- ger le composant de la serpillière à rouleau� Double tapotement Nettoyez la serpillière à rouleau 50FR-CA 1� Retirez le bac d'égouttage� 2� Nettoyez le bac d'égouttage� 3� Veuillez installer les composants du filtre du bac d'égouttage comme indiqué sur l'illustration� Remarque : Une petite quantité d'eau résiduelle peut s'échapper lors du retournement du DEEBOT s'il n'est pas en mode séchage� 4 Maintenir le bac d'égouttage propre Retirez le bac d'égouttage Nettoyez le module d'évitement d'obstacles 5 Entretenir les autres composantes Nettoyez le pare-chocs 51FR-CA Nettoyez les capteurs anti-chute Nettoyez le capteur de bordure Remarque : Les contacts de recharge contiennent des composants électroniques sensibles� Nettoyez-les avec un chiffon sec� N'utilisez pas de chiffon humide pour éviter les dégâts d'eau� Nettoyez les contacts de charge Nettoyez le module de navigation 52FR-CA Nettoyez les roues motrices Nettoyez la roue universelle Remarque : Tenez la poignée pour soulever le sac à poussière, ce qui peut empêcher efficacement les fuites de poussière� 2� Retirez le sac à poussière jetable dans le sens de la flèche et jetez-le� 1� Retirez le couvercle du boîtier de collecte de poussière� 1 Entretenir le sac à poussière ENTRETIEN DE LA STATION 53FR-CA 2� Nettoyez la base du plateau de lavage de la serpillière et le filtre du plateau� 1� Nettoyez la base de la station� 2 Entretenez le plateau de lavage de la serpillière 3� Nettoyez le boîtier de collecte de poussière avec un chiffon sec et installez un nouveau sac à poussière� 4� Installez le couvercle de boîtier de collecte de poussière et appuyez sur les deux côtés pour assurer une étanchéité hermétique� Clic 54FR-CA 3� Installez le plateau de lavage et la base de la serpillière� Remarque : Veuillez installer correctement le plateau et la base pour éviter les dysfonctionnements� Clic Veuillez noter que le DEEBOT ne peut pas se recharger lorsqu'il est éteint� Veuillez recharger complètement et éteindre le DEEBOT avant de le ranger� Veuillez le recharger tous les mois et demi pour éviter que la batterie ne se décharge trop� Remarque : • Une fois que le DEEBOT a terminé sa tâche de nettoyage, il est recommandé de ne pas l'éteindre, mais de le maintenir en recharge afin de mieux se préparer à la prochaine séance de nettoyage� • Si la batterie est trop déchargée ou n'est pas utilisée pendant une période prolongée, le DEEBOT peut ne pas être rechargé� Veuillez contacter ECOVACS pour obtenir de l'aide� Ne démontez pas la batterie vous-même� • Si vous n'utilisez pas le produit pendant une période prolongée, gardez les réservoirs d'eau vides, et la serpillière à rouleau sèche� 3 Entreposage 55FR-CA Pour connaître le problème potentiel, consultez les solutions correspondantes. Non. DysfonctionnementCause potentielleSolution 1 Le DEEBOT n'est pas en mesure de se connecter à l'application ECOVACS HOME� Nom d'utilisateur ou mot de passe de Wi-Fi incorrect saisi� Entrez le bon nom d'utilisateur et le bon mot de passe de Wi-Fi� Le DEEBOT n'est pas à portée du signal Wi-Fi de votre maison� Assurez-vous que le DEEBOT est à portée du signal Wi-Fi de votre maison� Essayez de rester le plus près possible du routeur� Le DEEBOT n'est pas dans l'état de configuration� Appuyez sur la touche RESET (Réinitialisation) pour connecter le DEEBOT à votre téléphone par Bluetooth� En cas d'échec, veuillez vous reconnecter en suivant les consignes de l'application ECOVACS HOME� Il n'y a pas de Wi-Fi domestique sur la liste des Wi-Fi� 1� Vérifiez si le nom du Wi-Fi contient des caractères spéciaux� Veuillez ne pas utiliser de caractères spéciaux comme ! @#& ¥%/\� 2� N'utilisez pas de réseau 5 GHz� Une application incorrecte est installée� Veuillez consulter la section 【 Téléchargez l'application ECOVACS HOME 】 pour télécharger et installer l'application� 2 Impossible de créer la carte des meubles dans l'application� Le déplacement du DEEBOT lors du nettoyage peut entraîner la perte de la carte� Pendant le nettoyage, ne déplacez pas le DEEBOT� Le nettoyage automatique n'est pas terminé� Assurez-vous que le DEEBOT revient automatiquement à la station OMNI après le nettoyage� Le mode à étages multiples n'était pas activé lors de la création de la deuxième carte� Veuillez activer le mode à étages multiples dans l'application� 3 La brosse latérale se déplace hors de sa position pendant l'utilisation� La brosse latérale n'est pas correctement installée� Lorsque vous installez la brosse latérale avec un tournevis, assurez-vous que la vis est bien serrée� 4 Aucun signal trouvé� Impossible de retourner à la station� La station OMNI est mal placée� Placez la station correctement selon les instructions de la section 【 Mise sous tension et recharge du DEEBOT 】 � La station OMNI est hors tension ou a été déplacée� Vérifiez si la station OMNI est connectée à l'alimentation électrique� Ne déplacez pas la station OMNI� Le DEEBOT ne commence pas à nettoyer à partir de la station OMNI� Il est recommandé que le DEEBOT commence à nettoyer à partir de la station OMNI� L'itinéraire d'amarrage est bloqué� Par exemple, la porte de la pièce où se trouve la station OMNI est fermée� Gardez le chemin de recharge dégagé� DÉPANNAGE 56FR-CA Non. DysfonctionnementCause potentielleSol…
Text truncated - open the document above for the full version.
Users Manual
24EN 2. Clean the mop washing tray base and the tray filter. 1. Clean the station base. 2 Maintain Mop Washing Tray 3. Clean the dust collection cabin with a dry cloth and install a new dust bag. 4. Install the dust collection cabin cover and press both sides to ensure a tight seal. Click 25EN 3. Install the mop washing tray and base. Note: Please install the tray and base properly to prevent malfunction. Click Please note that DEEBOT cannot charge when powered OFF. Please fully charge and switch OFF DEEBOT before storage. Please recharge it every 1.5 months to prevent the battery from over-discharging. Note: • After DEEBOT finishes its cleaning task, it is recommended not to power it off but to keep it charging, to better prepare for the next cleaning session. • If the battery is over-discharged or not used for a long time, DEEBOT may not be charged. Please contact ECOVACS for help. Do not disassemble the battery by yourself. • If you do not use the product for a long time, keep the water tanks empty, and the roller mop dry. 3 Storage 26EN For the following possible issue, refer to the corresponding solutions. No. MalfunctionPossible CauseSolution 1 DEEBOT is not able to connect to the ECOVACS HOME App� Incorrect Wi-Fi username or password entered� Enter the correct Wi-Fi username and password� DEEBOT is not within range of your home Wi-Fi signal� Make sure DEEBOT is within range of your home Wi-Fi signal� Try to stay as close to the router as possible� DEEBOT is not in the configuration state� Press the reset button to connect DEEBOT to your phone by Bluetooth� If it fails, please reconnect as guided by the ECOVACS HOME App� There is no home Wi-Fi on the Wi-Fi list� 1�Check if the Wi-Fi name contains special characters� Please do not use special characters like ! @#& ¥%/\� 2�Do not use a 5 GHz network� An incorrect App is installed� Please refer to the 【 Download ECOVACS HOME APP 】 section to download and install the App� 2 Unable to create the furniture map in the App� Moving DEEBOT when cleaning might cause the map to be lost� During cleaning, do not move DEEBOT� Auto cleaning is not finished� Make sure DEEBOT automatically returns to the OMNI Station after cleaning� Multi-floor mode was not enabled when the second map was created� Please enable multi-floor mode in the App� 3 The side brush drops out of place during use� The side brush is not properly installed� When installing the side brush with a screwdriver, ensure the screw is tightened securely� 4 No signal found� Unable to return to the station� The OMNI Station is incorrectly placed� Place the station properly according to the instructions in the 【 Power on and Charge DEEBOT 】 section� The OMNI Station is out of power or has been moved� Check whether the OMNI Station is connected to the power supply� Do not move the OMNI Station� DEEBOT does not start cleaning from the OMNI Station�It is recommended that DEEBOT start cleaning from the OMNI Station� The docking route is blocked� For example, the door is closed to the room where the OMNI Station is placed� Keep the charging route clear� TROUBLESHOOTING 27EN No. MalfunctionPossible CauseSolution 5 DEEBOT returns to the OMNI Station before it has finished cleaning� The room is so large that DEEBOT needs to return to recharge� Please enable auto-resume� For more details, please follow the App instructions� In highly complex home layouts, cleaning efficiency may decrease, possibly resulting in incomplete cleaning� Simplify your home layout� 6 DEEBOT is unable to charge� DEEBOT is not switched ON�Switch ON DEEBOT� DEEBOT's charging contacts are not connected to the OMNI station's charging contacts� Make sure that DEEBOT's charging contacts have connected to the station's charging contacts and flashes� Check whether DEEBOT's and OMNI station's charging contacts are dirty� Please clean these parts according to the instructions in the 【 REGULAR MAINTENANCE 】 section� The OMNI Station is not connected to the power supply� 1� Make sure the OMNI station is connected to power supply� 2� Once the power is connected, ensure that the motor startup sound can be heard� The base has not been installed in place�Refer to the 【 Quick Start 】 section for correct installation� 7 DEEBOT is very loud during cleaning� The main brush/side brush is tangled, or the dust bin/ roller mop/filter is blocked� It is recommended to clean the main brush, side brush, dust bin, roller mop, filter, etc�, regularly� DEEBOT is in Strong Suction Mode or Max Suction Power� Switch to Standard Mode� 8 DEEBOT gets stuck while working and stops� DEEBOT is tangled with objects on the floor (electrical wires, curtains, carpet fringing, etc�)� DEEBOT will try various ways to free itself� If its attempts fail, manually remove the obstacles and restart� DEEBOT might be stuck under furniture with an entrance of similar height� Please raise the furniture, set a physical barrier, or set a virtual boundary via the ECOVACS HOME App� DEEBOT is stuck in a narrow area� Tidy up your home, set a physical barrier, or set a virtual boundary via the ECOVACS HOME App� DEEBOT is stuck on a step or threshold� Refer to the guidance in the App to set up a threshold ramp or a virtual boundary� 28EN No. MalfunctionPossible CauseSolution 9 During cleaning, DEEBOT may encounter issues like a disorderly route, biased movement, repeated cleaning over the same spots, and missing small areas� (If there is a large area that has not been cleaned temporarily, DEEBOT will automatically clean the missed area� Sometimes DEEBOT will re-enter a cleaned room, which may not be repeated cleaning, but DEEBOT finds any missed area�) Objects such as wires and slippers placed on the ground block DEEBOT� Before cleaning, please tidy up scattered wires, slippers, and other objects on the ground as much as possible� If there is any area missed during cleaning, DEEBOT will correct it automatically� Please refrain from interfering (such as moving DEEBOT or blocking its route…
Text truncated - open the document above for the full version.
Users Manual
平面印刷品基本技术要求 科沃斯机器人股份有限公司 物料名称莎士比亚-美-水箱版高配-完整版说明书尺 寸145*210mm 型 号ZJ2522印刷颜色单色K 物料编码451-2522-0813装订方式胶装 版 次A阶 段A 材 质封面157哑粉纸+内页80g双胶纸页 数91p 变更记录: 设计审核批准 ECOVACS:机密图档 PLD 2025.12.17 张莹莹 Instruction Manual Instruction Manual ���������������������������������������������������������������������������������������������EN I P03 Manuel d’instructions ����������������������������������������������������������������������������������FR-CA I P32 Manual de instrucciones �����������������������������������������������������������������������������ES-LA I P61 3EN IMPORTANT SAFETY INSTRUCTIONS IMPORTANT SAFETY INSTRUCTIONS READ ALL INSTRUCTIONS BEFORE USING THIS APPLIANCE. When using an electrical appliance, basic precautions should always be followed, including the following: WARNING: Read all safety warnings and instructions� Failure to follow the warnings and instructions may result in electric shock, fire, or serious injury� 1� Do not allow to be used as a toy� Close attention is necessary when used by or near children� 2� Clear the area to be cleaned� Remove power cords and small objects from the floor that could entangle the Appliance� Tuck rug fringe under the rug base, and lift items such as curtains and tablecloths off the floor� 3� If there is a drop off in the cleaning area due to a step or stairs, you should operate the Appliance to ensure that it can detect the step without falling over the edge� It may become necessary to place a physical barrier at the edge to keep the unit from falling� Make sure the physical barrier is not a trip hazard� 4� Only use as described in this manual� Only use attachments recommended or sold by the manufacturer� 5� Do not handle plug or appliance with wet hands� 6� Non-rechargeable batteries are prohibited� 7� Do not use without Dust Bin and/or Filters in place� 8� Do not operate the vacuum in an area where there are lit candles or fragile objects on the floor to be cleaned� 9� Do not use and store in extremely hot or cold environments (below -5 ̊C /23 ̊F or above 40 ̊C/104 ̊F)� Please charge the robot in temperature above 0°C/32°F and below 40°C/104°F� 10� Keep hair, loose clothing, fingers, and all parts of body away from any openings and moving parts� 11� Do not operate the Appliance in a room where an infant or child is sleeping� 12� For INDOOR use ONLY� Do not use the Appliance in outdoor, commercial or industrial environments� Do not use Appliance on wet surfaces or surfaces with standing water� 13� Do not allow the Appliance to pick up large objects like stones, large pieces of paper, or any item that may clog the Appliance� 14� Do not use to pick up flammable or combustible materials such as gasoline, printer, or copier 4EN toner, or use in areas where they may be present� 15� Do not pick up anything that is burning or smoking, such as cigarettes, matches, hot ashes, or anything that could cause a fire� 16� Do not put any object into openings� Do not use with any opening blocked; keep free of dust, lint, hair, and anything that may reduce air flow� 17� Take care not to damage the power cord� Do not pull on or carry the Appliance or Docking Station by the power cord, use the power cord as a handle, close a door on the power cord, or pull power cord around sharp edges or corners� Do not run Appliance and Docking Station over the power cord� Keep power cord away from hot surfaces� Do not unplug by pulling on cord� To unplug, grasp the plug, not the cord� 18� If the power cord is damaged, it must be replaced by the manufacturer or its service agent in order to avoid a hazard� 19� Do not use with a damaged power cord or plug� Do not use the Appliance or Docking Station if it is not working properly, has been dropped, damaged, left outdoors, or come in contact with water� It must be repaired by the manufacturer or its service agent in order to avoid a hazard� 20� Turn OFF the power switch before cleaning or maintaining the Appliance� Turn off all controls before unplugging� Always turn off this appliance before connecting or disconnecting motorized nozzle� 21� Turn OFF the Power Switch before removing the Dust Bin� 22� Remove the Appliance from the Docking Station, and turn OFF the power switch to the Appliance before removing the battery for disposal of the Appliance� 23� The battery must be removed and discarded according to local laws and regulations before disposal of the Appliance� 24� Please dispose of used batteries according to local laws and regulations� 25� Do not incinerate the Appliance even if it is severely damaged� The batteries can explode in a fire� 26� When not using the Docking Station, unplug from outlet when not in use and before servicing� 27� The Appliance must be used in accordance with the directions in this Instruction Manual�Ecovacs Home Service Robotics cannot be held liable or responsible for any damages or injuries caused by improper use� 28� Prevent unintentional starting� Ensure the switch 5EN is in the off position before connecting to battery pack, picking up or carrying the appliance� 29� When battery pack is not in use, keep it away from other metal objects, like paper clips, coins, keys, nails, screws, or other small metal objects, that can make a connection from one terminal to another� Shorting the battery terminals together may cause burns or a fire� 30� Under abusive conditions, liquid may be ejected from the battery; avoid contact� If contact accidentally occurs, flush with water� If liquid contacts eyes, additionally seek medical help� Liquid ejected from the battery may cause irritation or burns� 31� Do not use a battery pack or appliance that is damaged or modified� Damaged or modified batteries may exhibit unpredictable behavior resulting in fire, explosion, or risk of injury� 32� Do not expose a battery pack or appliance to fire or excessive temperature� Exposure to fire or temperature above 130°C may cause explosion� The temperature of 130°C can be replaced by the temperature of 265°F� 33� Follow all charging …
Text truncated - open the document above for the full version.
Test Report
网址: www.fn-link.com Supplier website: www.fn link.com 承认 书 FN-LINK TECHNOLOGY LIMITED CUSTOMER APPROVED BY 批准 Approved by审核 Checked by制表 Prepared by SUPPLIER APPROVED BY 批准 Approved by审核 Checked by制表 Prepared by Customer 科沃斯 Project Name 4A8-1100-4700(莎士比亚) Customer NO. specification 工作频率:2400-2500MHz PCB天线 哑黑油 白字;尺寸 32×10MM;线长 56mm 线径 1.13 黑色线;带 1 代 IPEX;ROHS Supplier NO. Specification NO. 2025081803 Write by Jack REV. V2.0 Date 2025.9.27 Note 天线测试报告 antenna testing FN-LINK TECHNOLOGY LIMITED Change content version Change person Approve d by 2025.08.18 首版发行 V1.0 2025.9.25 修改线材长度 V2.0 FN-LINK TECHNOLOGY LIMITED 序号 Number 内容 content 页码 Page number - 承认书封面 Acknowledgment Letter Cover 1 one - 天线测试报告 Antenna test report 2 two - 版本变更记录 Version change record 3 three 1 one 承认书项目表 Confirmation Letter Project Table 4 four 2 two 试验设备和条件 Test equipment and conditions 5 five 3 three 样机结构说明件 Prototype structure specification 6 six 4 four 天线成品图 Finished antenna diagram 7 seven 5 five 天线S参数 Antenna S-Parameter 8 eight 6 six 增益/效率/3D 图 Gain/Efficiency/3D Graph 9 nine- fourteen 7 seven 包装 packing 10 fifteen 1.承认书项目表 (Index) 1. Recognition Letter Project Table (Index) FN-LINK TECHNOLOGY LIMITED 2.试验设备和条件(Test Equipment & Conditions) 1.1 Network Analyzers : KEYSIGHT P5002A1.2 Communications Test Set: R& S CMW 500 1.3 3D Chamber Test System: 24探头测试系统(24 probe testing system) 1. 微波暗室的测试原理图(Testing principle diagram of microwave anechoic chamber 2.说明。 这份报告总结了该项目天线的电气性能结果,包括天线的S11 参数,Gain和Efficiency.2. Explanation. This report summarizes the electrical performance results of the antenna for the project, including the S11 parameters, Gain, and Efficiency of the antenna FN-LINK TECHNOLOGY LIMITED FN-LINK TECHNOLOGY LIMITED A.电气特性(Electrical Characteristics) 频率范围(Frequency)2400-2500GHz 驻波比(V.S.W.R)≤2.0 增益(Peak Gain)0.91dBI 阻抗(Impedance)50 Ohm 辐射方向(Radiation)全向(Omni-directional) 极化方式(Polarization)线极化(Linear) 功率容量(Admitted Power)<10W B.材料和机械特性(Material & Mechanical Characteristics) 内部结构(Internal Structure)PCB 外部结构(External Structure)N/A 电缆型号(Cable Type)RF1.13 cable 连接器型号(Connector Type)国产1代IPEX端子 C.环境特性(Environmental Characteristics) 使用温度(Operation Temperature)- 40 ̊C ~ + 80 ̊C 贮存温度(Storage Temperature)- 40 ̊C ~ + 80 ̊C 天线寿命(Antenna Storage life )≤10 year 3. 电性参数 Electrical parameters 4. 天线成品图 Finished antenna diagram FN-LINK TECHNOLOGY LIMITED 5.天线S参数 Antenna S-Parameter VSWR Return loss FN-LINK TECHNOLOGY LIMITED 6. 增益/效率/3D 图 Gain/Efficiency/3D Graph Frequency/MhzEfficiency / %MaxGain/dBi 240036.06-1.45 241041.4-0.44 242044.670.11 243049.320.91 244047.970.52 245043.350.05 246040.27-0.37 247036.81-0.68 248033.65-1.23 249034.36-1.2 250032.73-1.45 FN-LINK TECHNOLOGY LIMITED 7. 包装 packing 产品包装规范Code for product packaging
Test Setup Photos
FCC ID: 2A64B-DEX95 IC: 28593-DEX95 Test Setup FCC ID: 2A64B-DEX95 IC: 28593-DEX95 FCC ID: 2A64B-DEX95 IC: 28593-DEX95
Test Report
FCC ID: 2A64B-DEX95 IC: 28593-DEX95 11N40SISO-Ant1-2437-PASS 11N40SISO-Ant1-2452-PASS FCC ID: 2A64B-DEX95 IC: 28593-DEX95 Band edge measurements Test Result TestMode Antenna ChName Frequency [MHz] RefLevel [dBm] Result [dBm] Limit [dBm] Verdict 11B Ant1 Low 2412 7.24 -35.33 ≤-22.76 PASS 11B Ant1 High 2462 7.88 -48.43 ≤-22.12 PASS 11G Ant1 Low 2412 3.83 -33.14 ≤-26.17 PASS 11G Ant1 High 2462 4.18 -44.56 ≤-25.82 PASS 11N20SISO Ant1 Low 2412 3.71 -32.15 ≤-26.3 PASS 11N20SISO Ant1 High 2462 4.73 -42.89 ≤-25.27 PASS 11N40SISO Ant1 Low 2422 -2.14 -40.58 ≤-32.14 PASS 11N40SISO Ant1 High 2452 -1.27 -38.55 ≤-31.27 PASS FCC ID: 2A64B-DEX95 IC: 28593-DEX95 Test Graphs 11B-Ant1-2412-PASS 11B-Ant1-2462-PASS 11G-Ant1-2412-PASS FCC ID: 2A64B-DEX95 IC: 28593-DEX95 11G-Ant1-2462-PASS 11N20SISO-Ant1-2412-PASS 11N20SISO-Ant1-2462-PASS 11N40SISO-Ant1-2422-PASS FCC ID: 2A64B-DEX95 IC: 28593-DEX95 11N40SISO-Ant1-2452-PASS FCC ID: 2A64B-DEX95 IC: 28593-DEX95 Conducted Spurious Emission Test Result TestMode Antenna Frequency[MHz] FreqRange [Mhz] RefLevel [dBm] Result [dBm] Limit [dBm] Verdict 11B Ant1 2412 0~Reference 7.42 7.42 --- PASS 11B Ant1 2412 30~1000 7.42 -61.18 ≤-22.58 PASS 11B Ant1 2412 1000~26500 7.42 -45.85 ≤-22.58 PASS 11B Ant1 2437 0~Reference 6.70 6.70 --- PASS 11B Ant1 2437 30~1000 6.70 -61.39 ≤-23.3 PASS 11B Ant1 2437 1000~26500 6.70 -45.33 ≤-23.3 PASS 11B Ant1 2462 0~Reference 7.94 7.94 --- PASS 11B Ant1 2462 30~1000 7.94 -61.44 ≤-22.06 PASS 11B Ant1 2462 1000~26500 7.94 -45.34 ≤-22.06 PASS 11G Ant1 2412 0~Reference 3.32 3.32 --- PASS 11G Ant1 2412 30~1000 3.32 -61.07 ≤-26.68 PASS 11G Ant1 2412 1000~26500 3.32 -47.3 ≤-26.68 PASS 11G Ant1 2437 0~Reference 5.13 5.13 --- PASS 11G Ant1 2437 30~1000 5.13 -60.61 ≤-24.87 PASS 11G Ant1 2437 1000~26500 5.13 -47.77 ≤-24.87 PASS 11G Ant1 2462 0~Reference 4.36 4.36 --- PASS 11G Ant1 2462 30~1000 4.36 -60.7 ≤-25.64 PASS 11G Ant1 2462 1000~26500 4.36 -49.76 ≤-25.64 PASS 11N20SISO Ant1 2412 0~Reference 3.77 3.77 --- PASS 11N20SISO Ant1 2412 30~1000 3.77 -60.72 ≤-26.23 PASS 11N20SISO Ant1 2412 1000~26500 3.77 -47.51 ≤-26.23 PASS 11N20SISO Ant1 2437 0~Reference 5.71 5.71 --- PASS 11N20SISO Ant1 2437 30~1000 5.71 -60.39 ≤-24.29 PASS 11N20SISO Ant1 2437 1000~26500 5.71 -49.44 ≤-24.29 PASS 11N20SISO Ant1 2462 0~Reference 4.11 4.11 --- PASS 11N20SISO Ant1 2462 30~1000 4.11 -61.01 ≤-25.89 PASS 11N20SISO Ant1 2462 1000~26500 4.11 -47.47 ≤-25.89 PASS 11N40SISO Ant1 2422 0~Reference -2.26 -2.26 --- PASS 11N40SISO Ant1 2422 30~1000 -2.26 -61.18 ≤-32.26 PASS 11N40SISO Ant1 2422 1000~26500 -2.26 -49.49 ≤-32.26 PASS 11N40SISO Ant1 2437 0~Reference -0.88 -0.88 --- PASS 11N40SISO Ant1 2437 30~1000 -0.88 -61.22 ≤-30.88 PASS 11N40SISO Ant1 2437 1000~26500 -0.88 -48.87 ≤-30.88 PASS 11N40SISO Ant1 2452 0~Reference -0.79 -0.79 --- PASS 11N40SISO Ant1 2452 30~1000 -0.79 -60.99 ≤-30.79 PASS 11N40SISO Ant1 2452 1000~26500 -0.79 -48.64 ≤-30.79 PASS FCC ID: 2A64B-DEX95 IC: 28593-DEX95 Test Graphs 11B-Ant1-2412-0~Reference-PASS 11B-Ant1-2412-30~1000-PASS 11B-Ant1-2412-1000~26500-PASS FCC ID: 2A64B-DEX95 IC: 28593-DEX95 11B-Ant1-2437-0~Reference-PASS 11B-Ant1-2437-30~1000-PASS 11B-A…
Text truncated - open the document above for the full version.
Contact Information
Applicant
Alix Liu(manager)
[email protected]Fax: 0512-67072006
Technical Contact
Ecovacs Robotics, Inc.Thomas Climer
1500 Fashion Island Blvd., Suite 201 · San Mateo, 94404 · United States
Test Firm
Intertek Testing Services (Shanghai FTZ) Co., Ltd.Leah Xu
Technical Specifications
| # | Rule Parts | Frequency Range | Power Output |
|---|---|---|---|
| 1 | 15C | 2.41 GHz - 2.46 GHz | 51.00 mW |
| 2 | 15C | 2.40 GHz - 2.48 GHz | 3.00 mW |
Other Applications from Ecovacs Home Service Robotics Co., Ltd.

2A64B-ZJ2576
Jul 28, 2026Floor Cleaning Robot
Equipment Class
DTS - Digital Transmission System
2A64B-ZJ2622
Jul 21, 2026Floor Cleaning Robot
Equipment Class
DTS - Digital Transmission System
2A64B-ZJ2618
Jul 16, 2026Floor Cleaning Robot
Equipment Class
DTS - Digital Transmission System
2A64B-WE005V01
May 13, 2026Window Cleaning Robot
Equipment Class
DTS - Digital Transmission System
2A64B-WD008V02
May 12, 2026Window Cleaning Robot
Equipment Class
DTS - Digital Transmission System