CB2775AHL5Universal Garage Door Opener w/ FHSS TX
Johnson Controls Interiors L.L.C.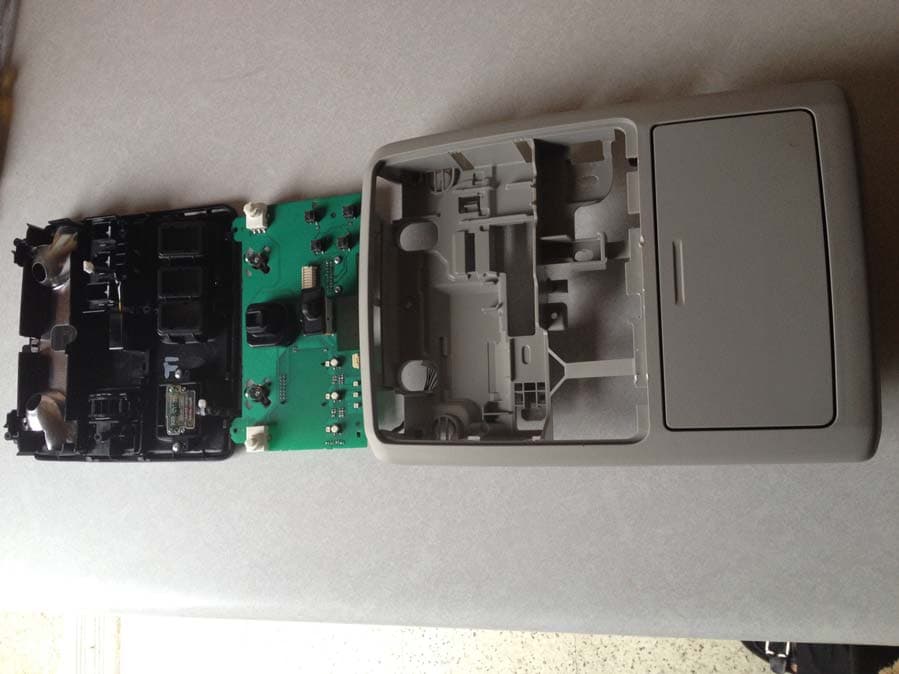
Click to zoom
Application Details
- Equipment Class
- DSR - Part 15 Remote Control/Security Device Transceiver
- Date of Grant
- Apr 29, 2013
- Application Purpose
- Original Equipment
- Date of Application
- Apr 28, 2013
- Equipment Note
- Universal Garage Door Opener w/ FHSS TX
- Frequency Range
- 411.00000000 - 440.00000000
- Country
- United States
Documents & Files
Document Text
Text extracted from the exhibit documents filed with the FCC. Open a document above to read the original.
Users Manual
HomeLink and the HomeLink house are registered trademarks of Johnson Controls, Inc. Programming and Information Guide The following is suggested text to be included in the vehicle Owner’s Manual, to assist the End User with functionality of their HomeLink Device. The HomeLink Wireless Control System provides a convenient way to replace up to three hand- held radio-frequency (RF) transmitters used to activate devices such as gate operators, garage door openers, entry door locks, security systems, even home lighting. Additional HomeLink information can be found on the Internet at www.homelink.com . Product and vehicle specific programming videos and other HomeLink related information can also be found at YouTube.com listed at the end of this document. Precautions ! Before programming HomeLink to a garage door opener or gate operator, make sure that people and objects are out of the way of the device to prevent potential harm or damage. When programming a garage door opener, it is advised to park outside of the garage. Do not use HomeLink with any garage door opener that lacks safety stop and reverse features as required by U.S. federal safety standards (this includes any garage door opener model manufactured before April 1, 1982). A garage door that cannot detect an object - signaling the door to stop and reverse - does not meet current U.S. federal safety standards. For more information, contact HomeLink at: www.homelink.com . Retain the original transmitter of the RF device you are programming for use in other vehicles as well as for future HomeLink programming. It is also suggested that upon the sale of the vehicle, the programmed HomeLink buttons be erased for security purposes. Refer to “Erasing HomeLink Buttons”. Programming HomeLink Note: Some vehicles may require the ignition switch to be turned on or to the second (“accessories”) position for programming and/or operation of HomeLink. It is also recommended that a new battery be placed in the hand-held transmitter of the device being programmed to HomeLink for quicker training and accurate transmission of the radio-frequency signal. 1. Position the end of your hand-held transmitter 1–3 inches (5–14 cm) away from the HomeLink button you wish to program while keeping the indicator light in view. 2. Simultaneously press and hold both the chosen HomeLink and hand-held transmitter buttons until the HomeLink indicator light changes from a slow to either a rapid blink (rolling code) or solid ON state (fixed code). If the indicator light has the multi color feature, the LED will also change from yellow to green. Now you may release both the HomeLink and hand-held transmitter buttons. Note: Some devices may require you to replace this Programming Step 2 with procedures noted in the “Gate Operator / Canadian Programming” section. If the HomeLink indicator HomeLink and the HomeLink house are registered trademarks of Johnson Controls, Inc. light does not change to a rapidly blinking light after performing these steps, contact HomeLink at www.homelink.com. 3. Firmly press, hold for five seconds and release the programmed HomeLink button up to two separate times to activate the door. If the door does not activate, press and hold the just- trained HomeLink button and observe the indicator light. If the indicator light stays on constantly, programming is complete and your device should activate when the HomeLink button is pressed and released. If the indicator light blinks continuously, continue with “Programming” steps 4-6 to complete the programming of a rolling code equipped device (most commonly a garage door opener). 4. At the garage door opener receiver (motor-head unit) in the garage, locate the “Learn” or “Smart” Button. This can usually be found where the hanging antenna wire is attached to the motor-head unit (see the Garage Door Opener manual to identify the “Learn Button”). 5. Firmly press and release the “learn” or “smart” button. (The name and color of the button may vary by manufacturer.) There are typically 30 seconds to initiate step 6. 6. Return to the vehicle and firmly press, hold for two seconds and release the programmed HomeLink button. Repeat the “press/hold/release” sequence a second time, and, depending on the brand of the garage door opener (or other rolling code equipped device), repeat this sequence a third time to complete the programming process. HomeLink should now activate your rolling code equipped device. Gate Operator / Canadian Programming Canadian radio-frequency laws require transmitter signals to “time-out” (or quit) after several seconds of transmission – which may not be long enough for HomeLink to pick up the signal during programming. Similar to this Canadian law, some U.S. gate operators are designed to “time-out” in the same manner. HomeLink and the HomeLink house are registered trademarks of Johnson Controls, Inc. If you live in Canada or you are having difficulties programming a gate operator or garage door opener by using the “Programming” procedures, replace “Programming HomeLink” step 2 with the following: Note: If programming a garage door opener or gate operator, it is advised to unplug the device during the “cycling” process to prevent possible overheating. 2. Continue to press and hold the HomeLink button while you press and release - every two seconds (“cycle”) your hand-held transmitter until the HomeLink indicator light changes from a slow to either a rapid blink (rolling code) or solid ON state (fixed code). Now you may release both the HomeLink and hand-held transmitter buttons. Proceed with “Programming” step 3 to complete. Additional Steps for Programming a Door System with Feedback The HomeLink has the capability of receiving Garage Door Status from compatible Garage Door Opener Systems. Check your Garage Door Opener Manual for the available feature and HomeLink compatibility. Also for a listing of compatible systems contact HomeLink at: www.homelink.com . Within the first (10) Hom…
Text truncated - open the document above for the full version.
External Photos
Exterior Photograph Front View Rear View Homelink inside housing Rear View with HL apart from Assembly Unit Front View with HL apart from Assembly Unit
ID Label/Location Info
Homelink FCC Label Placement Location
Internal Photos
Interior Photographs Internal View- Front Lighting Board Internal View- Rear Lighting Board Internal View- Front HomeLink Board Internal View- Rear HomeLink Board
RF Exposure Info
4/24/2013 1 RF Exposure / SAR Information – FCC KDB 447498 FCC ID: CB2775AHL5 Applicant: Johnson Controls, Inc. Model: 775AHL5 The following describes the use case, user separation for the extremities and head, and conducted power of the 775AHL5 model. Per KDB 447498 section 4.3.1, the module was under the test exclusion thresholds for all bands. This device is designed to be used while in a seated position inside of a vehicle. The operational condition is shown in the diagram below. It operates while a button is pressed, therefore the finger would be the closest part of the body to the antenna while it is transmitting. This distance is approximately 35mm due to the separation between the button surface and the antenna. The antenna to head distance would conservatively be 200mm away during the transmission. 4/24/2013 2 Calculations: As the finger would be inside of the 50mm test separation distance, the following formula would be used for calculating the extremity exclusion threshold: [(max power in mW) / (min test separation in mm)] * [(f(GHz))^1/2] The head conservatively would not be closer than 200mm away, which would put it outside of the 50mm test separation distance. Thus the following formulas would be used for calculating the head exclusion threshold: 4/24/2013 3 Step 1 threshold = {3 / [(f(GHz))^1/2]}*(50) then the limit in mW is given by [Step 1 threshold + (test separation distance – 50mm) * (f(MHz)/150]mW Frequency – 288MHz Measured Conducted Power – 14.88dBm Converting to mW – 14.88dBm = 31mW Extremity Test Separation – 35mm Head Test Separation – 200mm 4/24/2013 4 Conducted Measurement 10-g Extremity: [(31mW) / (35mm)] * [(0.288(GHz))^1/2] = 0.475 Which is less than the 7.5 for 10-g SAR 1-g Head: {3 / [(0.288(GHz))^1/2]}*(50) = 280 [280 + (200mm – 50mm) * 288/150]mW = 568mW 4/24/2013 5 31mW max output is less than the 568mW limit for test separation distances > 50mm Frequency – 310MHz Measured Conducted Power – 14.83dBm Converting to mW – 14.83dBm = 30mW Extremity Test Separation – 35mm Head Test Separation – 200mm Conducted Measurement 4/24/2013 6 10-g Extremity: [(30mW) / (35mm)] * [(0.310(GHz))^1/2] = 0.477 Which is less than the 7.5 for 10-g SAR 1-g Head: {3 / [(0.310(GHz))^1/2]}*(50) = 269 [269 + (200mm – 50mm) * 310/150]mW = 579mW 30mW max output is less than the 579mW limit for test separation distances > 50mm Frequency – 365MHz Measured Conducted Power – 14.43dBm Converting to mW – 14.43dBm = 28mW Extremity Test Separation – 35mm Head Test Separation – 200mm 4/24/2013 7 Conducted Measurement 4/24/2013 8 10-g Extremity: [(28mW) / (35mm)] * [(0.365(GHz))^1/2] = 0.483 Which is less than the 7.5 for 10-g SAR 1-g Head: {3 / [(0.365(GHz))^1/2]}*(50) = 248 [248 + (200mm – 50mm) * 365/150]mW = 613mW 28mW max output is less than the 613mW limit for test separation distances > 50mm Frequency – 433MHz Measured Conducted Power – 13.47dBm Converting to mW – 13.47dBm = 22mW Extremity Test Separation – 35mm Head Test Separation – 200mm 4/24/2013 9 Conducted Measurement 10-g Extremity: [(22mW) / (35mm)] * [(0.433(GHz))^1/2] = 0.413 Which is less than the 7.5 for 10-g SAR 4/24/2013 10 1-g Head: {3 / [(0.433(GHz))^1/2]}*(50) = 228 [228 + (200mm – 50mm) * 433/150]mW = 661mW 22mW max output is less than the 661mW limit for test separation distances > 50mm Frequency – 902.25MHz Measured Conducted Power – 11.2dBm Converting to mW – 11.2dBm = 13mW Extremity Test Separation – 35mm Head Test Separation – 200mm 4/24/2013 11 Conducted Measurement 10-g Extremity: [(13mW) / (35mm)] * [(0.90225(GHz))^1/2] = 0.353 Which is less than the 7.5 for 10-g SAR 4/24/2013 12 1-g Head: {3 / [(0.90225(GHz))^1/2]}*(50) = 158 [158 + (200mm – 50mm) * 902.25/150]mW = 1060mW 13mW max output is less than the 1060mW limit for test separation distances > 50mm Frequency – 914.75MHz Measured Conducted Power – 11.19dBm Converting to mW – 11.19dBm = 13mW Extremity Test Separation – 35mm Head Test Separation – 200mm 4/24/2013 13 Conducted Measurement 10-g Extremity: [(13mW) / (35mm)] * [(0.91475(GHz))^1/2] = 0.355 Which is less than the 7.5 for 10-g SAR 4/24/2013 14 1-g Head: {3 / [(0.91475(GHz))^1/2]}*(50) = 157 [157 + (200mm – 50mm) * 914.75/150]mW = 1072mW 13mW max output is less than the 1072mW limit for test separation distances > 50mm Frequency – 926.75MHz Measured Conducted Power – 11.09dBm Converting to mW – 11.09dBm = 13mW Extremity Test Separation – 35mm Head Test Separation – 200mm 4/24/2013 15 Conducted Measurement 10-g Extremity: [(13mW) / (35mm)] * [(0.92675(GHz))^1/2] = 0.358 Which is less than the 7.5 for 10-g SAR 4/24/2013 16 1-g Head: {3 / [(0.92675(GHz))^1/2]}*(50) = 156 [156 + (200mm – 50mm) * 926.75/150]mW = 1083mW 13mW max output is less than the 1083mW limit for test separation distances > 50mm
Test Report
Johnson Controls Interiors, LLC. Page 1 of 32 Model: 775AHL5 Technical Report to the FCC and Industry Canada Regarding Johnson Controls Interiors, L.L.C. Homelink© V Model: 775AHL5 FCC ID: CB2775AHL5 IC: 279B- 775AHL5 Emission Designator : 72KL1D 4/26/2013 A report concerning approval for Johnson Controls Homelink® model 775AHL5 Please issue grant immediately upon review. Measurements Made by: Measurements Reviewed by: Bolay Bun Edward Thomsen RF Test Site Technician Test / EMC Engineer Johnson Controls Interiors, LLC. Johnson Controls Interiors, LLC Report and Application Prepared by: Report Submitted by: Bolay Bun Edward Thomsen RF Test Site Technician Test / EMC Engineer Johnson Controls Interiors, LLC. Johnson Controls Interiors, LLC. Johnson Controls Interiors, LLC. Page 2 of 32 Model: 775AHL5 1. General Information 1.1. Product Description: The Johnson Controls Interiors HomeLink® HL5 Universal Garage Door Opener is a low-power transceiver OEM device that is installed into an overhead area of the automobile. The installation is provided by trained technicians during the course of the manufacture of the automobile. It is powered by the 12 Volt system of the automobile. This Universal Garage Door Opener has the capability to 1. Learn the frequency and bit code format of the user’s existing garage door remote control devices and 2. Reproduce and transmit the frequency and bit code format to remotely operate the user’s garage door. The unit is designed for the periodic operation of a control signal, which typically activates a garage door opener receiver. The unit is supplied to the automobile manufacturer without harness. For testing purposes a typical assembly and 2-conductor cable harness were used to power to the unit. The unit is only operational when the user depresses the control button. It becomes inactive after release of the control button. The three-button HomeLink® unit replaces up to three hand-held transmitters. In addition to the typical operation of the garage door, the unit will learn the radio frequency codes of other transmitter types to activate entry door locks, estate gates, security systems, and home or office lighting. The antenna system is an integral part of the unit. It cannot be altered nor replaced by the user. Service of this system is only available from the Automobile Manufacturer’s Dealerships and Johnson Controls Interiors, LLC. 1.2. Related Grants This device will have functionality that is covered under CFR 47 15.247 and RSS-210 Annex 1. The device will have a FCC ID # of CB2775AHL5 and an IC ID # of 279B- 775AHL5 un der both rule parts. A separate report is submitted for functionality covered under CFR 47 15.247 and RSS-210 Annex 8. 1.3. Test Methodology Radiated Emissions testing was performed according to ANSI C63.4-2003. The power source for this product is a 12V automotive vehicle battery, thus conducted emissions measurements are not required. The unit is supplied to the automobile manufacturer without harness. For testing purposes a 2-conductor cable harness was used to interface to the unit. Johnson Controls Interiors, LLC. Page 3 of 32 Model: 775AHL5 1.4. Test Facility The Open Area Test Site where these measurements were taken is located on the grounds of Johnson Controls Automotive Interiors System’s Edgar D. Prince Technical Campus, in the city of Holland, county of Ottawa, state of Michigan, United States of America. The site is a fully enclosed 10m weather-protected OATS. All structure materials above the conducting ground-plane are non-metallic and consist of wood, laminated lumber, fiberglass, glue, plastic, or fiberglass reinforced plastic. The site contains a 15-foot diameter turntable capable of supporting large cars and light trucks under test. Tabletop testing was conducted on a smaller 3m turntable described in the site recertification report. The test site has been fully described in a reports filled with the FCC and Industry Canada. The report filed with the FCC is dated December 20, 2011, was accepted by the FCC in a letter dated January 10, 2012. The report filled with Industry Canada, dated June 7, 2011, was accepted via a letter dated June 7, 2011 . Our OATS is registered with the IC under file number IC# 279B-1. 1.5. Accreditation The Johnson Controls, Inc. - Electronics Validation Lab is accredited to ISO 17025 by the American Association for Laboratory Accreditation (A2LA). Our laboratory scope and accreditation certificate (# 1425.02) are available from their web site www.a2la.org . Our scope of accreditation covers ANSI C63.4 Radiated Emissions at 3m, FCC 47 CFR Part 15, and IC RSS-210. 2. Product Labeling The FCC Identifier assigned is FCC ID: CB2775AHL5. The Industry Canada certification number is 279B- CB2775AHL5. These identifiers will be labeled on the product housing. The label will be placed on the exterior of the HL5 housing using an acrylic adhesive that will permanently affix the label. Because of the small size of the device and because the installation is inside a portion of the automobile, the following statements will appear in the user’s manual. Refer to attachment “Users Manual.pdf” for the entire text of the user’s manual. “This device complies with Part 15 of the FCC rules and with RSS-210 of the Industry Canada. Operation is subject to the following two conditions: (1) This device may not cause harmful interference, (2) This device must accept any interference that may be received including interference that may cause undesired operation. WARNING: The transmitter has been tested and complies with FCC and Industry Canada rules. Changes or modifications not expressly approved by the party responsible for the compliance could void the user’s authority to operate the device.” 2.1. Label Drawing and Location on Product. The label drawing is included in the Label Drawing.pdf attachment. A diagram showing the location of the label on the assembly is included in the Label Location.pdf attachment. 3. Test Co…
Text truncated - open the document above for the full version.
Test Report
Johnson Controls Interiors L.L.C. Electronics Test Laboratory 915 East 32 nd Street, Holland MI 49423. Tel: 616-394-6194, Fax: 616-394-6100 FCC ID: CB2775AHL5 & IC 279B-775AHL5 Certification Application. Noise floor levels from 1860 MHz to 4330 MHz
Test Setup Photos
Test Set Up Test Set Up Flat Test Set Up Side Test Set Up End
Contact Information
Applicant
Rick Markiewicz(Electronics Engineering Manager)
Technical Contact
Johnson ControlsEdward Allen Thomsen
[email protected]616-394-1729
915 East 32nd Street · Holland · United States
Test Firm
Johnson Controls Interiors LLCEdward Thomsen
Technical Specifications
| # | Rule Parts | Frequency Range | Power Output |
|---|---|---|---|
| 4 | 15.231 | 411 MHz - 440 MHz | - |
Other Applications from Johnson Controls Interiors L.L.C.

CB2-BLUE15M-TCU
Mar 20, 2014Automotive Telematics Module with Handsfree Bluetooth
Equipment Class
DSS - Part 15 Spread Spectrum Transmitter
CB2-BLUE15M
Jan 19, 2014Bluetooth Telematics Device
Equipment Class
DSS - Part 15 Spread Spectrum Transmitter
CB262932
Jul 15, 2013Automotive Electronics Infotainment Head Unit with Bluetooth and WLAN
Equipment Class
DTS - Digital Transmission System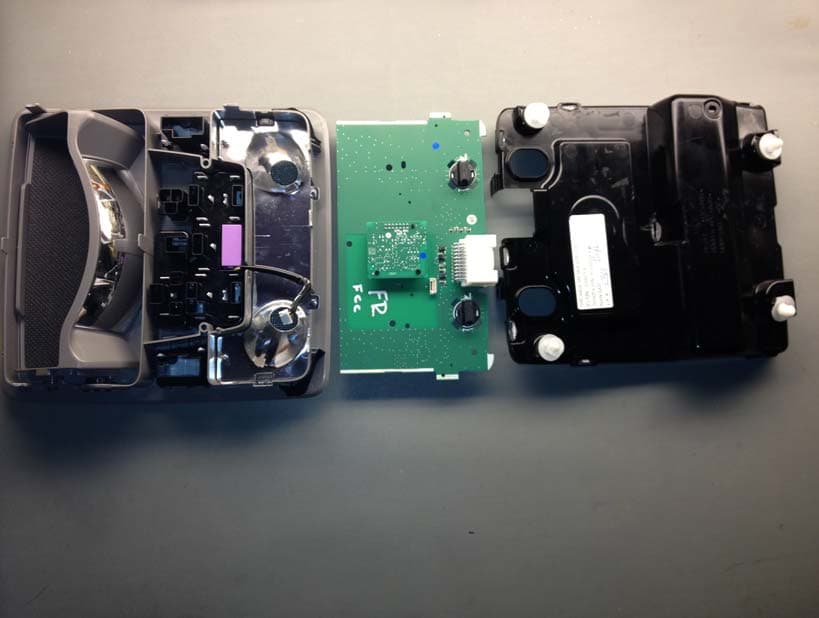
CB2440AHL5
Feb 24, 2013Universal Garage Door TX w/ FHSS TX
Equipment Class
DSS - Part 15 Spread Spectrum Transmitter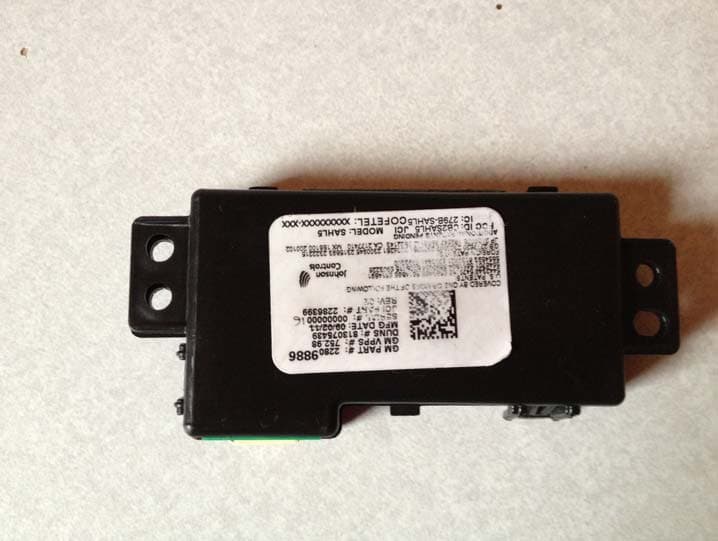
CB2SAHL5C
Dec 19, 2012Universal Garage Door Opener Transmitter w/ FHSS Transmitter
Equipment Class
DSR - Part 15 Remote Control/Security Device Transceiver