CKENKE249Marine Radar
Japan Radio Co., Ltd.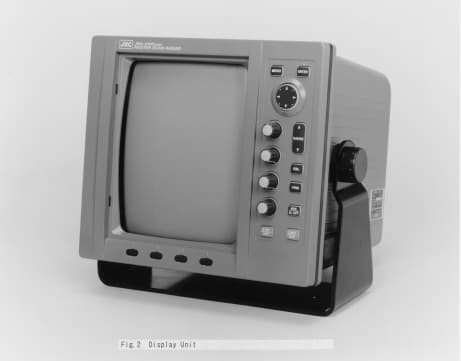
Click to zoom
Application Details
- Equipment Class
- MRD - Marine Radar
- Date of Grant
- Feb 02, 2003
- Application Purpose
- Original Equipment
- Date of Application
- Dec 08, 2002
- Equipment Note
- Marine Radar
- Frequency Range
- 9380.00000000 - 9440.00000000
- Company
- Japan Radio Co., Ltd.
- Country
- United States
Documents & Files
Document Text
Text extracted from the exhibit documents filed with the FCC. Open a document above to read the original.
Users Manual
JMA-2343/2344 For further information contact : HEAD OFFICE & SALES DEPT. Akasaka Twin Tower (Main), 17-22, Akasaka 2-chome, Minato-ku,Tokyo, 107-8432 JAPANPhone : +81-3-3584-8711Fax : +81-3-3584-8715 Telex : 0242-5420 JRCTOK J MAIN PLANT 1-1, Shimorenjaku 5-chome, Mitaka-shi,Tokyo 181-8510 JAPAN Phone : +81-422-45-9111Fax : +81-422-45-9110 Telex : 02822-351 JRCMTK J I はじめに はじめにはじめに はじめに このたびは、JRC船舶レーダJMA-2343/JMA-2344をお買い上げいただきま して、まことにありがとうございます。 本装置は、レーダ信号の送受信部、ブラウン管表示部および空中線等の主要部か らなる、船舶の安全航行を図るための船舶用レーダ装置です。 ● お使いになる前に、この取扱説明書をよくお読みのうえ、正しくお使いくだ さい。 ● 取扱説明書は必要なときに参照できるよう大切に保管してください。 万一、ご使用中にわからないことや不具合が生じたときにお役立てください。 PREFACE Thank you very much for purchasing the JRC marine radar equipment, JMA-2343 and JMA-2344. This equipment is a marine radar equipment designed to obtain safe operation of marine ships. The equipment consists of a radar signal transceiver unit, a CRT display unit and a scanner unit as its main units. ● Before operating the equipment, be sure to read this instruction manual carefully for correct operation. ● Maintain this instruction manual so that operators can refer to it at anytime. Refer to this manual when any inconvenience or defect occur. II ●ご使用の ●ご使用の●ご使用の ●ご使用のまえに● まえに●まえに● まえに● この取扱説明書および製品への表示では、製品を安全に正しくお 使いいただき、あなたや他の人々への危害や財産への損害を未然 に防止するために、いろいろな絵表示をしています。その表示と 意味は次のようになっています。 内容をよく理解してから本文をお読みください。 この表示を無視して、誤った取扱いをすると、人が死亡または重 傷を負う可能性が想定される内容を示しています。 この表示を無視して、誤った取扱いをすると、人が傷害を負う可 能性が想定される内容および物的損害のみの発生が想定される内 容を示しています。 △記号は注意(危険・警告を含む)を促す内容があることを告げる ものです。 図の中に具体的な注意内容(左図の場合は感電注意)が描かれてい ます。 記号は禁止の行為であることを告げるものです。 図の中や近傍に具体的な禁止内容(左図の場合は分解禁止)が描か れています。 ●記号は行為を強制したり指示する内容を告げるものです。 図の中に具体的な指示内容(左図の場合は電源プラグをコンセント から抜け)が描かれています。 絵表示について 絵表示について絵表示について 絵表示について 警告 警告警告 警告 注意 注意注意 注意 絵表示の例 絵表示の例絵表示の例 絵表示の例 警告ラベルについて 警告ラベルについて警告ラベルについて 警告ラベルについて 本製品の上カバーには警告ラベルが貼ってあります。 警告ラベルを取り外したり、破損、改変を絶対にしないでください。 感電注意 分解禁止 禁止 プラグ を抜け 指示 III ● ●● ●Before Operation● ●● ● Various pictorial indications are included in this manual and are shown on these equipment so that you can operate them safely and correctly and prevent any danger to you and / or to other persons and any damage to your property during operation. Such indications and their meanings are as follows. Please understand them before you read this manual: This indication is shown where any person is supposed to be in danger of being killed or seriously injured if this indication is neglected and these equipment are not operated correctly. This indication is shown where any person is supposed to be injured or any property damage is supposed to occur if this indication is neglected and these equipment are not operated correctly. The△mark represents CAUTION (including DANGER and WARNING). Detailed contents of CAUTION ("Electric Shock" in the example on the left.) is shown in the mark. The mark represents prohibition. Detailed contents of the prohibited action ("Disassembling Prohibited" in the example on the left) is shown in the mark. The ● mark represents instruction. Detailed contents of the instruction ("Disconnect the power plug" in the example on the left) is shown in the mark. Pictorial Indication WARNING CAUTION Examples of pictorial indication Warning label There is a warning label on the top cover of the equipment. Do not try to remove, break or modify the label. Electric Shock Disassembling Prohibited Prohibition Disconnect the power plug instruction IV ●ご使用上の注意● ●ご使用上の注意●●ご使用上の注意● ●ご使用上の注意● 空中線、送受信機及び指示機の内部には触れないでください。 空中線、送受信機及び指示機の内部には触れないでください。空中線、送受信機及び指示機の内部には触れないでください。 空中線、送受信機及び指示機の内部には触れないでください。 高電圧部により感電の原因となります。機器内部の保守、点検、調整等は当社の営 業部またはお近くの支社・支店・営業所または代理店にサービスを依頼してくださ い。 当社の営業部・支社・支店・営業所 巻末の「事業所一覧」をご覧ください。 空中線輻射部は回転しますので、近づかないでください。 空中線輻射部は回転しますので、近づかないでください。空中線輻射部は回転しますので、近づかないでください。 空中線輻射部は回転しますので、近づかないでください。 急に空中線が回転し人体を殴打して、負傷する原因となります。 空中線輻射部は人が近づけないよう操舵室の屋根、フライングブリンジ、架台、レ ーダーマスト等の高い場所に設置することをおすすめします。また、人の近づく恐 れのある場合は空中線ガードを設置することをおすすめします。空中線の作業をす る場合は、空中線の安全スイッチを切ってください。 空中線は人の頭より高い位置に設置してください。 空中線は人の頭より高い位置に設置してください。空中線は人の頭より高い位置に設置してください。 空中線は人の頭より高い位置に設置してください。 至近距離で直接電波を浴びると人体に影響を及ぼす原因となります。 保守、点検で人がアンテナに接近する場合は指示機の準備 保守、点検で人がアンテナに接近する場合は指示機の準備保守、点検で人がアンテナに接近する場合は指示機の準備 保守、点検で人がアンテナに接近する場合は指示機の準備/ // /断スイッチを 断スイッチを断スイッチを 断スイッチを 押し、指示機を準備状態にしてください。 押し、指示機を準備状態にしてください。押し、指示機を準備状態にしてください。 押し、指示機を準備状態にしてください。 至近距離で直接電波を浴びると人体に影響を及ぼす原因となります。 警告 警告警告 警告 注意 注意注意 注意 レーダはあくまでも航法援助装置としてご使用ください。 レーダはあくまでも航法援助装置としてご使用ください。レーダはあくまでも航法援助装置としてご使用ください。 レーダはあくまでも航法援助装置としてご使用ください。 また、操船の最終判断は必ず操船者自身で行ってください。 また、操船の最終判断は必ず操船者自身で行ってください。また、操船の最終判断は必ず操船者自身で行ってください。 また、操船の最終判断は必ず操船者自身で行ってください。 操船の最終判断を、レーダが表示する情報のみに頼った場合、衝突、座礁等の事故の 原因となることがあります。 V ● ●● ● Cautions to be used during operation ● ●● ● Do not touch the insides of the scanner unit, transceiver and display unit. Touching any high voltage area, you will get an electric shock. For maintenance, inspection and adjustment of internal parts of these equipment, consult with our sales office or distributor in your district. Since the scanner unit radiator rotates, do not approach it. The scanner unit may start rotating suddenly, and consequently any person may be struck and be injured. We recommend you to install the scanner unit radiator on the roof of the wheel house, flying bridge, trestle, radar mast or any other high position so that no person can approach it. When servicing the scanner unit, set the scanner unit safety button to the OFF position. Install the scanner unit at any place higher than any person. If being exposed directly to electric wave at close range, you may suffer adverse influence. When approaching the antenna for maintenance or inspection, set the power button of the display unit to the ST-BY position. If being exposed directly to electric wave at close range, you may suffer adverse influence. WARNING CAUTION Use these radar only as assisting devices for navigation. Also, the officer should make the final decision for maneuvering b y himself. If you make the final decision of maneuvering only on the information which a radar disp…
Text truncated - open the document above for the full version.
Users Manual
174 3.3.10 In case of high waves CAUTION On short range scales, the setting of the sea surface clutter suppression should not be advanced to an extent that results in complete suppression of all clutter. Such a setting may suppress echoes from targets such as vessels or hazardous objects in addition to echoes from the waves and thus impair detection. When using the sea surface clutter suppression function, be sure that the sup- pression level is set at the optimum. When sea waves become high, echoes from the high waves (sea clutter) appear on the PPI screen making it difficult to see image of echoes from vessels or other objects. Sea clutter is increasingly prominent to the extent that its source is close to the ship. By using the [SEA] control function or the "automatic sea surface" function, sea surface clutter may be suppressed facilitating monitoring of the targets. Manual sea surface clutter suppression Manual sea surface clutter suppressionManual sea surface clutter suppression Manual sea surface clutter suppression (a) Turn the [SEA] control in the clockwise direction. As the control is turned in the clockwise direction, suppression of sea surface clutter increases. Automatic sea surface clutter suppression Automatic sea surface clutter suppressionAutomatic sea surface clutter suppression Automatic sea surface clutter suppression (a) Push the soft key PROCESS PROCESSPROCESS PROCESS . (b) Push the soft key 1 to select A-SEA A-SEAA-SEA A-SEA . Sea surface clutter suppression is enabled depend on the condition of the image. (c) Push the MENU MENUMENU MENU key. The soft key will return to the initial function display. Sea clutter being displayed as image due to high waves. Sea clutter has been suppressed (the image of the echo from the target has also been suppressed). 175 3.3.11 Measuring the range to the target To measure the range to the target, the operator may take one of the following actions. • Use VRM (Variable Range Markers) • Move the center of the VRM (floating EBL) • Use the parallel line cursor • Use the cursor 1. Using VRM 1. Using VRM1. Using VRM 1. Using VRM • A VRM is a circle that is displayed on the PPI screen. • Since the size of the VRM may be change at will using the upper or lower portion of the cross key, the operator is able to measure the range of any desired target. • This radar equipment is capable of displaying two VRM simultaneously (#1VRM and #2VRM). • The #1VRM and #2VRM are displayed, selected and erased using the VRM VRMVRM VRM key. • Whether or not the #2VRM is enabled is set at the menu. • A VRM can take on the following states: The VRM is not displayed. The VRM is displayed The cross key is not in VRM mode. The cross key is in VRM mode The VRM to be used (#1VRM or #2VRM) is not selected. The VRM to be used (#1VRM or #2VRM) is selected. Measuring the distance from the ship using #1VRM Measuring the distance from the ship using #1VRMMeasuring the distance from the ship using #1VRM Measuring the distance from the ship using #1VRM (a) Select "FIX" in the line "EBL1/VRM1" - the menu "FUNCTION". The #1VRM value represents the distance from the ship. The center of #2VRM is always fixed at the position of the ship. Setting whether or not use of #2VRM is enabled Setting whether or not use of #2VRM is enabledSetting whether or not use of #2VRM is enabled Setting whether or not use of #2VRM is enabled (a) Select "YES" in the line "VRM2" - the menu "FUNCTION". Use of #2VRM will be enabled. If "NO" is selected, use of #2VRM will be disabled. Operating the #1VRM/#2 Operating the #1VRM/#2Operating the #1VRM/#2 Operating the #1VRM/#2VRM VRMVRM VRM (a) Push the VRM VRMVRM VRM key. Each time the VRM key is pushed, the VRM that may be operated using the cross key changes sequentially between #1VRM and #2VRM. The #1VRM/#2VRM that is currently enabled is the VRM value at the upper left of the screen that is enclosed with dotted lines. 176 (b) Push the left or right side of the cross key. This enables operating the VRM selected in (a). • When the lower portion of the cross key is pushed, the size of the VRM will be reduced. • When the upper portion of the cross key is pushed, the size of the VRM will be increased. Erasing the #1VRM and #2VRM Erasing the #1VRM and #2VRMErasing the #1VRM and #2VRM Erasing the #1VRM and #2VRM (a) Push the VRM VRMVRM VRM key. • When both #1VRM and #2VRM are displayed. Push the VRM key and enclose the value of the #1VRM or #2VRM that is to remain on the screen with dotted lines. • When either #1VRM or #2VRM is displayed. Enclose the displayed #1VRM or #2VRM in dotted lines. (b) Continue pushing the VRM VRMVRM VRM key. The #1VRM or #2VRM selected in (a) will be erased. 2. Moving the center of the VRM 2. Moving the center of the VRM2. Moving the center of the VRM 2. Moving the center of the VRM z Please refer to "3.3.14 Floating VRM and EBL" for the method of using the floating EBL. 3. Changing the interval between the pa 3. Changing the interval between the pa3. Changing the interval between the pa 3. Changing the interval between the parallel line cursors rallel line cursorsrallel line cursors rallel line cursors z Please refer to "3.3.15 Using the parallel line cursor" for the method of using the parallel line cursor. 4. Using the cross hair cursor 4. Using the cross hair cursor4. Using the cross hair cursor 4. Using the cross hair cursor z Please refer to "3.3.18 Simultaneously measuring the bearing, distance, and travel time to the target" for the method of using the cross hair cursor. 177 3.3.12 Changing the range unit With this radar equipment, the range unit measured using the VRM or cross hair cur- sor may be selected from among the following. NM (nautical miles) KM (kilometers) KY (kilo yards) (a) Select among "NM", "KY", or "KM" in the line "RANGE" - the menu "DISPLAY". (b) Push the MENU MENUMENU MENU key. The menu setting has been completed. 3.3.13 Measuring the bearing of a target To measure the bearing of a target, the operator m…
Text truncated - open the document above for the full version.
Users Manual
付 付 図 図 A A t t t t a a c c h h e e d d F F i i g g u u r r e e s s 【図 101 JMA-2343 機器間接続図】 【 Fig. 101 INTERCONNECTION DIAGRAM OF JMA-2343 】 P 1 P2 1 2 3 1 2 3 4 5 6 7 8 9 10 11 12 13 14 15 16 COM- TIE VDE NC BZ NC NC NC COM + VD 橙太 緑 GRN 白 WHT 黄 YEL 同軸 黒 ( シールド ) 黒太 BLK.T 白太 WHT.T DC - DC + 青太,紫太 TI TIE BP BZ VD VDE COM + COM - 赤太,黄太 橙太 ORG.T 緑 GRN 白 WHT 黄 YEL 1 2 3 4 P202 P302 1 2 3 4 5 NC 黒太 BLK.T (-) 白太 WHT.T (+) 船内電源 SHIP ’ S MAINS (DC 1 0.2V ~ 42V) CFQ-6776 CFQ-6774 NCD NCD NCD NCD- - - -4 1 70 4 1 70 4 1 70 4 1 70 指示機 指示機 指示機 指示機 DISPLAY UNIT DISPLAY UNIT DISPLAY UNIT DISPLAY UNIT NKE NKE NKE NKE- - - -2 2 2 249 49 49 49 空中線 空中線 空中線 空中線 SCANNER UNIT SCANNER UNIT SCANNER UNIT SCANNER UNIT TI BP 青太 BLU.T 赤太 NC 2A 2A 1 A 1 A 紫太 PUR.T 黄太 YEL.T BLK BLU.T, PUR.T RED.T, YEL.T 黒 ( シールド ) BLK (Shield) 同軸 COAX シールド線 Shielded wire 同軸線 50 Ω Coax. 50 ohms 太線 Large wire 太 T 2 2A 1 A P20 1 1 受信 回 路 RECEIVER CAE-457 変 調回 路 MODULATOR CME-307 【図 102 JMA-2344 機器間接続図】 【 Fig. 102 INTERCONNECTION DIAGRAM OF JMA-2344 】 変 調回 路 MODULATOR CME-308 BLK (Shield) P 1 P2 1 2 3 1 2 3 4 5 6 7 8 9 10 11 12 13 14 15 16 COM- TIE VDE NC BZ NC NC NC COM + VD 橙太 緑 GRN 白 WHT 黄 YEL 同軸 黒 ( シールド ) 黒太 BLK.T 白太 WHT.T DC - DC + 2 2A 青太,灰太 1 A TI TIE BP BZ VD VDE COM + COM - 赤太,緑太 橙太 ORG.T 緑 GRN 白 WHT 黄 YEL 1 2 3 4 P202 P302 1 2 3 4 5 P20 1 NC 黒太 BLK.T (-) 白太 WHT.T (+) CFQ-6776 CFQ-6882 NCD NCD NCD NCD- - - -4 1 70 4 1 70 4 1 70 4 1 70 指示機 指示機 指示機 指示機 DISPLAY UNIT DISPLAY UNIT DISPLAY UNIT DISPLAY UNIT NKE NKE NKE NKE- - - -250 250 250 250 空中線 空中線 空中線 空中線 SCANNER UNIT SCANNER UNIT SCANNER UNIT SCANNER UNIT TI BP 青太,灰太 赤太, 緑太 NC 2A 2A 1 A 1 A 紫太,茶太 黄太,桃太 BLK BLU.T, GRY.T RED.T, GRN.T 黒 ( シールド ) 同軸 COAX 1 2 2A 紫太,茶太 1 A 黄太,桃太 P209 PUR.T, BRN.T YEL.T, PNK.T 1 BLU.T, GRY.T RED.T, GRN.T PUR.T, BRN.T YEL.T, PNK.T 船内電源 SHIP ’ S MAINS (DC 1 0.2V ~ 42V) シールド線 Shielded wire 同軸線 50 Ω Coax. 50 ohms 太線 Large wire 太 T 受信 回 路 RECEIVER CAE-457- 1 【図 103 JMA-2343 一次電源系統図】 【 Fig. 103 POWER SUPPLY DIAGRAM OF JMA-2343 】 AVR ノイズフィルタ Noise filter AVR 回路 AVR circuit スイッチ回路 Switch circuit 発振回路 Oscillator STBY/OFF X-MIT/OFF 主パネル回路 Main panel circuit (CCK-872) 電源回路 Power supply circuit (CBD-1596) 主制御回路 Main control circuit (CBD-1156) +12V -5V +1.8V AVR +5V +3.3V MARPA 回路 MRPA circuit (CDC-1144) (Option) モニタ主制御回路 Monitor main control circuit (CCN-366) 変調回路 Modulator circuit ( CME-307 ) 受信回路 Receiver circuit (CAD-457) リレー Rela y AVR 回路 AVR circuit AVR +12V -7V +15V +330V +8V F2 F1 指示機 指示機 指示機 指示機 Display unit Display unit Display unit Display unit ( ( ( ( NCD NCD NCD NCD- - - -4 1 70 4 1 70 4 1 70 4 1 70 ) ) ) ) 空中線 空中線 空中線 空中線 Scanner unit Scanner unit Scanner unit Scanner unit ( ( ( ( NKE NKE NKE NKE- - - -249 249 249 249 ) ) ) ) モータ Motor + + + + - - - - 船内電源 Ship ’ s main (DC +10. 2V to 42V) + + + + - - - - J1-2 J1-1 1A 2A +12V 【図 104 JMA-2344 一次電源系統図】 【 Fig. 104 POWER SUPPLY DIAGRAM OF JMA-2344 】 受信回路 Receiver circuit (CAD-457-1) AVR 回路 AVR circuit AVR +12V -7V +15V +365V +8V 空中線 空中線 空中線 空中線 Scanner unit Scanner unit Scanner unit Scanner unit ( ( ( ( NKE NKE NKE NKE- - - -250 250 250 250 ) ) ) ) モータ Motor 1A 2A 安全スイッチ Safety switch S101 エンコーダ Encoder AVR ノイズフィルタ Noise filter AVR 回路 AVR circuit スイッチ回路 Switch circuit 発振回路 Oscillator STBY/OFF X-MIT/OFF 主パネル回路 Main panel circuit (CCK-872) 電源回路 Power supply circuit (CBD - 1596) 主制御回路 Main control circuit (CBD-1156) +12V -5V +1.8V AVR +5V +3.3V MARPA 回路 MRPA circuit (CDC-1144) (Option) モニタ主制御回路 Monitor main control circuit (CCN-366) リレー Relay F2 F1 指示機 指示機 指示機 指示機 Display unit Display unit Display unit Display unit ( ( ( ( NCD NCD NCD NCD- - - -4 1 70 4 1 70 4 1 70 4 1 70 ) ) ) ) + + + + - - - - 船内電源 Ship ’ s main (DC +10. 2V to 42V) + + + + - - - - J1-2 J1-1 +12V 変調回路 Modulator circuit モータ制御回路 Motor control circuit
Users Manual
【図 116 CRT モニタ部接続図】 【 Fig. 116 CIRCUIT DRAWING OF CRT MONITOR UNIT 】 モニタユニット MONITOR UNIT : 7WZRD0041 主制御回路 MAIN CONTROL CIRCUIT (CNN-366) モニタ機内 INTERNAL CONNECTION MONITOR UNIT (CKJ-159) アンテナ (NKE-249 :プリントアンテナ、 NKE-250 :スロットアンテナ ) ANTENNA (NKE-249:Printed array 、 NKE-250:Slot antenna) ロータリージョイント Rotary joint Drive motor モータ エンコーダ Scanner encoder Circulator 送受切換器 ダイオードリミッタ Diode limiter MIC If out if アンプ1 If amplifier1 if アンプ 2 If amplifier2 if アンプ 3 If amplifier3 バンドパスフィルタ Bandpass filter ログアンプ1 Log amplifier1 ログアンプ 2 Log amplifier2 Video 加算回路 VD addition if アンプ 4 If amplifier4 ログアンプ 3 Log amplifier3 エミッタフォロア Emitter follower VDOUT 指示機 Display unit Tune indicator circuit 同調指示回路 CPU D/A 変換 DAC 外部インターフェース External I/F 受信回路 Receiver circuitNKE-249:CAE-457NKE-250:CAE-457-1 指示機 Display unit TUNEF TUNEL TNI BS1 BS2 BS3 circuit 受信部ユニット Receiver unitNKE-249:NRG-140NKE-250:NRG-141 スイッチ Switch マグネトロン Magnetron パルストランス Pulse trans. BP TI PW 1 ~3 バッファ Buffer amp. パルス幅切換回路 Switching circuit バッファ Buffer amp. バッファ Buffer amp. 船内電源 Ship's main 電圧発生部 Voltage generator モータコントロール回路 Motor control circuit (NKE-250 のみ ) (only NKE-250) MCT 安全スイッチ (NKE-250 のみ ) Ant. safety switch(only NKE-250) レギュレータ (NKE- 249 のみ ) Voltage regulator(only NKE-249) +8V -7V +15V +330V(NKE-249)+365V(NKE-250) only NKE-249 only NKE-250 指示機 Display unit BP BZ バッファ Buffer amp. TI 変調回路 Modulator circuit NKE-249:CME-307,NKE-250:CME-308 送受信部ユニット Modulator & receiver unit NKE-249:NZT-10 , NKE-250:NZT-11 MIC 電源回路 MIC power supply Circuit OPE +8V F/E PSTUNEV (1) (2) (3) (4) (5) (6) (7) (8)(9) (10)(11) (12) (13) (14) (!5) (16) (17)(18)(19) (20) (21) (22) (23) (24) (25) 【図 117 空中線回路ブロック図】 【 Fig. 117 BLOCK DIAGRAM OF SCANNER UNIT 】 ブロック番号 部品番号 ブロック番号 部品番号 ブロック番号 部品番号 ブロック番号 部品番号 ブロック番号 部品番号 block No. part No. block No. part No. block No. part No. block No. part No. block No. part No. ( 1 ) E 1 0 1 (6) IC2 ( 11 ) TR8,9, 1 0,IC 1 7 ( 1 6) IC7, 1 8 (2 1 ) TR7,C30,R32,33,RV 1 (2) TR4 (7) IC3 ( 1 2) IC 11 ( 1 7) T2 (22) IC5 (3) TR5 (8) TR6 ( 1 3) IC4 ( 1 8) TR2 1 (23) TR 1 9,20 (4) TR3 (9) TR 1 ,2 ( 1 4) TR 1 2, 1 3 ( 1 9) TR 1 4 (24) TR 1 5,22 (5) T2,3 ( 1 0) IC 1 ( 1 5) TR 1 4, 1 5 (20) TR9, 1 0, 11 , 1 2 (25) IC 1 ,2,T 1 【図 118 指示機回路ブロック図】 【 Fig. 118 BLOCK DIAGRAM OF DISPLAY UNIT 】 JMA-2343/2344 For further information contact : HEAD OFFICE & SALES DEPT. Akasaka Twin Tower (Main), 17-22, Akasaka 2-chome, Minato-ku,Tokyo, 107-8432 JAPANPhone : +81-3-3584-8711Fax : +81-3-3584-8715 Telex : 0242-5420 JRCTOK J MAIN PLANT 1-1, Shimorenjaku 5-chome, Mitaka-shi,Tokyo 181-8510 JAPAN Phone : +81-422-45-9111Fax : +81-422-45-9110 Telex : 02822-351 JRCMTK J
Block Diagram
JMA-2300 SERIES CIRCUIT DIAGRAM OF DISPLAY UNIT(NCD-4170) ASIC RADAR signal processing ASIC (IC12) ADC Clutter suppression Time base / Register Gain control Buffer memory CPU I/F Rotation signals I/F BP, BZ Radar video Buffer TI Main control ASIC (IC10) Scan correlatio n processin g Wakes Address generator Buffer memory Radar echo memory (IC11) 4M x 16bit Switches Volumes RADAR signal processing ASIC Main panel (CCK-873) Soft key panel (CCK-872) Switches Monitor unit (H-7WZRD0041) Monitor main control circuit (CCN-366) Monitor internal connection (CKJ-159) High voltage Zoom Graphic memory (IC6, 28) 256K x 8bit DAC Mix SEL CPU (IC2) PPI address setting Program memory (IC5 ) 8M RAM (IC7) Memory control Simulator, PPI clear data Monitor I/F Video H-sync, V-sync Graphic data ADC Serial I/F I/F memory CPU Voltage generator +12V +3.3V, +5V, +12V, -5V Relay Ship’s main (DC 10.2 to 42V) Scanner unit External I/F Scanner unit Power supply circuit (CBD-1596) BP, BZ, TI, Radar video Video, H-sync, V-sync Video, H-sync, V-sync GPS NMEA I/O Serial data Key scan Sub-monitor BP, BZ Radar video BP, BZ, TI MARPA circuit (CDD-1144) (Option) BP, BZ, Radar video Program memory Guard zone alarm Buffer Buffer Main control circuit (CMC-1156) DAC Buzzer (BZ1) Panel dimmer DAC ANTENNA(NKE-249:Printedarray?NKE-250:Slotantenna) RotaryjointDrivemotor Scannerencoder Circulator Diodelimiter MIC Ifout Ifamplifier1Ifamplifier2Ifamplifier3BandpassfilterLogamplifier1 Logamplifier2 VDaddition Ifamplifier4Logamplifier3 Emitterfollower VDOUT Displayunit Tuneindicatorcircuit CPU DAC ExternalI/F Receivercircuit NKE-249:CAE-457 NKE-250:CAE-457-1 Displayunit T U N E F T U N E L T N I B S 1 B S 2 B S 3 circuit Receiverunit NKE-249:NRG-140 NKE-250:NRG-141 Switch Magnetron Pulsetrans. B P T I P W 1 - 3 Bufferamp.Switchingcircuit Bufferamp. Bufferamp. Ship'smain Voltagegenerator Motorcontrolcircuit (onlyNKE-250) M C T Ant.safetyswitch(onlyNKE-250) Voltageregulator (onlyNKE-249) +8V -7V +15V +330V(NKE-249) +365V(NKE-250) onlyNKE-249 onlyNKE-250 Displayunit BP BZ Bufferamp. TI Modulatorcircuit NKE-249:CME-307,NKE-250:CME-308 Modulator&receiverunit NKE-249:NZT-10,NKE-250:NZT-11 MICpowersupply Circuit OPE +8V F/EPS TUNEV JMA-2300 SERIES CIRCUIT DIAGRAM OF SCANNER UNIT(NKE-249,NKE-250)
External Photos
External photos of JMA-2343 FCC ID; CKENKE249 Display unit NCD-4170 Display unit NCD-4170 Front Antenna unit NKE-249
Internal Photos
Internal photos FCC ID; CKENKE249 Display Internal Photo form left Display Internal Photo from left Internal Photo Main control unit in display Internal photo of Power supply board in display. Internal Photo of panel switch board. Internal photo of CRT Board Internal photo of Antenna. Internal photo of Transmitter and Receiver Internal photo of Modulator board. Internal Photo of Receiver Board.
Operational Description
Circuit explanation of display unit type NCD-4170 The display unit type NCD-4170 is composed of the following circuit block. a) Main control circuit b) Power supply circuit c) Main panel circuit d) Soft key panel circuit e) Monitor control circuit The input power supply range of the display unit is between DC+10.2V and DC+42V, and the signal composition between the display unit and the scanner unit is as mentioned in the following. a) Power supply : Between DC+10.2V and DC+42V. b) Transmitting trigger: 8Vp-p, Frequency depends on radar range. c) Radar video: Approx.1.8Vp-p max d) Rotation pulses: 2048pulses/rev, 5Vp-p e) Bearing signal: 1 pulse/rev, 5Vp-p f) Communication line: RS-485, Half duplex 1.Power supply circuit(CBD-1596) This circuit is the DC-DC converter power supply of the fly-back form, and supplies various voltages to each circuit inner the display unit. Input voltage range is between DC+10.2V and DC+42V, and when the input voltage is less than 9V or more than 46V, the oscillation of the converter is stopped to protect the circuit by the over-voltage, low voltage protection circuit. Furthermore, when connection of the input power supply is reverse, the circuit is protected with protection diode CD1 and the fuse F1. The output voltage are +12V (1.5A max), +3.3V(1.5A max) and -4.7V (0.1A max), and the output of +3.3V is adjusted in the precision of ±0.05V using the volume RV1‘+3.3V ADJ’. The switching frequency is 70kHz, which is controlled by the oscillator IC (IC1), and the regulation of the output voltage is made using feedback of the output of +12V. And, this circuit has the sensor of the output of +3.3V to protect a circuit for the occurrence of an unexpected unusual voltage. When +3.3V output exceeds +3.6V, oscillation of the converter is stopped, and the power supply circuit stops the function. And, this circuit has the relay ‘K1’ which controls a power supply to the scanner unit. This relay works with the output of +12V, when the relay switch on, the ship’s main is supplied to the scanner unit through the noise filter and the fuse‘F2’. 2.Main control circuit(CMC-1156) This circuit controls the main system of the radar with the micro-chip (IC2) which CPU core is SH3 (manufactured by Hitachi), and with the program memory (IC5) and the work memory (IC7). The main functions of this circuit are radar signal processing, screen drawing and an interface with the outside. Almost all the radar signal processing is done by the signal processing ASIC (IC12) with digital style. After adjustment of reference level, the radar video signal sent from the scanner unit is inputted to IC12 as an analog signal. The inputted video signal is changed into the digital signal by the eight bits A/D converter included inside at the sampling rate of about 50MHz. The suppression of sea and rain clutter signal by technique of the STC and the FTC, and the radar interference rejection are carried out at the digitized video signal. After sweep average and gain processing are carried out more, the video signal is stores in the built-in buffer memory. In the STC, the gain of the radar video signal is restrained as low as near distance which sea clutter signal is contained, with STC parameter selected by antenna height setting via maintenance menu and position of the sea knob on the operation panel. And, the basic data of STC parameter are transferred to IC12 from the CPU after power on of the display unit, and STC parameter is calculated at a speed which is the same as the sampling rate of the above-mentioned A/D converter one after another inside IC12. In the FTC, the rain clutter signal is suppress by the high pass filter processing which characteristics depends on the position of the RAIN knob on the operation panel. In the interference rejection processing, a rank filter technique is done with three sweep video signals stored in memories with built-in IC12, and the rejection level, when strong is IR2, weak is IR1, is selectable by soft key on the operation panel. The IR1 is suitable to reject of comparatively weak interference signals, it works as median filter which outputs the middle level signal in the data of three sweep. On the other hand, the IR2 is suitable to reject of comparatively strong interference signals, it outputs the minimum level signal in the data of three sweep. The video signal stored in the buffer memory inside IC12 is sent to ASIC (IC10) for screen drawing, and processing of scan correlation and the echo trail are done on the XY coordinate. In conversion from the polar coordinate to the XY coordinate, the coordinate of the each video signal is calculated one after another based on the PPI center coordinate set up from the CPU in the address generator part inside IC10, and the address of the memory (IC11) for the video signal is controlled. The video signal that the above-mentioned processing of scan correlation and echo trail were done on the XY coordinate is stored in the memory (IC11). The scan correlation processing averages the level of the last processing result stored in of the memory (IC11) and this raw data, referring to the operation table stored in RAM inside IC10. After processing of the scan correlation and the echo trail, zoom processing is carried out in the video signal. Then the video signal data is mixed with the graphic data, and is stored in the buffer memory inside IC10. The signal stored in the buffer memory inside IC10, is changed into the analog signal by the D/A converter part, and it is supplied to the monitor unit through the monitor interface part. The signal specifications that it is supplied to the monitor unit are as mentioned in the following. For monitor signal timing Dot clock: 30MHz Horizontal synchronous frequency: 31.51kHz Vertical synchronous frequency: 58.9Hz H-BLANK H-SYNC 21.33us/640d ot 4.13us/124do t 2.67us/80dot 3.60us/108do t 31.73us/952d ot H-BLANK H-SYNC480line 30line 6line 19line 535line Vertical Horizontal The serial communicatio…
Text truncated - open the document above for the full version.
Parts List/Tune Up Info
244 9.6 After-installation Adjustments 9.6.1 Installation-time check (a) After completing the installation procedure, it is necessary to check the radar unit to verify that all installation steps have been conducted as instructed. In particular, check for correct cabling, for normal component operating state, for water leakage in the scanner unit, and for proper grounding of braided shielding cable. 9.6.2 Functional checks (a) After completing the installation-time check and before checking the operation of the radar, make sure that the output voltages of the inboard power supply fall within their permissible range. (b) Read "3 Basic Operation" carefully and thoroughly and make sure that the radar functions normally. Then, manipulate all controls and menu functions to ensure that they function normally. (c) If it becomes necessary to make an adjustment though the radar unit is normal, read "9.7 Adjustment Procedures" carefully and follow the instructions given in that section. 9.6.3 Adjustment items (a) Radar's bearing adjustment is mandatory. (b) If the control is not positioned near the center of the scale during tuning or if tuning fails, make a coarse tuning from the "TUNE PRESET" menu. (c) If there is a difference between the range displayed on the radar's PPI screen and the actual range, adjust the range from the "DISPLAY TIMING" menu. (d) The "BUZZER" menu can be used to adjust the volume of the alarming buzzer. (e) The "STC PRESET" menu can be used to adjust the STC. 245 9.6.4 Rectifier unit ● The rectifier unit can run on inboard voltages of 100/110/115 VAC and 200/220/230 VAC provided that connections at the input terminals on the NBA-797A T701 are changed. The figures below show how to change the connections at the input ter- minals. 100/110/115 VAC 200/220/230 VAC [Reconnecting the NBA-797A input terminals] Reconnect according to the input voltage. 115V 110V 100V This terminal must not be reconnected. Reconnect according to the input voltage. 230V 220V 200V This terminal must not be reconnected. 246 9.7 Adjustment Procedures 9.7.1 General adjustments 1. Adjustments to be made when a part is replaced 1. Adjustments to be made when a part is replaced1. Adjustments to be made when a part is replaced 1. Adjustments to be made when a part is replaced Adjustments need to be performed when major parts of the radar unit. are replaced. (a) When the V101 magnetron is replaced Tuning (b) When the E101 front end is replaced Tuning (c) When the V901 Cathod-ray tube is replaced * Off center adjustment When the CRT monitor PCB is replaced Brilliance level adjustment Focus adjustment *: When exchanging V901 (CRT), the Direction coil implement in the stuck condition. Incidentally, It is possible to arrange in cathode-ray tube…
Text truncated - open the document above for the full version.
Contact Information
Applicant
Yuji Kinoshita(General Manager)
Technical Contact
Japan Radio Co. Ltd. Seattle BranchKatsuharu Moriguchi
[email protected]206-654-5644
1011 SW Klickitat Way Bldg B Suite100 · Seattle, Washington · United States
Non-Technical Contact
Japan Radio Co Ltd Seattle Branch OfficeTrevor Sterry
[email protected]206-654-5644
Test Firm
Japan Radio Co., Ltd.Mitsuru Okamoto
Technical Specifications
| # | Rule Parts | Frequency Range | Power Output | Emission |
|---|---|---|---|---|
| 1 | 80 | 9.38 GHz - 9.44 GHz | 4000 W | 81M0P0N |
Other Applications from Japan Radio Co., Ltd.
CKENTG1014
May 09, 20235G Radio Unit
Equipment Class
CBD - Citizens Band Category A and B Devices
CKENKE2632
Oct 21, 2015Solid State S-Band Marine Radar
Equipment Class
MRD - Marine Radar
CKENJJ-200
Jan 22, 2015Handy Search
Equipment Class
UWB - Ultra Wideband Transmitter
CKEJRN-130K
Oct 21, 20143G/GSM IT Controller
Equipment Class
PCB - PCS Licensed Transmitter
CKENKE1066
Feb 04, 2014MARINE RADAR
Equipment Class
MRD - Marine Radar