GKRPOCKETPCE740WWireless PDA
Compal Electronics Inc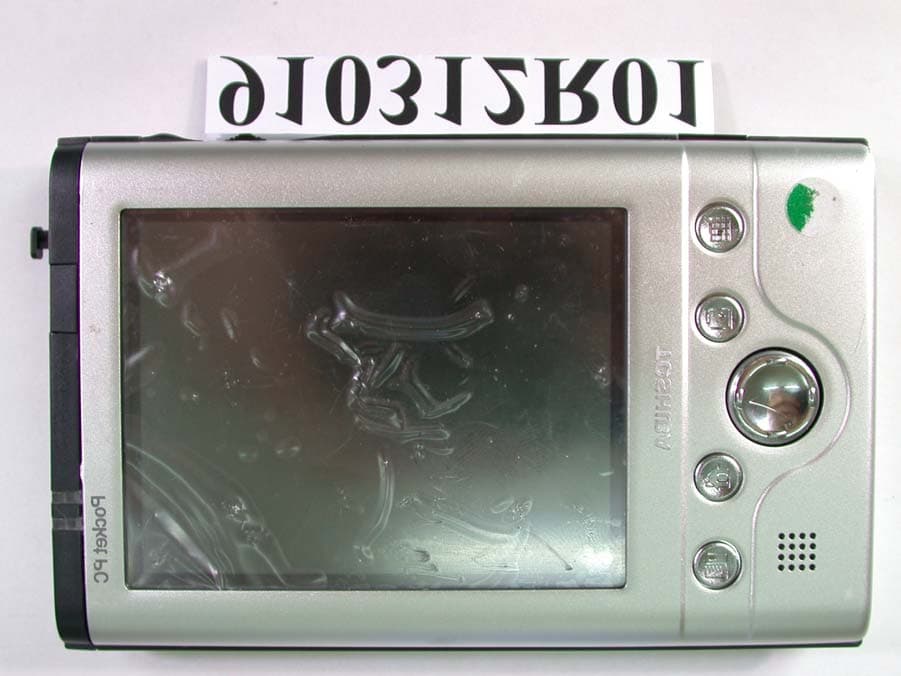
Click to zoom
Application Details
- Equipment Class
- DTS - Digital Transmission System
- Date of Grant
- May 12, 2002
- Application Purpose
- Original Equipment
- Date of Application
- May 12, 2002
- Equipment Note
- Wireless PDA
- Frequency Range
- 2412.00000000 - 2462.00000000
- Company
- Compal Electronics Inc
- Country
- Taiwan
Documents & Files
Document Text
Text extracted from the exhibit documents filed with the FCC. Open a document above to read the original.
Users Manual
Chapter 1: Getting Started Welcome Congratulations on purchasing a Toshiba Pocket PC. Due to the size and capabilities of this device, you can keep your most important business and personal information up-to-date and close at hand. Microsoft ® ActiveSync ® increases the power of your device by allowing you to synchronize the information on your desktop or laptop computer with your device. Picture yourself in the following situations: •While walking with a colleague, your Toshiba Pocket PC device rings. You look at the caller ID and see it’s your manager who is calling. She asks if you two are free this afternoon for an emergency meeting. While your colleague fumbles through his paper organizer, you press a button on your device and instantly see a list of today’s appointments and meetings. You are quickly able to tell your manager your available times, and make a note of the new meeting while on the call. You hang up, send an e-mail with a schedule request for the three of you at the desired location. •While walking with a colleague, your cell phone rings and your manager asks if you two are free this afternoon for an emergency meeting. While your colleague fumbles through his paper organizer, you press a button on your device and instantly see a list of today’s appointments and meetings. You are quickly able to tell your manager your available times. For more information on scheduling appointments and meetings, see Chapter 4. 1-2 Toshiba Pocket PC e740 User’s Guide •You’re meeting your friends tonight for dinner and a movie. You down- load the latest movie information from the Internet to your desktop computer and then synchronize it with your device. At dinner, you pull out your Toshiba Pocket PC device and review your movie options with your friends. For more information on downloading Web pages to your device, see Chapter 6. •A Calendar reminder alerts you that it is time to catch the bus. You grab your Toshiba Pocket PC device and catch the bus just in time. Because ActiveSync keeps the information on your device up-to-date, you leisurely review your task list, make notes about the new books and CDs you want to buy, and read and respond to e-mail messages. When you get back to the office, ActiveSync transfers any task changes you made, your notes, and your e-mail message responses to your desktop computer. For more information on ActiveSync, see Chapter 3. 1-3 Chapter 1: Getting Started Where to Find Information This book describes your device hardware, provides an overview of the programs on your device, and explains how to connect your device to a Toshiba Pocket PC computer, a network, or the Internet. For instructions on setting up your device and installing ActiveSync, see the Quick Start Card. The following table is a guide to additional information to help you use your device. For information on: See this source: Programs on your device This User’s Guide and device Help. To view Help, tap and then Help. Additional programs that can be installed on the device The Toshiba Pocket PC Companion CD. Connecting to and synchronizing with a Toshiba Pocket PC computer The Quick Start Card or ActiveSync Help on your Toshiba Pocket PC computer. To view Help, click Help and then Microsoft ActiveSync Help. Last-minute updates and detailed technical information The Read Me files, located in the Microsoft ActiveSync folder on the Toshiba Pocket PC computer and on the Toshiba Pocket PC Companion CD. Up-to-date information on your Toshiba Pocket PC http://www.microsoft.com/mobile/pocketpc 1-4 Toshiba Pocket PC e740 User’s Guide Stereo Headphone Jack Power Button / Front Light Program Button 1, 2, 3 & 4. ( from the Rear ) Speaker Cursor Button / Navigtion Button Touch Screen Battery / Alarm Lamp Led Recording Button ( Program Button 5 ) Lock Cradle Connecting Port Guide Pin Lock Release Button Chapter 2: Basic Skills You can easily learn to use your Toshiba Pocket PC. This chapter de- scribes the use and customization of your Toshiba Pocket PC. Parts Names and Function Main unit (front view) 2-2 Toshiba Pocket PC e740 User’s Guide AC Adaptor Jack Battery Switch Cradle Connection Port RF Switch USB Port Cradle Connecting Port VGA Port Expansion Pack The USB Crable Initial Setting of Program Button Program button 1 = Calendar Program button 2 = Tasks Program button 3 = Home Program button 4 = Contacts Program button 5 = Voice recorder
Users Manual
2-3 Chapter 2: Basic Skills MIC Stereo Headphone jack Jog Dial SD Card slot CF Card slot Infrared port Battery Pack Lock Knob Expansion Pack Main unit ( back view ) The power button turns the unit and the front light on and off. Battery Switch and Battery Switch Lock Power button When the power is off When the power is on Press it for some time. The power turns on. The front light alternately turns on/off. Press it quickly. The power turns on. The power turns off. Power Button 2-4 Toshiba Pocket PC e740 User’s Guide Battery Switch The battery switch supplies/cuts off the battery power to the Toshiba Pocket PC. The setting of this switch at shipment is “stop”. When using the Toshiba Pocket PC for the first time, slide this switch to the right (the “supply” side) with the stylus. This switch should be on the “supply” side. The battery switch lock secures the battery switch to the “supply” side. Set the battery switch from the “supply” side to the “stop” side while sliding the battery switch lock to the “release” side with the stylus. Alarm Lamp LED Flashing orange When the preset alarm time, which was set through Calendar or Tasks, goes off, the lamp starts flashing. Steady orange Indicates charging of the built-in battery. Flashing yellow The built-in battery charging process is stopped due to the ambient temperature being too high or low. Charge the built-in battery in an ambient temperature of approx. 41°F to 95°F. Steady green Indicates full charge of the built-in battery. The alarm lamp indicates the machine condition. How to Use the Stylus 2-5 Chapter 2: Basic Skills The stylus is used for menu selection or data input on the touch-screen of the Toshiba Pocket PC. Tap: Touch the screen once with the stylus to open items and select options. Drag: Hold the stylus on the screen and drag it across to select text and images. Drag in a list to select multiple items. Tap and hold: Tap and hold the stylus on an item to see a list of actions available for that item. On the pop-up menu that appears, tap the action you want to perform. When you operate the touch screen of the Toshiba Pocket PC, use the supplied stylus. If the tip of the stylus is damaged, do not use it. If you operate the touch screen with a damaged stylus or a ballpoint pen, the touch screen may be damaged. When the stylus is damaged, please purchase a new one. About the Cursor Button You can move a cursor (selection display) on the screen by pressing the upper, lower, right or left part of the cursor button. You can select a program to launch by pressing the center part of the cursor button. The cursor movement is different depending on the screen. When the cursor is at the right or the left side of the screen, it may not move.
Users Manual
2-6 Toshiba Pocket PC e740 User’s Guide Battery Charging A built-in battery is installed in the Toshiba Pocket PC. When using the Toshiba Pocket PC for the first time, set the battery switch to the supply side, and then charge the built-in battery with the supplied AC adapter. How to Charge the Battery You can use two charging methods. When you connect the AC adapter and the Toshiba Pocket PC, turn the unit off. 1.Connect the supplied AC adapter and the cradle as shown in the figure below, and then insert the Toshiba Pocket PC into the cradle. 2-7 Chapter 2: Basic Skills 2.Connect the supplied AC adapter and the Toshiba Pocket PC as shown in the figure below. For charging the built-in battery, maintain an ambient temperature from approx. 41°F to 95°F. When the lamp is lit in orange during the built-in battery charging, you can use the Toshiba Pocket PC. When the built-in battery is completely charged, the LED alarm lamp color will change to green.
Users Manual
2-8 Toshiba Pocket PC e740 User’s Guide How to Prolong Battery Life Use the Toshiba Pocket PC with the AC adapter. When you use the Toshiba Pocket PC under the following conditions, the power consumption will be large. Please use the AC adapter when: The Toshiba Pocket PC is operated while connected to your com- puter. The Toshiba Pocket PC is operated with storage card or with any other optional equipment. Select the short power-off time in the setting menu. This will shorten the time the unit will remain on if not used. For more information, see “Customize Your Toshiba Pocket PC” in Chapter 2. Turn off the front light. Set the screen brightness to power saving mode. Also shorten the light turn-off time. For more information, see “Customize Your Toshiba Pocket PC” in Chapter 2. Use the Toshiba Pocket PC with an ambient temperature between 59°F and 77°F. This temperature range is the most effective for the built-in battery. When you use the Toshiba Pocket PC in high or low temperature en- vironments, the operable time is shortened due to the decrease of the built-in battery capacity. Battery Life The built-in battery has a limited life. Repeated charging/discharging of the built-in battery gradually decreases operable time. When the operable time has been extremely shortened, it is time to replace the built-in battery with a new one. Do not leave the Toshiba Pocket PC in a place of high or low tempera- ture. It may shorten battery life. 2-9 Chapter 2: Basic Skills Battery Charge Level and Stored Data Protection If the battery charge level becomes extremely low, or is completely dis- charged, the memory data stored in the Toshiba Pocket PC will be de- leted. When the low battery status icon or the alarm message appears, immedi- ately connect the AC adapter to the Toshiba Pocket PC and charge the built-in battery. The built-in battery gradually discharges even if the device is not be- ing used. When the Toshiba Pocket PC is left for a long time, the built- in battery of the Toshiba Pocket PC may completely discharge. It is recommended to save the Toshiba Pocket PC’s memory data to your computer or to a storage card. The manufacturer is not responsible for data change or clearance due to battery discharge. Please acknowledge that. 2-10 Toshiba Pocket PC e740 User’s Guide Initial Setup When using the Toshiba Pocket PC for the first time, carry out initial setup according to the procedures below after a built-in battery has been charged. 1.Press the power button to turn the power on. The Welcome screen appears. Tap the screen to start the following setup. 2.Execute touch screen correction. When the align screen appears, tap the center of the cross target with the stylus. The next target position changes upon tapping the target. Five taps completes the positioning correction. The screen then changes to the Stylus screen. If a finger or any other object touches the screen during correc- tion, the correction will be cancelled. Repeat the correction proce- dure. 3.Read how to use the stylus. Read and understand the stylus operation, and then tap NEXT. For more information on stylus operation, see “How to Use the Sty- lus” in Chapter 2. 4.Learn the pop-up menu operation. Read the on-screen explanation and then follow the instructions. Display the pop-up menu, and cut and paste the data according to the screen instructions. After you finish the paste operation, this stage is completed. Tap NEXT. 5.Set the ZONE. When tapping the right q mark, the city and the time zone lists appear. Tap the desired city and time zone. When the setup is completed, tap NEXT. 6.To complete the initial setup. When the Complete screen appears, the initial setup is completed. After tapping the screen, you can use the Toshiba Pocket PC. When you tap the Complete screen, the Today screen appears. For more information on the Today screen, see “Today screen” in Chap- ter 2. 2-11 Chapter 2: Basic Skills Setup Method of Options Method of Setting Card into CF Card Slot To insert a card: 1.Turn off the power. 2.Open the card cover. 3.Insert the card with its contact surface (metal contact surface) facing the back of the Toshiba Pocket PC. 2-12 Toshiba Pocket PC e740 User’s Guide To remove a card: 1.Turn off the power. 2.Open the card cover. 3.Lightly press down the card until a clicking sound is heard. The card will pop out slightly from the slot. 4.Pull the card straight up to remove. 2-13 Chapter 2: Basic Skills Method of Setting Card into SD Card Slot To insert a card: 1.Turn off the power. 2.Open the card cover. 3.Insert the card with its contact surface (metal contact surface) facing the back of the Toshiba Pocket PC. 2-14 Toshiba Pocket PC e740 User’s Guide To remove a card: 1.Turn off the power. 2.Open the card cover. 3.Lightly press down the card until a clicking sound is heard. The card will pop out slightly from the slot. 4.Pull the card straight up to remove. When storage cards are inserted in both the CF and SD card slots, one of them may only be accessible depending on the application or the Settings operation (typically, the first storage card inserted is ac- cessed). Typical examples: - Notes of Pocket Outlook. - Saving the destination selection of the Options item of the Tools menu of Pocket Word.
Users Manual
2-15 Chapter 2: Basic Skills To connect Remote Control-Fitted Earphone Microphone You can listen to the sound output from your Toshiba Pocket PC by con- necting the optional remote control-fitted earphone microphone. Insert the optional remote control-fitted earphone plug into the stereo head- phone jack as shown in the figure below. Use the specified remote control-fitted earphone. If you use a differ- ent type of earphone, it may malfunction. The connectable pin size of the headphone/earphone is a 3.5 mm mini plug type. 2-16 Toshiba Pocket PC e740 User’s Guide Connecting to a Computer Before connecting your Toshiba Pocket PC to a computer, check the fol- lowing. ActiveSync has been installed on your computer. (See Chapter 3.) Male sure that the Pocket PC and the computer are both turned off. The position of connecting port on the computer may differ according to the computer type. To Connect Using The Supplied USB Cradle: 1.Connect the USB cradle to your computer as shown in the illustration below.
Users Manual
2-17 Chapter 2: Basic Skills 2.Insert the the USB crable into the Pocket PC. To connect directly using an connection cable: Connect the Pocket PC directly to your computer using an optional Toshiba USB cable ( sold separately ).
Users Manual
2-18 Toshiba Pocket PC e740 User’s Guide Learning to use your device is easy. This chapter describes the basic con- cepts of using and customizing your device. Device Buttons and the Stylus Your device has hardware buttons that control actions and scroll functions, and a stylus for selecting items and entering information. On the device, the stylus replaces the mouse. •Tap. Touch the screen once with the stylus to open items and select options. •Drag. Hold the stylus on the screen and drag across the screen to select text and images. Drag in a list to select multiple items. •Tap and hold. Tap and hold the stylus on an item to see a list of actions available for that item. On the pop-up menu that appears, tap the action you want to perform. 2-19 Chapter 2: Basic Skills Today Screen When you turn on your device for the first time each day (or after 4 hours of inactivity), you’ll see the Today screen. You can also display it by tapping and then Today. On the Today screen, you can see at a glance impor- tant information for the day. Following are some of the status icons you may see. Tap to switch to a program. Tap to change volume or mute all sounds. Tap to viewnotification messages. Tap to change date and time. Tap to open an item. Your day at a glance. Tap to viewconnection status. Tap to create a newitem. 2-20 Toshiba Pocket PC e740 User’s Guide If more notification icons need to be displayed than there is room to display them, the Notification icon,, will display. Tap the icon to view all notification icons. Programs You can switch from one program to another by selecting it from the menu. (You can customize which programs you see on this menu. For information, see “Adjusting Settings,” later in this chapter.) To access some programs, you’ll need to tap , Programs, and then the program name. You can also switch to some programs by pressing a program button. Your device has one or more program buttons located on the front or side of the device. The icons on the buttons identify the programs they switch to. Some programs have abbreviated labels for check boxes and drop-down menus. To see the full spelling of an abbreviated label, tap and hold the stylus on the label. Drag the stylus off the label so that the command is not carried out. The following table contains a partial list of programs that are on your de- vice. Look on the Toshiba Pocket PC Companion CD for additional pro- grams that you can install onto your device. Status Icon Meaning Turns all sounds on and off Backup battery is low Main batteries are charging Main batteries are low Main batteries are very low Main batteries are full Connection is active Synchronization is beginning or ending Synchronization is occurring Notification that one or more instant messages were received Notification that one or more e-mail messages were received 2-21 Chapter 2: Basic Skills Navigation Bar and Command Bar The navigation bar is located at the top of the screen. It displays the active program and current time, and allows you to switch to programs and close screens. Use the command bar at the bottom of the screen to perform tasks in programs. The command bar includes menu names, buttons, and the In- put Panel button. To create a new item in the current program, tap New . To see the name of a button, tap and hold the stylus on the button. Drag the stylus off the button so that the command is not carried out. Icon Program Description ActiveSync Synchronize information between your device and desktop computer. Calendar Keep track of your appointments and create meeting requests. Contacts Keep track of your friends and colleagues. Inbox Send and receive e-mail messages. Pocket Internet Explorer Browse Web and WAP sites, and download new programs and files from the Internet. Notes Create handwritten or typed notes, drawings, and recordings. Tasks Keep track of your tasks. Pocket Excel Create new workbooks or view and edit Excel workbooks created on your desktop computer. MSN Messenger Send and receive instant messages with your MSN Messenger contacts. Pocket Word Create new documents or view and edit Word documents created on your desktop computer. 2-22 Toshiba Pocket PC e740 User’s Guide Tap to change volume to mute the device. Tap to quickly select a program you have recently used. Tap to see additional programs. Tap to select a program. Tap to customize the device. Input panel button. Newbutton. Menu names. Buttons. Pop-up Menus With pop-up menus, you can quickly choose an action for an item. For example, you can use the pop-up menu in the contact list to quickly delete a contact, make a copy of a contact, or send an e-mail message to a contact. The actions in the pop-up menus vary from program to program. To access a pop-up menu, tap and hold the stylus on the item name that you want to perform the action on. When the menu appears, lift the stylus, and tap the action you want to perform. Or tap anywhere outside the menu to close the menu without performing an action. 2-23 Chapter 2: Basic Skills Tap and hold to display the pop-up menu. Lift the stylus and tap the action you want. Tap outside the menu to close it without performing an action. Notifications Your device reminds you in a variety of ways when you have something to do. For example, if you’ve set up an appointment in Calendar, a task with a due date in Tasks, or an alarm in Clock, you’ll be notified in any of the following ways: •A message box appears on the screen. •A sound, which you can specify, is played. •A light flashes on your device. •The device vibrates. To choose reminder types and sounds for your device, tap and then Settings. In the Personal tab, tap Sounds & Notifications. The options you choose here apply throughout the device. 2-24 Toshiba Pocket PC e740 User’s Guide Input Panel button. Tap to see your choices. Select an input method. Enter Information on Your Toshiba Pocket PC You have several options for entering new information: •Use the input panel to enter type…
Text truncated - open the document above for the full version.
Users Manual
2-18 Toshiba Pocket PC e740 User’s Guide Learning to use your device is easy. This chapter describes the basic con- cepts of using and customizing your device. Device Buttons and the Stylus Your device has hardware buttons that control actions and scroll functions, and a stylus for selecting items and entering information. On the device, the stylus replaces the mouse. •Tap. Touch the screen once with the stylus to open items and select options. •Drag. Hold the stylus on the screen and drag across the screen to select text and images. Drag in a list to select multiple items. •Tap and hold. Tap and hold the stylus on an item to see a list of actions available for that item. On the pop-up menu that appears, tap the action you want to perform. 2-19 Chapter 2: Basic Skills Today Screen When you turn on your device for the first time each day (or after 4 hours of inactivity), you’ll see the Today screen. You can also display it by tapping and then Today. On the Today screen, you can see at a glance impor- tant information for the day. Following are some of the status icons you may see. Tap to switch to a program. Tap to change volume or mute all sounds. Tap to viewnotification messages. Tap to change date and time. Tap to open an item. Your day at a glance. Tap to viewconnection status. Tap to create a newitem. 2-20 Toshiba Pocket PC e740 User’s Guide If more notification icons need to be displayed than there is room to display them, the Notification icon,, will display. Tap the icon to view all notification icons. Programs You can switch from one program to another by selecting it from the menu. (You can customize which programs you see on this menu. For information, see “Adjusting Settings,” later in this chapter.) To access some programs, you’ll need to tap , Programs, and then the program name. You can also switch to some programs by pressing a program button. Your device has one or more program buttons located on the front or side of the device. The icons on the buttons identify the programs they switch to. Some programs have abbreviated labels for check boxes and drop-down menus. To see the full spelling of an abbreviated label, tap and hold the stylus on the label. Drag the stylus off the label so that the command is not carried out. The following table contains a partial list of programs that are on your de- vice. Look on the Toshiba Pocket PC Companion CD for additional pro- grams that you can install onto your device. Status Icon Meaning Turns all sounds on and off Backup battery is low Main batteries are charging Main batteries are low Main batteries are very low Main batteries are full Connection is active Synchronization is beginning or ending Synchronization is occurring Notification that one or more instant messages were received Notification that one or more e-mail messages were received 2-21 Chapter 2: Basic Skills Navigation Bar and Command Bar The navigation bar is located at the top of the screen. It displays the active program and current time, and allows you to switch to programs and close screens. Use the command bar at the bottom of the screen to perform tasks in programs. The command bar includes menu names, buttons, and the In- put Panel button. To create a new item in the current program, tap New . To see the name of a button, tap and hold the stylus on the button. Drag the stylus off the button so that the command is not carried out. Icon Program Description ActiveSync Synchronize information between your device and desktop computer. Calendar Keep track of your appointments and create meeting requests. Contacts Keep track of your friends and colleagues. Inbox Send and receive e-mail messages. Pocket Internet Explorer Browse Web and WAP sites, and download new programs and files from the Internet. Notes Create handwritten or typed notes, drawings, and recordings. Tasks Keep track of your tasks. Pocket Excel Create new workbooks or view and edit Excel workbooks created on your desktop computer. MSN Messenger Send and receive instant messages with your MSN Messenger contacts. Pocket Word Create new documents or view and edit Word documents created on your desktop computer. 2-22 Toshiba Pocket PC e740 User’s Guide Tap to change volume to mute the device. Tap to quickly select a program you have recently used. Tap to see additional programs. Tap to select a program. Tap to customize the device. Input panel button. Newbutton. Menu names. Buttons. Pop-up Menus With pop-up menus, you can quickly choose an action for an item. For example, you can use the pop-up menu in the contact list to quickly delete a contact, make a copy of a contact, or send an e-mail message to a contact. The actions in the pop-up menus vary from program to program. To access a pop-up menu, tap and hold the stylus on the item name that you want to perform the action on. When the menu appears, lift the stylus, and tap the action you want to perform. Or tap anywhere outside the menu to close the menu without performing an action. 2-23 Chapter 2: Basic Skills Tap and hold to display the pop-up menu. Lift the stylus and tap the action you want. Tap outside the menu to close it without performing an action. Notifications Your device reminds you in a variety of ways when you have something to do. For example, if you’ve set up an appointment in Calendar, a task with a due date in Tasks, or an alarm in Clock, you’ll be notified in any of the following ways: •A message box appears on the screen. •A sound, which you can specify, is played. •A light flashes on your device. •The device vibrates. To choose reminder types and sounds for your device, tap and then Settings. In the Personal tab, tap Sounds & Notifications. The options you choose here apply throughout the device. 2-24 Toshiba Pocket PC e740 User’s Guide Input Panel button. Tap to see your choices. Select an input method. Enter Information on Your Toshiba Pocket PC You have several options for entering new information: •Use the input panel to enter type…
Text truncated - open the document above for the full version.
Cover Letter(s)
COMPAL ,Inc.EMC DOCUMENT Personal Mobile Computing& Communications Divison COMPAL ELECTRONICS INC. 581, Jui Kuang Rd., Neihu, Taipei 114, Taiwan, R.O.C. TEL: +886-2226-3799 FAX: +886-2226-1215 [email protected] Inform Letter Dear Customer, According to FCC’s regulation, the following Declaration of Conformity has to be made by a company located in USA. They are: This device has been confirmed to be in compliance with the requirements of ANSI C63.4 & FCC part 15 regulations. The test result has been shown in the ADT test report with number RF910303R01A. And this compliance is subject to the following two conditions: This device may not cause harmful interference and, This device must accept any interference received, including interference that may cause undesired operation. This declaration can be a separate sheet and be sure that the following message will be also included in this declaration: Product name, model name and trade name. Company name, and address of the one who is responsible for this declaration. Name, title, telephone and fax number as well as the signature of the contact person. Thanks for your attention.
External Photos
Page 1 ANNEX PHOTOGRAPHS OF EUT Page 2 Page 3
Internal Photos
Page 4 Page 5 Page 6 Page 7 Page 8
Operational Description
FCC ID: GKRPOCKETPCE740W ADT No.910303R01A Operational Description The transmitter of the EUT (Pocket PC) is powered by host equipment. The antenna is integrated antenna similar with Inverted-F. The output power of this device is lower than 16mW. For more detailed instruction, please take a look at the users manual. DSSS Information This device is Direct Sequence Spread Spectrum, the data is mixed by pseudorandom code which is an orthogonal code. The mixed data is digital modulated by BPSK and QPSK technique depends on the data rates. The CCK coding is applied for increasing the data rate, and also the processing gain will be increased. The bit rates are 1,2,5.5,11Mbps, the symbol rates are 1,1,1.375,1.375Mbps, the chip rates are always 11Mbps. So, the Chip/symbol is 11,11,8 and 8 respectively. Although the bit rate is higher, the processing gain is lower than 10, but the CCK coding used in higher bit rate will provide 2.2dB coding gain.
RF Exposure Info
FCC ID: GKRPOCKETPCE740W ADT No.: 910303R01A FCC TEST REPORT REPORT NO.: RF910303R01A MODEL NO.: POCKET PC e740W ACCORDING: FCC Guidelines for Human Exposure IEEE C95.1 APPLICANT: COMPAL ELECTRONICS INC. ADDRESS: 581, Juikuang Rd., Neihu, Taipei 114, Taiwan, R.O.C. ISSUED BY: Advance Data Technology Corporation LAB LOCATION: 47 14th Lin, Chiapau Tsun, Linko, Taipei, Taiwan, R.O.C. 0528 ILAC MRA Lab Code: 200102-0 FCC ID: GKRPOCKETPCE740W ADT No.: 910303R01A RF Exposure Measurement (Mobile Device) 1. Introduction 2.4 GHz frequency band is regarded specially as a dangerous band for its heating harmfulness to the human body. That’s why microwave oven is operating in this frequency band. The manufacturer whose product is working in this frequency band is obligatory to prove the harmfulness of his product. In this document, we try to prove the safety of radiation harmfulness to the human body for our product. The limit for Maximum Permissible Exposure (MPE) specified in FCC 1.1310 is followed. The Gain of the antenna used in this product is measured in a Fully Anechoic Chamber (FAC), and the maximum total power input to the antenna is measured. Through the Friis transmission formula and the maximum ga…
Text truncated - open the document above for the full version.
Contact Information
Applicant
Joyce Ting(Senior RF Regulatory Compliance Engineer)
Technical Contact
Advance Data Technology CorporationAlan Lane
[email protected]+886 3 327 0910
13-1, Lane 19, WenShan 3rd St. · Taoyuan · Taiwan
Test Firm
Bureau Veritas CPS (H.K.) Ltd. Taoyuan BranchRichard Chen
Technical Specifications
| # | Rule Parts | Frequency Range | Power Output |
|---|---|---|---|
| 1 | 15C | 2.41 GHz - 2.46 GHz | 44.70 mW |
Other Applications from Compal Electronics Inc
GKRRXLN4N
May 26, 2026LGA Module
Equipment Class
CBE - Citizens Band End User DevicesGKRCMMG3L
May 08, 20265G Module
Equipment Class
CBE - Citizens Band End User DevicesGKRRMMG4
Jan 23, 20265G Module
Equipment Class
CBE - Citizens Band End User DevicesGKRRXLN3
Dec 08, 2024LGA Module
Equipment Class
CBE - Citizens Band End User DevicesGKRRMMT1
Aug 14, 2024NTN miniPCIE module
Equipment Class
TNB - Licensed Non-Broadcast Station Transmitter