J9CGSK2UTSatellite Phone
Qualcomm Technologies, Inc.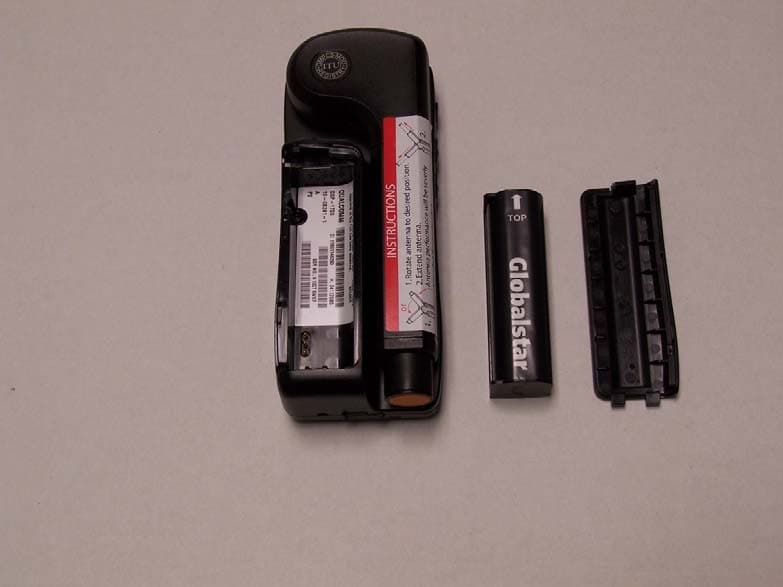
Click to zoom
Application Details
- Equipment Class
- TNE - Licensed Non-Broadcast Transmitter Held to Ear
- Date of Grant
- Sep 25, 2006
- Application Purpose
- Original Equipment
- Date of Application
- Sep 25, 2006
- Equipment Note
- Satellite Phone
- Frequency Range
- 1610.50000000 - 1621.35000000
- Company
- Qualcomm Technologies, Inc.
- Country
- United States
Documents & Files
Document Text
Text extracted from the exhibit documents filed with the FCC. Open a document above to read the original.
Users Manual
QUALCOMM Globalstar GSP-1700 Phone User Manual 00-80-C6302-1.book Page 1 Friday, July 21, 2006 10:12 AM This guide is based on the production version of the QUALCOMM Globalstar GSP-1700 Phone. Software changes may have occurred after this printing. QUALCOMM reserves the right to make changes in technical and product specifications without prior notice. QUALCOMM Incorporated 5775 Morehouse Drive, San Diego, CA 92121-1714 Document Number 80-C6302-1 Rev B Copyright © 2006 QUALCOMM® Incorporated All rights reserved This technology was exported from the United States Government. Diversion contrary to U.S. law prohibited. QUALCOMM® is a registered trademark of QUALCOMM Incorporated. Digital by QUALCOMM® is a registered trademark of QUALCOMM Incorporated. SMART KEY™ is a trademark of QUALCOMM Incorporated. Globalstar™ and Globalstar® are registered trademarks and service marks of Globalstar, Inc. All other trademarks and registered trademarks are properties of their respective owners. Printed in United States of America 00-80-C6302-1.book Page 2 Friday, July 21, 2006 10:12 AM iii Contents Getting Started ..........................................................................................1 Understanding this guide ......................................................................2 Preparing to make calls .........................................................................2 Making voice calls ..................................................................................4 Making Data Calls .................................................................................4 Receiving calls ........................................................................................5 Ending calls ............................................................................................6 Displaying your phone number .............................................................6 Solving problems ....................................................................................6 Contacting customer service .................................................................6 Phone Basics ...............................................................................................7 Phone features and keypad .................................................................8 Display indicators ................................................................................10 Antenna ................................................................................................11 Calling Basics ...........................................................................................13 Turning the phone on and off ..............................................................13 Standby mode .....................................................................................14 Power save mode .................................................................................14 Entering numbers ................................................................................15 Making emergency calls ......................................................................16 Redialing a call ....................................................................................17 Muting a call ........................................................................................17 Possible service provider services .......................................................17 Menu Basics ..............................................................................................19 Accessing the Main Menu ...................................................................21 Navigating and using menus ..............................................................21 Phone Book Menu ...................................................................................23 Entering letters and other characters ................................................23 Entering pauses ...................................................................................25 Saving entries ......................................................................................26 Finding entries .....................................................................................27 Editing entries .....................................................................................28 00-80-C6302-1.book Page iii Friday, July 21, 2006 10:12 AM Contents iv Erasing entries ....................................................................................29 Using the “secret” feature ...................................................................29 Viewing numbers .................................................................................30 Sending tones .......................................................................................30 Prepending numbers ...........................................................................31 Speed dialing ........................................................................................32 One-touch dialing ................................................................................32 Call History Menu ...................................................................................33 Accessing the call history list ..............................................................34 Viewing call history details .................................................................35 Messages Menu ........................................................................................37 Message alerts .....................................................................................37 Reading messages ................................................................................37 Voice messages .....................................................................................38 Text messages ......................................................................................39 Features Menu ........................................................................…
Text truncated - open the document above for the full version.
Users Manual
13 Calling Basics This section provides information on the following basic features: ■Turning the phone on and off ■Standby mode ■Power save mode ■Entering numbers ■Making emergency calls ■Redialing a call ■Muting a call ■Possible service provider services Turning the phone on and off Turning the phone on 1.Before turning the phone on, make sure that the battery is charged and properly installed (see Battery chargers, page 87, and Battery replacement, page 89). 2.Press and hold until the indicator light illuminates (about one second). 3.The phone is now in standby mode (see Standby mode, page 14) searching for service. Tip When the phone is turned on, a Globalstar animation sequence displays. To stop this animation, press any key. Turning the phone off 1.Press and hold until “Powering Off” displays. 2.Release . 00-80-C6302-1.book Page 13 Friday, July 21, 2006 10:12 AM Calling Basics 14 Tip If the phone does not turn off, press and hold for more than one second. Standby mode With the power on, the phone is in standby mode while searching for service. The following screen shows the search messages that display. Once service is established (also called service registered), your banner, the date and time, and the appropriate icons display. Power save mode If service is not established (registered) while in standby mode, the phone switches to power save mode. Power save mode maximizes battery life by periodically looking for service. The following message displays: To return to standby mode, press any key. Looking for service..... menubook <banner> Sept 14, Tue 9:10 AM MDT menubook Service not found. Press key to retry. 00-80-C6302-1.book Page 14 Friday, July 21, 2006 10:12 AM Calling Basics 15 Entering numbers When you enter a telephone number, the phone accepts up to 32 digits or other characters including hyphens and pauses. Note All 32 characters do not always display on certain screens and may be replaced by periods (...). To display the entire number, use the View # option in the Phone Book menu (see Finding entries, page 27) or the Call History menu (see Viewing call history details, page 35). To enter telephone numbers From standby mode, use the keypad to enter the desired telephone number directly into the opening screen. After the first number key is pressed, a new screen displays the number and provides the following options: ■To save this number in your phone book, press save. ■To find this number in your phone book, press find. ■To clear this number and start again, press. ■To place the call to this number, press . To edit numbers 1.Press book. 2.To scroll through the phone book, press one of the volume buttons located on the side of the phone. 3.When the cursor is flashing over the entry to be edited, press view. 1-800-555-1212 save find 1 save book 00-80-C6302-1.book Page 15 Friday, July 21, 2006 10:12 AM Calling Basics 16 4.Press options. 5.Press to edit. 6.Press to edit the number. 7.Use the keypad to edit the numbers. Tip The button can be used to delete a digit or character. Note You cannot use or to move the cursor when entering or editing numbers because these keys are used to enter # or *. To delete numbers ■Press to delete one previous character at a time. ■Press one of the volume buttons to position the cursor over a digit or character, then press to delete. ■Press and hold to delete the entire entry. Making emergency calls ■When making emergency calls, no special conditions apply. ■Locking or restricting the phone does not prevent making calls to emergency numbers. ■Contact your service provider for emergency numbers. To make an emergency call 1.Enter the emergency number (for example, 911). 2.Press . 00-80-C6302-1.book Page 16 Friday, July 21, 2006 10:12 AM Calling Basics 17 Redialing a call To redial a recent call 1.Press . 2.Select the phone number from the list. 3.Press . Muting a call While on a call, the microphone can be muted so that the person on the other end cannot hear you. To turn mute on ■Press mute. The word “Mute” replaces the word “Time” on the screen until you end the call or turn mute off. To turn mute off ■Press mute. The word “Time” replaces the word “Mute” on the screen. Possible service provider services International dialing To make international calls 1.Enter the international access code, the country code, and the phone number. Shortcut: Press and hold until a plus (+) displays on the screen, and then enter the country code and phone number. Mute: 1:06 | menu | | mute | Mute: 00-80-C6302-1.book Page 17 Friday, July 21, 2006 10:12 AM Calling Basics 18 2.Press . If international dialing is supported in your network, contact your service provider for more information. Position location service While making a call, it is possible to download your current location coordinates. (See Current position coordinates, page 46.) Call waiting Call waiting lets you know that you are receiving an incoming call by sounding a beep. For instructions on how to use call waiting, contact your service provider. Three-way calling Three-way calling allows you to talk to two callers at the same time. For instructions on how to use three-way calling, contact your service provider. Caller ID Caller ID displays an incoming call’s phone number on the screen, if available. If the phone number of the caller matches one stored in your phone book, the name also displays with the number. For more information on caller ID, contact your service provider. 00-80-C6302-1.book Page 18 Friday, July 21, 2006 10:12 AM 19 Menu Basics This section provides a guide to ■Accessing the Main Menu ( menu) ■Navigating and using menus The following chart shows the various menus available from the Main Menu. Press menu to access the Main Menu. 00-80-C6302-1.book Page 19 Friday, July 21, 2006 10:12 AM Menu Basics 20 8 System 1 Status 2 Find Home 3 Version 4 Service Provider Select 1 Viewing Lists 2 Adding to List 3 Editing List 4 Erasing a Provider 5 Force Selection 5 Service Provider 6 Territory …
Text truncated - open the document above for the full version.
Users Manual
33 Call History Menu This section provides information on how to use the call history list: ■Accessing the call history list ■Viewing call history details The call history contains the last ten incoming or outgoing voice calls, and includes the following details on each call: ■The most recent call is numbered 0 and displays at the top of the list and the oldest call at the bottom (separated by a dashed line). ■When the list is full, a new call takes the first position in the list and the oldest call is deleted. ■The list is saved after you turn the phone off. ■If the caller’s phone number is stored in the phone book, the caller’s name displays in the call history list. ■If more than one name matches a call back number, the entry with the lowest phone book location number displays. Called ByIncoming calls, if caller ID is available (see Caller ID, page 18) Call ToOutgoing calls AddedScratchpad entries (see Scratchpad, page 46) MissedUnanswered incoming calls, if caller ID is available Caller IDCaller ID information received Call WaitingCall-waiting information received during a call Call Hist view 2 00-80-C6302-1.book Page 33 Friday, July 21, 2006 10:12 AM Call History Menu 34 Accessing the call history list To access the call history list 1.From standby mode, press menu. Then press Call History. Or Press . 2.To access the last ten calls, press the scroll keys. For example: 3.Scroll down to select a call from the most recent to the oldest calls, or scroll up to select a call from the oldest to the most recent. 4.After selecting a call, choose one of the following options: ■To call the number, press . ■To save the number in your phone book: ❑Press view. ❑Press options. ❑Press save. ❑Press ok (see Saving entries, page 26). ■To exit call history without calling or storing a number, press or . scrn_callhist.eps John 5551212 7654321 1 2 0 view 00-80-C6302-1.book Page 34 Friday, July 21, 2006 10:12 AM Call History Menu 35 Viewing call history details To view call history details 1.Scroll to select a call on the list. 2.Press view. 3.Press options. 4.Select one of the following: ■Date/Time – Display the date and time of the call. view Wendy 0 1 Bob 2 658-0987 options CALL TO Bob 202-987-6543 2 Date/Time: Sept 22, Wed 3:45 PM MDT ok 00-80-C6302-1.book Page 35 Friday, July 21, 2006 10:12 AM Call History Menu 36 ■Duration – Display the duration of the call. ■Save – Save the number in your phone book. ■View # – View the entire number. ■Send – Make a call to the number. ■Send Tones – Send DTMF tones while on a call. (See Sending tones, page 30.) ■Prepend – Add numbers, such as an area code or country code, at the beginning of the phone number and save it in your phone book. Call Duration: 2 min 25 sec ok Options 1 Date/Time 2 Duration 3 Save 00-80-C6302-1.book Page 36 Friday, July 21, 2006 10:12 AM 37 Messages Menu This section provides information about SMS (short message service) text and voice mail messages. ■Message alerts ■Reading messages ■Voice messages ■Text messages Contact your service provider for information regarding the availability of text and voice mail notifications. Message alerts The phone can be configured for message alerts (see New Message, page 72). When the phone is turned on and an SMS message is received, the phone alerts you by: ■Flashing an indicator light. ■Sounding a beep. ■Displaying the text message indicator or voice mail notification indicator on the screen. The text message and voice mail notification indicators display until all messages are read. Reading messages When you read a message, new messages are accessed first. If the message contains a call back number matching one in your phone book, the corresponding name displays in place of the number. If more than one name matches a call back number, the entry with the lowest phone book location number displays. 3 Messages Voice Te x t 00-80-C6302-1.book Page 37 Friday, July 21, 2006 10:12 AM Messages Menu 38 Voice messages Accessing voice mail messages If someone leaves a voice mail message, your phone receives a voice mail notification and alerts you. To access messages, choose one of the following options: ■Access voice mail notifications for call details. ■Call your voice mail system and listen to the message. (Service providers vary on the details provided about the message.) If new voice mail messages are received, the total number of voice mail notifications is updated. To access voice mail notifications 1.From standby mode, press and hold . The total number of voice mail messages received displays under “Old.” 2.Press voice. The voice mail notification displays either a call back number or a name if the call back number matches one in the phone book. Note If more than one name matches a call back number, the entry with the lowest phone book location number displays. 3.Select a message, then choose one of the following options: ■To display more detail, if available, press view. ■The detail information automatically scrolls on the screen and pauses so you can read it. Msgs New/Old text voice Text 00/00 Voice 04 00-80-C6302-1.book Page 38 Friday, July 21, 2006 10:12 AM Messages Menu 39 ■To manually scroll, press a scroll key. ■To read the next voice mail notification, press next. To call your voice mail system 1.Press and hold . 2.Press voice. 3.To find the voice mail notification you want, press next. 4.Press view. 5.Press . The phone number for the voice mail system displays, if available. If it does not display, the message “No Voice Mail Number received” displays. Manually enter the voice mail phone number. 6.If necessary, prepend (add) digits before the voice mail phone number. For example, if you are out of the area of your voice mail phone number, prepend the area code or country code. 7.Press again. 8.To retrieve your messages, follow the voice mail system instructions. To erase voice message notifications 1.Press and hold . 2.Press voice. 3.To find the voice mail notification you want, press next. 4.Pr…
Text truncated - open the document above for the full version.
Users Manual
53 Security Menu This section provides information on how to use the following security features: ■Lock code ■Locking the phone ■Restricting the phone ■Entering the priority numbers ■Erasing call history list ■Erasing phone book entries ■Erasing SMS messages ■Resetting preferences Lock code When accessing the Security menu for the first time, enter the lock code supplied by your service provider. If you forget your lock code, contact your service provider. Entering a new lock code If it becomes necessary to change the lock code, create a new 4-digit code. 1 Lock code 2 Locking the phone 3 Restricting the phone 4 Entering priority numbers 5 Erasing call history list 6 Erasing phone book entries 7 Erasing SMS messages 8 Resetting preferences 6 Security 00-80-C6302-1.book Page 53 Friday, July 21, 2006 10:12 AM Security Menu 54 To enter the new lock code 1.From standby mode, press menu. 2.Press Security 3.Enter the current lock code. 4.Press New Code. 5.Enter your new 4-digit lock code. 6.Press save. The phone displays confirmation of the new code entry. Locking the phone The phone can be locked to prohibit any outgoing calls except priority and emergency numbers. ■Incoming calls are not affected. ■No shortcuts are available for dialing emergency or priority numbers. ■All other functions are locked. Tip To unlock the phone, enter the lock code used to access the Security menu. To lock the phone 1.From standby mode, press menu. 2.Press Security. 3.Enter your lock code. 4.Press Lock Phone. 5.Scroll to select one of these options: ■Never – The phone cannot be locked. ■Now – Immediately locks the phone for one time only. ■On Power Up – Locks the phone every time you turn the phone on. 00-80-C6302-1.book Page 54 Friday, July 21, 2006 10:12 AM Security Menu 55 To unlock the phone 1.Press unlock. 2.To return to the main menu, enter your lock code. (Enter the same lock code used to access the Security menu.) If you forget your lock code, contact your service provider. Restricting the phone Restricting the phone limits outgoing calls to emergency and priority numbers, plus phone book locations 1 to 9. Phone book changes cannot be made in this mode. To restrict the phone 1.From standby mode, press menu. 2.Press Security. 3.Enter your lock code. 4.Press Restrict. 5.Scroll to select one of these options: ■Yes – Make calls to emergency numbers, priority numbers, and phone book locations 1 to 9 only. There are no shortcuts for dialing emergency numbers or priority numbers unless you add them to your phone book. ■No – Make calls to any number. Entering priority numbers Priority numbers can be called when the phone is locked or restricted. Store up to three priority numbers (maximum 32 digits each). To enter a priority number 1.From standby mode, press menu. 2.Press Security. 3.Enter your lock code. 00-80-C6302-1.book Page 55 Friday, July 21, 2006 10:12 AM Security Menu 56 4.Press Priority #. 5.Scroll to Priority#1, Priority#2, or Priority#3. 6.Press edit. 7.Enter the phone number. 8.Press ok. Erasing call history list This feature erases the entire call history list. 1.From standby mode, press menu. 2.Press Security. 3.Enter your lock code. 4.Press Erase Call. 5.Press ok. ❑To erase the entire call history list, press ok. ❑To return to the menu without erasing the list, press . Erasing phone book entries This feature erases all entries in the phone book. 1.From standby mode, press menu. 2.Press Security. 3.Enter your lock code. 4.Press Erase Book. 5.Press ok. ❑To erase all entries in the phone book, press ok. ❑To return to the menu without erasing the list, press . 00-80-C6302-1.book Page 56 Friday, July 21, 2006 10:12 AM Security Menu 57 Erasing SMS messages This feature erases all SMS (short message service) messages, including all locked or unlocked text messages and all voice mail notification messages. Use this erase feature to avoid running out of memory (see To avoid running out of memory, page 42). 1.From standby mode, press menu. 2.Press Security. 3.Enter your lock code. 4.Press Erase SMS (short message service). 5.Press ok. ❑To erase all messages, press ok. ❑To return to the menu without erasing any messages, press . Resetting preferences This feature resets all preferences to the original settings (defaults) entered by your service provider. These preferences include those described in Preferences Menu, page 59, with these exceptions: ■The banner is not reset. ■The Service Provider Preferred and Prohibited Lists are deleted (see Service Provider Select, page 79). ■The lock code is not reset. ■The phone book, call history, or SMS messages are not erased. To reset preferences 1.From standby mode, press menu. 2.Press Security, enter your lock code. 3.Press Reset Prefs. 4.Press ok. 5.When prompted to reset all preferences, press ok. 00-80-C6302-1.book Page 57 Friday, July 21, 2006 10:12 AM Security Menu 58 00-80-C6302-1.book Page 58 Friday, July 21, 2006 10:12 AM 59 Preferences Menu This section provides information on how to set up the following phone preferences: ■Sounds ■Display ■Alerts ■Calling 7 Preferences 1 Sounds 2 Display 3 Alerts 4 Calling 1 Ringer Type 2 Ringer Volume 3 Earpiece Volume 4 Key Beep Sound 5 Key Beep Volume 6 Key Beep Length 7 Mute Stereo 1 Backlight 2 Sort Book 3 Banner 4 Auto Hyphens 5 Show Time 6 Time Zone 7 Language 8 Display Color 1 Fade 2 Minute 3 Service change 4 New Message 1 Auto Answer 2 Auto Redial 3 One-Touch Dial 4 Auto-Key Answer 5 Ring While Stowed 00-80-C6302-1.book Page 59 Friday, July 21, 2006 10:12 AM Preferences Menu 60 Sounds To set up your personal sound preferences, changes can be made to the following functions: ■Ringer type ■Ringer volume ■Earpiece volume ■Key beep sound ■Key beep volume ■Key beep length ■Mute stereo Ringer Type For incoming calls, the ringer can be changed to one of eight different rings or melodies. To set the incoming calls ringer type 1.From standby mode, press menu. 2.Press Preferences. 3.Press Sounds. 4.Press Ringer Type. 5.Press…
Text truncated - open the document above for the full version.
Users Manual
Preferences Menu 63 Note The key beep length affects the DTMF tones used for sending tones over the network for automated phone services, such as voice mail or online banking. Select the appropriate key beep length before sending tones (see Sending tones, page 30). To set the key beep length 1.From standby mode, press menu. 2.Press Preferences. 3.Press Sounds. 4.Press KeyBeepLen. 5.Press or to select “standard.” Press again to select “custom.” ■Standard – Key beep is short and fixed in length. ■Custom – Key beep sounds as long as you press a key. 6.Press ok. Mute Stereo To use this feature the Globalstar Installation Kit mute line must be connected to the stereo mute line. When using the kit, this feature can be set to automatically mute the stereo in your vehicle when receiving incoming calls. Press when making outgoing calls. (Contact your service provider or kit installer for more information on implementing this in your vehicle.) To mute the stereo 1.Be sure that the kit mute line is connected to the stereo mute line. 2.From standby mode, press menu. 3.Press Preferences. 4.Press Sounds. 5.Press Mute Stereo. 00-80-C6302-1.book Page 63 Friday, July 21, 2006 10:12 AM Preferences Menu 64 6.Press or to select “yes.” Press again to select “no.” 7.Press ok. Display The following display features can be adjusted: ■Backlight ■Sort Book ■Banner ■Auto Hyphen ■Manual Hyphen ■Show Time ■Time Zone Backlight The screen and keypad backlighting can be adjusted to maximize battery life. To set the backlight 1.From standby mode, press menu. 2.Press Preferences. 3.Press Display. 4.Press Backlight. 5.Scroll to select one of the following: ■Always Off – The backlight is always off, which significantly increases battery life. ■7 Seconds – Turns the backlight off 7 seconds after the last key press. ■15 Seconds – Turns the backlight off 15 seconds after the last key press. ■30 Seconds – Turns the backlight off 30 seconds after the last key press. 00-80-C6302-1.book Page 64 Friday, July 21, 2006 10:12 AM Preferences Menu 65 ■Always On – The backlight is always on, which significantly decreases battery life. 6.Press ok. To turn the backlight on ■Press any key. Note If this feature is set to “Always Off,” pressing any key does not turn the backlight on. Sort Book This option allows users to select whether the phone book displays in numerical location order or by alphabetic name order. To set the sort order 1.From standby mode, press menu. 2.Press Preferences. 3.Press Display. 4.Press Sort Book. 5.Press or to select “location#.” Press again to select “alphabetic.” 6.Press ok to confirm sort change. Banner When the phone is turned on, a banner or personal greeting can be displayed. As many as 12 characters can be added to the startup screen, such as a company name or a personal reminder. To edit the banner 1.From standby mode, press menu. 2.Press Preferences. 00-80-C6302-1.book Page 65 Friday, July 21, 2006 10:12 AM Preferences Menu 66 3.Press Display. 4.Press Banner. 5.Choose one of the following: ■Press ok to return to standby mode. ■Press edit to change the banner. (See Entering numbers, page 15.) 6.Press ok to confirm banner changes. Auto Hyphens This feature automatically inserts hyphens when entering phone numbers. As the following example shows, hyphens are inserted automatically when numbers are entered: # – ### – ### – #### Note To manually enter hyphens, see Manual Hyphens, page 66. To set auto hyphen 1.From standby mode, press menu. 2.Press Preferences. 3.Press Display. 4.Press AutoHyphen. 5.Press or to select “yes.” Press again to select “no.” 6.Press ok. Manual Hyphens Hyphens can be entered manually from standby mode or when editing phone numbers in the phone book. Each hyphen counts as one character. Note To automatically insert hyphens, see Auto Hyphens, page 66. 00-80-C6302-1.book Page 66 Friday, July 21, 2006 10:12 AM Preferences Menu 67 To manually enter a hyphen 1.Press and hold . The following screen displays: 2.To add a hyphen, on the screen, press . Note You cannot insert a hyphen or pause as the first digit of a phone number. Pressing and holding will display the messages screen. Show Time The time format can be set by selecting 12-hour, 24-hour, UTC, or Off. UTC (universal time coordinated) displays as the default mode. To set the time format 1.From standby mode, press menu. 2.Press Preferences. 3.Press Display. 4.Press Show Time. 5.Press or to select one of the following: ■12 hour – Time displays in 12-hour format ■24 hour – Time displays in 24-hour format ■Off – Time does not display 6.Press ok. Time Zone This feature allows you to select the display of a different time zone instead of UTC (universal time coordinated) time. The time zone remains selected ardPause imePause - Hyphen 1 2 3 00-80-C6302-1.book Page 67 Friday, July 21, 2006 10:12 AM Preferences Menu 68 until you change it. UTC (plus or minus any hour) is an option if your time zone is unavailable. The available time zones include: EuropeanGMTGreenwich Mean Timesame as UTC BSTBritish Summer TimeUTC + 1 hour ISTIrish Summer TimeUTC + 1 hour WETWestern Europe Timesame as UTC WEST Western Europe Summer TimeUTC + 1 hour CETCentral Europe TimeUTC + 1 hour CESTCentral Europe Summer TimeUTC + 2 hours EETEastern Europe TimeUTC + 2 hours EESTEastern Europe Summer TimeUTC + 3 hours MSKMoscow TimeUTC + 3 hours MSDMoscow Summer TimeUTC + 4 hours MSDMoscow Summer Time, IrkutskMSD + 5 hours MSKMoscow, Chita, YakutskMSK + 6 hours MSDMoscow Summer Time, Chita Yakutsk MSK + 6 hours MSKMoscow, Vladivostock, Khabavorsk, Sakhalin MSK + 7 hours MSKMoscow, MagadanMSK + 8 hours MSDMoscow Summer, MagadanMSD + 8 hours MSKMoscow, Kamchatka, AnadyrMSK + 9 hours 00-80-C6302-1.book Page 68 Friday, July 21, 2006 10:12 AM Preferences Menu 69 To select a different time zone 1.From standby mode, press menu. 2.Press Preferences. 3.Press Display. 4.Press TimeZone. MSDMoscow Summer, Kamchatka, Anadyr MSD + 9 hours BeijBeijing, ChinaUTC + 8 hours U.S. and Canada …
Text truncated - open the document above for the full version.
Contact Information
Applicant
Paul Guckian(Vice President, Regulatory Engineering)
Technical Contact
Qualcomm IncorporatedPaul Jayne
[email protected]858-651-1758
5775 Morehouse Drive · San Diego, California · United States
Non-Technical Contact
Qualcomm IncorporatedPaul Jayne
[email protected]858-651-1758
Test Firm
Nemko USA, Inc.Rhonda Saxon
Technical Specifications
| # | Rule Parts | Frequency Range | Power Output | Emission | Tolerance |
|---|---|---|---|---|---|
| 1 | 25 | 1.61 GHz - 1.62 GHz | 1 W | 1M25G1W | 5.0000000000 ppm |
Other Applications from Qualcomm Technologies, Inc.
J9C-M2X75
Aug 13, 2024Module
Equipment Class
CBE - Citizens Band End User DevicesJ9C-M2X72
Aug 13, 2024Module
Equipment Class
PCB - PCS Licensed Transmitter
J9C-QCNCM825
Aug 26, 2023Qualcomm WiFi 7/BT Combo module
Equipment Class
6CD - 15E 6 GHz Low Power Dual Client
J9C-QCNCM865
Apr 04, 2023Qualcomm WiFi 7/BT Combo module
Equipment Class
NII - Unlicensed National Information Infrastructure TX
J9CQCARD7280N
Nov 07, 2022QCARD7280
Equipment Class
DTS - Digital Transmission System