Q87-DP-608HIGH DEFINITION MEDIA PLAYER
LINKSYS LLC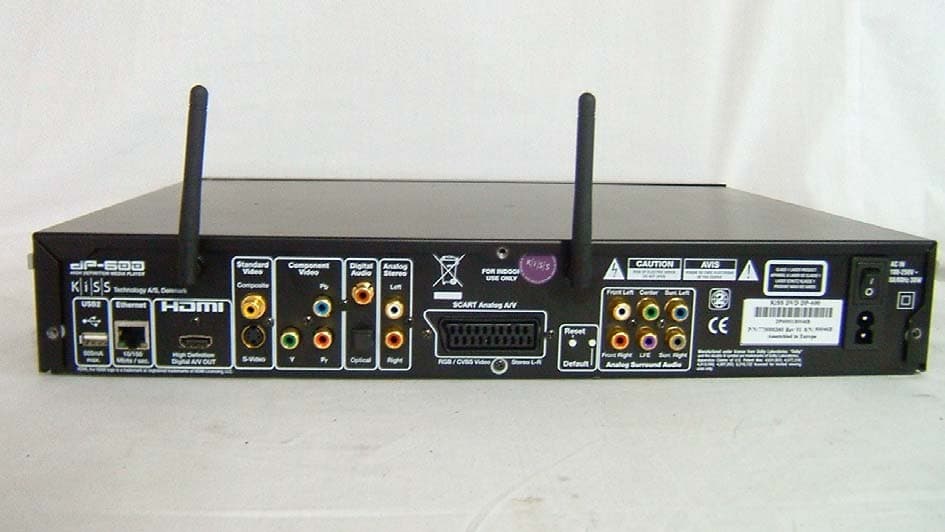
Click to zoom
Application Details
- Equipment Class
- DTS - Digital Transmission System
- Date of Grant
- May 24, 2006
- Application Purpose
- Original Equipment
- Date of Application
- May 24, 2006
- Equipment Note
- HIGH DEFINITION MEDIA PLAYER
- Frequency Range
- 2412.00000000 - 2462.00000000
- Company
- LINKSYS LLC
- Country
- United States
Documents & Files
Document Text
Text extracted from the exhibit documents filed with the FCC. Open a document above to read the original.
Users Manual
english It’s not just about playing DVDs KiSS DP-600 High Defi nition Media Player USER GUIDE kiss-technology.com english english © KiSS Technology A/S 2005 - DP-600 v. 1.1 - PN: 710000320 español polski português nederlands italiano dansk deutsch français english Read these instructions carefully before using the unit. Follow the safety instructions on the unit and safety precautions listed below. Keep these operating instructions handy for future reference. Read these instructions. Keep these instructions. Heed all warnings. Follow all instructions. Do not use this apparatus near water. Clean only with dry cloth. Do not block any ventilation openings. Install according to the manufacturer’s instructions. Do not defeat the purpose of the polarized grounding type plug. A polarized plug has two blades with one wider than the other. A grounding type plug has two blades and a third grounding prong. The wide blades or the third prong are provided for your safety. If the provided plug does not fit your outlet, consult an electrician for a replacement of the obsolete outlet. Do not install near any heat sources such as radiators, heat registers, stoves, or other apparatus, including amplifiers, that produce heat. Protect the power cord from being walked on or pinched, particularly at the plugs, convenience receptacles, and the point at which they exit from the apparatus. Only use the attachments/accessories specified by the manufacturer. Use only with a cart, stand, tripod, bracket, or table specified by the manufacturer or sold with the apparatus. When a cart is used, use caution when moving the cart/apparatus combination to avoid injury from tip-over. Unplug this apparatus during lightning storms or when unused for long periods of a time. Refer all servicing to qualified personnel. Servicing is required when the apparatus has been damaged in any way, such as when a power supply cord or plug is damaged, liquid has been spilled or objects have fallen into the apparatus, or the apparatus has been exposed to rain or moisture, does not operate normally, or has been dropped. OUTDOOR USe WARnIng To reduce the risk of fire or electric shock, do not expose this apparatus to rain or moisture. This apparatus must not be used outdoors WeT lOCATIOn mARKIng Apparatus should not be exposed to dripping or splashing and no objects filled with liquids, such as vases, should be placed on the apparatus. SeRvICe InSTRUCTIOnS CAUTIOn - These service instructions are for use by qualified service personnel only. To reduce the risk of electric shock, do not perform any servicing other than that contained in the operating instructions unless you qualify to do so. SeRvICe 1. CAUTIOn - Damage requiring service - The unit should be serviced by qualified service personnel if: the AC power supply cord or the plug has been damaged; objects or liquids have gotten into the unit; the unit has been exposed to rain; the unit does not operate normally or exhibits a marked change in performance; or the unit has been dropped or the cabinet damaged. 2. CAUTIOn - Servicing - Do not attempt to service the unit beyond what is described in these operating instructions. Refer all other servicing to authorized servicing personnel. 3. CAUTIOn - Replacement parts - When parts need replacing, ensure the service personnel uses parts specified by the manufacturer or parts that have the same characteristics as the original parts. Unauthorized substitutes may result in fire, electric shock, or other hazards. 4. CAUTIOn - Safety check - After repairs or service, ask the servicer to perform a safety check to confirm the unit is in proper working condition. To clean this unit, wipe with a soft, damp cloth. • never use alcohol, paint thinner or benzene to clean this unit. • never use a chemically treated cloth . b Important Safety Instructions THIS PRODUCT UTIlIZeS A lASeR BeAm WHICH CAn CAUSe HAZARDOUS RADIATIOn eXPOSURe IF THIS PRODUCT IS USeD InCORReCTlY. Be SURe TO FOllOW THeSe DIReCTIOnS FOR PROPeR USe. DO nOT OPen COveR AnD DO nOT RePAIR OR SeRvICe YOURSelF. ReFeR SeRvICIng TO QUAlIFIeD PeRSOnnel. Using controls, making adjustments, or performing procedures, other than those specified herein, may result in hazardous radiation exposure. Do not open covers and do not repair unit yourself. Refer servicing to qualified personnel. To reduce the risk of fire, electric shock, or product damage, do not expose this apparatus to rain, moisture, dripping, or splashing, and take care that no objects filled with liquids, such as vases, are placed on this product. Do not install or place this unit in a bookcase, built-in cabinet, or other confined space. Do not obstruct the unit’s ventilation openings with newspapers, tablecloths, curtains or similar items. ensure the unit is well-ventilated to prevent risk of electrical shock or fire hazard due to overheating. Do not place sources of naked flames, such as lighted candles, on this unit. Dispose of batteries in an environmentally friendly manner. THe FOllOWIng APPlIeS OnlY TO THe U.S.A. AnD CAnADA • To prevent electric shock, match wide blade of plug to wide slot and fully insert. If the plug that comes with this unit does not fit into your electrical outlet, consult an electrician. FOR THe mIDDle eAST, SOUTH AFRICA, AnD ASIA • This unit is intended for use in tropical climates. FOR AUSTRAlIA AnD neW ZeAlAnD • This unit is intended for moderate climates. This product may receive radio interference caused by mobile telephones during use. If such inference occurs, increase the distance between the product and the mobile telephone. DAngeR: vISIBle AnD InvISIBle lASeR RADIATIOn WHen OPen. AvOID DIReCT eXPOSURe TO BeAm. (FDA 21 CFR) CAUTIOn: vISIBle AnD InvISIBle lASeR RADIATIOn WHen OPen. AvOID eXPOSURe TO BeAm. (IeC60825-1) THe FOllOWIng APPlIeS OnlY In THe U.S.A. This equipment has been tested and found to comply with the limits for a class B digital device, pursuant to part 15 of the FCC Rules. These limits …
Text truncated - open the document above for the full version.
Users Manual
9 english 5 Connecting your Player to a Network Ethernet Connection using a router Equipment required • A router, with a built-in switch or a separate switch/hub. • 2 or 3 straight Ethernet cables. • A Windows PC or a Macintosh with an Ethernet connection. • KiSS PC-Link Software CD for Windows PC or download KiSS MacLink for Macintosh at www.kiss-technology.com/support under Software. Step-by-Step Guide 1 Connect the player to the router’s built-in switch or an external switch/hub which is connected to the router. 2 Connect the Computer to the router’s built-in switch or an external switch which is connected to the router. 3 Check that your Internet connection is working. If any problems occur, contact your ISP (Internet Service provider). KiSS DP-600 Computer Router Internet KiSS DP-600 Switch Router Computer Internet While the DP-600 does not come with a hard drive for storing your home videos, music or photos, the DP-600 does support external USB mass storage devices like hard drives, USB memory sticks and certain card readers. To connect such a device, simply remove the cover in the lower right part of your player’s front panel. Behind the cover you will find an USB port. There is also an USB port on the back of your player. See the Chapter “Overview of the Player” if you are unsure where these ports are. Connect your device to either one of these ports. Once you have connected your device properly, you can access the files on your device by pressing the MENU button of your remote control to enter the Player menu. Go to the USB section select the type of content you would like to browse. Note: The DP-600 supports the following file systems on mass storage devices: FAT16, FAT32 and NTFS. If you do not know which file system your mass storage device is using, please consult the User Guide for the device or contact the manufacturer for this information. Please also note that the DP-600 only supports mass storage devices in “read only” mode. This means that you cannot rename, delete or in any other way alter your files on the drive from the DP-600. USB Mass Storage Device Connection english 10 english Ethernet Network with a Computer using Internet connection sharing KiSS DP-600 Computer Crossed cable Internet KiSS DP-600 Switch Computer Internet Equipment required • Switch/hub and 2 straight cables or a crossed cable. • A Windows PC or a Macintosh with an Ethernet connection. • KiSS PC-Link Software CD for Windows PC or download KiSS MacLink for Macintosh at www.kiss-technology.com/support under Software. Step-by-Step Guide 1 Connect the player to the Computer with a crossed cable or to a switch/hub. 2 Connect the Computer to the Internet (LAN/Modem/ADSL). 3 Check that your Internet connection is working. If any problems occur, contact your ISP (Internet Service provider) 4a On the Windows PC select Network Connection in Control Panel. Open Properties for the network connection that is connected to the Internet. Select Advanced where you enable Internet connection sharing. 4b On the Macintosh, go to System Preferences, select Sharing. Under sharing choose the Internet tab and click Start to enable Internet Connection Sharing. 5 Install KiSS PC-Link on the Windows PC or KiSS MacLink on the Mac and select the content to be shared with your player. Check in the KiSS PC-Link info tab that the right card has been chosen. 6 Start the player, press SETUP on your remote and go to NETWORK SETTINGS. Check that WIRED is selected under NETWORK INTERFACE and that AUTOMATIC CONFIGURATION (DHCP) is ENABLED. Press SETUP to exit this menu. 7 Press MENU and go to PC-LINK. 8 Press SELECT HOST, the name of the server should appear on your screen, press OK to select it. 9 Choose between AUDIO FILES, VIDEO FILES or PICTURE FILES. The player will display the list of fi les available from your Computer. 10 If you have any problems, please check the FAQ on our web site for any questions. And if that doesn’t help then contact the KiSS Hotline Your player should now be connected. 4 Install KiSS PC-Link on the PC or KiSS MacLink on the Mac and select the content to be shared with your player. Check in the KiSS PC-Link info tab that the right card has been chosen. 5 Start the player, press SETUP on your remote and go to NETWORK SETTINGS. Check that WIRED is selected under NETWORK INTERFACE and that AUTOMATIC CONFIGURATION (DHCP) is ENABLED. Press SETUP to exit this menu. 6 Press MENU and go to PC-LINK. 7 Press SELECT HOST, the name of the server should appear on your screen, press OK to select it. 8 Choose between AUDIO FILES, VIDEO FILES or PICTURE FILES. The player will display the list of fi les available from your Computer. 9 If you have any problems please check the FAQ on our web site for any questions If that doesn’t help then contact the KiSS Hotline Your player should now be connected. Equipment required • One straight or crossed cable. Step-by-Step Guide 1 With a direct Internet connection, you can only access the online features such as WebRadio. KiSS PC-Link or KiSS MacLink can NOT be enabled. 2 Start the player, press SETUP on your remote and go to NETWORK SETTINGS. Check that WIRED is selected under NETWORK INTERFACE and that AUTOMATIC CONFIGURATION (DHCP) is ENABLED. Press SETUP to exit this menu. 3 Press SETUP to exit this menu. 4 Press KiSS ONLINE on your remote to select the service you wish to use. 5 If you have any problems please check the FAQ on our web site for any questions, and if that doesn’t help then contact the KiSS Hotline. Your player should now be connected. Internet KiSS DP-600 Ethernet Network using a direct Internet connection english 11 english Possible errors. - Cable problem, check that there is light in all the ports of the switch/hub - There is a fi rewall installed on the Computer which blocks the ports used by KiSS PC-Link or KiSS MacLink (port 8000 must be open) - The player and the Computer are not on the same Subnet (problem with playing video) - Your Computer has been …
Text truncated - open the document above for the full version.
Users Manual
14 english Now that you have connected your player to the other devices, you can begin setup. First, we recommend that you turn on your television before turning on your KiSS Player. This way, the video channel you have chosen will appear on your television screen automatically. Turning on your KiSS Player before your television, however, has no negative affect on the use or operation of your player. In this case, you would simply have to use your TV remote to search for the video channel you want your player set to, instead of it appearing automatically. 6 Turning your player "On" for the first time 2. Press the On/Off button located on the back of your KiSS player to turn the player on. A red light will appear on the front display indicating that the player is on Standby mode. 1. Turn "On" your television. 3. Press the Standby button on your remote to start the player. If you are powering up your KiSS player for the first time, the Quick Setup Menu will appear automatically. english 15 english Powering up your player for the first time, you will be presented with the Quick Setup wizard allowing you basic setup of your player with very few button presses and minimal technical knowledge. The Quick Setup is simple and largely self-explanatory. Should you at a later time wish to go through it again or alter some more advanced settings, please consult the “Advanced Setup” section of this User Guide. 7 Quick Setup - If this menu does not appear when you start the DVD Player, re-check the cable connections. - You can always go back and start again if you happen to do something wrong, Just press on the SETUP button of your remote, go to MISC. SETTINGS and select QUICK SETUP. 4. Loud Speaker setup selection Please select the loud speaker setup connected to your amplifier or TV. If you are using more than two speakers connected to a surround sound amplifier, please select “Surround”. If there are only two speakers connected or you are receiving sound from your TV only, please select “Stereo”. This screen will prompt you to select the video output you will be using. Please select the same cable type that you used to connect your player to your TV. If you are uncertain of which cable you connected, pictures act as a rough guide. 2. Video output selection 3. Display format selection This screen will prompt you to select the format of the TV connected to your player. Choices are 16:9 widescreen or conventional 4:3 format. If you are unsure what your television is, select the depiction that is closest in resemblance. This first screen will tell you to select the language you wish to use on your DVD Player. Use the directional buttons of your remote control to navigate and press the OK button to select a language. 1. Language Selection english 16 english - If this menu does not appear when you start the DVD Player, re-check the cable connections. - You can always go back and start again if you happen to do something wrong, Just press on the SETUP button of your remote, go to MISC. SETTINGS and select QUICK SETUP. Once you have connected an Ethernet cable to your DP-600 or are ready to set your wireless network, select either “Wired Network” (for ethernet cable connection) or “Wireless Network” depending on the type of network connection you wish to set up. - If you have selected “Wired Network”, proceed to item 6a. - If you have selected “Wireless Network”, proceed to item 6b. - If you do not wish to set up your network yet, simply select “No Network” to complete QuickSetup. 5. Selecting the Network 7. Setting the Wireless Network Encryption Key Congratulations! You have successfully set up your player! Don’t forget to set up your network! Networks labelled “Locked” are protected by a Network Encryption Key. Press “OK” on your remote to select the network. Use the on-screen keypad to enter the Network Key (password) exactly. This enables the DP-600 to use the wireless network freely. Once you have entered the Key, press “OK” to complete the Quick Setup. See this manual’s chapter on Advanced Setup, if you wish to change any Network Settings manually. Selecting “Wired Network” turns on the Automatic Network Configuration (DHCP) . Press “OK” to complete the Quick Setup. See this manual’s chapter on Advanced Setup, if you wish to change any Network Settings manually. 6a. Selecting the Network (Wired Networks) 6b. Selecting the Network (Wireless Networks) When you select “Wireless Network”, the DP-600 displays a list showing all of the networks that are available. Use the arrow buttons on your remote to choose the desired network. Networks labelled as “Unlocked” are available for free. Networks labelled “Locked” are protected. Select the available network of your choice. If you select a free network, press “OK” to complete the Quick Setup. See item 7 if the network you wish to select is “Locked”. See this manual’s chapter on Advanced Setup, if you wish to change any Network Settings manually. Congratulations! You have set up your player english 17 english This section walks you through each section of the main menu of the player giving you access to all of its primary functions like file browsing, playback of media and online services. To exit or re-enter the menu, simply press the MENU button on your remote control. Play: Play the disc currently inserted in the player. Resume playback: If you have previously stopped playback of a DVD disc still in the player, press this to resume playback where you left off. Video files: Browse and play video files on the inserted disc. Audio files: Browse and play audio files on the inserted disc. Picture files: Browse and view JPG-format pictures on the inserted disc. Eject: This opens the disc tray of the player. Disc Playback 8 Player Menu This menu section contains options for browsing and playing files residing on your computer from your DP- 600. In order to use them, you need to set up a KiSS PC-Link host on your PC or a KiSS MacLink host for the Apple Macintosh. P…
Text truncated - open the document above for the full version.
Users Manual
19 english Repeat: This option can be toggled between repeating the whole disc, the current chapter only or none. Change subtitle: Toggle between available subtitles for the video playing. A quicker shortcut to this function is pressing the SUBTITLE button on the remote control. Pressing it additional times will allow you to cycle through available subtitles. Change audio track: Toggle between available audio tracks/languages. If none are available, you cannot use this option. A quicker shortcut to this function is pressing the AUDIO button on the remote control. Pressing it additional times will allow you to cycle through available audio tracks. Mute: This menu item simply mutes the sound. OK: Apply settings and exit the Options menu. Apart from DVD discs, the DP-600 is also capable of playing a wide variety of other video formats. Video files in these formats will in many cases not look as good as DVD material since these formats were originally created for higher compression of video and audio. The advantage of this is that you are able to fit more video on a disc, but at a slight quality loss. Other restrictions also apply, as some of them will not support interactive menus, subtitles, multiple soundtracks and spoken languages. To play discs containing files in the above mentioned formats, press EJECT to open the disc tray and place a disc with supported video content in it. Press EJECT again to close the tray. After the disc has been recognized you will be presented with the content of the disc on screen. Select the video you wish to see and press OK. Options: At any time during playback you can press the OPTIONS button on the remote control for a list of additional video playback related options. Time Search: Time Search allows you to skip into the video by a specified number of minutes. Media information: Entering this item will provide you with a view of the technical data for the video playing. Repeat: This option can be toggled between repeating the whole disc, the current chapter/video clip only or none. Change subtitle: Toggle between available subtitles for the video playing. A quicker shortcut to this function is pressing the SUBTITLE button on the remote control. Pressing it additional times will allow you to cycle through available subtitles. Change audio track: Toggle between available audio tracks/languages. If none are available or if they are provided in an unrecognized format, you cannot use this option. A quicker shortcut to this function is pressing the AUDIO button on the remote control. Pressing it additional times will allow you to cycle through available audio tracks. Mute: This menu item simply mutes the sound. Press it again to unmute. OK: Apply settings and exit the Options menu. Playing Video Files, MPEG, MPEG-4, DivX, XviD, Nero Digital, WMV Playing Audio CDs, MP3, Ogg Vorbis Press the EJECT button on the front of the player or on the remote to open the disc tray. Place the Audio CD in it and press either the PLAY or EJECT button again to start it automatically. After a few seconds the CD track list will appear. You can navigate it using the arrow buttons on your remote and press OK to play a track. Apart from Audio CD’s, the DP-600 is also capable of playing a number of different compressed audio formats. Compressing audio will enable you to fit more songs on a single disc with an almost inaudible decrease in quality depending on the amount of compression used. The DP-600 currently has support for the following formats: MP3, Ogg Vorbis (.OGG), and Windows Media Audio (.WMA). When a CD is already inserted into the DP-600, you can start it by pressing PLAY on your remote. From the menu you can also access it by selecting the Disc menu and select “Play disc”. Options: While viewing the track list you can press the OPTIONS button on the remote control for a list of additional CD playback related options. Repeat: This option can be toggled between repeating the whole disc, the current track or none. english 20 english Shuffle: Enabling this option will shuffle the order in which tracks are played. Disable it to play back tracks in their proper order. Media information: Entering this item while playing audio files will provide you with a view of the available metadata for the audio file playing. Metadata can contain information such as artist, album, release year, genre and more. Note that metadata availability may vary greatly between files. OK: Apply settings and exit the Options menu. Viewing Jpeg pictures Press EJECT to open the drawer and place a CD with picture content in. Press EJECT again to close the drawer. After a few seconds, the menu DISC will appear on your screen. Select PICTURE FILES to view the list of images on the CD, choose the one you want to watch and press ENTER. Use the NEXT/PREVIOUS arrow to view other pictures from the CD. You can enlarge the picture by pressing ZOOM on your remote. To eject the CD, press STOP to go out of the menu and come back to the DISC section. Choose EJECT. KiSS PC-Link is the software provided with your DP-600. Once the connection established between your DP-600 and your PC, load your Audio, Video and Picture content located on your PC to KiSS PC-Link to play/see them on your television. KiSS PC-Link is a software to be installed on a Windows PC enabling you to view and play audio, video and picture files from a connected PC on the DVD Player. KiSS PC-Link can only be installed on a Windows PC running Windows XP or later. Installing KiSS PC-Link: Insert the KiSS PC-Link CD in your PC. The installation software will start automatically. Follow the on-screen instructions until installation is complete. A shortcut will be created on your desktop. Double click it to start the program. KiSS MacLink: Mac users can download KiSS MacLink, a Macintosh alternative to KiSS PC-Link at www.kiss-technology.com/support under SOFTWARE. Instructions are also available from the same place. KiSS PC-Link 10 Using KiSS PC-Link Netwo…
Text truncated - open the document above for the full version.
Users Manual
29 english 14 Product Specification Product Description High Defi nition Media Player General Features DVD Player, High Defi nition Media Player, Video-On-Demand*, IP Television*, KiSS Online** (Online Electronic Program Guide, WebRadio 3, Online Weather, StockView, Online Games), KiSS PC-Link***, Windows Media Connect, Nero Digital Software (Nero Recode 2-CE, Nero ShowTime 2-CE, Nero MediaHome CE) Networking Ethernet 10/100 Base T, Wireless 802.11g Video Playback Formats DVD, Windows Media 9, Windows Media 9 HD, MPEG, MPEG-2, MPEG-4, DivX 3.11, DivX 4, DivX 5, DivX HD, Nero Digital, XviD Audio Playback Formats Audio CD, WMA, WMA Pro, MP3, MPEG, MPEG-2 Picture Playback Formats JPEG, PNG Compatible Media Type DVD, DVD-ROM, DVD-R, DVD-RW, DVD+R, DVD+RW, CD, VCD, SVCD, MP3-CD, Network Drives, USB2 Storage Device Maximum Resolution 1920 x 1080 Television System PAL, SECAM, NTSC Video Output Connections SCART, HDMI, Composite Video, S-Video, Component Video Audio Output Connections Analog Stereo, Optical Audio, Coaxial Audio Other Connections 2 x USB2, Ethernet 10/100, RJ45 Connector for wireless Antenna Hard Disk No Hard Disk available on this model Package Content DP-600 Unit, Remote Control and batteries, 2 x Wireless Antenna, SCART Cable, Composite Video Cable, Analog Stereo Cable, Power Cable, KiSS PC-Link Software, Nero Digital Software, User Guide * Only countries where the service is available ** Requires a Broadband Internet Connection *** Requires a PC running Windows XP. A Macintosh Compatible version is available from KiSS Website **** Only available on certain models KiSS DP-600 english 30 english 15 Support Further information and assistance is available at KiSS Technology’s website under www.kiss-technology.com/support Important safety information • Read these instructions carefully and pay attention to all warnings and guidelines. • Do not overload electrical sockets or extension cables. Overloading can result in fire or electric shock. • Never insert objects into the DVD player’s cabinet door. They might come into contact with dangerous voltage points or short-circuit components, which can cause fire or electric shock. • Do not spill liquids on the DVD player. • If the DVD Player does not function normally, or if it emits unusual sounds or odours, pull out the plug immediately and contact an authorised technician. • Do not attempt to service the DVD player yourself. If you open or dismantle the shielding, you expose yourself to dangerous voltage and other hazards. All maintenance must be carried out by qualified service technicians. Environmental information • The system is made of recyclable materials which can be reused if disassembled by authorised personnel. • Please follow local regulations for the disposal of packaging materials, used batteries and discarded units. Copyright This product contains copyright technology which is protected pursuant to the patents that are the property of Macrovision Corporation and other copyright holders. Any use of this copyright technology must be approved by Macrovision Corporation. The technology is intended for use in the home unless otherwise approved by Macrovision Corporation. Breakdown and disassembly are prohibited. Made under license from Dolby Laboratories. “Dolby” and the double “D” symbol are trademarks of Dolby Laboratories. “DTS” and “DTS Digital Out” are trademarks of Digital Theater Systems, Inc. Warranty certificate KiSS provides a twenty-four (24) month warranty from the date of purchase against material and manufacturing defects. For defects covered by the warranty, the product must be returned to the dealer that sold the product. Terms of Warranty 1. The warranty is only valid on presentation of the original sales receipt, and if the serial number on the product is fully legible. 2. The obligations of KiSS are limited either to repair or replacement of defective components. The repair or replacement of defective components is based on an assessment by KiSS. Exchange is only possible if the repair cannot be performed. 3. Warranty repairs must be carried out by an authorised KiSS dealer, or an authorised service centre. No remuneration is provided for repairs performed by unauthorised workshops. Any repairs or damage to the product caused by unauthorised intervention are not covered by this warranty. 4. This product will not be considered as being defective, either in materials or in manufacture, if adaptation to national, local, technical or safety-related requirements is required in countries other than the specific country for which the product was originally designed and manufactured. 5. This warranty does not cover these types of adaptations, and no remuneration will be offered for these types of adaptations or for any consequential damages. The warranty does not cover the following: a) Periodic inspection, maintenance and repair or replacement of parts resulting from normal wear. b) Costs connected to transport, disassembly or installation of the product. c) Misuse, including use for purposes other than was intended, or faulty installation. d) Damage caused by lightning, water, fire, natural catastrophes, war, insurrection, incorrect line voltage, insufficient ventilation or other causes outside the control of KiSS. 6. This warranty applies to every legal owner of the product during the warranty period. Packaging If possible, use the original packing material for any shipping. Otherwise, repack the DP-600 using: • A reinforced cardboard box, strong enough to carry the weight of the product. • At least 6 cm/2.36 inches of shock-absorbing material around the product. • Non-abrasive, dust-free material for the other parts. • Non-abrasive wrapping for the product. (dust and dirt cover). • Repack the product in such a way as to ensure that it cannot shift in the box during transport. • No other alternative will be accepted. Information we must receive before repairing the product: Model name: KiSS DVD Player DP-600 Ser…
Text truncated - open the document above for the full version.
Contact Information
Applicant
Po-Wen Cheng(Regulatory Compliance Manager)
Test Firm
DT&C Co.,Changho Lee
Technical Specifications
| # | Rule Parts | Frequency Range | Power Output |
|---|---|---|---|
| 1 | 15C | 2.41 GHz - 2.46 GHz | 30.50 mW |
Other Applications from LINKSYS LLC

Q87-WDS060
Aug 11, 2020WiFi Smart Light Switch with Dimmer
Equipment Class
DTS - Digital Transmission System
Q87-03564
Jun 28, 2020Linksys Tri-Band Wireless-AC Router
Equipment Class
NII - Unlicensed National Information Infrastructure TX
Q87-03566
Jun 23, 2020Linksys Tri-Band Wireless-AC Router
Equipment Class
NII - Unlicensed National Information Infrastructure TX
Q87-03530
Apr 29, 2020Linksys MAX-STREAM AC1900+ WiFi Range Extender
Equipment Class
NII - Unlicensed National Information Infrastructure TX
Q87-08151
Mar 30, 2020Linksys Dual-Band 802.11ax Wireless Router
Equipment Class
DTS - Digital Transmission System