Q87-WUSB11-V28Wireless-B USB Network Adapter
LINKSYS LLC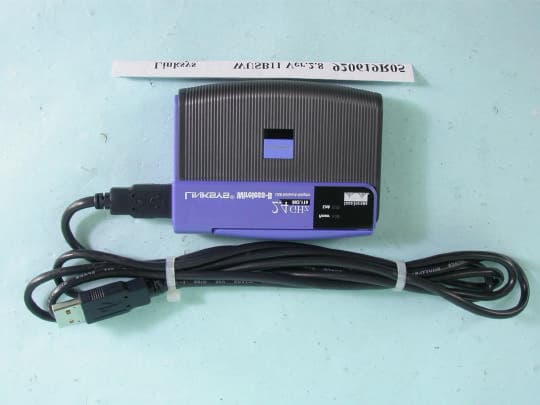
Click to zoom
Application Details
- Equipment Class
- DTS - Digital Transmission System
- Date of Grant
- Jul 09, 2003
- Application Purpose
- Original Equipment
- Date of Application
- Jul 09, 2003
- Equipment Note
- Wireless-B USB Network Adapter
- Frequency Range
- 2412.00000000 - 2462.00000000
- Company
- LINKSYS LLC
- Country
- United States
Documents & Files
Document Text
Text extracted from the exhibit documents filed with the FCC. Open a document above to read the original.
Users Manual
Wireless-B USB Network Adapter Use this guide to install:WUSB11 User Guide COPYRIGHT & TRADEMARKS Specifications are subject to change without notice. Linksys is a registered trademark ortrademark of Cisco Systems, Inc. and/or its affiliates in the U.S. and certain other coun-tries. Copyright © 2003 Cisco Systems, Inc. All rights reserved. Other brands and prod-uct names are trademarks or registered trademarks of their respective holders.LIMITED WARRANTYLinksys warrants to the original end user purchaser ("You") that, for a period of one year, (the"Warranty Period”). Your Linksys product will be free of defects in materials and workmanshipunder normal use. Your exclusive remedy and Linksys's entire liability under this warranty willbe for Linksys at its option to repair or replace the product or refund Your purchase price lessany rebates.If the product proves defective during the Warranty Period call Linksys Technical Support inorder to obtain a Return Authorization Number. BE SURE TO HAVE YOUR PROOF OF PUR-CHASE ON HAND WHEN CALLING. When returning a product, mark the Return AuthorizationNumber clearly on the outside of the package and include a copy of your original proof of pur-chase. RETURN REQUESTS CANNOT BE PROCESSED WITHOUT PROOF OF PURCHASE.You are responsible for shipping defective products to Linksys. Linksys pays for UPS Groundshipping from Linksys back to You only. Customers located outside of the United States ofAmerica and Canada are responsible for all shipping and handling charges. ALL IMPLIED WARRANTIES AND CONDITIONS OF MERCHANTABILITY OR FITNESS FOR APARTICULAR PURPOSE ARE LIMITED TO THE DURATION OF THE WARRANTY PERIOD. ALLOTHER EXPRESS OR IMPLIED CONDITIONS, REPRESENTATIONS AND WARRANTIES,INCLUDING ANY IMPLIED WARRANTY OF NON-INFRINGEMENT, ARE DISCLAIMED. Somejurisdictions do not allow limitations on how long an implied warranty lasts, so the above limi-tation may not apply to You. This warranty gives You specific legal rights, and You may alsohave other rights which vary by jurisdiction.TO THE EXTENT NOT PROHIBITED BY LAW, IN NO EVENT WILL LINKSYS BE LIABLE FORANY LOST DATA, REVENUE OR PROFIT, OR FOR SPECIAL, INDIRECT, CONSEQUENTIAL,INCIDENTAL OR PUNITIVE DAMAGES, HOWEVER CAUSED REGARDLESS OF THE THEORYOF LIABILITY, ARISING OUT OF OR RELATED TO THE USE OF OR INABILITY TO USE THEPRODUCT, EVEN IF LINKSYS HAS BEEN ADVISED OF THE POSSIBILITY OF SUCH DAM-AGES. IN NO EVENT WILL LINKSYS' LIABILITY EXCEED THE AMOUNT PAID BY YOU FORTHE PRODUCT. The foregoing limitations will apply even if any warranty or remedy provided under this Sectionfails of its essential purpose. Some jurisdictions do not allow the exclusion or limitation of inci-dental or consequential damages, so the above limitation or exclusion may not apply to You.Please direct all inquiries to: Linksys, P.O. Box 18558, Irvine, CA 92623. FCC STATEMENTThis IWireless-B USB Network Adapter has been tested and complies with the specificationsfor a Class B digital device, pursuant to Part 15 of the FCC Rules. These limits are designedto provide reasonable protection against harmful interference in a residential installation. Thisequipment generates, uses, and can radiate radio frequency energy and, if not installed andused according to the instructions, may cause harmful interference to radio communications.However, there is no guarantee that interference will not occur in a particular installation. If thisequipment does cause harmful interference to radio or television reception, which is found byturning the equipment off and on, the user is encouraged to try to correct the interference byone or more of the following measures:• Reorient or relocate the receiving antenna• Increase the separation between the equipment or devices• Connect the equipment to an outlet other than the receiver’s• Consult a dealer or an experienced radio/TV technician for assistanceFCC Caution: Any changes or modifications nor expressly approved by the party responsiblefor compliance could void the user's authority to operate this equipment.This device complies with Part 15 of the FCC Rules. Operation is subject to the following twoconditions: (1) This device may not cause harmful interference, and (2) This device mustaccept any interference received, including interference that may cause undesired operation.FCC RF Radiation Exposure StatementThis device and its antenna(s) must operate with a separation distance of at least 20 cm fromall persons and must not be co-located or operating in conjunction with any other antenna ortransmitter. End-users must be provided with specific operations for satisfying RF exposurecompliance. INDUSTRY CANADA (CANADA)This Class B digital apparatus complies with Canadian IC-03.Cet appareil numérique de la classe B est conforme à la norme NMB-003 du Canada.The use of this device in a system operating either partially or completely outdoors mayrequire the user to obtain a license for the system according to the Canadian regulations.EC DECLARATION OF CONFORMITY (EUROPE)Linksys Group declares that the product included conforms to the specifications listedbelow, following the provisions of the EMC Directive 89/336/EEC and Low Voltage Directive73/23/EEC:ETS 301489-17, 301 489-1 General EMC requirements for Radio equipment.EN 609 50 SafetyETS 300-328-2 Technical requirements for Radio equipment.Note: This equipment is intended to be used in all EU and EFTA countries. Outdoor use maybe restricted to certain frequencies and/or may require a license for operation. For moredetails, contact Linksys Corporate Compliance.Note: Combinations of power levels and antennas resulting in a radiated power level ofabove 100 mW are considered as not compliant with the above mentioned directive and arenot allowed for use within the European community and countries that have adopted theEuropean R&TTE directive 1999/5/EC and/or the CEPT recommendation Rec 70.03. Formore details on legal combinations of power levels and antennas, contact Lin…
Text truncated - open the document above for the full version.
Users Manual
STEP C 3. Using the velcro strip on the Adapter’s Wall Mount, attach the Adapter to the velcro strip on your wall. If your PC is running Windows XP, proceed to “Chapter 6: Driver Installation and Configuration for Windows XP.” If your PC is running Windows 98SE, Me, or 2000, the installation of the Wireless-B USB Network Adapter is complete. If you want to check the link information, search for available wireless networks, or make addi- tional configuration changes, proceed to “Chapter 7: Using the WLAN Monitor for Windows 98SE, Me, and 2000.” 13 1. Attach the separate adhesive strip of vel- cro to the wall where you will be mount-ing the Adapter. 2. To attach the Wall Mount to the Adapter, slide the Wall Mount into the grooves onthe back panel of the Adapter, as shown inSteps A, B, and C.STEP ASTEP B 12 Figure 5-6 Figure 5-7Figure 5-8 Figure 5-9 15 14 2. When Windows has finished installing the driver, click the Finish button. You have now completed the driver installation for the Wireless-B USB Network Adapter. To configure the Adapter, pro- ceed to the next section, “Windows XP Wireless Zero Configuration.” Figure 6-2 Chapter 6: Driver Installation andConfiguration for Windows XPAfter connecting the Adapter to your computer, you will install the driver andconfigure the Adapter.1. Windows XP will automatically detect the Adapter. Insert the Setup CD- ROM into your CD-ROM drive. Click the radio button next to Install the software automatically (Recommended) . Then click the Next button. Important for Windows XP users: Do NOT run the Wireless USB Network Adapter Setup Wizard. If the Setup Wizard runs automatical-ly after the Setup CD-ROM has been inserted, click the Exit button. Figure 6-1 OverviewDriver Installation for Windows XP 3. If WEP is enabled, the screen in Figure 6-5 willappear. Enter the WEP keyof your wireless network inthe Network key field, and re-enter it in the Confirm network key field. Then click the Connect button, and go to step 4. 4. The screen in Figure 6-6 will appear if your connection is active.For more information about wireless networking on a Windows XP computer,click Start and then Help and Support . Enter the keyword wireless in the field provided, and press the Enter key. Congratulations! The installation of the Wireless-B USB Network Adapter is complete. 17 16 1. After installing the Adapter, the Windows XP WirelessZero Configuration iconwill appear in your comput-er’s system tray (see Figure6-3). Double-click the icon. 2. The screen that appears will show any available wireless network. Select the network you want. If this network has WEPencryption enabled, go tostep 3.If this network does nothave WEP encryptionenabled, then Figure 6-4will appear. Make sure thebox next to Allow me to connect to the selectedwireless network, eventhough it is not secure is checked. Then click theConnect button, and go to step 4. Windows XP Wireless Zero Configuration Note for Windows XP users: Windows XP has a built-in configura- tion tool. Use Windows XP Wireless Zero Configuration (in the sys-tem tray at the bottom of your screen) to configure the Adapter. Figure 6-3 Figure 6-5 Note: Steps 2 and 3 are the instructions and screenshots for Windows XP with Service Pack 1 installed.If you have not installed Service Pack 1, select the network you want,and click the Connect button. If the network has WEP encryption enabled, enter the WEP key in the Network key field, and then click the Connect button. Note: Windows XP Wireless Zero Configuration does not support the use of a passphrase. Enter the exact WEP key used by your accesspoint. Figure 6-4 Figure 6-6 The Link Information screen displays network mode, signal strength, and link quality information about the current connection. It also provides a button toclick for additional status information. Ad-Hoc Mode or Infrastructure Mode - The screen indicates whether the Adapter is currently working in ad-hoc or infrastructure mode.Signal Strength - The Signal Strength bar indicates signal strength, from 0 to 100%. Link Quality - The Link Quality bar indicates the quality of the wireless net- work connection, from 0 to 100%.Click the More Information button to view additional information about the wireless network connection.Click the X (Close) button in the upper right corner to exit the WLAN Monitor. 19 18 Link Information Figure 7-3 Chapter 7: Using the WLAN Monitorfor Windows 98SE, Me, and 2000Use the WLAN Monitor to check the link information, search for availablewireless networks, or create profiles that hold different configuration settings.After installing the Adapter, the Wireless-B USB NetworkAdapter WLAN Monitor icon will appear in your system tray.Double-click the icon (see Figure 7-1).The Link Information screen will appear. From this screen, you can find out how strong the current wireless signal is and how good the connection’s quali-ty is. You can also click the More Information button to view additional sta- tus information about the current wireless connection. To search for availablewireless networks, click the Site Survey tab. To perform configuration changes, clickthe Profiles tab. Figure 7-1 Figure 7-2 Important for Windows XP users: Windows XP has a built-in configuration tool. Use the Windows XP Wireless Zero Configuration (in the system tray at the bottom of your screen) to configure the Adapter. See “Chapter 6: Driver Installation and Configuration forWindows XP.” Accessing the WLAN MonitorOverview 21 Wireless Network StatusStatus - The status of the wireless network connection. SSID - The SSID of the wireless network. Network Mode - The wireless mode currently in use. Transfer Rate - The data transfer rate of the current connection. Channel - The channel to which the wireless network devices are set. WEP - The status of the WEP encryption security feature. MAC - The MAC address of the wireless network’s access point. TCP/IP SettingIP Address - The IP Address of the Adapter. Subnet Mask - The Subnet Mask…
Text truncated - open the document above for the full version.
Users Manual
3. If WEP is enabled, the screen in Figure 6-5 willappear. Enter the WEP keyof your wireless network inthe Network key field, and re-enter it in the Confirm network key field. Then click the Connect button, and go to step 4. 4. The screen in Figure 6-6 will appear if your connection is active.For more information about wireless networking on a Windows XP computer,click Start and then Help and Support . Enter the keyword wireless in the field provided, and press the Enter key. Congratulations! The installation of the Wireless-B USB Network Adapter is complete. 17 16 1. After installing the Adapter, the Windows XP WirelessZero Configuration iconwill appear in your comput-er’s system tray (see Figure6-3). Double-click the icon. 2. The screen that appears will show any available wireless network. Select the network you want. If this network has WEPencryption enabled, go tostep 3.If this network does nothave WEP encryptionenabled, then Figure 6-4will appear. Make sure thebox next to Allow me to connect to the selectedwireless network, eventhough it is not secure is checked. Then click theConnect button, and go to step 4. Windows XP Wireless Zero Configuration Note for Windows XP users: Windows XP has a built-in configura- tion tool. Use Windows XP Wireless Zero Configuration (in the sys-tem tray at the bottom of your screen) to configure the Adapter. Figure 6-3 Figure 6-5 Note: Steps 2 and 3 are the instructions and screenshots for Windows XP with Service Pack 1 installed.If you have not installed Service Pack 1, select the network you want,and click the Connect button. If the network has WEP encryption enabled, enter the WEP key in the Network key field, and then click the Connect button. Note: Windows XP Wireless Zero Configuration does not support the use of a passphrase. Enter the exact WEP key used by your accesspoint. Figure 6-4 Figure 6-6 The Link Information screen displays network mode, signal strength, and link quality information about the current connection. It also provides a button toclick for additional status information. Ad-Hoc Mode or Infrastructure Mode - The screen indicates whether the Adapter is currently working in ad-hoc or infrastructure mode.Signal Strength - The Signal Strength bar indicates signal strength, from 0 to 100%. Link Quality - The Link Quality bar indicates the quality of the wireless net- work connection, from 0 to 100%.Click the More Information button to view additional information about the wireless network connection.Click the X (Close) button in the upper right corner to exit the WLAN Monitor. 19 18 Link Information Figure 7-3 Chapter 7: Using the WLAN Monitorfor Windows 98SE, Me, and 2000Use the WLAN Monitor to check the link information, search for availablewireless networks, or create profiles that hold different configuration settings.After installing the Adapter, the Wireless-B USB NetworkAdapter WLAN Monitor icon will appear in your system tray.Double-click the icon (see Figure 7-1).The Link Information screen will appear. From this screen, you can find out how strong the current wireless signal is and how good the connection’s quali-ty is. You can also click the More Information button to view additional sta- tus information about the current wireless connection. To search for availablewireless networks, click the Site Survey tab. To perform configuration changes, clickthe Profiles tab. Figure 7-1 Figure 7-2 Important for Windows XP users: Windows XP has a built-in configuration tool. Use the Windows XP Wireless Zero Configuration (in the system tray at the bottom of your screen) to configure the Adapter. See “Chapter 6: Driver Installation and Configuration forWindows XP.” Accessing the WLAN MonitorOverview 21 Wireless Network StatusStatus - The status of the wireless network connection. SSID - The SSID of the wireless network. Network Mode - The wireless mode currently in use. Transfer Rate - The data transfer rate of the current connection. Channel - The channel to which the wireless network devices are set. WEP - The status of the WEP encryption security feature. MAC - The MAC address of the wireless network’s access point. TCP/IP SettingIP Address - The IP Address of the Adapter. Subnet Mask - The Subnet Mask of the Adapter. Default Gateway - The Default Gateway address of the Adapter. DNS - The DNS address of the Adapter. DHCP - The status of the DHCP client. Save to Profile - Click the Save to Profile button to save the current settings in a configuration profile. Then the Create connection profile screen will appear. Enter a name for the new profile, and click the OK button. Click the Back button to return to the initial Link Information screen. Click the X (Close) button in the upper right corner to exit the WLAN Monitor. 20 The Site Survey screen displays a list of infrastructure and ad-hoc networks available for connection. For all networks detected, the following are listed:SSID - The SSID, unique name, of the wireless network. Signal - The qualitative strength of the wireless signal. Site InformationFor each network selected, the following settings are listed:Network Mode - The wireless mode currently in use. Channel - The channel to which the wireless network devices are set. WEP - The status of the WEP encryption security feature. MAC - The MAC address of the wireless network’s access point. Surveyed at - The time at which the wireless network was scanned. Refresh - Click the Refresh button to perform a new search for wireless devices. Figure 7-5 Site Survey Figure 7-4 23 Connect - To connect to one of the networks on the list, select the wireless net- work , and click the Connect button. If the wireless network has WEP encryp- tion enabled, you will see the screen shown in Figure 7-6.In the WEP drop-down box, select the type of WEP encryption used by the wireless network: 64-bit / 10 hex. characters or 128-bit / 26 hex. characters . If the wireless network uses a passphrase, enter the passphrase in thePassphrase field. If the…
Text truncated - open the document above for the full version.
Users Manual
21 Wireless Network StatusStatus - The status of the wireless network connection. SSID - The SSID of the wireless network. Network Mode - The wireless mode currently in use. Transfer Rate - The data transfer rate of the current connection. Channel - The channel to which the wireless network devices are set. WEP - The status of the WEP encryption security feature. MAC - The MAC address of the wireless network’s access point. TCP/IP SettingIP Address - The IP Address of the Adapter. Subnet Mask - The Subnet Mask of the Adapter. Default Gateway - The Default Gateway address of the Adapter. DNS - The DNS address of the Adapter. DHCP - The status of the DHCP client. Save to Profile - Click the Save to Profile button to save the current settings in a configuration profile. Then the Create connection profile screen will appear. Enter a name for the new profile, and click the OK button. Click the Back button to return to the initial Link Information screen. Click the X (Close) button in the upper right corner to exit the WLAN Monitor. 20 The Site Survey screen displays a list of infrastructure and ad-hoc networks available for connection. For all networks detected, the following are listed:SSID - The SSID, unique name, of the wireless network. Signal - The qualitative strength of the wireless signal. Site InformationFor each network selected, the following settings are listed:Network Mode - The wireless mode currently in use. Channel - The channel to which the wireless network devices are set. WEP - The status of the WEP encryption security feature. MAC - The MAC address of the wireless network’s access point. Surveyed at - The time at which the wireless network was scanned. Refresh - Click the Refresh button to perform a new search for wireless devices. Figure 7-5 Site Survey Figure 7-4 23 Connect - To connect to one of the networks on the list, select the wireless net- work , and click the Connect button. If the wireless network has WEP encryp- tion enabled, you will see the screen shown in Figure 7-6.In the WEP drop-down box, select the type of WEP encryption used by the wireless network: 64-bit / 10 hex. characters or 128-bit / 26 hex. characters . If the wireless network uses a passphrase, enter the passphrase in thePassphrase field. If the wireless network uses a WEP key, enter the WEP key in the Key 1 field. Click the OK button to complete the network connection and return to the Site Survey screen, or click the Cancel button to cancel the network connection and return to the Site Survey screen. On the Site Survey screen, click the X (Close) button in the upper right corner to exit the WLAN Monitor. 22 The Profiles screen lets you save different configuration profiles for different network setups. You can also import or export profiles. The default profileholds the initial configuration saved when you ran the Setup Wizard.For all profiles, the following are listed:Profile - Name of the connection profile. SSID - The wireless network’s SSID, as set in the connection profile. Profile InformationFor each profile selected, the following are listed:Network Mode - The mode of the wireless network currently in use. Transfer Rate - The Adapter is set to Auto mode, so it will dynamically shift to the fastest data transfer rate possible at any given time.Channel - The channel to which the wireless network devices are set. WEP - The status of the WEP encryption security feature. Connect - To connect to a wireless network using a specific profile, select the profile , and click the Connect button. Edit - Select a profile, and click the Edit button to change an existing profile. New - Click the New button to create a new profile. See the next section, “Creating a New Profile,” for detailed instructions. Figure 7-7 Profiles Figure 7-6 1. On the Profiles screen, click the New button to create a new profile. 2. Enter a name for the new profile, and click the OK button. Click the Cancel button to return to the Profiles screen. 25 24 Creating a New Profile Figure 7-11Figure 7-10 Import - Click the Import button to import a profile that has been saved in another location. Select the appropriate file, and click the Open button. Export - Select the profile you want to save in a different location, and click the Export button. Direct Windows to the appropriate folder, and click the OK button.Delete - Click the Delete button to delete a profile. Click the X (Close) button in the upper right corner to exit the WLAN Monitor. Figure 7-8Figure 7-9 Note: If you want to export more than one profile, you have to export them one at a time. 27 26 4. The Network Mode screen shows a choice of two network modes. Click the Infrastructure Mode radio button if you want your wireless computers to communicate with computers on your wired network via a wireless accesspoint. Click the Ad-Hoc Mode radio button if you want multiple wireless computers to communicate directly with each other. Then complete the SSID field. Click the Next button to continue or the Back button to return to the previous screen. Infrastructure Mode - This mode allows wireless and wired networks to communicate through an access point.Ad-Hoc Mode - This mode allows wireless-equipped computers to com- municate directly with each other. No access point is used.SSID - The SSID is the unique name shared by all devices in a wireless net- work. The SSID must be identical for all devices in the wireless network. Itis case-sensitive and must not exceed 32 characters (use any of the charac-ters on the keyboard). Make sure this setting is the same for all devices inyour wireless network. Figure 7-13 3. The Network Setting screen will appear next. If your network has a DHCP server, click the radio button next to Obtain an IP address automatically (DHCP) . Click the Next button to continue, or click the Cancel button to return to the Profiles screen. If your network does not have a DHCP server, click the radio button next toSpecify the IP Address . Enter an IP Address …
Text truncated - open the document above for the full version.
Cover Letter(s)
American Telecommunications Certification Body Inc. 6731 Whittier Ave, McLean, VA 22101 July 9, 2003 RE: Cisco-Linksys, LLC FCC ID: 17401 Armstrong Avenue I have a few comments on this Application. 1.) Please supply External Photographs for this device. 2.) Please supply Internal Photographs for this device. 3.) The RF Pout listed in the Test Report does not match the Form 731. 4.) The RF Pout listed in the RF Exposure information does not match Form 731. 5.) The Users Manual is broken up into five pieces that total over 15.8MB. I dare not upload this Manual in present form to the FCC website. Please supply a much, much smaller manual. 6.) Although a Label is supplied, there is no information as to where it will be located on this device. Please supply location information. William H. Graff President and Examining Engineer mailto: [email protected] The items indicated above must be submitted before processing can continue on the above referenced application. Failure to provide the requested information may result in application termination. Correspondence should be considered part of the permanent submission and may be viewed from the Internet after a Grant of Equipment Authorization is issued. Please do not respond to this correspondence using the email reply button. In order for your response to be processed expeditiously, you must submit your documents through the AmericanTCB.com website. Also, please note that partial responses increase processing time and should not be submitted. Any questions about the content of this correspondence should be directed to the sender.
External Photos
Page 1 CONSTRUCTION PHOTOS OF EUT Page 2
Internal Photos
Page 1 CONSTRUCTION PHOTOS OF EUT Page 2 Page 3 Page 4
Operational Description
FCC ID: Q87-WUSB11-V28 ADT No.920619R05 Operational Description The transmitter of the EUT (Wireless-B USB Network Adapter) is powered by host equipment. The antenna types are Dipole antennas without antenna connector. The other instruction, please have a look at the users manual. DSSS Information This device is Direct Sequence Spread Spectrum, the data is mixed by pseudorandom code which is an orthogonal code. The mixed data is digital modulated by BPSK and QPSK technique depends on the data rates. The CCK coding is applied for increasing the data rate, and also the processing gain will be increased. The bit rates are 1,2,5.5,11Mbps, the symbol rates are 1,1,1.375,1.375Mbps, the chip rates are always 11Mbps. So, the Chip/symbol is 11,11,8 and 8 respectively. Although is higher bit rate, the processing gain is lower than 10, but the CCK coding used in higher bit rate will provide 2.2dB coding gain.
RF Exposure Info
FCC ID: Q87-WUSB11-V28 ADT No.: 920619R05 FCC TEST REPORT REPORT NO.: RF920619R05 MODEL NO.: WUSB11 Ver.2.8 ACCORDING: FCC Guidelines for Human Exposure IEEE C95.1 APPLICANT:Cisco-Linksys, LLC ADDRESS:17401 Armstrong Avd., Irvine, CA 92614 ISSUED BY:Advance Data Technology Corporation LAB LOCATION:47 14th Lin, Chiapau Tsun, Linko, Taipei, Taiwan, R.O.C. 0528 ILAC MRA Lab Code: 200102-0 FCC ID: Q87-WUSB11-V28 ADT No.: 920619R05 RF Exposure Measurement (Mobile Device) 1. Introduction 2.4GHz frequency band is regarded specially as a dangerous band for its heating harmfulness to the human body. That’s why microwave oven is operating in this frequency band. The manufacturer whose product is working in this frequency band is obligatory to prove the harmfulness of his product. In this document, we try to prove the safety of radiation harmfulness to the human body for our product. The limit for Maximum Permissible Exposure (MPE) specified in FCC 1.1310 is followed. The Gain of the antenna used in this product is measured in a Fully Anechoic Chamber (FAC), and the maximum total power input to the antenna is measured. Through the Friis transmission formula and the maximum gain of the antenna, we can calculate the distance, away from the product, where the limit of MPE is reached. 2. RF Exposure Limit According to FCC 1.1310: The criteria listed in the following table shall be used to evaluate the environmental impact of human exposure to radio-frequency (RF) radiation as specified in 1.1307(b). FCC ID: Q87-WUSB11-V28 ADT No.: 920619R05 LIMITS FOR MAXIMUM PERMISSIBLE EXPOSURE (MPE) Frequency Range (MHz) Electric Field Strength (V/m) Magnetic Field Strength (A/m) Power Density (mW/cm 2 ) Average Time (minutes) (A)Limits For Occupational / Control Exposures 30-30061.40.1631.06 300-1500......F/3006 1500-100,000......56 (B)Limits For General Population / Uncontrolled Exposure 30-30027.50.0730.230 300-1500......F/150030 1500-100,000......1.030 F = Frequency in MHz 3. Friis Formula Friis transmission formula : Pd = (Pout*G) / (4*pi*r 2 ) where Pd = power density in mW/cm 2 Pout = output power to antenna in mW G = gain of antenna in linear scale Pi = 3.1416 R = distance between observation point and center of the radiator in cm If we know the maximum Gain of the antenna and the total power input to the antenna, through the calculation, we will know the MPE value at distance 2.5cm. Ref. : David K. Cheng, Field and Wave Electromagnetics, Second Edition, Page 640, Eq. (11-133). 4. EUT Operating condition The software provided by Manufacturer enabled the EUT to transmit and receive data at lowest, middle and highest channel individually. FCC ID: Q87-WUSB11-V28 ADT No.: 920619R05 5. Classification The antenna of the product, under normal use condition, is at least 20cm away from the body of the user. Warming statement for keeping 20cm separation distance and the prohibition of operating next to a person has been printed on the user’s manual. So, this product is classified as the Mobile Device. 6. Test Results 6.1. Antenna Gain The maximum Gain measured in Fully Anechoic Chamber is 1dBi or 1.26(numeric). 6.2. Output Power Into Antenna & MPE value at distance 20cm: Channel Channel Frequency (MHz) Output Power to Antenna (mW) Power Density (mW/cm 2 ) Limit of Power Density (mW/cm 2 ) 1241238.550.00971.0 6243738.900.00981.0 11246238.020.00951.0
Test Report
FCC ID: Q87-…
Text truncated - open the document above for the full version.
Contact Information
Applicant
Po-Wen Cheng(Regulatory Compliance Manager)
Technical Contact
Advance Data Technology CorporationEllis Wu
[email protected]+886 3 327 0910
13-1, Lane 19, WenShan 3rd St. · Taoyuan · Taiwan
Test Firm
Bureau Veritas CPS (H.K.) Ltd. Taoyuan BranchRichard Chen
Technical Specifications
| # | Rule Parts | Frequency Range | Power Output |
|---|---|---|---|
| 1 | 15C | 2.41 GHz - 2.46 GHz | 39.00 mW |
Other Applications from LINKSYS LLC

Q87-WDS060
Aug 11, 2020WiFi Smart Light Switch with Dimmer
Equipment Class
DTS - Digital Transmission System
Q87-03564
Jun 28, 2020Linksys Tri-Band Wireless-AC Router
Equipment Class
NII - Unlicensed National Information Infrastructure TX
Q87-03566
Jun 23, 2020Linksys Tri-Band Wireless-AC Router
Equipment Class
NII - Unlicensed National Information Infrastructure TX
Q87-03530
Apr 29, 2020Linksys MAX-STREAM AC1900+ WiFi Range Extender
Equipment Class
NII - Unlicensed National Information Infrastructure TX
Q87-08151
Mar 30, 2020Linksys Dual-Band 802.11ax Wireless Router
Equipment Class
DTS - Digital Transmission System