DZL201824Cordless Numpad
Logitech Inc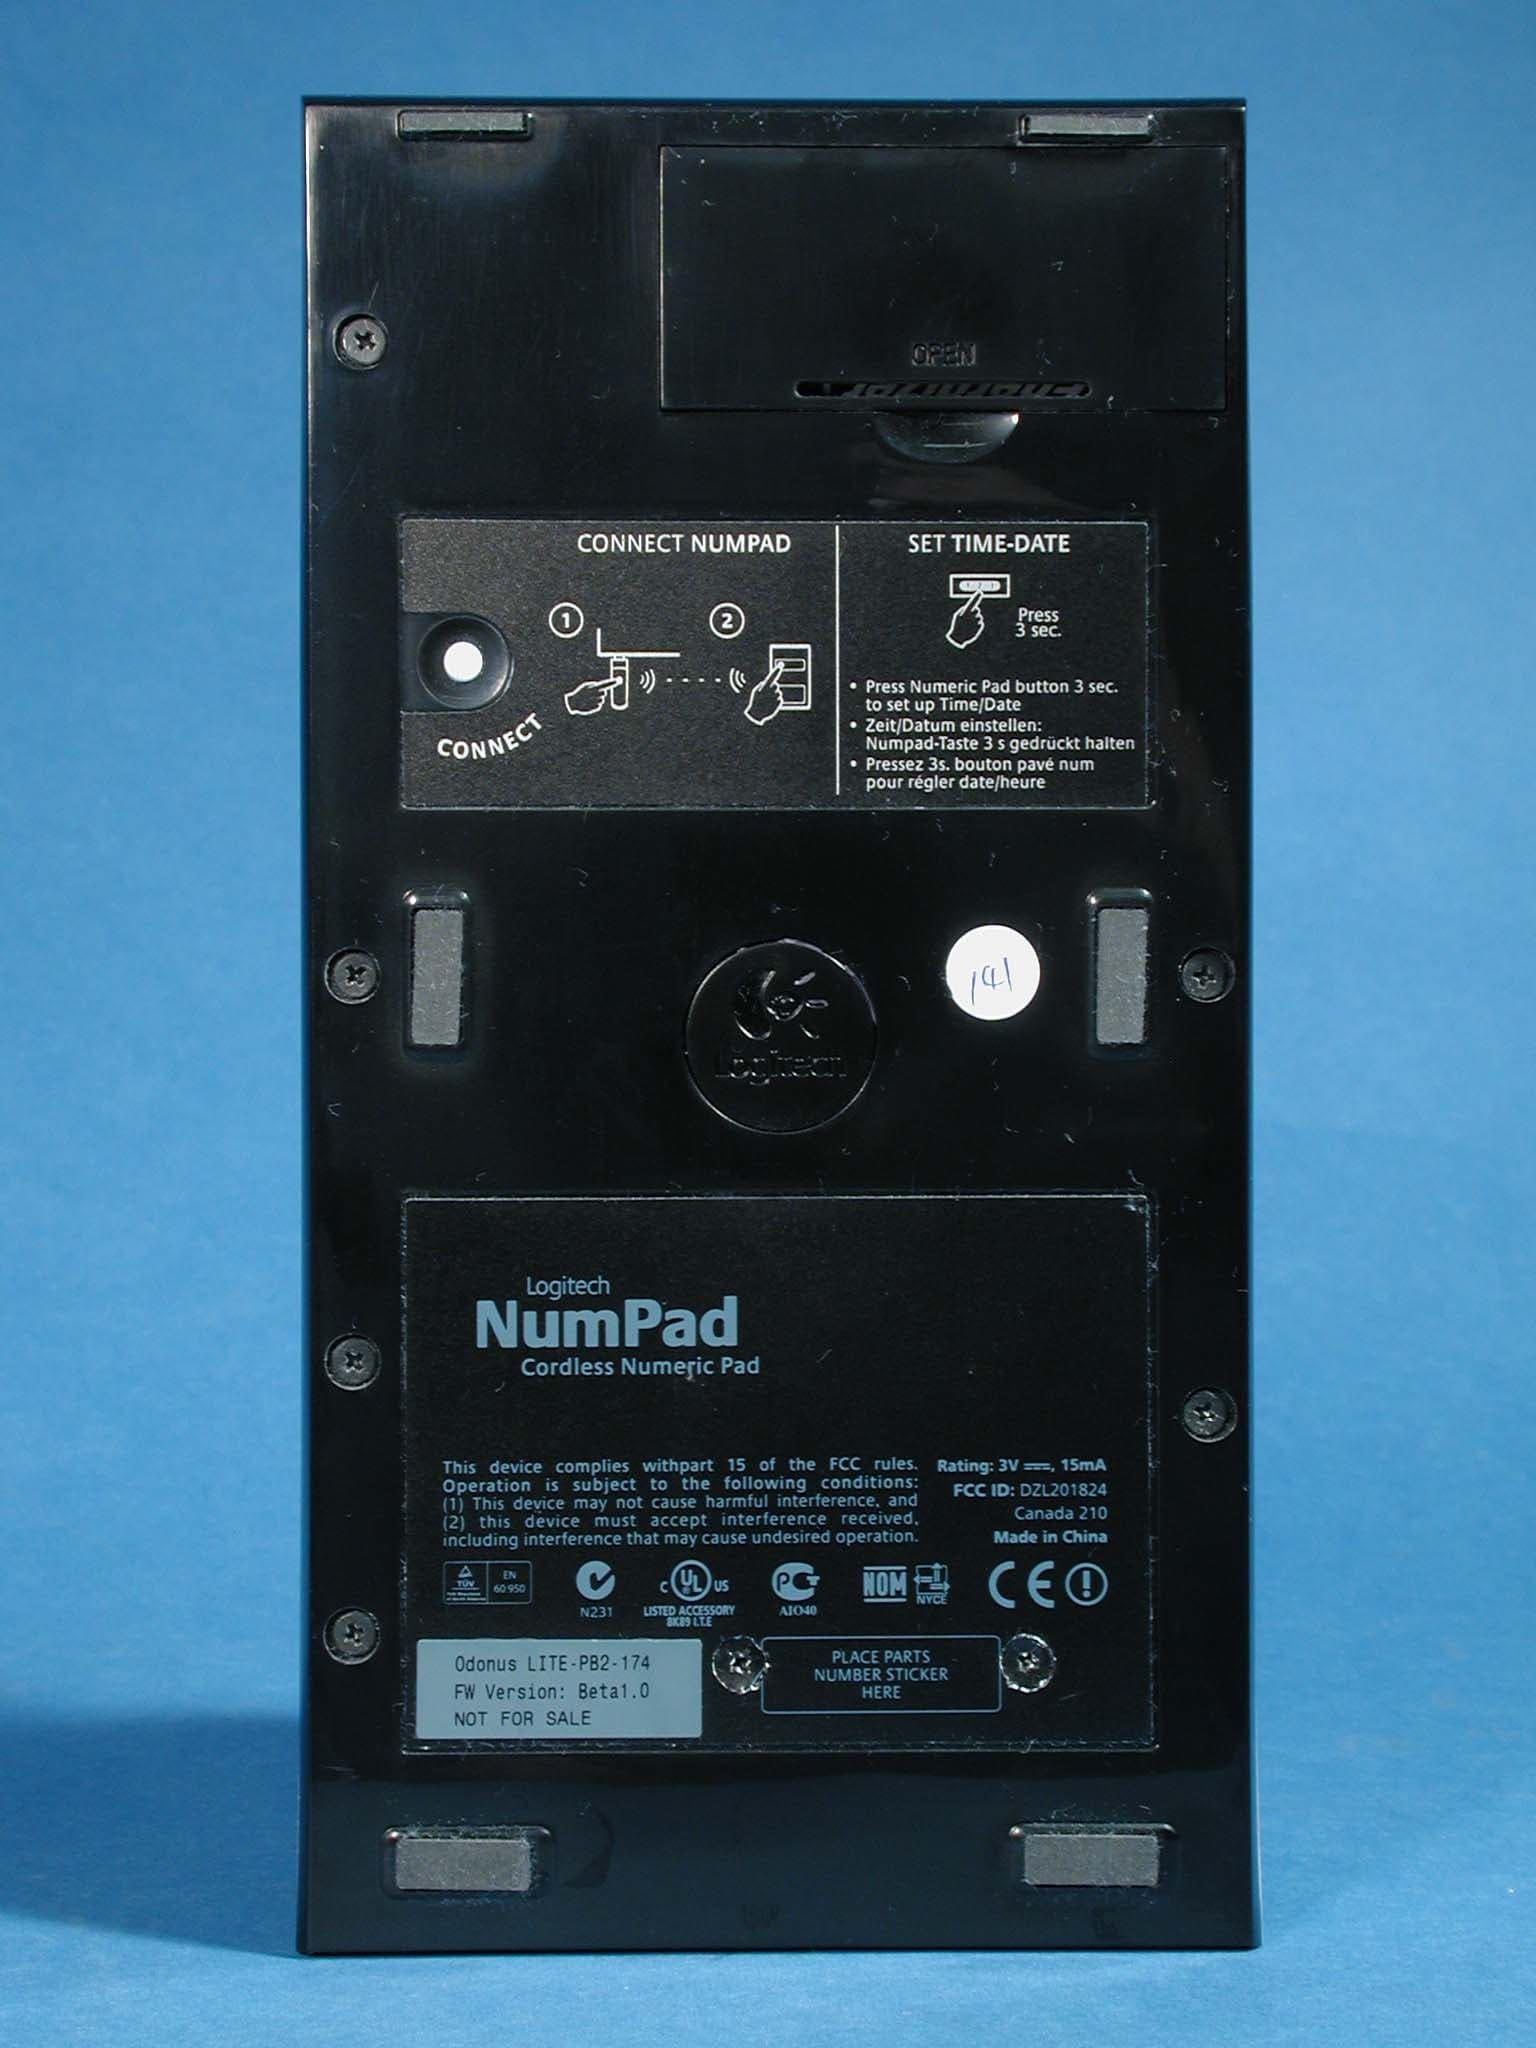
Click to zoom
Application Details
- Equipment Class
- DXX - Part 15 Low Power Communication Device Transmitter
- Date of Grant
- Aug 18, 2004
- Application Purpose
- Original Equipment
- Date of Application
- Aug 18, 2004
- Equipment Note
- Cordless Numpad
- Frequency Range
- 27.14500000 - 27.14500000
- Company
- Logitech Inc
- Country
- United States
Documents & Files
Document Text
Text extracted from the exhibit documents filed with the FCC. Open a document above to read the original.
Users Manual
Installation Guide English Laptop: Plug wireless mini-receiver directly into computer's USB port. Desktop and docking station: 1) Plug USB stand into computer’s USB port. 2) Plug wirless mini-receiver into the USB stand. Important: You must plug in the mini-receiver in both configurations to make the mouse, keyboard, and Numeric Pad work. Español Laptop: Plug wireless mini-receiver directly into computer's USB port. Desktop and docking station: 1) Plug USB stand into computer’s USB port. 2) Plug wirless mini-receiver into the USB stand. Important: You must plug in the mini-receiver in both configurations to make the mouse, keyboard, and Numeric Pad work. Français Laptop: Plug wireless mini-receiver directly into computer's USB port. Desktop and docking station: 1) Plug USB stand into computer’s USB port. 2) Plug wirless mini-receiver into the USB stand. Important: You must plug in the mini-receiver in both configurations to make the mouse, keyboard, and Numeric Pad work. Português Laptop: Plug wireless mini-receiver directly into computer's USB port. Desktop and docking station: 1) Plug USB stand into computer’s USB port. 2) Plug wirless mini-receiver into the USB stand. Important: You must plug in the mini-receiver in both configurations to make the mouse, keyboard, and Numeric Pad work. 1 2 CONNECT MEDIAPAD English Install 2 AA alkaline batteries in the mouse, keyboard, and Numeric Pad. Español Install 2 AA alkaline batteries in the mouse, keyboard, and Numeric Pad. Français Install 2 AA alkaline batteries in the mouse, keyboard, and Numeric Pad. Português Install 2 AA alkaline batteries in the mouse, keyboard, and Numeric Pad. 4 L o g i t e c h English To enjoy all the features of the mouse and keyboard, install the software. Español Para disponer de todas las funciones del ratón y del teclado, debe instalar el software. Français Pour profiter pleinement de toutes les fonctions du clavier et de la souris, vous devez installer le logiciel. Português Para utilizar todas as funções do rato e do teclado, instale o software. English Package Contents: 1. Keyboard 2. Numeric Pad 3. Mouse 4. Wireless mini-receiver 5. Desktop USB stand 6. Pouch for mouse and receiver 7. Software 8. Six AA alkaline batteries Español Contenido de la caja: 1. Teclado 2.Teclado numérico 3. Ratón 4. Minirreceptor inalámbrico 5. Soporte USB de sobremesa. 6. Estuche para ratón y receptor 7. Software 8. Seis pilas alcalinas AA Français Contenu: 1. Clavier 2. Pavé numérique 3. Souris 4. Minirécepteur sans fil 5. Support USB de bureau 6. Etui pour la souris et le récepteur 7. Logiciel 8. Six piles alcalines AA Português Conteúdo do pacote: 1. Teclado 2. Teclado numérico 3. Rato 4. Mini-receptor sem fios 5. Suporte USB de secretária 6. Estojo para rato e receptor 7. Software 8. Seis pilhas AA alcalinas English Turn ON computer. Español Encienda el ordenador. Français Mettez l’ordinateur sous tension. Português Ligue o computador. ONON 1 2 3 2 1 ONON 5 9 6 8 English Test all devices. If a device does not work, repeat step 7 for that device only. Español Test all devices. If a device does not work, repeat step 7 for that device only. Français Test all devices. If a device does not work, repeat step 7 for that device only. Português Test all devices. If a device does not work, repeat step 7 for that device only. 7 English Establish a connection for each device separately. Place the device within 30 cm of mini-receiver for this procedure. Keyboard: 1) FIRST, press Connect button on mini-receiver. 2) SECOND, press Connect button under keyboard. 3) Test keyboard. If keyboard is not working, carefully repeat steps 1 and 2. Numeric Pad: 1) FIRST, press Connect button on mini-receiver. 2) SECOND, press Connect button under Numeric Pad. 3) Test Numeric Pad. If Numeric Pad is not working, carefully repeat steps 1 and 2. Mouse: 1) FIRST, press Connect button on mini-receiver, which is connected to PC. 2) SECOND, press Connect button under mouse. 3) Test mouse. If mouse is not working, carefully repeat steps 1 and 2. Español Establish a connection for each device separately. Place the device within 30 cm of mini-receiver for this procedure. Keyboard: 1) FIRST, press Connect button on mini-receiver. 2) SECOND, press Connect button under keyboard. 3) Test keyboard. If keyboard is not working, carefully repeat steps 1 and 2. Numeric Pad: 1) FIRST, press Connect button on mini-receiver. 2) SECOND, press Connect button under Numeric Pad. 3) Test Numeric Pad. If Numeric Pad is not working, carefully repeat steps 1 and 2. Mouse: 1) FIRST, press Connect button on mini-receiver, which is connected to PC. 2) SECOND, press Connect button under mouse. 3) Test mouse. If mouse is not working, carefully repeat steps 1 and 2. Français Establish a connection for each device separately. Place the device within 30 cm of mini-receiver for this procedure. Keyboard: 1) FIRST, press Connect button on mini-receiver. 2) SECOND, press Connect button under keyboard. 3) Test keyboard. If keyboard is not working, carefully repeat steps 1 and 2. Numeric Pad: 1) FIRST, press Connect button on mini-receiver. 2) SECOND, press Connect button under Numeric Pad. 3) Test Numeric Pad. If Numeric Pad is not working, carefully repeat steps 1 and 2. Mouse: 1) FIRST, press Connect button on mini-receiver, which is connected to PC. 2) SECOND, press Connect button under mouse. 3) Test mouse. If mouse is not working, carefully repeat steps 1 and 2. Português Establish a connection for each device separately. Place the device within 30 cm of mini-receiver for this procedure. Keyboard: 1) FIRST, press Connect button on mini-receiver. 2) SECOND, press Connect button under keyboard. 3) Test keyboard. If keyboard is not working, carefully repeat steps 1 and 2. Numeric Pad: 1) FIRST, press Connect button on mini-receiver. 2) SECOND, press Connect button under Numeric Pad. 3) Test Numeric Pad. If Numeric Pad is not working, carefully repeat steps 1 and 2. Mouse: 1) FIRST, press Connec…
Text truncated - open the document above for the full version.
Users Manual
i English 1. Enhanced function keys. 2. Stand by. 3. Internet Home. 4. E-Mail. 5. Internet search. 6. Integrated palm rest. 7. Increases volume. 8. Mutes volume. 9. Decreases volume. 10. Launches default media application. 11. Stop. 12. Next and Previous track. 13. Play/Pause. 14. Numeric Pad LCD. 15. On/Off button. 16. Numeric Pad mode (Press 3 seconds to set up time and date). 17. Calculator mode. Español 1. Teclas de función mejoradas. 2. Espera. 3. Inicio de Internet. 4. Correo electrónico. 5. Búsqueda en Internet. 6. Reposamanos acoplado. 7. Aumento de volumen. 8. Silenciamiento. 9. Reducción de volumen. 10. Inicio de aplicación multimedia predeterminada. 11. Detención. 12. Pista siguiente y anterior. 13. Reproducción/pausa. 14. LCD de teclado numérico. 15. Botón de activación/desactivación. 16. Modo de teclado numérico (pulse 3 segundos para ajusta hora y fecha). 17. Modo de calculadora. Français 1. Touches de fonctions améliorées. 2. Veille. 3. Page d'accueil Internet. 4. E-Mail. 5. Recherche Internet. 6. Appuie-poignets intégré. 7. Augmente le volume. 8. Coupe le volume. 9. Réduit le volume. 10. Lance l'application multimédia par défaut. 11. Arrêt. 12. Piste suivante et précédente. 13. Lecture/Pause. 14. Ecran LCD du pavé numérique. 15. Bouton Marche/Arrêt. 16. Mode Pavé numérique (appuyez pendant 3 secondes pour configurer la date et l'heure). 17. Mode Calculatrice. Português 1. Teclas de função avançadas. 2. Stand by. 3. Home da Internet. 4. E-Mail. 5. Pesquisa de Internet. 6. Apoio para palmas das mãos integrado. 7. Aumenta o volume. 8. Silencia o volume. 9. Diminui o volume. 10. Inicia a aplicação de média predefinida. 11. Parar. 12. Faixa anterior e Próxima faixa. 13. Reproduzir/Pausa. 14. LCD do teclado numérico. 15. Botão On/Off. 16. Modo Teclado numérico (Prima durante 3 segundos para definir a hora e data.). 17. Modo Calculadora. 2 3 4 5 6 7 8 9 10 11 12 13 1 English Solving Setup Problems. 1. Check mini-receiver installation. Mini-receiver must be plugged into a computer USB port for devices to work. Try another USB port. 2. If you experience intermittent performance, try using the desktop USB stand for better reception. Make sure to keep the stand and mini-receiver away from electrical devices; avoid metallic surfaces. 3. Check battery installation of any device that does not work. Establish a connection for any device that does not work. Place the non-working devices within 30 cm of the mini-receiver. Mouse: 1) FIRST, press Connect button on mini-receiver. 2) SECOND, press Connect button under mouse. 3) Test mouse. If mouse is not working, repeat steps 1 and 2. Keyboard: 1) FIRST, press Connect button on mini-receiver. 2) SECOND, press Connect button under keyboard. 3) Test keyboard. If keyboard is not working, repeat steps 1 and 2. Numeric Pad: 1) FIRST, press Connect button on mini-receiver. 2) SECOND, press Connect button under Numeric Pad. 3) Test Numeric Pad. If Numeric Pad is not working, repeat steps 1 and 2. Español Solving Setup Problems. 1. Check mini-receiver installation. Mini-receiver must be plugged into a computer USB port for devices to work. Try another USB port. 2. If you experience intermittent performance, try using the desktop USB stand for better reception. Make sure to keep the stand and mini-receiver away from electrical devices; avoid metallic surfaces. 3. Check battery installation of any device that does not work. Establish a connection for any device that does not work. Place the non-working devices within 30 cm of the mini-receiver. Mouse: 1) FIRST, press Connect button on mini-receiver. 2) SECOND, press Connect button under mouse. 3) Test mouse. If mouse is not working, repeat steps 1 and 2. Keyboard: 1) FIRST, press Connect button on mini-receiver. 2) SECOND, press Connect button under keyboard. 3) Test keyboard. If keyboard is not working, repeat steps 1 and 2. Numeric Pad: 1) FIRST, press Connect button on mini-receiver. 2) SECOND, press Connect button under Numeric Pad. 3) Test Numeric Pad. If Numeric Pad is not working, repeat steps 1 and 2. Français Solving Setup Problems. 1. Check mini-receiver installation. Mini-receiver must be plugged into a computer USB port for devices to work. Try another USB port. 2. If you experience intermittent performance, try using the desktop USB stand for better reception. Make sure to keep the stand and mini-receiver away from electrical devices; avoid metallic surfaces. 3. Check battery installation of any device that does not work. Establish a connection for any device that does not work. Place the non-working devices within 30 cm of the mini-receiver. Mouse: 1) FIRST, press Connect button on mini-receiver. 2) SECOND, press Connect button under mouse. 3) Test mouse. If mouse is not working, repeat steps 1 and 2. Keyboard: 1) FIRST, press Connect button on mini-receiver. 2) SECOND, press Connect button under keyboard. 3) Test keyboard. If keyboard is not working, repeat steps 1 and 2. Numeric Pad: 1) FIRST, press Connect button on mini-receiver. 2) SECOND, press Connect button under Numeric Pad. 3) Test Numeric Pad. If Numeric Pad is not working, repeat steps 1 and 2. Português Solving Setup Problems. 1. Check mini-receiver installation. Mini-receiver must be plugged into a computer USB port for devices to work. Try another USB port. 2. If you experience intermittent performance, try using the desktop USB stand for better reception. Make sure to keep the stand and mini-receiver away from electrical devices; avoid metallic surfaces. 3. Check battery installation of any device that does not work. Establish a connection for any device that does not work. Place the non-working devices within 30 cm of the mini-receiver. Mouse: 1) FIRST, press Connect button on mini-receiver. 2) SECOND, press Connect button under mouse. 3) Test mouse. If mouse is not working, repeat steps 1 and 2. Keyboard: 1) FIRST, press Connect button on mini-receiver. 2) SECOND, press Connect button under keyboard. 3) Test keyboard. I…
Text truncated - open the document above for the full version.
Cover Letter(s)
Logitech Europe S.A. Z.I Moulin du Choc D 1122 Romanel sur Morges Switzerland To: Telefication B.V. Attn: Dept. FCC TCB Edisonstraat 12A 6902 PK ZEVENAAR The Netherlands Subject: Request for short-term FCC confidentiality (FCC ID: DZL201824) Reference number: Y-RX43 Date: August 2,2004 Dear FCC TCB, Persuant to 47 CFR Section 0.459(a) & (b), Logitech Europe S.A. hereby requests short-term FCC confidentiality of the following materials submitted in support of FCC certification application for FCC ID : DZL201824 until September 20, 2004 a. Label and Label placement b. Photographs of overall appearance c. Test report d. Test set-up photographs e. User’s manual f. Internal photographs g. RF exposure/Environmental Evaluation h. Cover letters Above materials contain secrets, proprietary and technical information, which would customarily be quarded from competitors under 47 CFR, section 0.457(d)(2). Disclosure or publication or any portion of this company confidential material to other parties could cause substantial competitive harm and provide unjustified benefits for competitors. Logitech Europe S.A. understands that pursuant to 47 CFR section 0.457(d)(1)(ii) disclosure of the applicant and all accompanying documentation will not be made before the date of the grant. Pascal Bornel Compliance engineer
Cover Letter(s)
Logitech Europe S.A. Z.I Moulin du Choc D 1122 Romanel sur Morges Switzerland To: Telefication B.V. Attn: Dept. FCC TCB Edisonstraat 12A 6902 PK ZEVENAAR The Netherlands Subject: Request for permanent FCC confidentiality (FCC ID: DZL201824) Reference number: Y-RX43 Date: July 14,2004 Dear FCC TCB, Persuant to 47 CFR Section 0.459(a) & (b), Logitech Europe S.A. hereby requests permanent FCC confidentiality of the following materials submitted in support of FCC certification application for FCC ID : DZL201824 a. Block diagram b. Schematic diagrams c. Operational description d. Bill of Material Above materials contain secrets, proprietary and technical information, which would customarily be quarded from competitors under 47 CFR, section 0.457(d)(2). Disclosure or publication or any portion of this company confidential material to other parties could cause substantial competitive harm and provide unjustified benefits for competitors. Logitech Europe S.A. understands that pursuant to 47 CFR section 0.457(d)(1)(ii) disclosure of the applicant and all accompanying documentation will not be made before the date of the grant. Pascal Bornel Compliance engineer
External Photos
Photographs module Page: 1 of 2 Logitech AGY-734733-0000.A0 Photograph 1: Y-RX43 top view Photographs module Page: 2 of 2 Logitech AGY-734733-0000.A0 Photograph 2: Y-RX43 bottom view
ID Label/Location Info
Label location FCC ID: DZL201824 Page 1/1 FCC ID: DZL201824
Internal Photos
Photographs module Page: 1 of 2 Logitech AGY-734733-0000.A0 Photograph 1: Y-RX43 internal view Photographs module Page: 2 of 2 Logitech AGY-734733-0000.A0 Photograph 2: Y-RX43 internal view (PCB)
Test Report
Radio test report 99544231 based on: FCC part 15; subpart C; section 15.227 (10-1-03 edition) Cordless Numpad Logitech Cordless Numpad Y-RX43 Logitech AGY-734733-0000.A0 Report number: 99544231 Logitech AGY-734733-0000.A0 Contents MAIN MODULE............................................................................................................................................3 1 I NTRODUCTION ....................................................................................................................................3 2 P RODUCT .............................................................................................................................................4 3 T EST SCHEDULE ...................................................................................................................................4 4 P RODUCT DOCUMENTATION .................................................................................................................5 5 O BSERVATIONS AND COMMENTS .........................................................................................................6 6 M ODIFICATIONS TO THE SAMPLE ..........................................................................................................6 7 S UMMARY ............................................................................................................................................6 8 C ONCLUSIONS ......................................................................................................................................7 TEST RESULTS MODULE .........................................................................................................................8 1 G ENERAL INFORMATION ......................................................................................................................8 1.1 Equipment information ...................................................................................................................8 2 E MISSION TESTS ...................................................................................................................................9 2.1 Field strength of intentional signal .................................................................................................9 2.2 Field strength of unwanted emissions...........................................................................................10 USED TEST EQUIPMENT MODULE .....................................................................................................11 This report comprises of three modules. The total number of pages is: 11 Main module Page: 3 of 11 Report number: 99544231 Logitech AGY-734733-0000.A0 Main module 1 Introduction This report contains the result of tests performed by: Telefication bv Edisonstraat 12a 6902 PK Zevenaar The Netherlands Telefication complies with the accreditation criteria for test laboratories as laid down in ISO/IEC 17025:1999. The accreditation covers the quality system of the laboratory as well as the specific activities as described in the authorized annex bearing the accreditation number L021 and is granted on 30 November 1990 by the Dutch Council For Accreditation (RvA: Raad voor Accreditatie). The contents of this test report, if reproduced, shall be copied in full, unless special consent in writing for reproduction in part is granted by Telefication. Copyright of this test report is reserved to Telefication. Ordering party: Company name : Logitech Europe S.A. Address : Z.I. Moulin du Choc D Zipcode : CH-1122 City/town : Romanel sur Morges Country : Switzerland Date of order : 5 July 2004 Main module Page: 4 of 11 Report number: 99544231 Logitech AGY-734733-0000.A0 2 Product A sample of the following product was submitted for testing: Product description : Cordless Numpad Manufacturer : Logitech Europe S.A. Trade mark : Logitech Cordless Numpad Type designation : Y-RX43 FCC ID : DZL201824 Hardware version : -- Serial number : Odonus LITE-PB2-174 Software release : Beta1.0 3 Test schedule Tests were carried out in accordance with the specification detailed in chapter 7 “Summary” of this report. Tests were carried out at the following location: • TNO Electronic Products & Services (EPS) B.V Smidshornerweg 18 9822 TL Niekerk The Netherlands FCC listed : 90828 Industry Canada : IC3501 The samples of the product were received on: • 15 July 2004 Tests were carried out on: • 21 July 2004 Main module Page: 5 of 11 Report number: 99544231 Logitech AGY-734733-0000.A0 4 Product documentation For production of this report the following product documentation was used: Description: Date: Identification: Testing indications July 2004 Cordless Numpad Y-RX43 Product Description July 2004 Y-RX43 Block diagram 9 July 2004 Odonus Lite : Y-RX43 PCB lay out 28 June 2004 ODONUS LITE Y-RX43 REV A0 Circuit diagram 3 June 2004 Y-RX43 ODONUS LITE Parts list 8 July 2004 Y-RX43 ODONUS LITE The above-mentioned documentation will be filed at Telefication for a period of 10 years following the issue of this test report. Main module Page: 6 of 11 Report number: 99544231 Logitech AGY-734733-0000.A0 5 Observations and comments None. 6 Modifications to the sample No modifications were made to the sample. 7 Summary The product is intended for use in the following application area(s): INDUCTIVE DATA TRANSMISSION APPLICATION IN THE 27 MHz BAND The samples were tested according to the following specification(s): FCC part 15; subpart C; section 15.227 (10-1-03 edition) Main module Page: 7 of 11 Report number: 99544231 Logitech AGY-734733-0000.A0 8 Conclusions The samples of the product showed NO NON-COMPLIANCES to the specification stated in chapter 7 of this report. The results of the tests as stated in this report, are exclusively applicable to the product items as identified in this test report. Telefication does not accept any responsibility for the results stated in this test report, with respect to the properties of product items not involved i…
Text truncated - open the document above for the full version.
Test Setup Photos
Photographs module Page: 1 of 5 Logitech AGY-734733-0000.A0 Photograph page 1: Test set up Y-RX43: on turntable Photographs module Page: 2 of 5 Logitech AGY-734733-0000.A0 Photograph page 2: Test set up Y-RX43: radiated emissions at 3 m distance Photographs module Page: 3 of 5 Logitech AGY-734733-0000.A0 Photograph page 3: Test set up Y-RX43: magnetic radiated emissions (X-POS) Photographs module Page: 4 of 5 Logitech AGY-734733-0000.A0 Photograph page 4: Test set up Y-RX43: magnetic radiated emissions (Y-POS) Photographs module Page: 5 of 5 Logitech AGY-734733-0000.A0 Photograph page 5: Test set up Y-RX43: magnetic radiated emissions (Z-POS)
Contact Information
Applicant
Paul Zahra(Regulatory Compliance Manager)
Technical Contact
Logitech Europe S.A.Pascal Bornel
[email protected]+41 21 863 5067
Z.I. Moulin du choc D · Romanet sur Morges 1122 · Switzerland
Test Firm
TUV Rheinland Nederland B.V.Ties E. T Koning
Technical Specifications
| # | Rule Parts | Frequency Range | Power Output |
|---|---|---|---|
| 2 | 15C | 27.145 MHz - 27.145 MHz | - |
Other Applications from Logitech Inc
DZLS00118
Oct 06, 2011AIR SPEAKER
Equipment Class
DTS - Digital Transmission System
DZLA00032
Aug 07, 2011Nano Receiver
Equipment Class
DSS - Part 15 Spread Spectrum Transmitter
DZLA00031
Jul 24, 2011Wireless Headset H600
Equipment Class
DSS - Part 15 Spread Spectrum Transmitter
DZLS00114
Jul 20, 2011Wireless module
Equipment Class
DSS - Part 15 Spread Spectrum Transmitter
DZLA00033
Jul 18, 2011Wireless Headset H800
Equipment Class
DSS - Part 15 Spread Spectrum Transmitter